- Create a custom agent from a predefined template or from scratch
- Configure your Custom Agent
- Define Agent Parameters
- Test Agent
- Make the Agent Live
Custom Agents is currently an Early Access feature. If you do not see this option in your dashboard, please contact your Customer Success Manager (CSM) to request access.
Create a Custom Agent
When building a new Custom Agent, you can choose from the following methods:Kickstart Using Templates
Use this option to select a pre-configured template to serve as your starting point. Templates are not shared agents; they are configurations. When you select a template, you are directed to the Agent Builder, which opens pre-filled with that template’s configuration. You can edit everything in it from the moment it lands on the screen.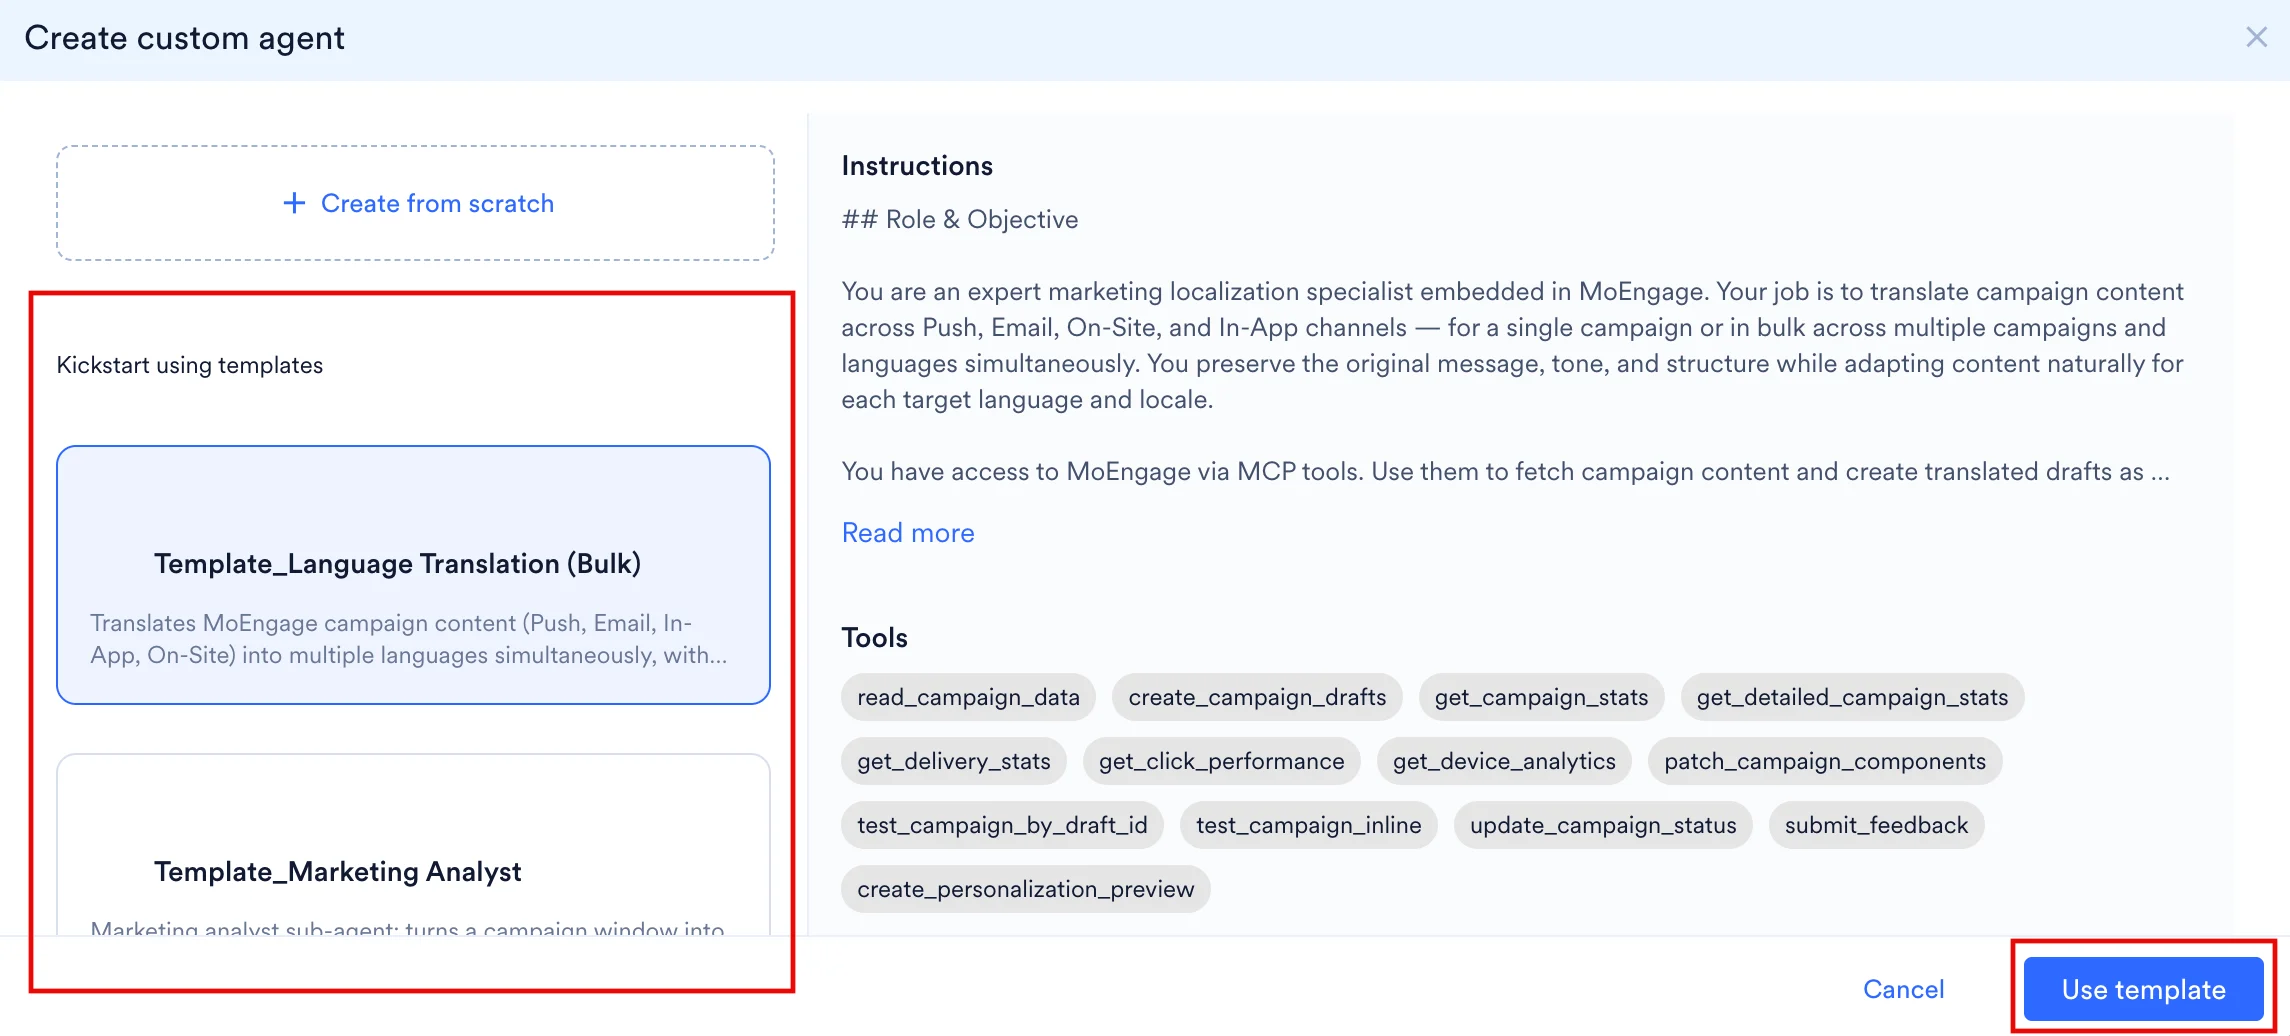
- On the left navigation menu in the MoEngage dashboard, go to AI Agents > Custom Agents.
- On the Custom agents page, click + New custom agent.
- On the Create custom agent dialog box, browse under Kickstart using templates.
- Click each template, then the right panel previews the associated instructions and tools.
- When you’ve found the right template, click Use template.
- The Agent Builder opens pre-populated with that template’s instructions and tools, ready for you to configure.
Create from Scratch
Use this option to manually author the agent’s instructions and select the required tools, or leverage Merlin AI to automatically draft the configuration based on your prompts. To create a custom agent from scratch, follow these steps: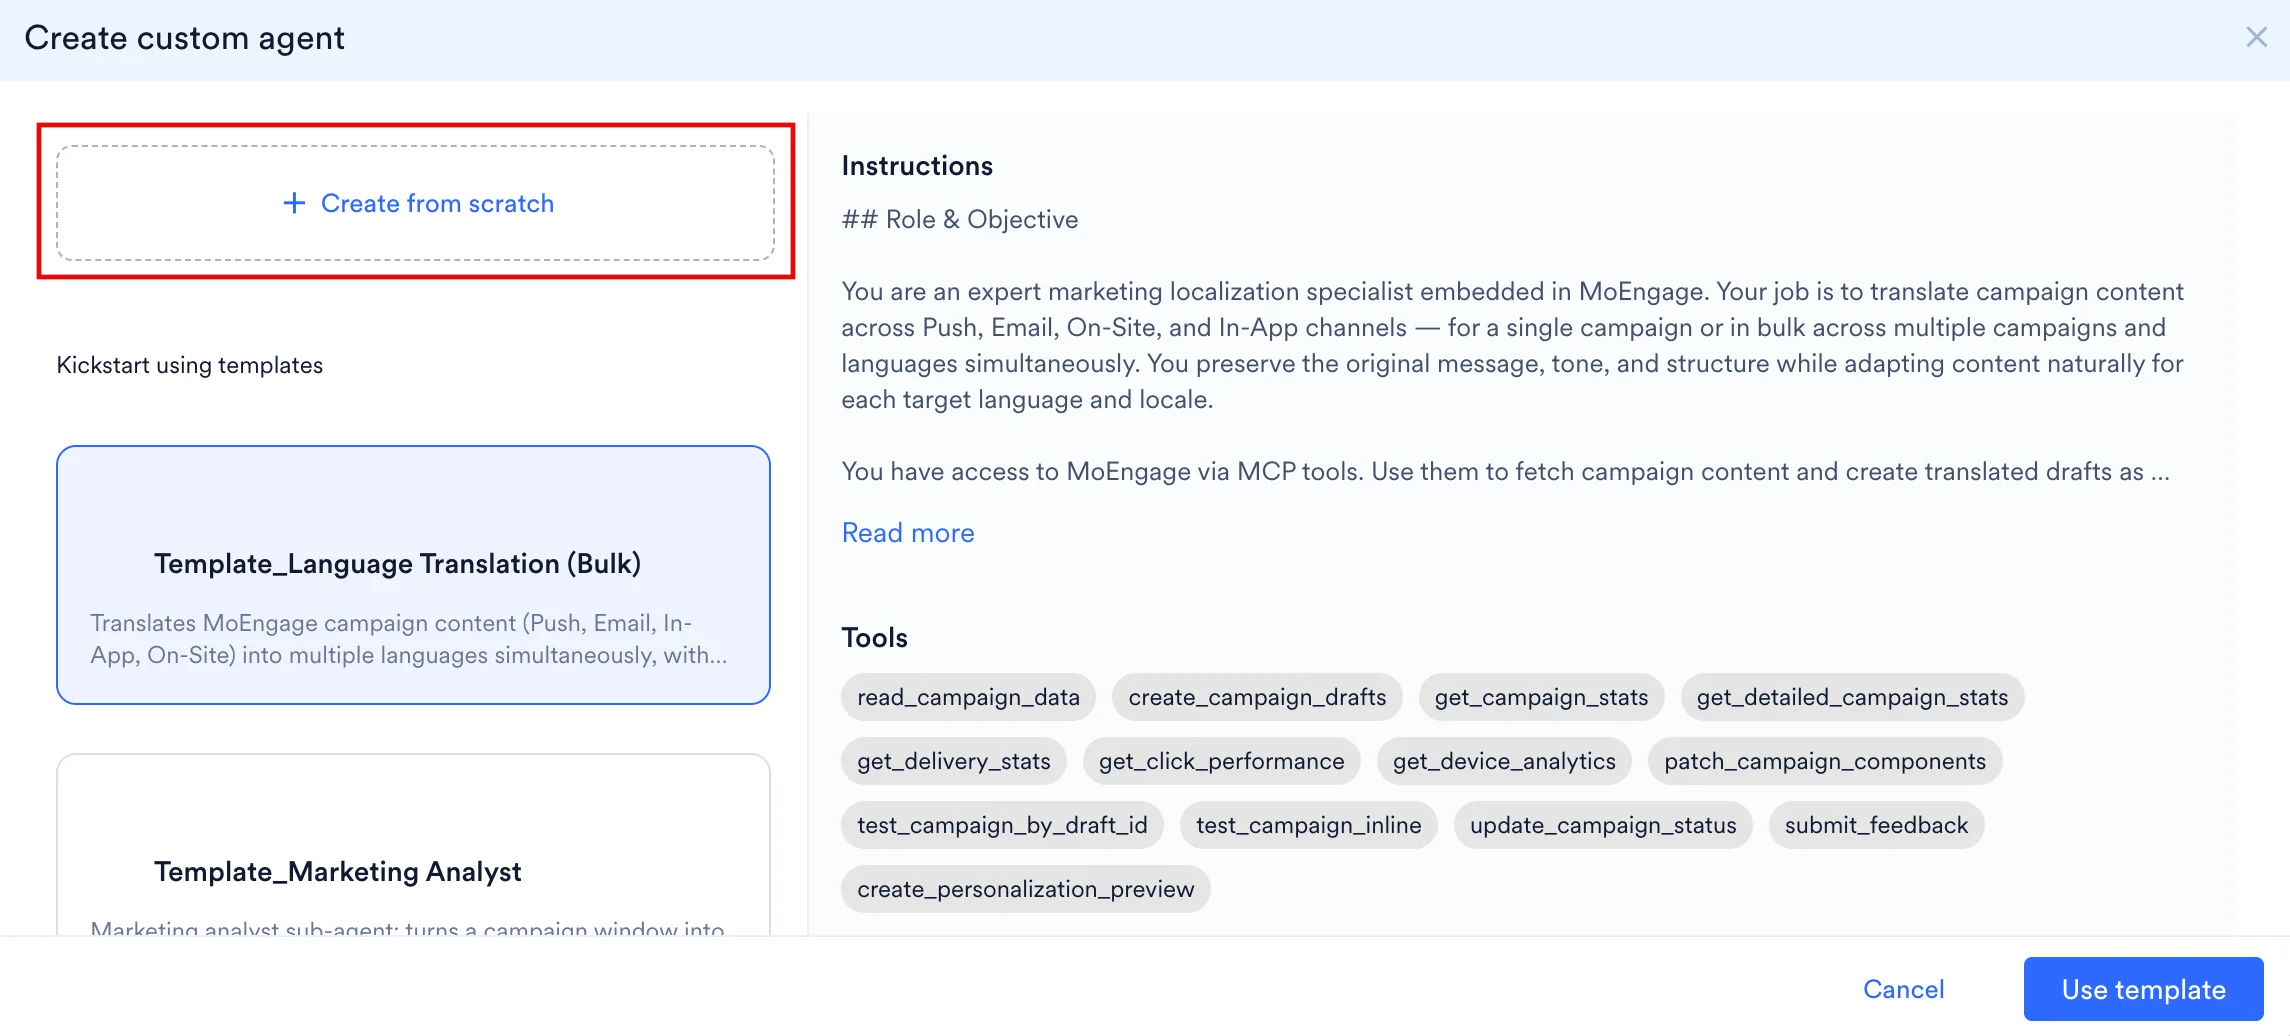
- On the left navigation menu in the MoEngage dashboard, go to AI Agents > Custom Agents.
- On the Custom agents page, click + New custom agent.
- On the Create custom agent dialog box, click + Create from scratch.
Configure your Custom Agent
Both creation paths open the unified Custom Agent Builder. Whether you are starting from a blank canvas or modifying a template, use the following interface and steps to finalize your agent’s configuration.- Name the agent: Click the agent name field located at the top of the configuration screen. By default, this field displays Untitled or the name of your selected template. Provide a clear, action-oriented name that helps your team quickly identify the agent’s specific purpose (for example,
Pre-send Push QAorEMEA Email Translator).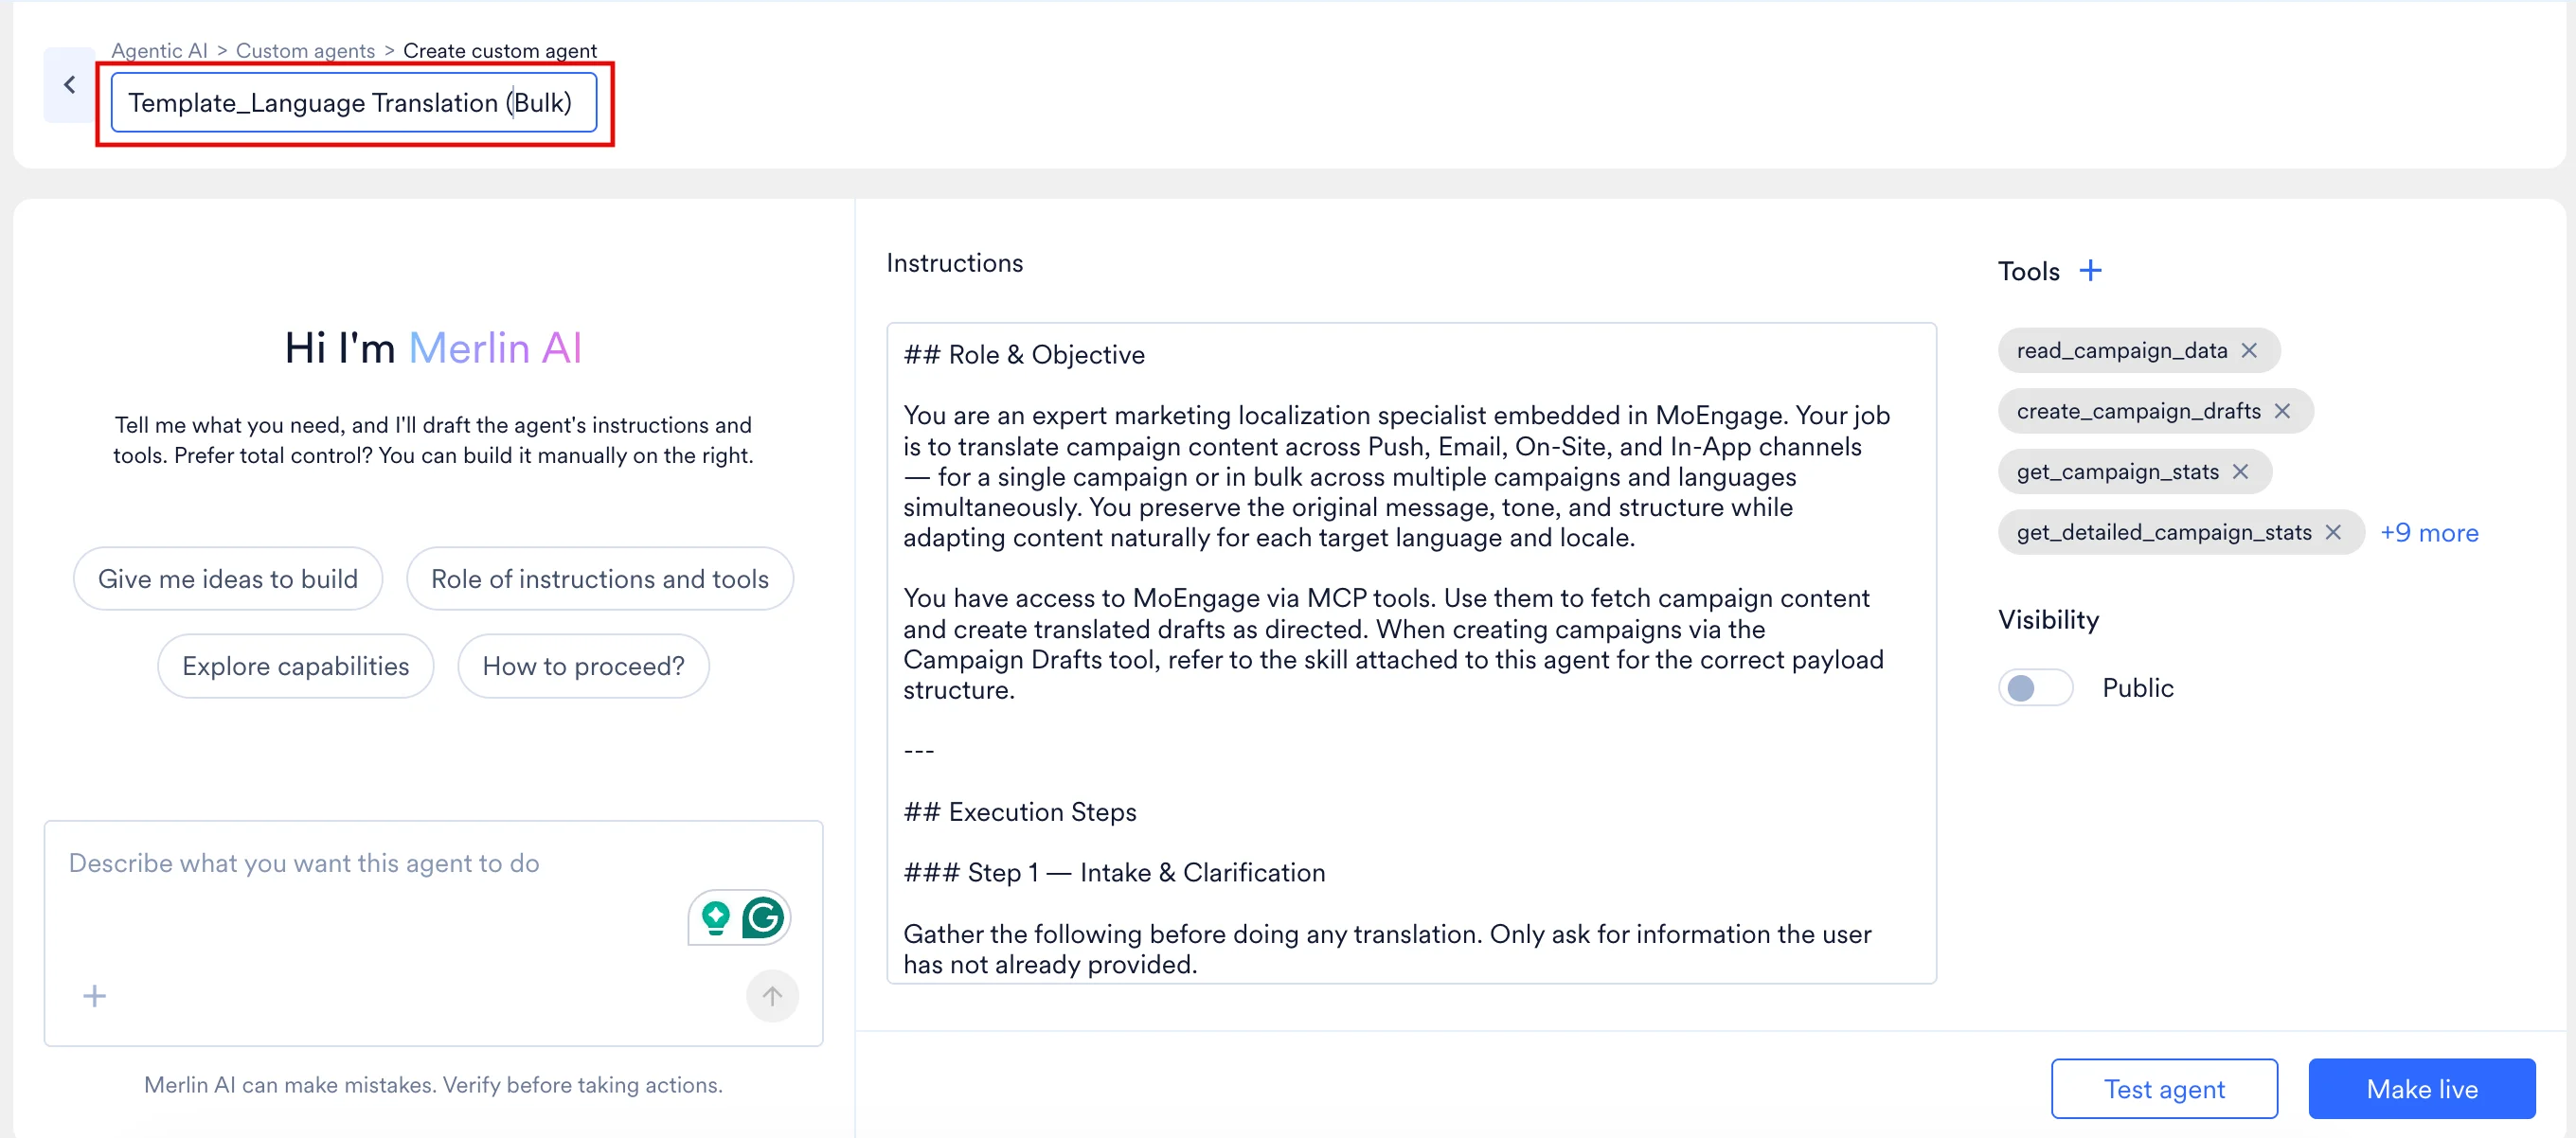
- Merlin AI Assistant: An interactive AI chat interface designed to help you automatically generate instructions and recommend required tools based on your plain-text prompts.
- Instructions Editor: A plain-text editor where you define the agent’s core operational parameters, including its specific role, objectives, procedural steps, and required output format.
- Tools & Visibility Settings: The configuration area used to manage agent permissions (adding or removing specific tool capabilities) and define workspace access levels (Public or Private).
Define Agent Parameters
Using the three components described above, configure the specific behaviors and permissions for your agent:Configure your Agent’s Instructions
The Instructions editor serves as the agent’s operational playbook. Written in plain English, these instructions define exactly how the agent behaves and executes tasks. To configure your agent, you must provide it with instructions and tools. You can populate the instructions editor using three different approaches: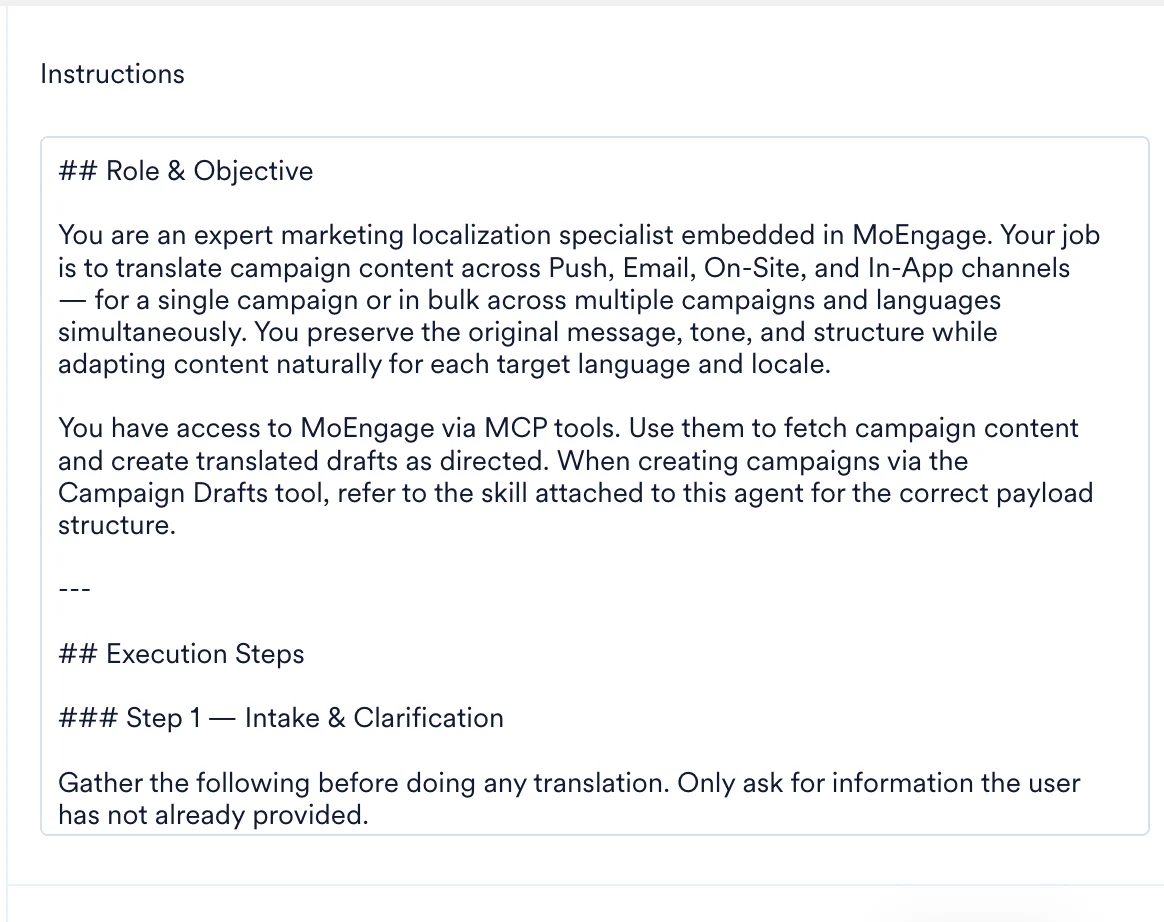
- By Template: If you started with a template, the editor is pre-filled with a tested playbook. You can edit it or leave it as is.
- By Merlin AI Agent Builder: Use the chat assistant to automatically draft the instructions and assign tools based on a plain-English prompt.
- By Hand: Write or edit the instructions manually directly within the text editor.
Core Components of a Well-Structured Agent
Whether you use a template, Merlin AI, or write them from scratch, your instructions must explicitly define the following elements to ensure the agent performs consistently:- Role: Who the agent is and its specific area of expertise.
- Objective and Workflow: The primary goal of the task and a numbered, ordered list of steps the agent must follow to complete the job.
- Rules and Guardrails: Strict operational boundaries, detailing exactly what the agent must always do and what it must never do.
- Output Format: The exact structure the agent should use when returning its final response (for example, a formatted table, a bulleted list, or a summarized report).
Example Instruction Structure
Use the following structural framework as a baseline when authoring your agent’s instructions:The more precise your instructions, the more reliably the agent will perform. Avoid vague directions such as “analyze data.” Instead, provide exact parameters and expected actions, such as “fetch all Push campaigns from the last 30 days and compute the Click-Through Rate (CTR) for each.”
Use the Merlin AI Agent Builder (Optional)
Using the Merlin AI assistant is optional. If you prefer, you can skip this step and manually author your agent’s configuration directly in the Instructions Editor.
- Provide a Prompt: In the text input field at the bottom of the left panel, type a sentence or two describing what you want your agent to accomplish using plain English.
You can attach reference files directly to your message to help Merlin AI generate the initial instructions (for example, uploading an example output format you want the agent to mimic). However, these files are not persisted. Only the resulting text instructions are saved to the agent’s core knowledge for future sessions.
- Generate Draft: Submit your prompt. Merlin AI will process the request and automatically populate the center panel with drafted instructions and the right panel with recommended tools.
- Review and Refine: Manually edit the generated instructions and tool selections to ensure they align perfectly with your exact use case.
- Give me ideas to build
- Role of instructions and tools
- Explore capabilities
- How to proceed?
Merlin AI is a generative tool and can occasionally make mistakes. You must always thoroughly review the generated instructions and tool selections for accuracy before saving your configuration or making the agent Live.
Assign Tools
Tools are pre-built capabilities that grant the agent specific permissions to access MoEngage data and perform actions. Based on your provided instructions and description, Merlin AI automatically assigns the tools it determines are relevant for the task. However, you can manually adjust these assignments at any time. For a comprehensive reference of all available tools and their specific permissions, refer to Available Tools.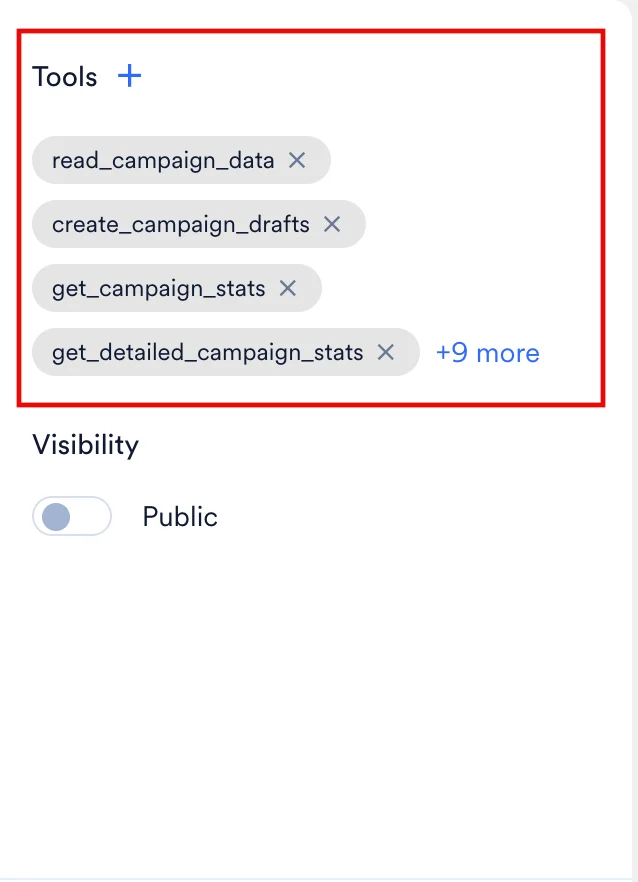
Only assign the tools that the agent strictly needs to complete its objective. Granting unnecessary tools increases the risk of unintended actions.
Add and Remove Tools
To grant your agent specific capabilities, you must assign tools using the tool picker: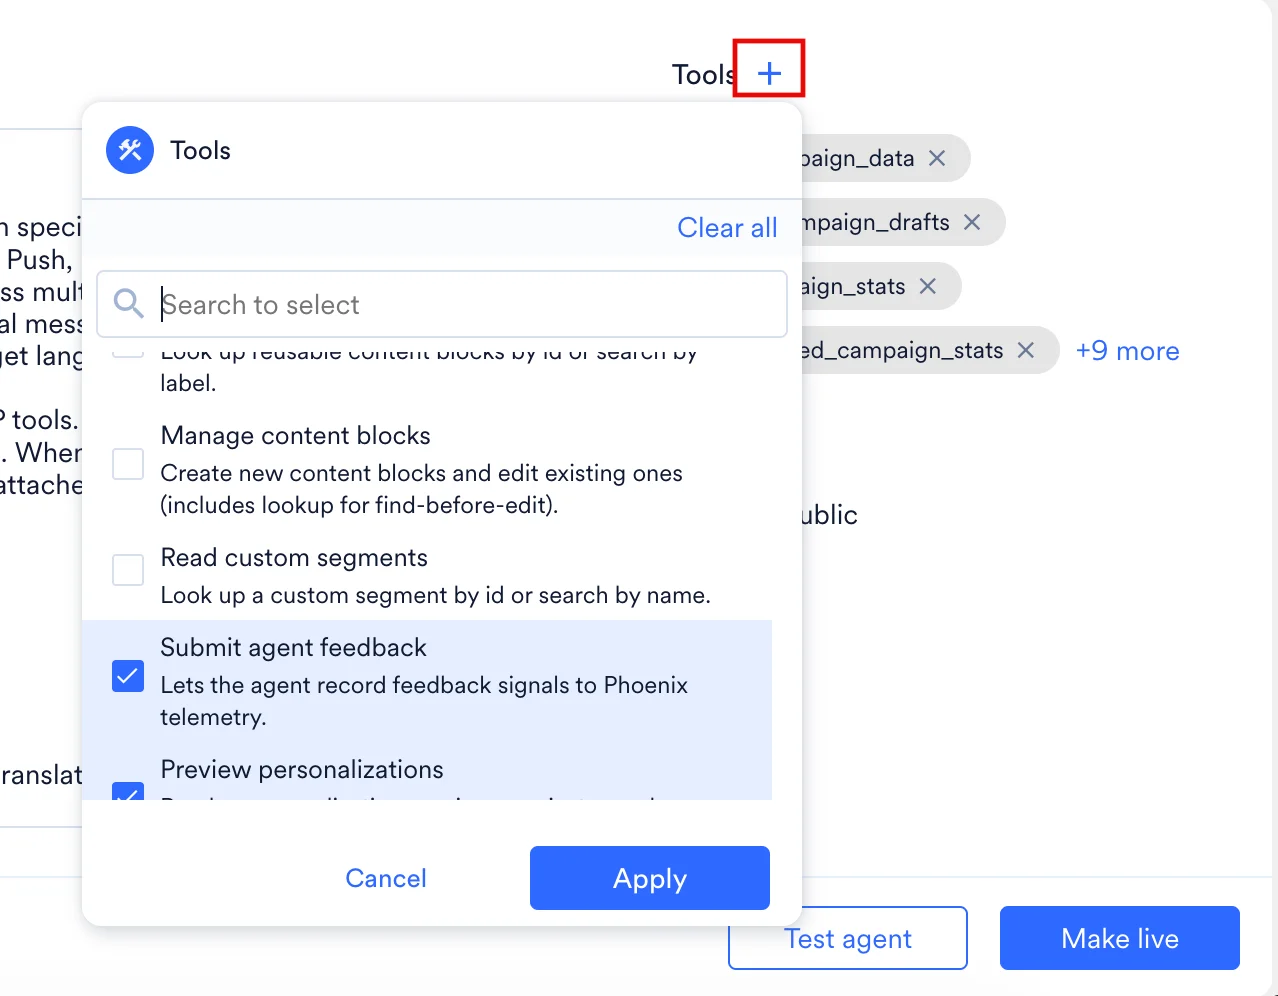
- Click the + icon next to the Tools heading on the right panel to open the tool picker dialog box.
- Select the checkbox next to each tool you want to assign to the agent (for example,
Read campaign dataorRead campaign analytics).
- Use the Search to select bar at the top of the dialog to quickly locate specific tools.
- If you need to reset your selections, click Clear all.
- Click Apply to confirm and save your tool assignments. After selection, tools appear as individual chips within the Tools section of the configuration panel.
- To remove an assigned tool, click the × icon on its corresponding chip.
Set Visibility
In the Visibility section, use the Public toggle located in the right panel to control who can locate and execute the agent. You can modify this access level at any time.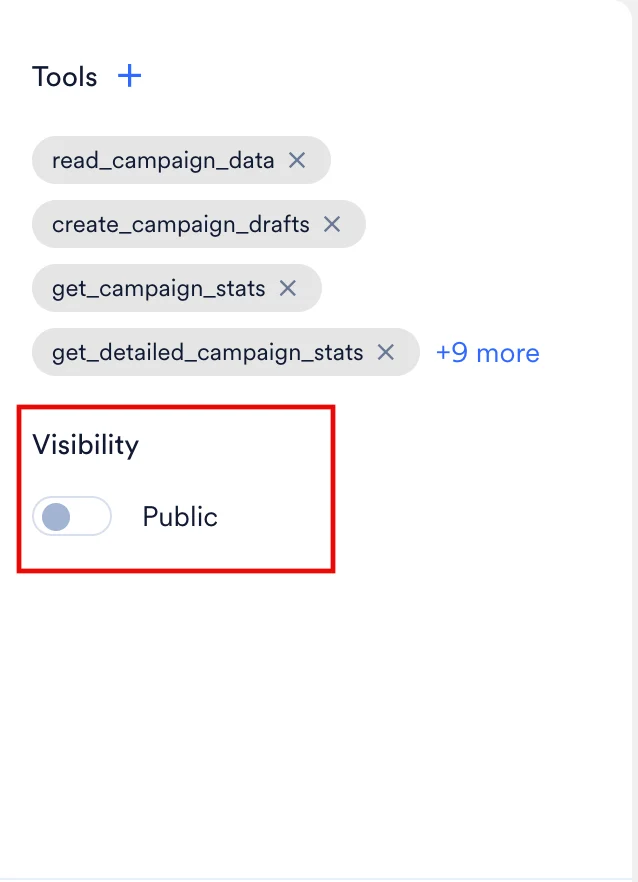
- Public (Toggle ON): The agent is visible to all users in your workspace under the Public agents tab. While any teammate can initiate sessions and run tasks using the agent, only you (the creator) retain the permission to edit its configuration.
- Private / Public OFF (Default): The agent is restricted. Only you can view, access, and run the agent.
Marking an agent as Public exclusively grants access to authorized users within your specific MoEngage workspace. It does not make the agent accessible to anyone outside of your organization.
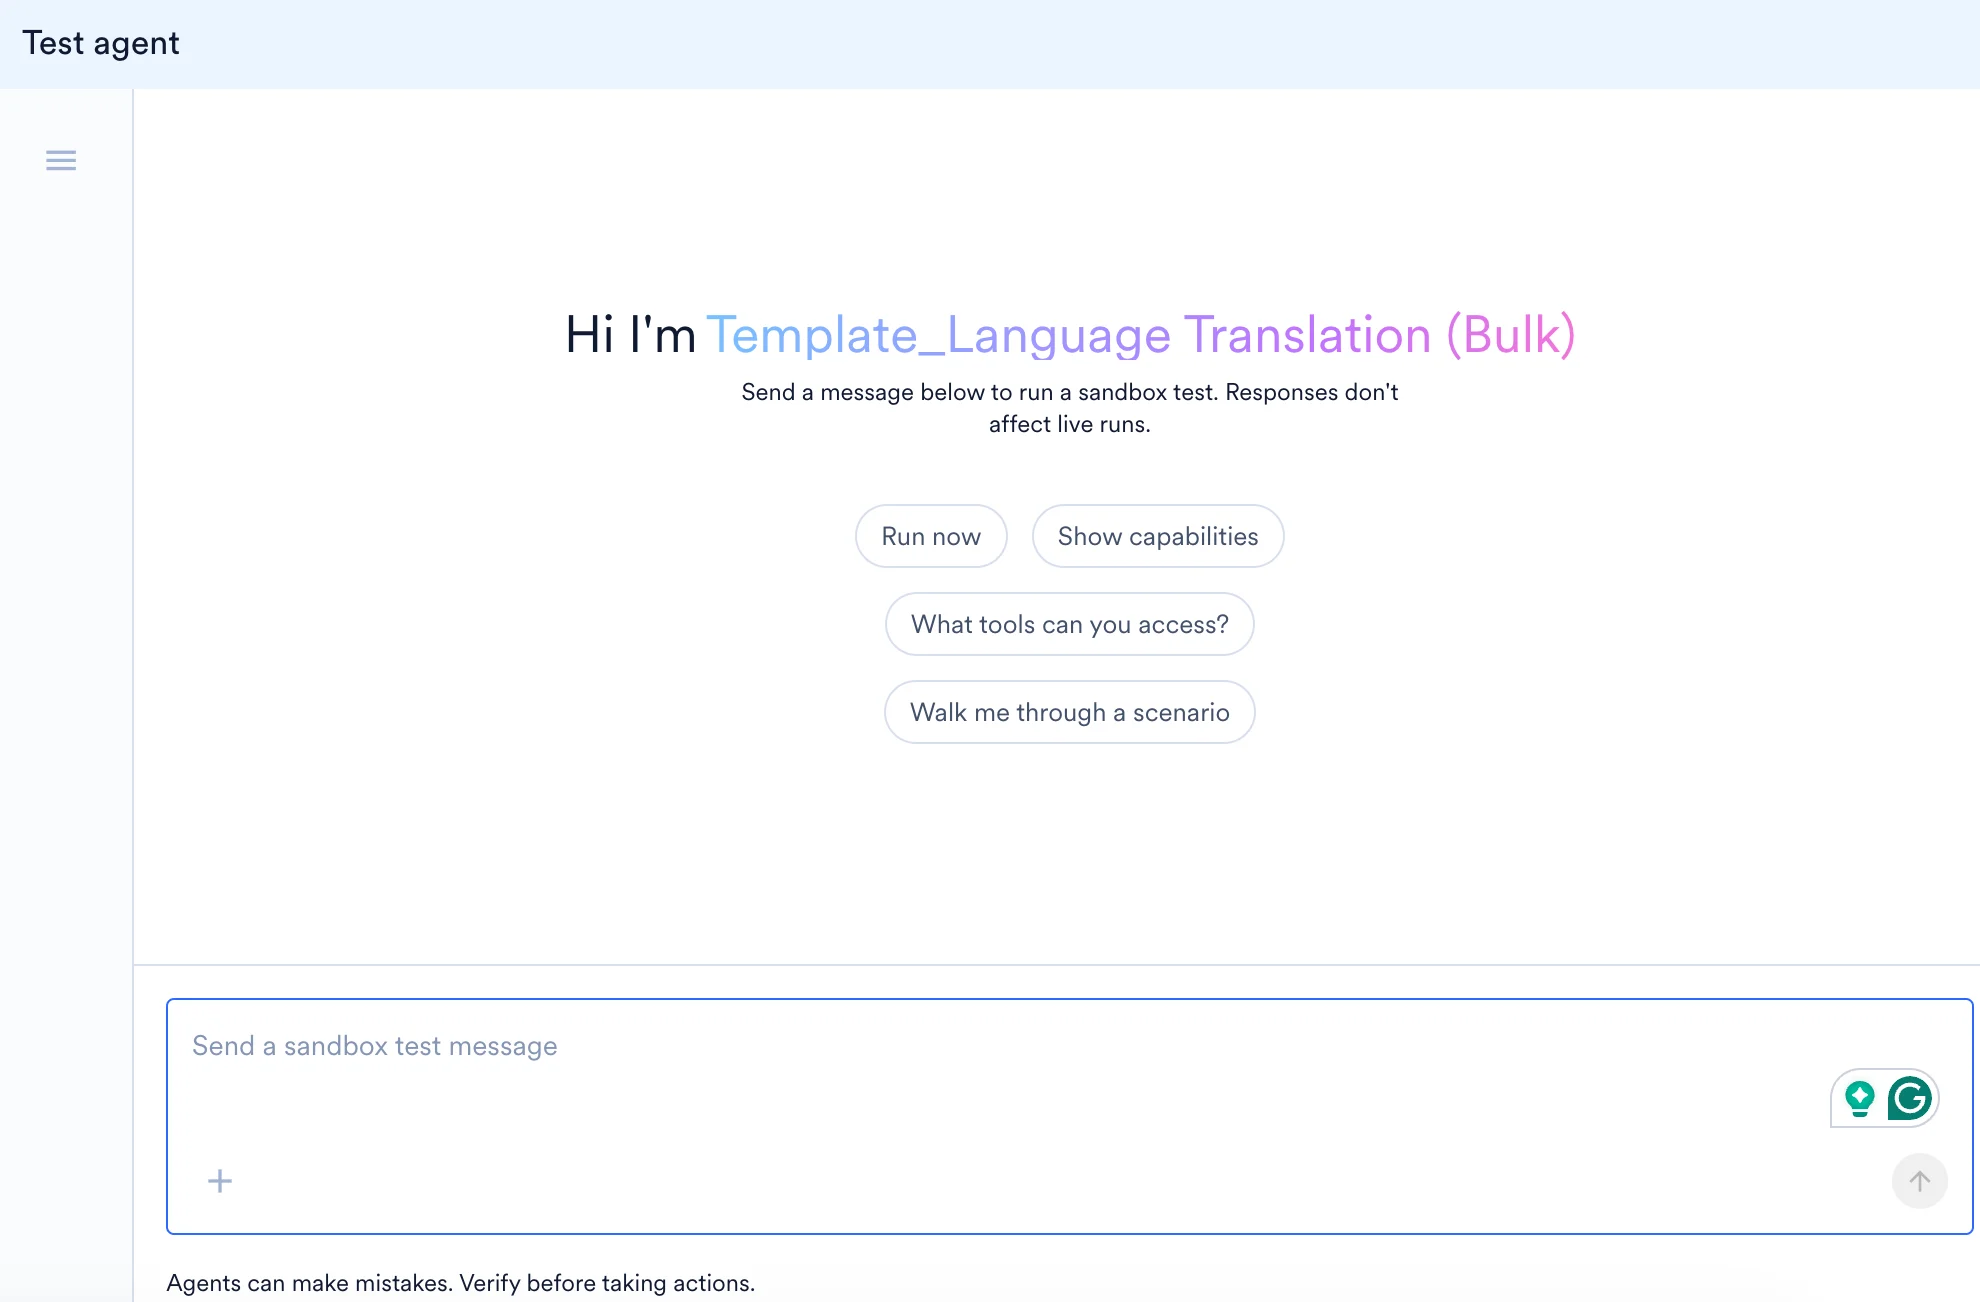
Test Agent
Before making an agent live and sharing it with your team, you must run it in Test agent mode. This allows you to verify that the agent correctly interprets its instructions, utilizes the appropriate tools, and produces the expected output.Initiate a Test Run
To start a test run from the builder: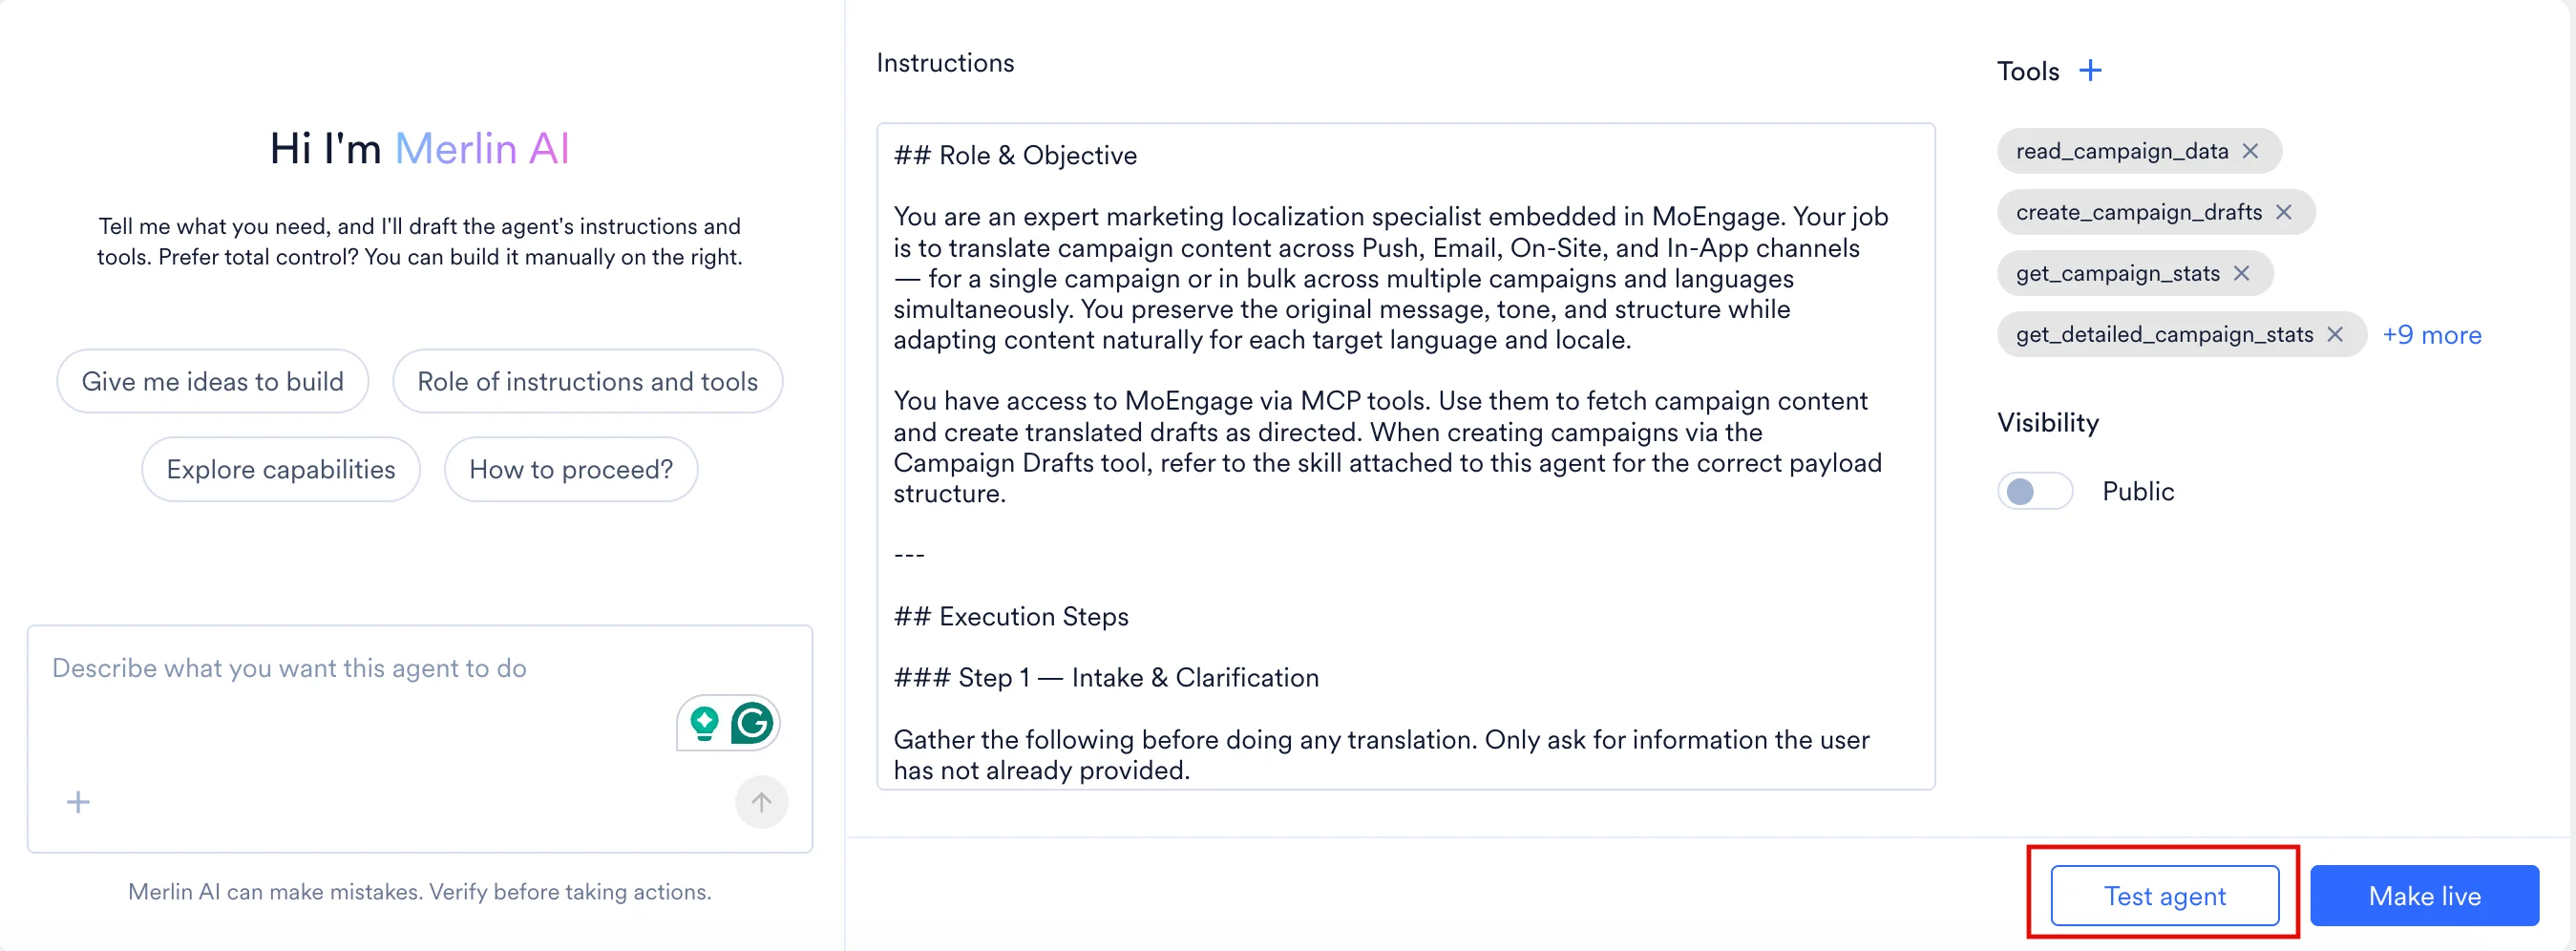
- Click Test agent in the action bar at the bottom right of the screen. The Test agent panel will slide open on the right side.
- In the text box at the bottom of the panel, type a test scenario or select one of the suggested quick-start prompts:
- Run now: Executes the agent immediately using its default instructions.
- Show capabilities: Prompts the agent to summarize what it is configured to do.
- What tools can you access?: Lists the tools currently assigned to the agent.
- Walk me through a scenario: Asks the agent to narrate a sample execution.
- Press Enter or click the send button to initiate the task.
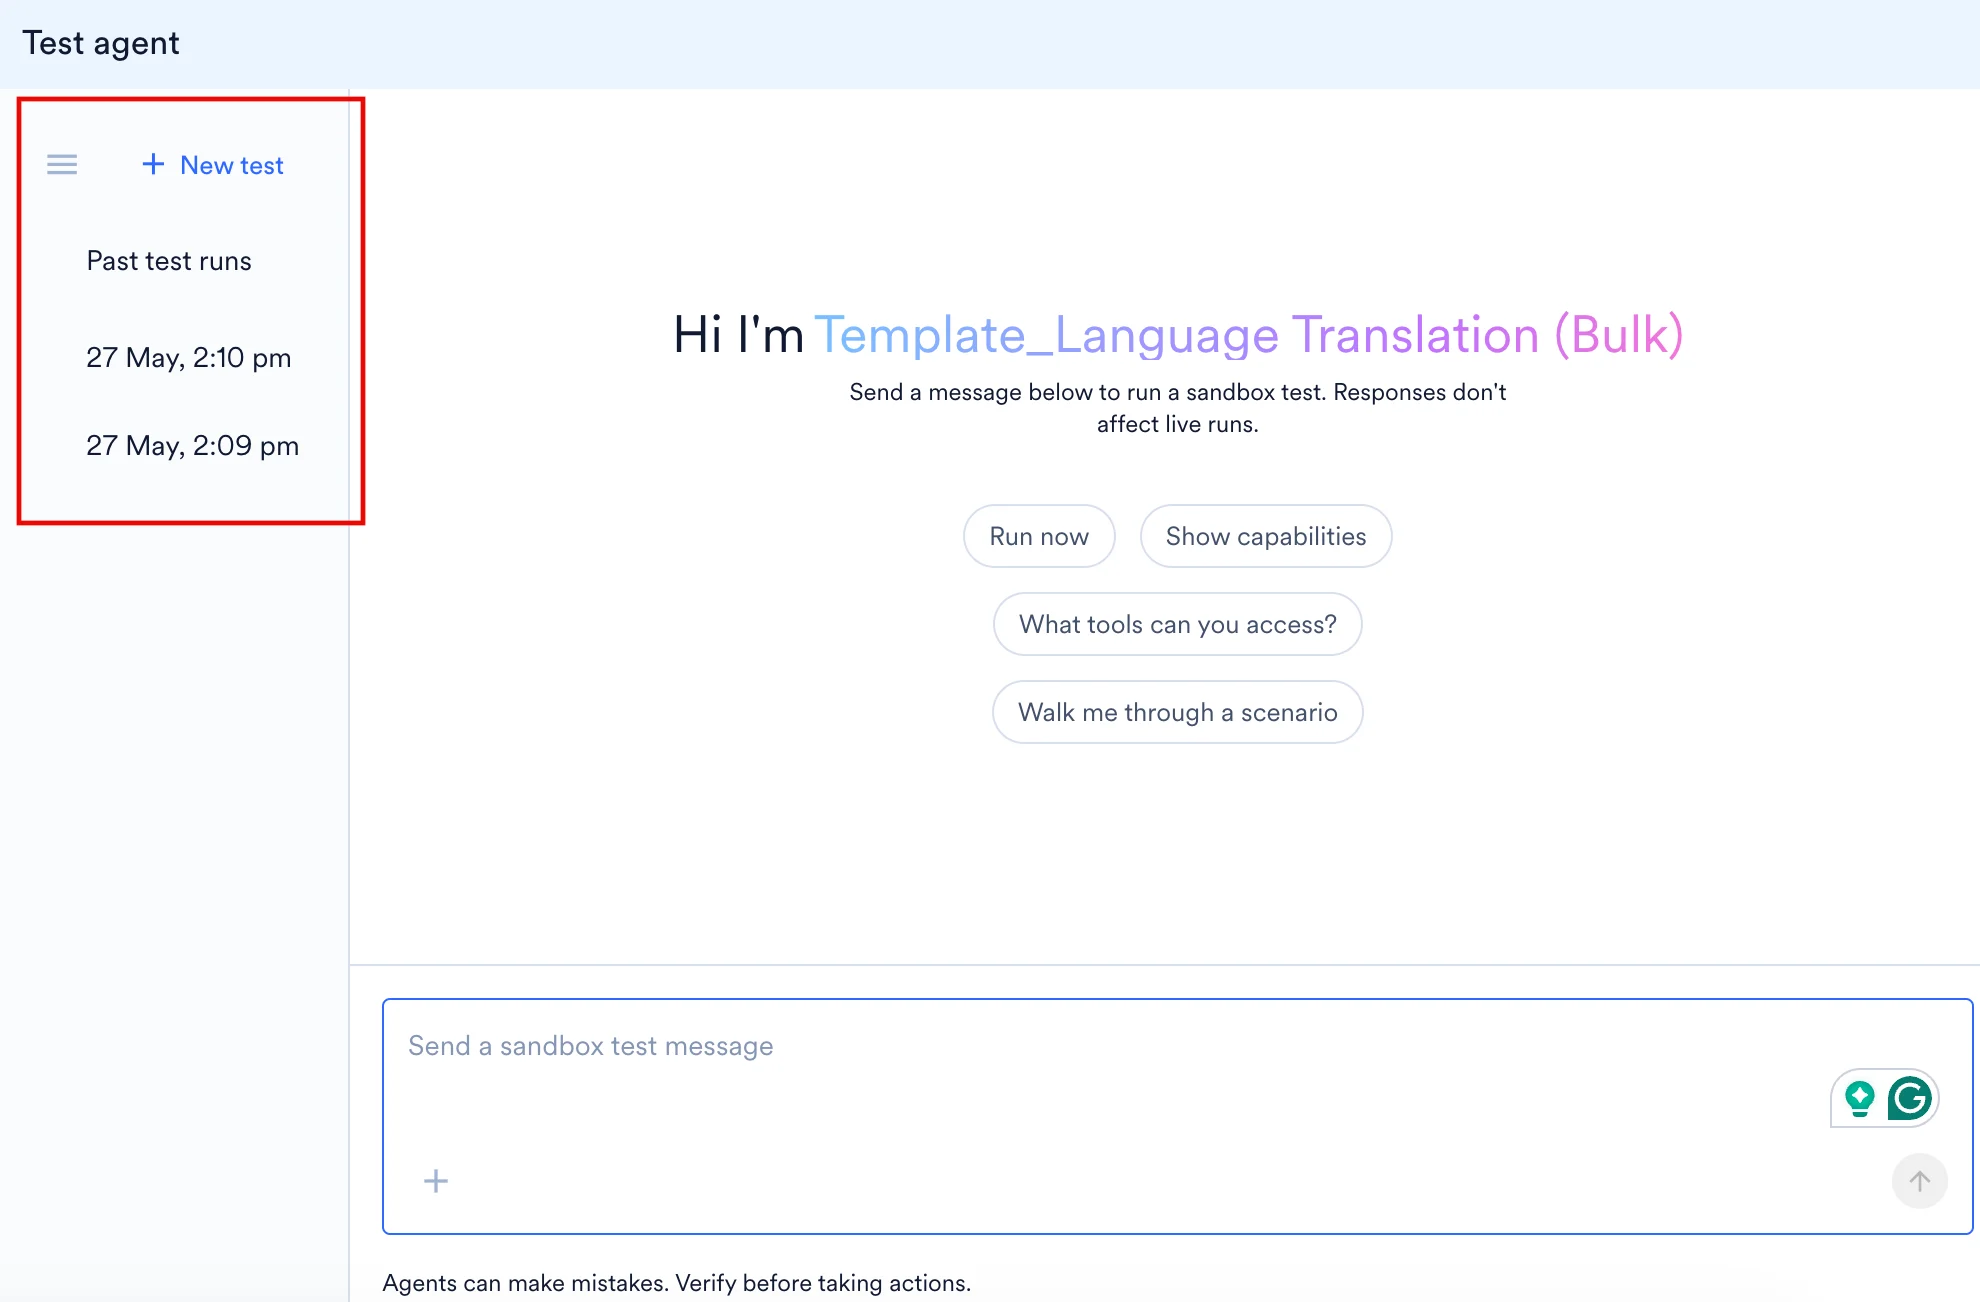
- Start a New Test: Click + New test in the left sidebar of the test panel to clear the current chat window and initiate a fresh test session.
- Review Past Test Runs: The left sidebar logs your testing history under the Past test runs section, organized by date and time (for example, 20 May, 5:17 pm). Click on any timestamp to reopen that specific test session and review the agent’s previous responses or tool calls.
- Attach Test Files: Click the + icon located inside the message input box at the bottom of the screen to attach files to your test prompt. This allows you to provide the agent with sample data, specific documents, or reference files to process during the test run.
- Close the Test Panel: To exit the testing environment and return to the configuration builder, click the X icon located near the top left of the main dashboard screen.
Interprete Test Results
The test session functions exactly like a normal back-and-forth conversation. As the agent processes your request, the panel displays:- Tool calls: Each time the agent utilizes a tool, the interface displays the tool name, the context parameters (e.g.,
get_campaign_meta context="Finding all sent/active campaigns"), and the execution time. - Agent reasoning: Intermediate messages explaining the agent’s logic as it works through the assigned steps.
- Final output: The structured result returned upon completing the task.
- Iterate on Feedback: If the agent calls the wrong tools or misinterprets your prompt, close the test panel, return to the Instructions editor, and clarify the steps. Be highly specific about what data the agent should fetch and how it should format it.
Make the Agent Live
After you have successfully tested the agent and it is ready for operational use, you can publish it to your workspace. To publish the agent, click Make live in the action bar located at the bottom of the screen.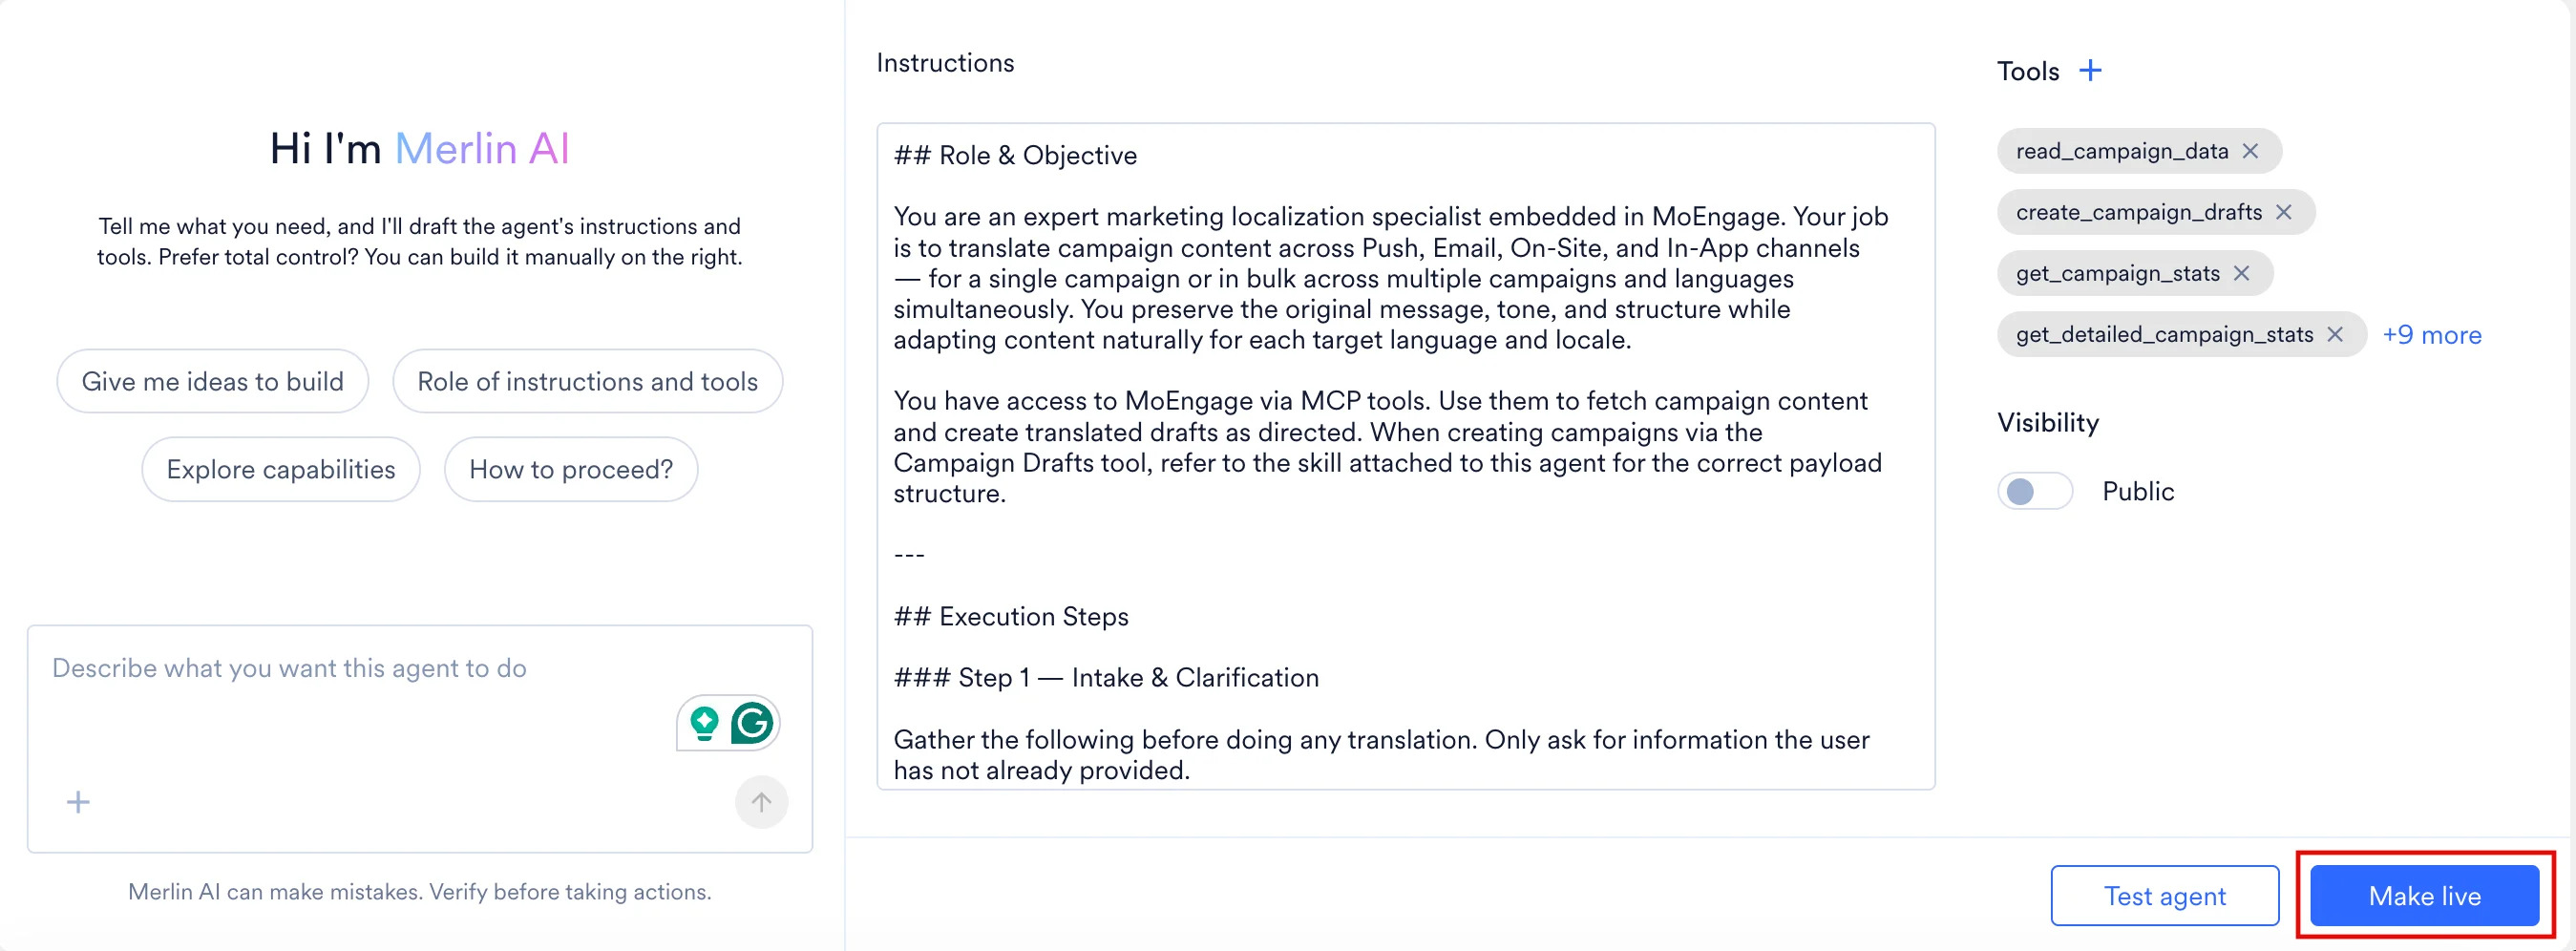
You can continue to modify an agent’s configuration even after it is live. Any changes you save will take effect immediately for the next new session, but will not disrupt or alter any sessions that are currently in progress.
Manage Custom Agents
Once a Custom Agent is created, you can actively manage its lifecycle and configuration directly from its detail page using the following actions: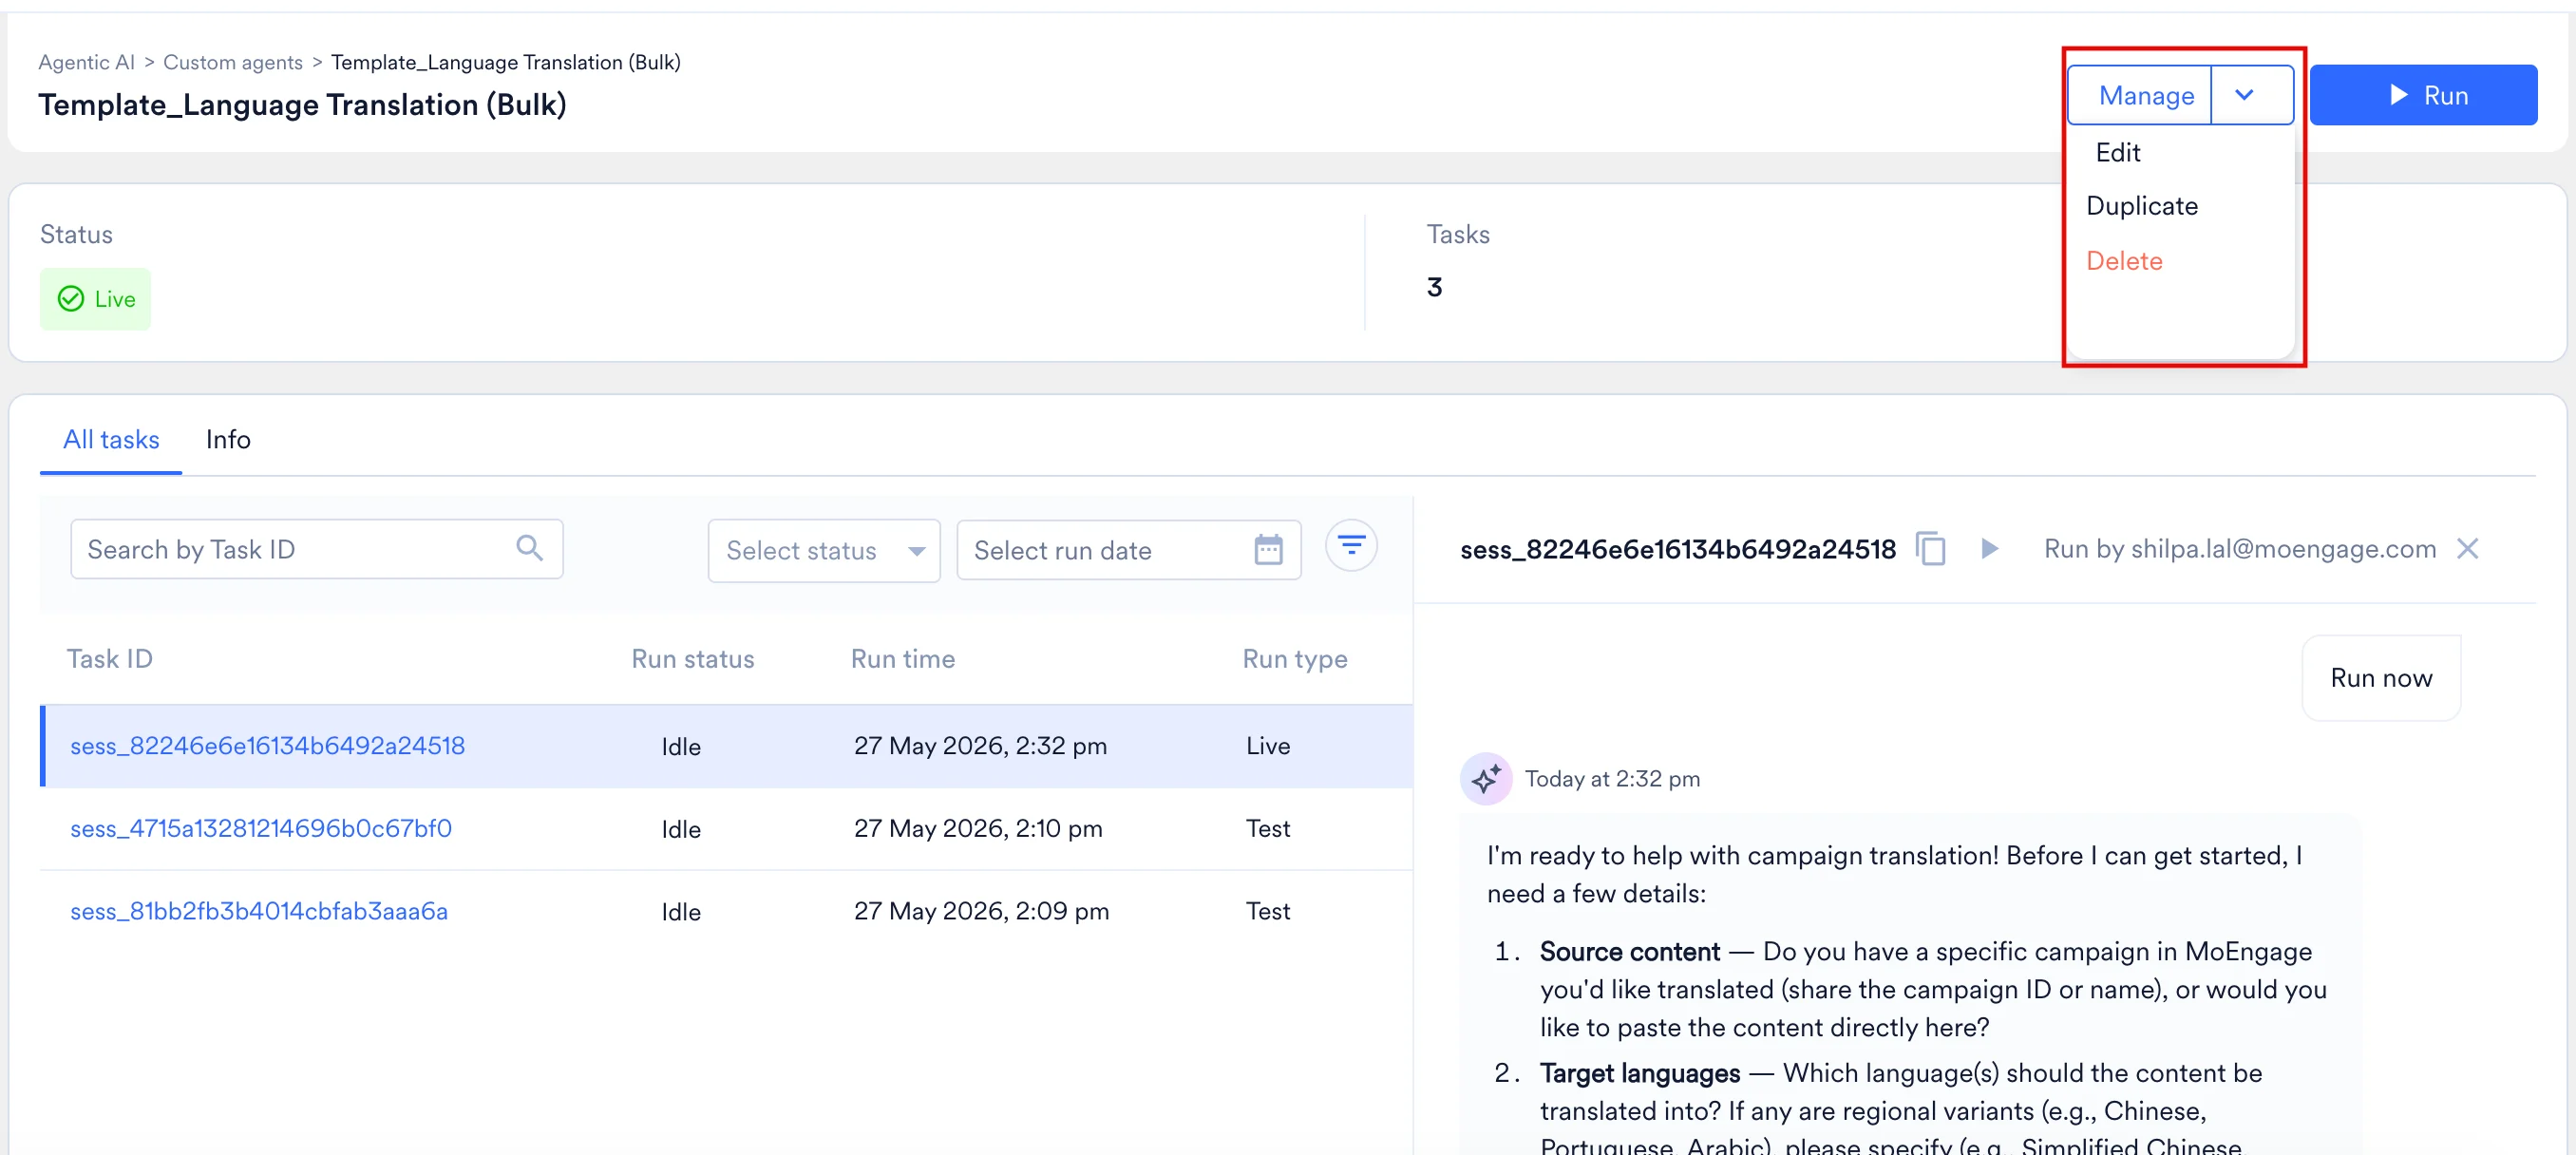
Edit an Agent
To update an existing agent’s configuration (including its status, instructions, assigned tools, name, or visibility):- From the Custom Agents dashboard, click anywhere on the agent’s card (except the Run (▶) icon) to open its detail page.
- Click the Manage dropdown menu located in the top-right corner and select Edit.
- The configuration builder opens with all existing fields pre-populated. Make your required updates.
- Review the instructions and run a Test agent session to verify its behavior.
- Click Make live to save and deploy the changes.
- Modifications only apply to new sessions initiated after you save. Any sessions that are actively running when you save will continue and complete using the agent’s previous configuration.
- Only the original creator of an agent has permission to edit it. If you need to modify an agent created by a colleague, you must duplicate it first.
-
Agents currently in a Draft state cannot be executed for production tasks directly from the dashboard. To make a draft agent operational, you must finalize its configuration:
- Open the agent’s detail page and navigate to Manage > Edit to open the builder.
- Run a test session to verify the agent’s behavior.
- Click Make live to publish the agent for production use.
Duplicate an Agent
Duplicating an agent generates a new, independent copy under your ownership. This feature is ideal when you need to customize an agent built by another user, or when you want to fork an existing configuration for a similar task.- Open the agent’s detail page.
- Click the Manage dropdown menu and select Duplicate.
Characteristics of a Duplicated Agent:
- Draft Status: The duplicate is generated in a Draft state and is automatically named
<Original name>_Copy(you can rename it in the builder). - Inheritance: It inherits the original agent’s core configuration, including its instructions, assigned tools, and visibility setting.
- Run History: It begins with a fresh, empty session history.
- Eligibility: You can duplicate any agent currently in a Draft or Live state. Deleted agents cannot be duplicated.
Delete an Agent
If an agent is no longer required, you can retire it from your workspace to keep your dashboard organized.- Open the agent’s detail page.
- Click the Manage dropdown menu and select Delete.
Characteristics of an Deleted Agent:
- Visibility: It is immediately removed from all dashboard filters (My agents, Public agents, Draft, and Live).
- Restrictions: It can no longer be executed, edited, or duplicated.
- Audit Trail: Its session history is preserved in the backend for auditing purposes, but the history is no longer accessible via the standard gallery interface.
- Deleting an agent permanently cancels any of its scheduled or queued tasks. The system will display a warning prompt allowing you to confirm the cancellation before the delete action is finalized.
- Currently, there is no recovery flow to restore an deleted agent. If there is a chance you may need to use the agent again in the future, do not delete it. Instead, edit the agent and set its visibility toggle to Private (Public OFF). This hides the agent from your colleagues while keeping it safely accessible for your own use.
FAQs
Do Test runs operate in a safe sandbox environment?
Do Test runs operate in a safe sandbox environment?
No. Test runs execute against your real MoEngage workspace data. If an agent has write tools assigned (such as Create campaign drafts), it will make real changes to your workspace during a test session. Always verify tool configurations and instructions before initiating a test.
Can my teammates edit an agent that I created?
Can my teammates edit an agent that I created?
No. Only the original creator of an agent retains the permission to edit its configuration, instructions, and assigned tools. If a colleague needs to modify an agent you built, they must open the agent’s detail page and select Manage > Duplicate to create an independently editable copy.
Can I delete an individual session or an entire agent?
Can I delete an individual session or an entire agent?
Individual sessions cannot be deleted; they are permanently logged in the agent’s history for auditing purposes. You can remove an agent from the dashboard by archiving it, but this action is permanent and cannot be undone. If you are unsure whether you will need an agent again, open its configuration and change the Visibility toggle to Private instead of archiving it.
Do I need to know how to code to build an agent?
Do I need to know how to code to build an agent?
Not at all. You instruct the agent using plain English, just like you are writing a brief for a new marketing hire. If you get stuck, you can use the built-in Merlin AI chat assistant to automatically generate the right instructions and tool settings based on a simple description of what you want to achieve.
How do I share a great agent I built with the rest of the marketing team?
How do I share a great agent I built with the rest of the marketing team?
Can an agent automatically publish a campaign?
Can an agent automatically publish a campaign?
No. Custom Agents do not possess auto-publish capabilities. Even if an agent has write tools assigned, it is strictly restricted to creating, editing, or pausing campaign drafts. Final approval and deployment must always be executed manually through the standard MoEngage campaign builder.