

Introduction
Viber is a cross-platform voice-over-IP and instant messaging software application that is secure, fast, and synchronized across all devices. Through Viber, brands can engage with their users using rich messaging with which they can easily interact.MoEngage and Viber
MoEngage and Viber integration allows you to leverage advanced segmentation, predictive capabilities, personalization, and triggering features to message your users on the Viber Bot through the Viber REST Bot API.Use cases
The integration with MoEngage helps you with the following use cases:- Personalized Messaging: You can send personalized messages to users based on their preferences.
- Rich Media Content: You can make messages more visual with images, videos, and files through Viber messages.
- Automated Campaigns: You can send messages automatically at scheduled times or trigger messages based on user actions.
Methods to Send Messages via Viber Integration
You can send messages via Viber integration with the following methods:- Native APIs: You can use MoEngage campaigns to send messages using Viber APIs.
- Infobip Connector: You can send messages to your Viber users using the Infobip connector.
- 8x8 Connector: You can engage users on Viber using the 8x8 Chat Apps API. This connector allows you to send text, media (images, videos, files), and messages with call-to-action (CTA) buttons directly from MoEngage campaigns.
Integration via Native
Prerequisites
- Viber bot: To use this integration, you must have a Viber bot. When sending Viber messages, your messages are associated with your Viber bot official, resulting in users seeing your bot details. For more information on creating a bot, refer to Viber Partners portal.
- Active auth token: An active Viber account that supports bots (iOS or Android). During account creation, the Viber account is set as the account administrator.
- Account authentication token: This unique account identifier validates your account in all API requests. After you create the account, an authentication token will appear on your account’s edit info screen (only for admins).
- Viber user IDs: This unique ID is associated with each Viber user.
Note: After subscribing to your Viber bot, you can access the user’s IDs through the Viber Users API. - Setup account webhook: Define webhook and response preferences during account setup to configure message handling.
- Viber is part of the Connected Channels add-on. Contact your dedicated MoEngage CSM (customer success manager) to enable it for your account.
- After users send their first message to the Viber bot, they are automatically subscribed.
- Personalized campaigns can only be sent to users if you have their user identifier (phone number).
- The Viber bot does not assign a default phone number to users. You can obtain a phone number in two ways:
- You must directly request it from the user by sending a broadcast message on their Viber ID.
- You can access phone numbers directly if you are part of the Business Messages service of Viber.
Step 1: Connect Viber on the App Marketplace
To connect Viber on the App marketplace, perform the following steps:- On the left navigation menu in the MoEngage dashboard, click App marketplace.
- On the App Marketplace page, search for Viber.
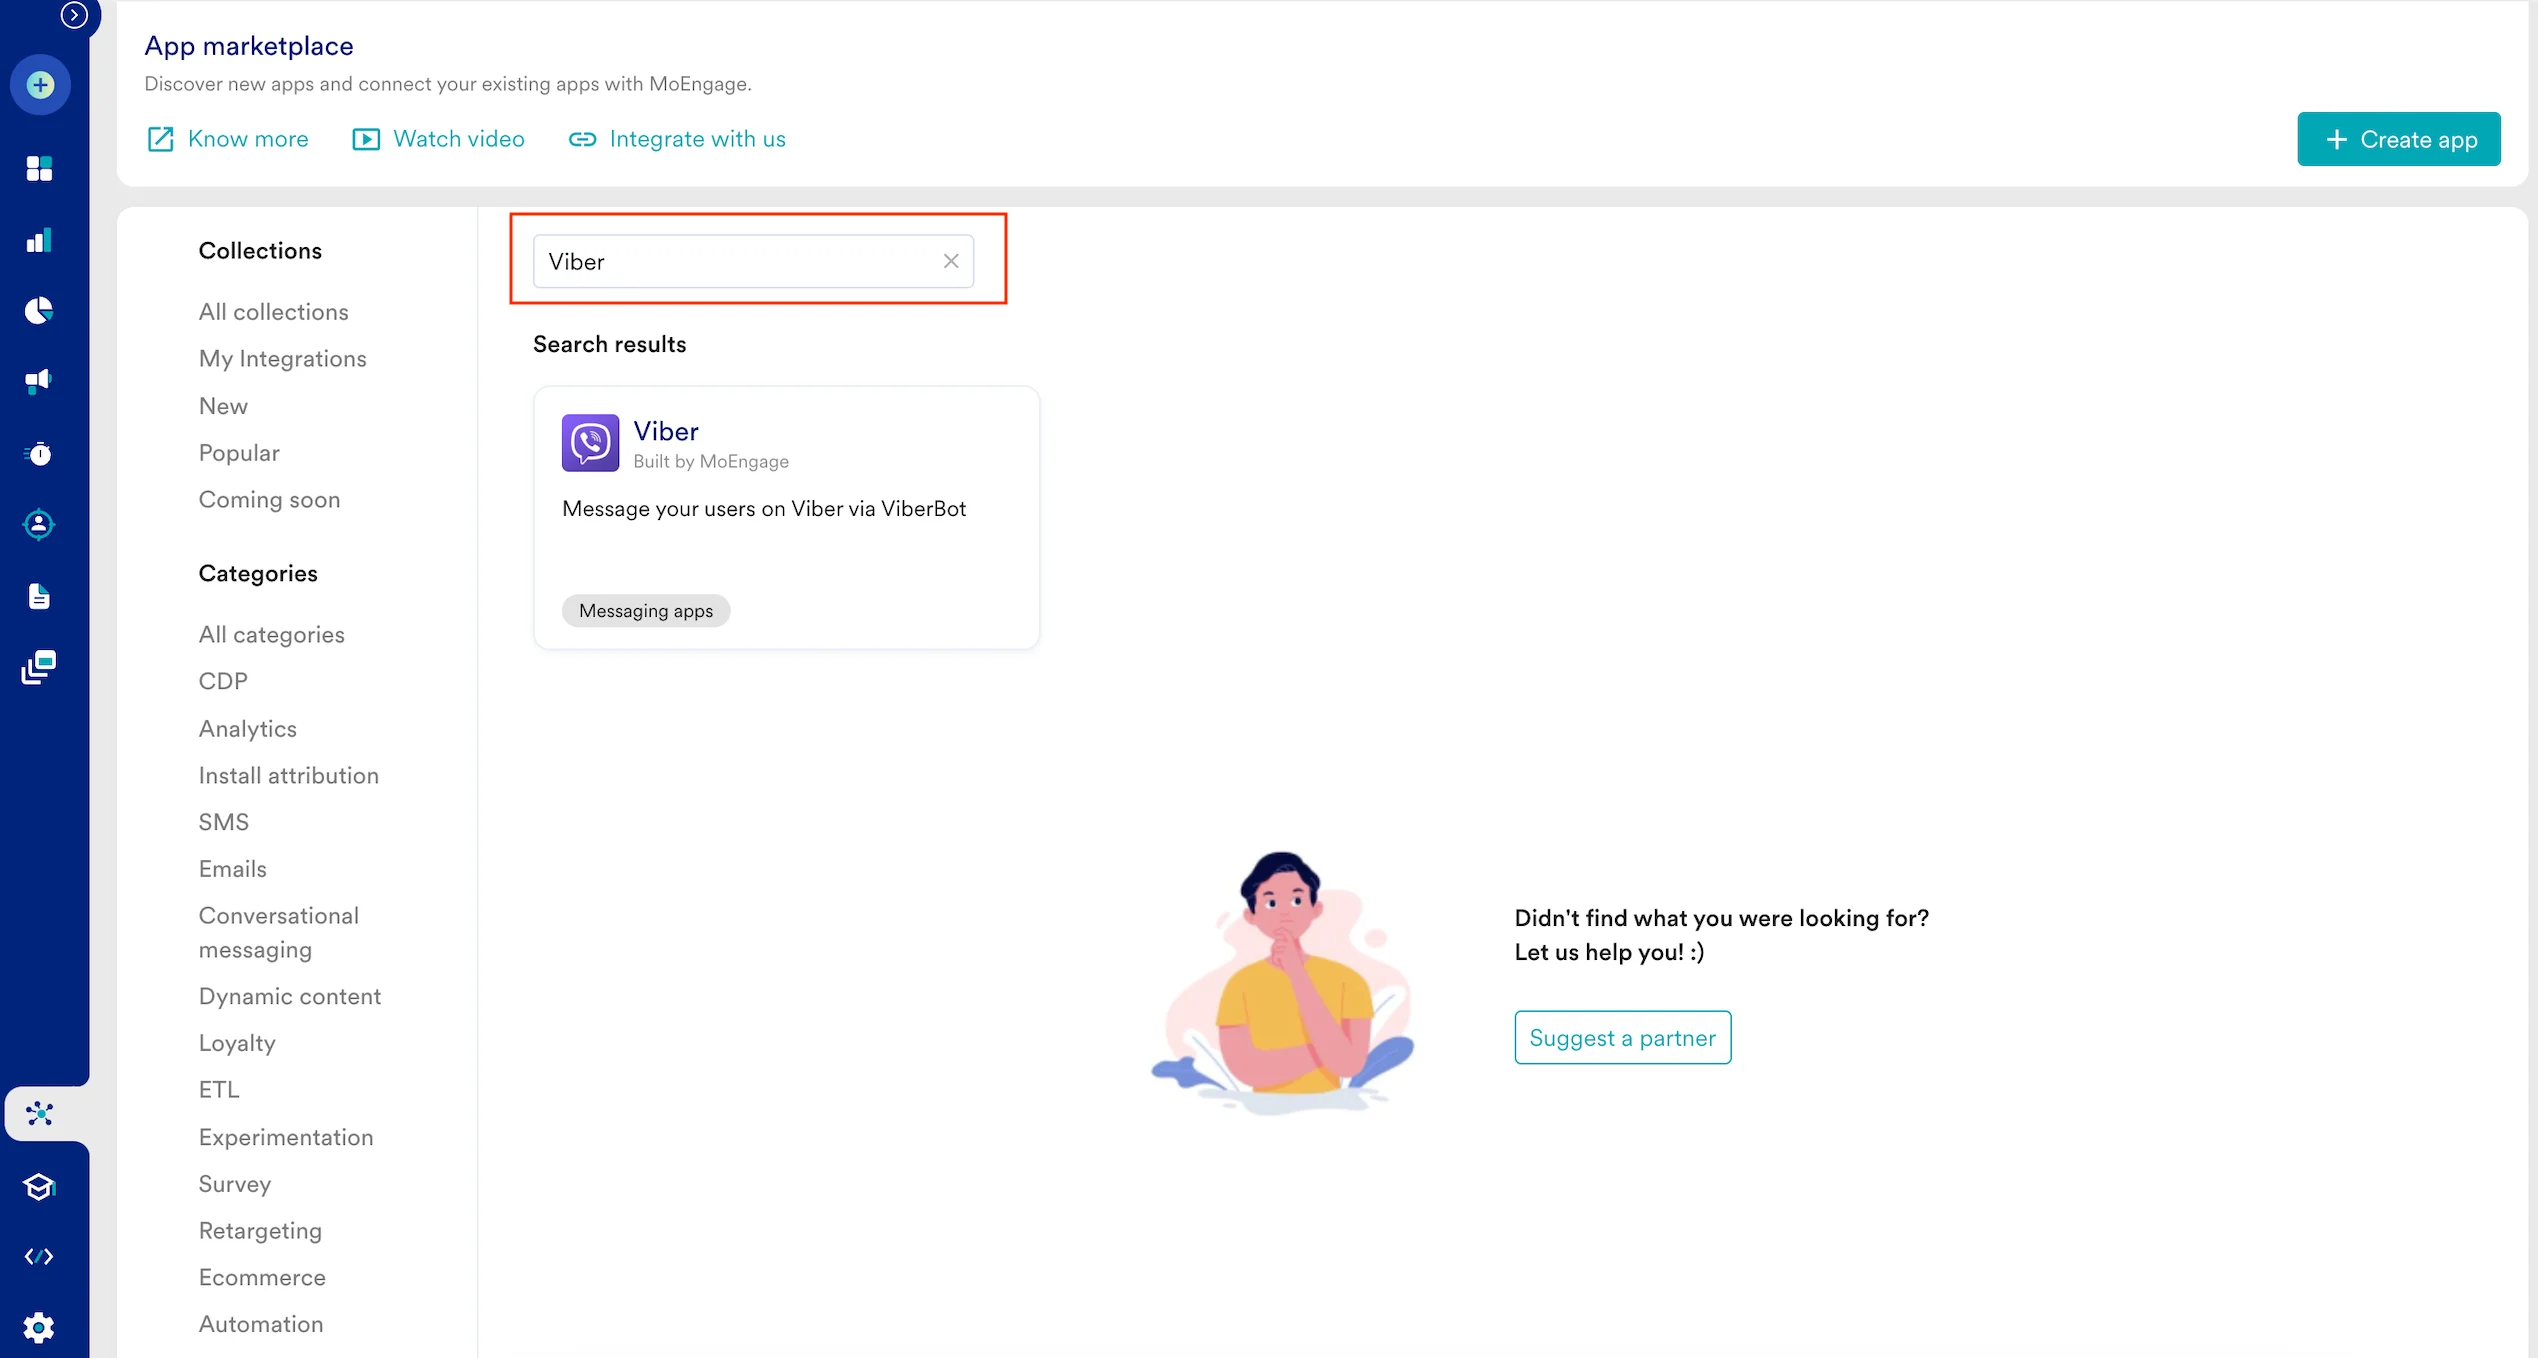
- Click the Viber tile.
- On the Viber page, go to the Integrate tab.
- Click the + Add integration down arrow key and then click Send messages (Native).
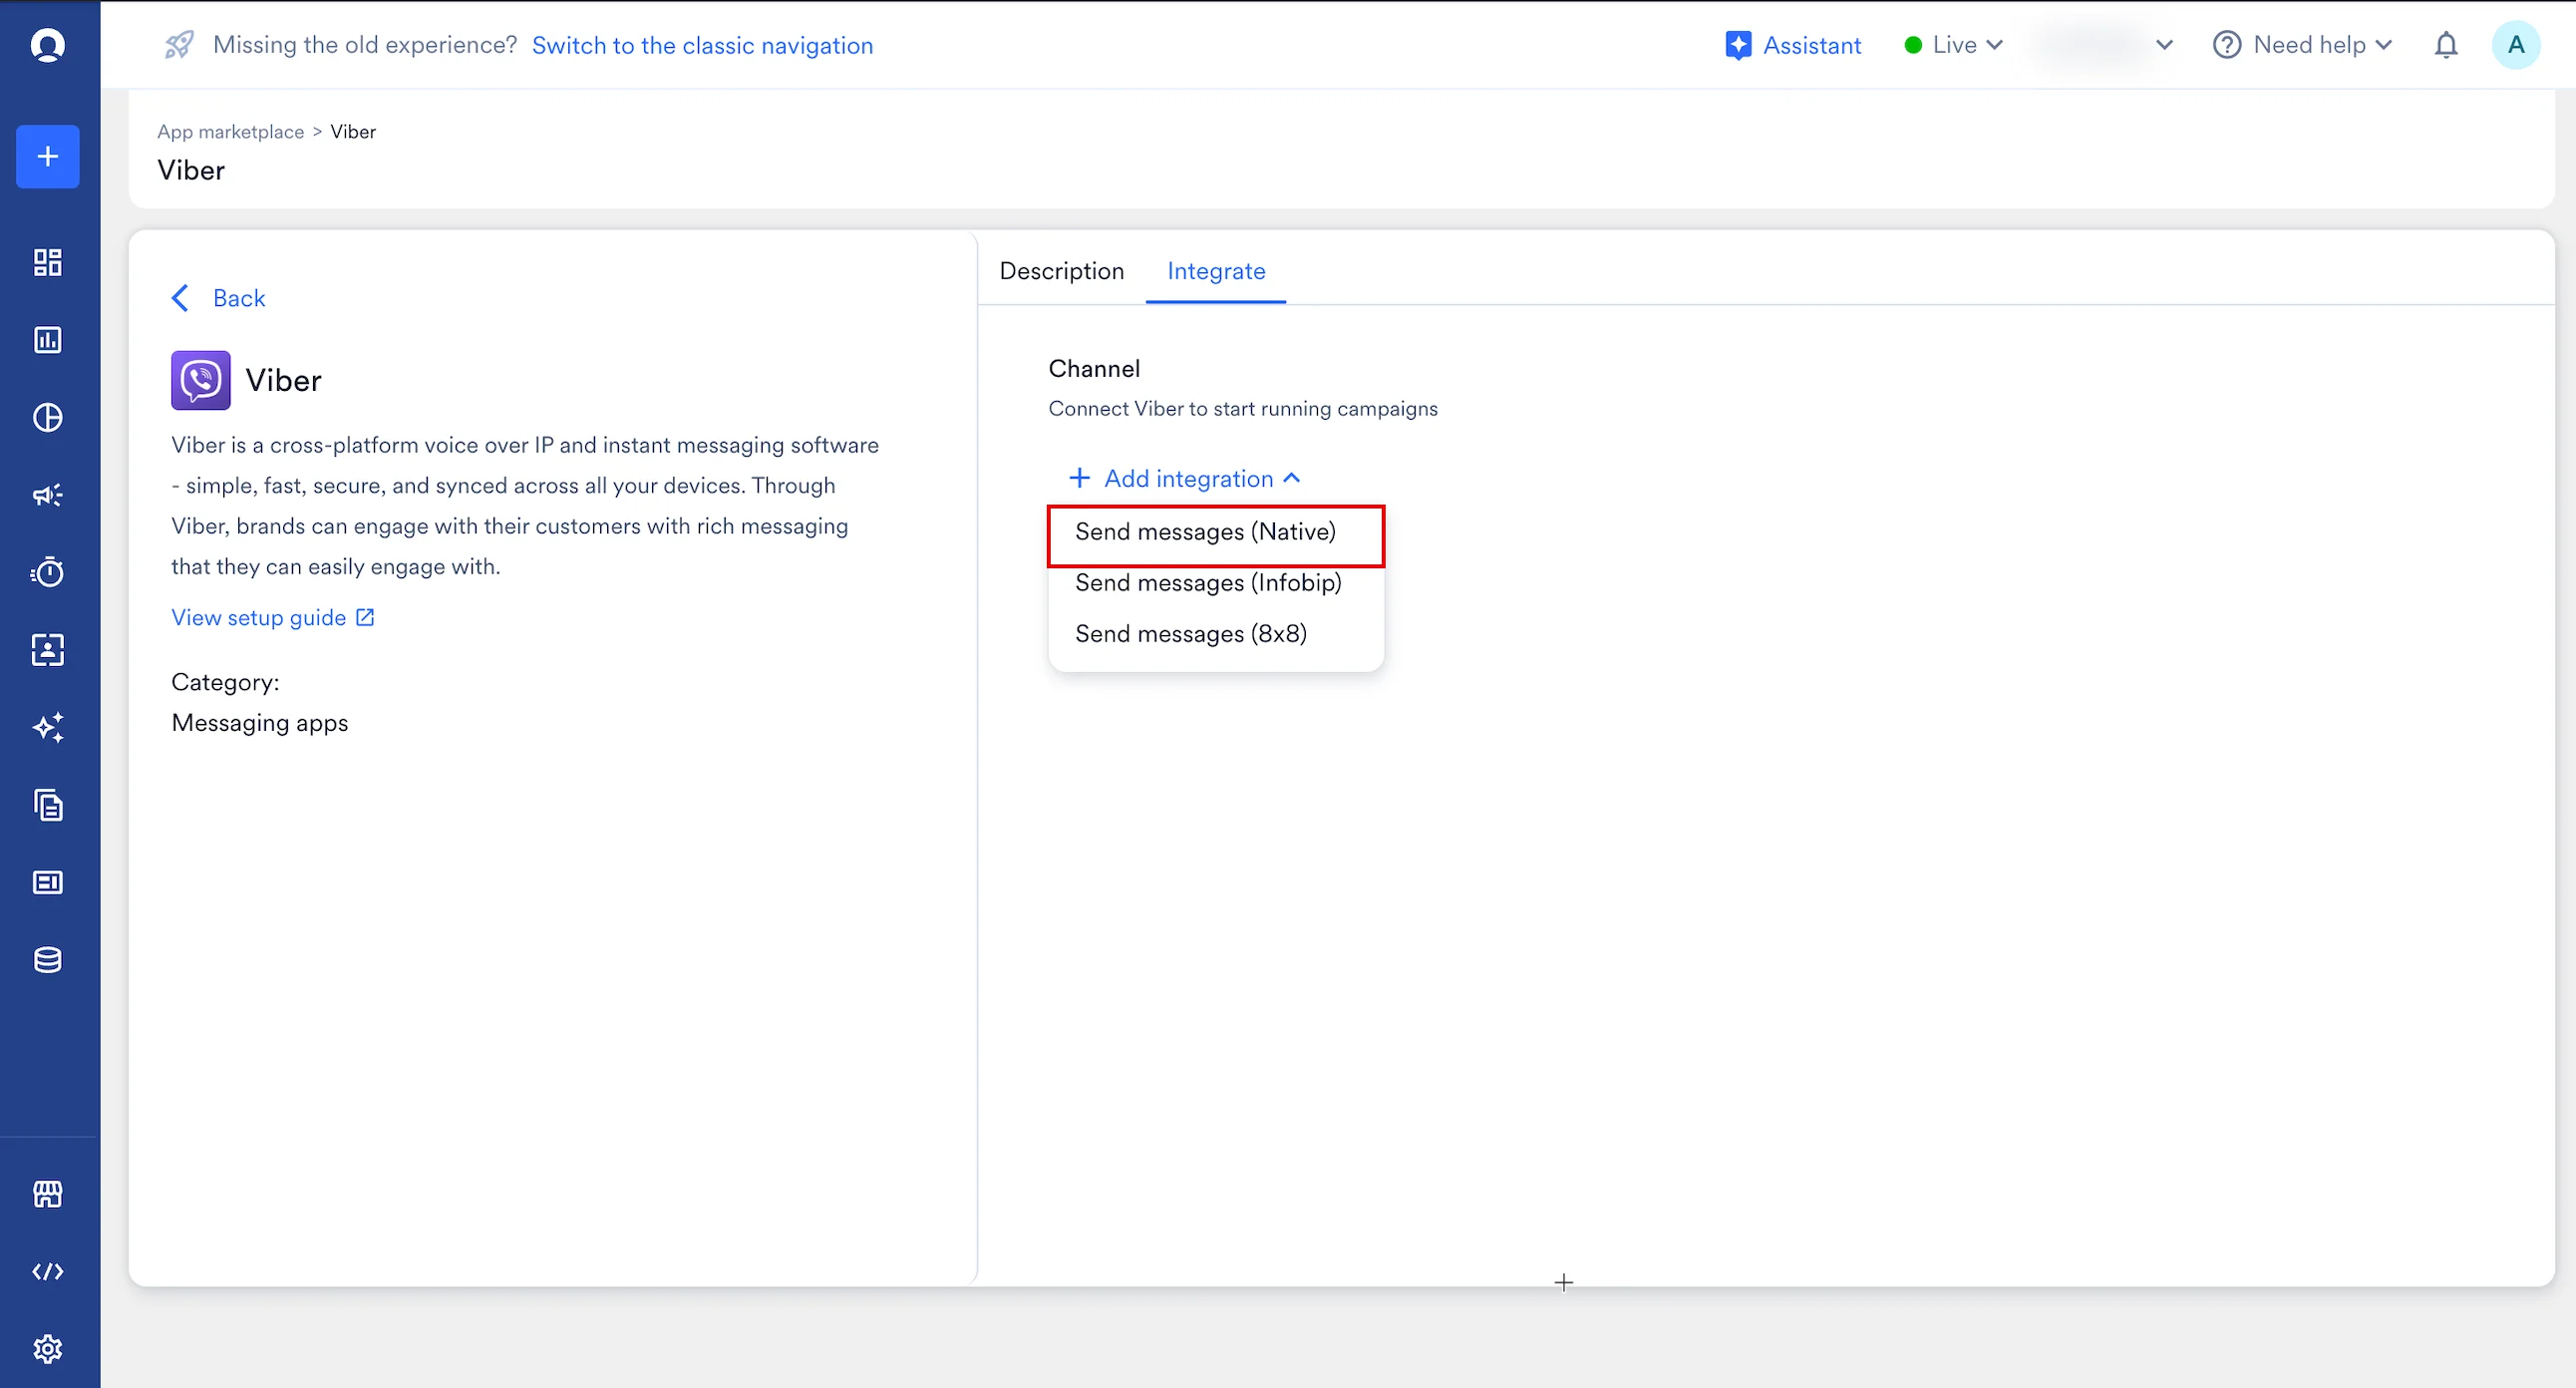
- Enter the following details:
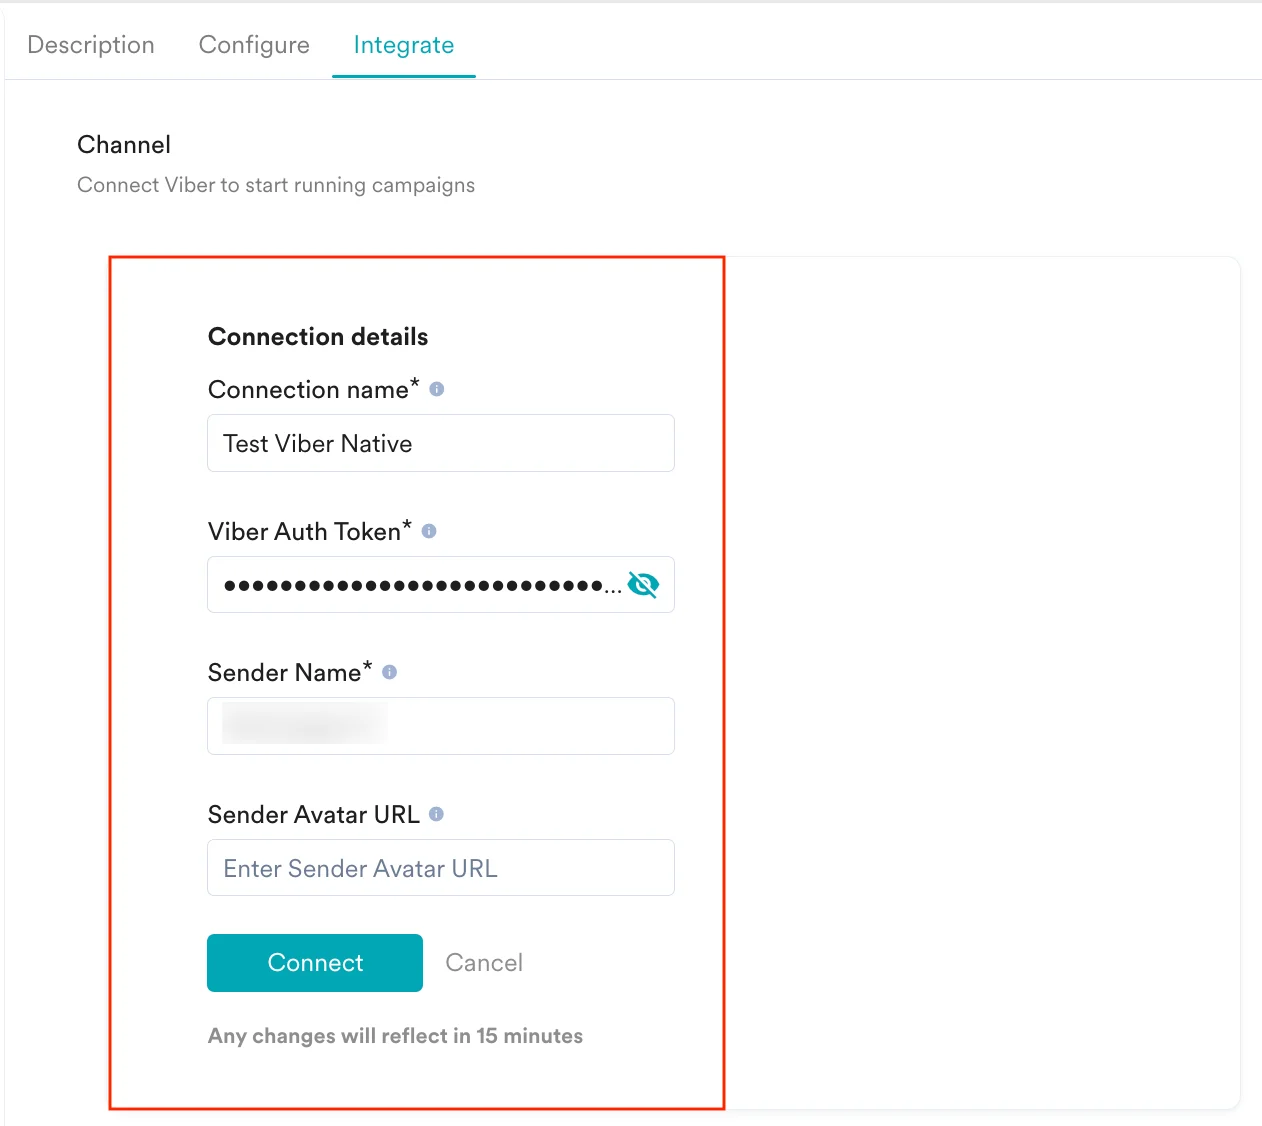
- Click Connect. Your Viber connection is integrated.
Step 1.1: Collect users’ Viber IDs
To send messages in Viber, you must collect your users’ Viber IDs to identify and interact with them consistently. Viber users’ IDs are generated by Viber and can be used when interacting with Viber APIs.Step 1.2: Save the Users’ Viber IDs on MoEngage
After obtaining a list of Viber users’ IDs, you must add them to MoEngage as a viber_id, a custom-tracked user attribute or property. You can do one of the following:- Pass this data to MoEngage using the User Data API.
- Upload it using User Imports inside MoEngage.
Step 2: Create a Viber Campaign on MoEngage
To create a campaign on MoEngage, perform the following steps:- On the left navigation menu in the MoEngage dashboard, click Engage, and then click Campaigns
- On the All campaigns page, click + Create campaign.
- On the Create campaign dialog box, under Connected Apps, click Viber and then click the most suitable delivery type.
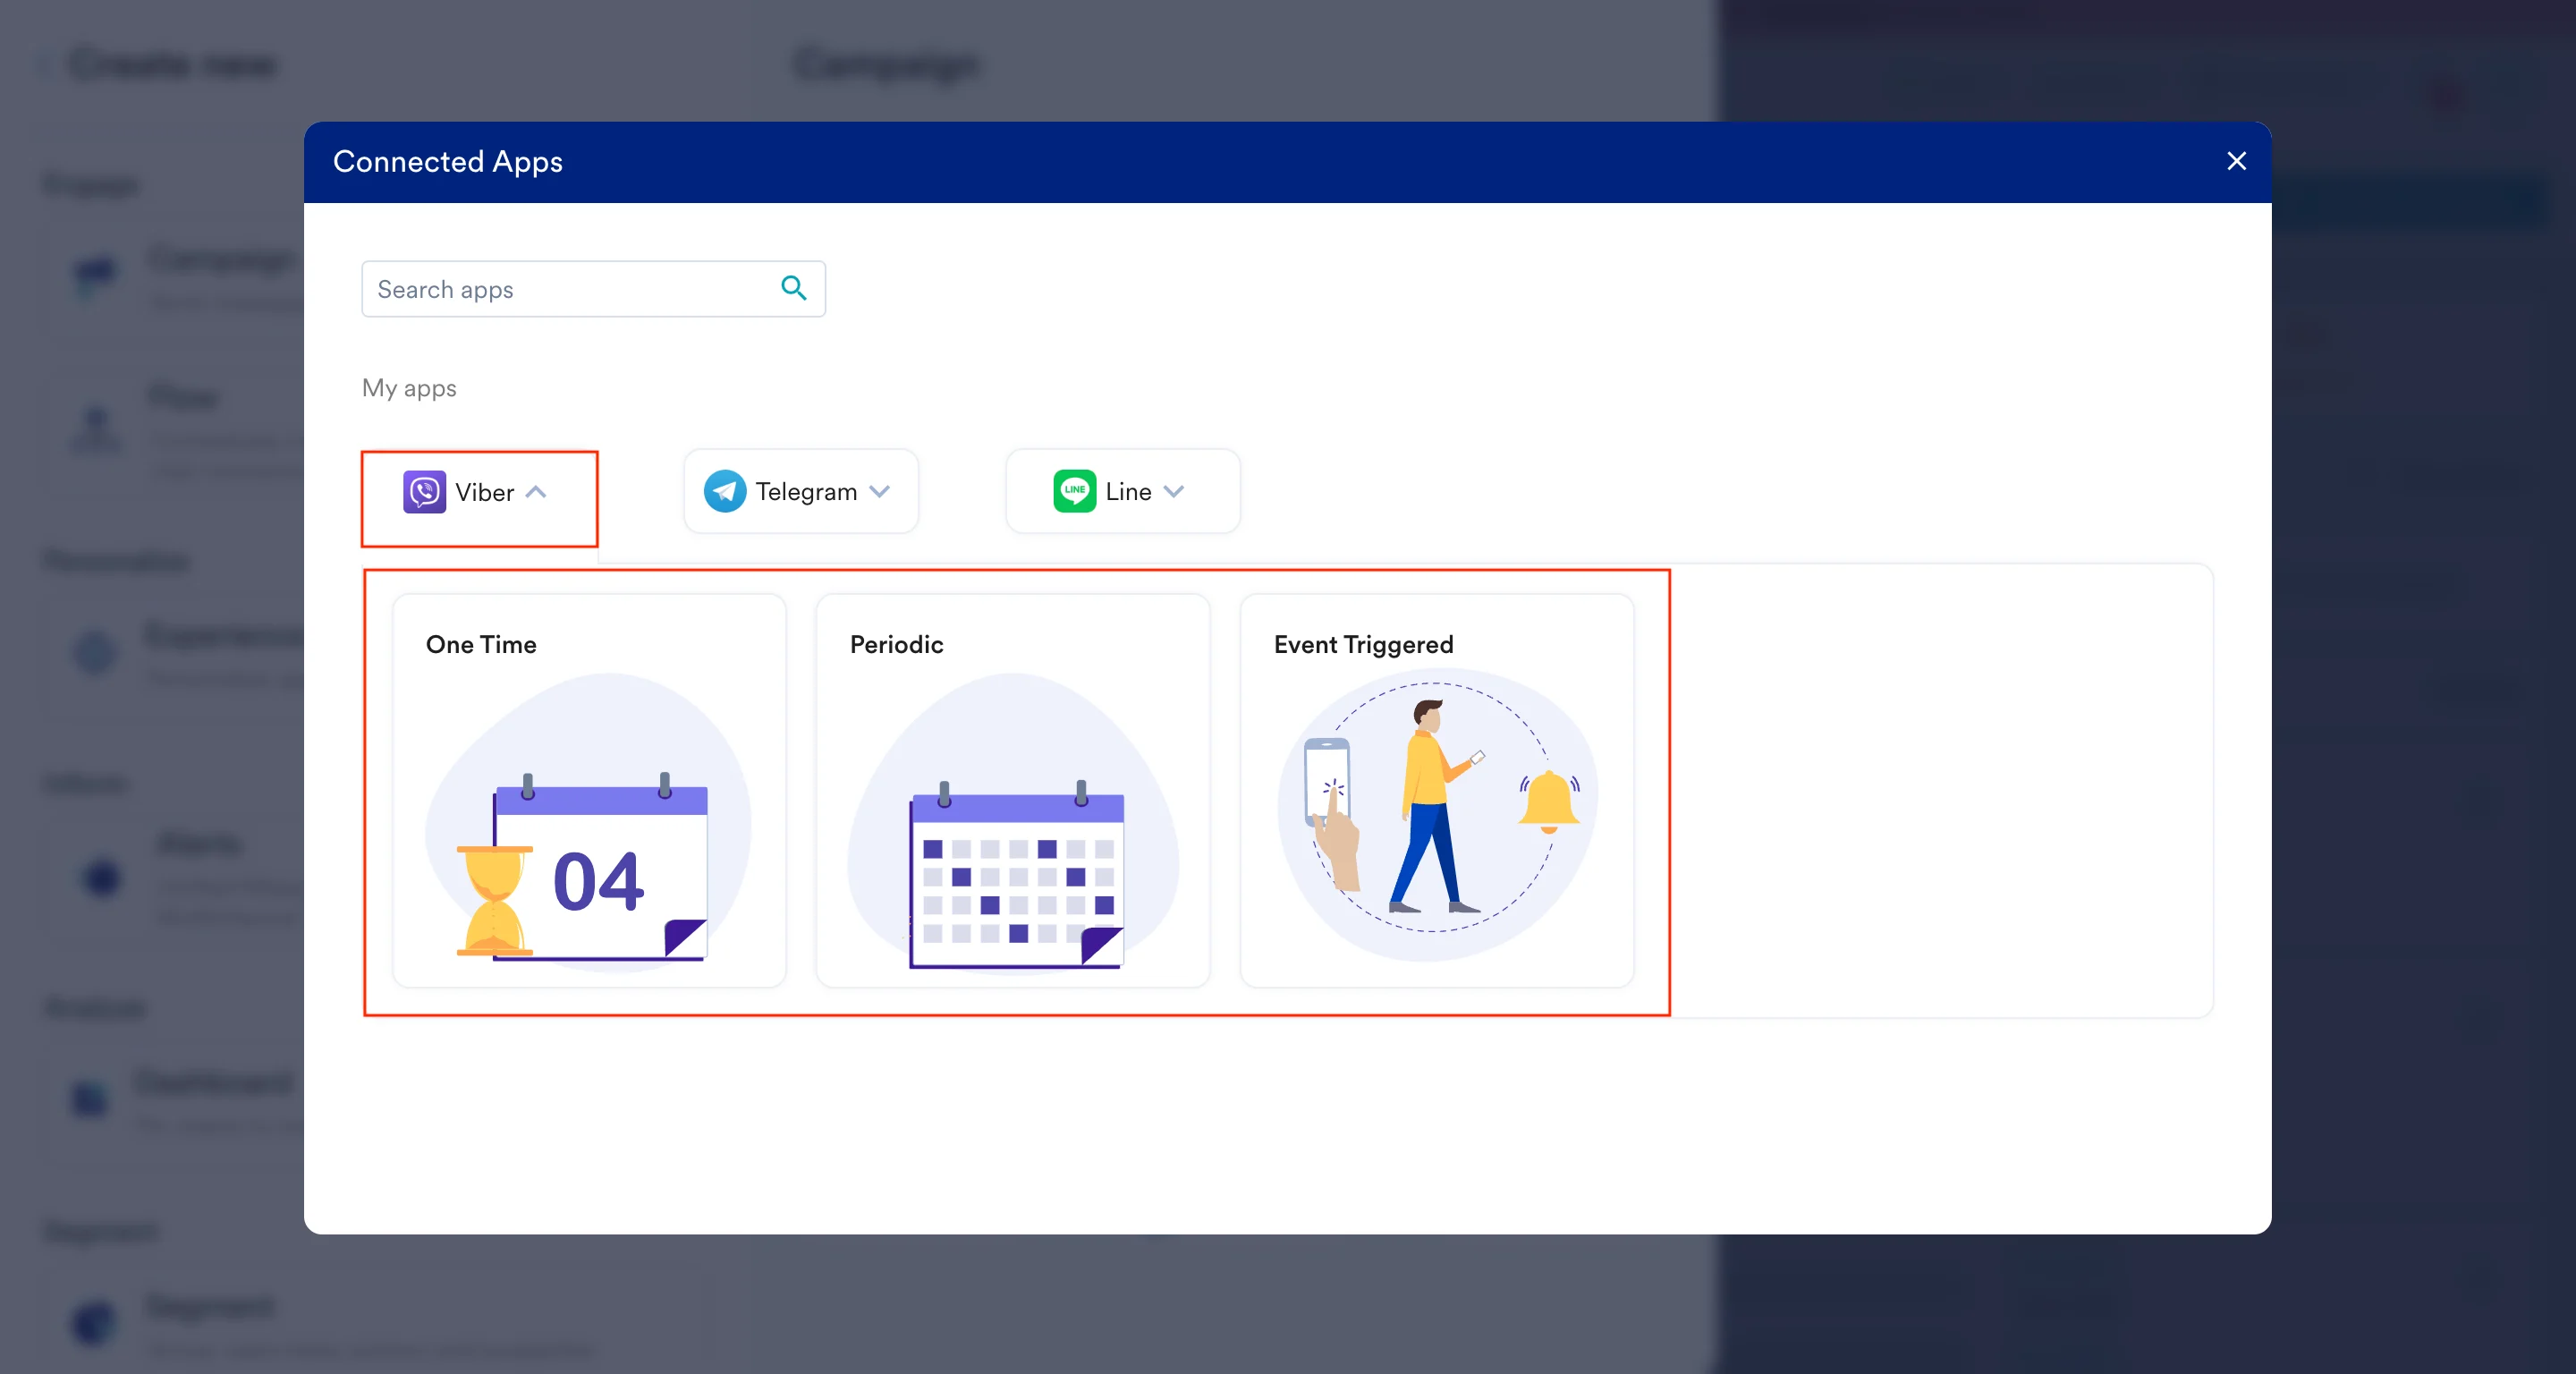
- Under Select audience, click Filter users by.
- On the User property tab, select the segment of users for whom Viber_id exists (you can combine it with other segment criteria).
- In step 2 of the campaign creation (Content), select the native message connector and specify the content you want to send out.
- Enter the following details:

- Select the Message type to send. Supported types are Text, Picture, and Video. Based on the type, enter the fields in the sections below.
- Text Message
- Picture Message
- Video Message
If you select Text, enter the following details:
- Your campaign is now ready to be tested and sent. Using the Test functionality, you can also test your connector configuration.
 If your test user successfully receives the message, your setup is ready.
 - Publish the campaign.
Integration via Infobip
Prerequisites
- Viber Bot: To use this integration, you must have a Viber bot. When sending Viber messages, your messages are associated with your Viber bot official, resulting in users seeing your bot details. For more information on creating a bot, refer here.
- Infobip APIs: This allows for a Viber connection to be established with a connected Viber bot, enabling access to Infobip APIs.
Step 1: Connect Viber on the App marketplace
To connect Viber on the App marketplace, perform the following steps:- On the left navigation menu in the MoEngage dashboard, click App marketplace.
- On the App Marketplace page, search for Viber.
- Click the Viber tile.
- On the Viber page, go to the Integrate tab.
- Click the +Add integration dropdown and then click Send messages (Infobip).
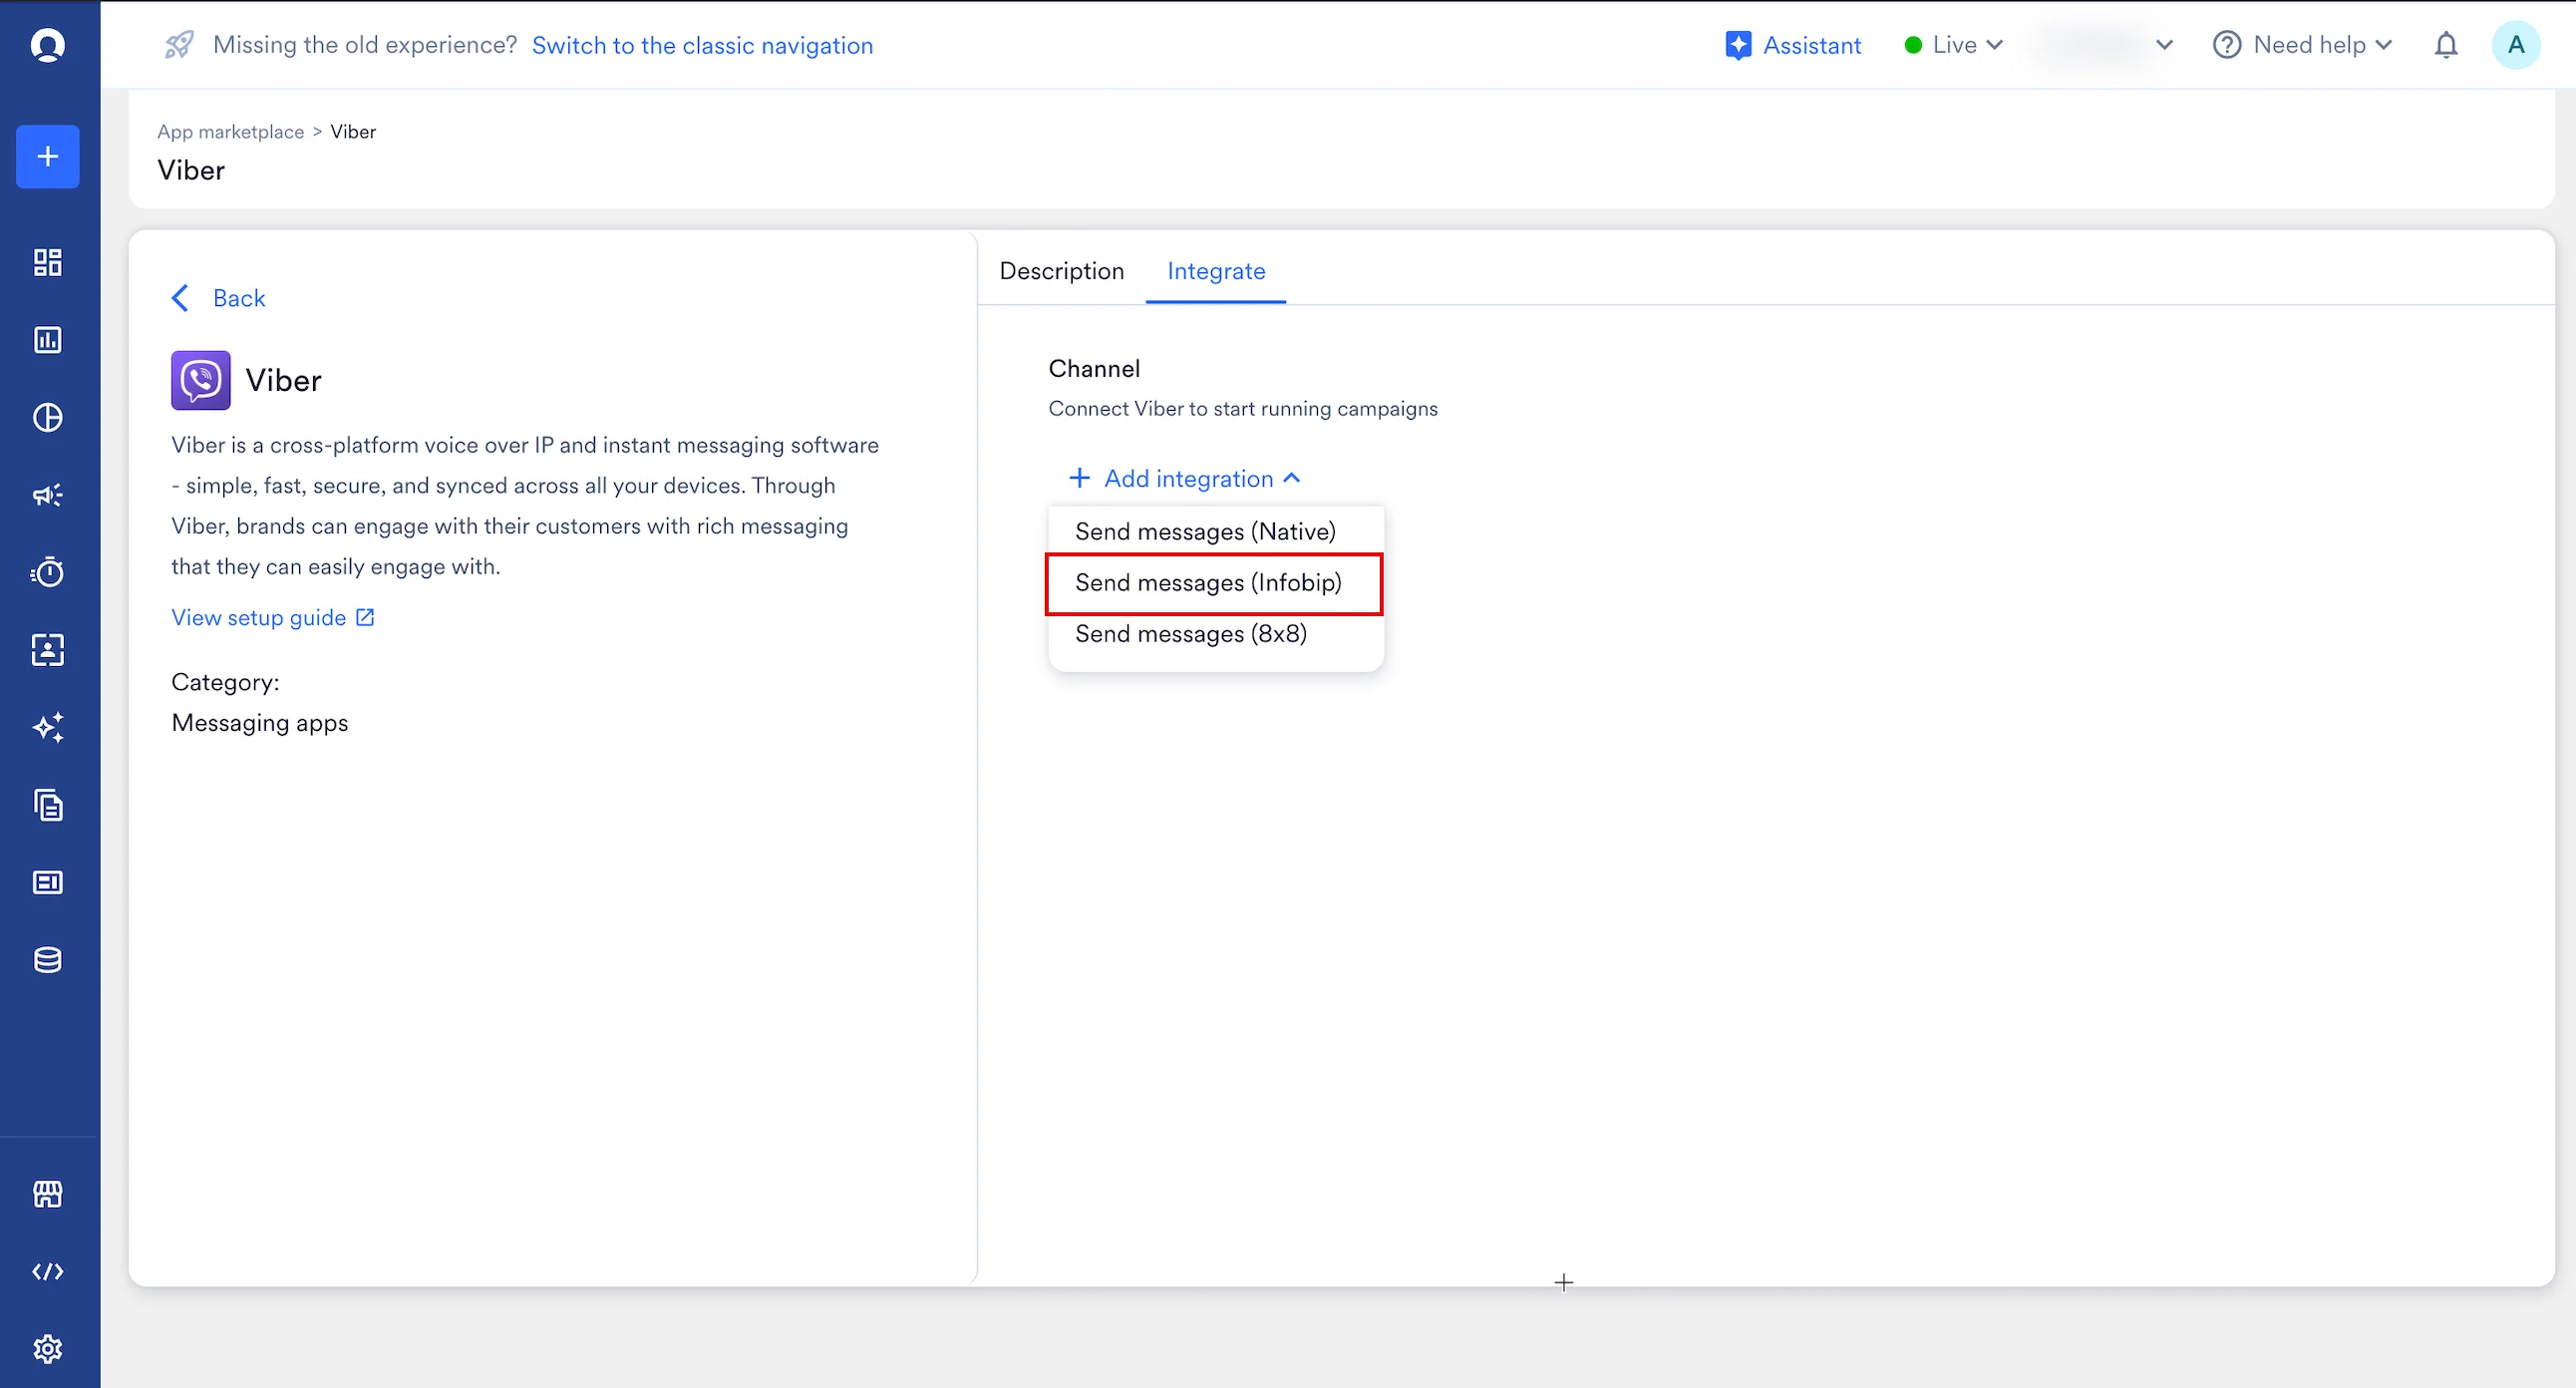
- Enter the following details:
- Click Connect. Your Viber connection is now integrated.
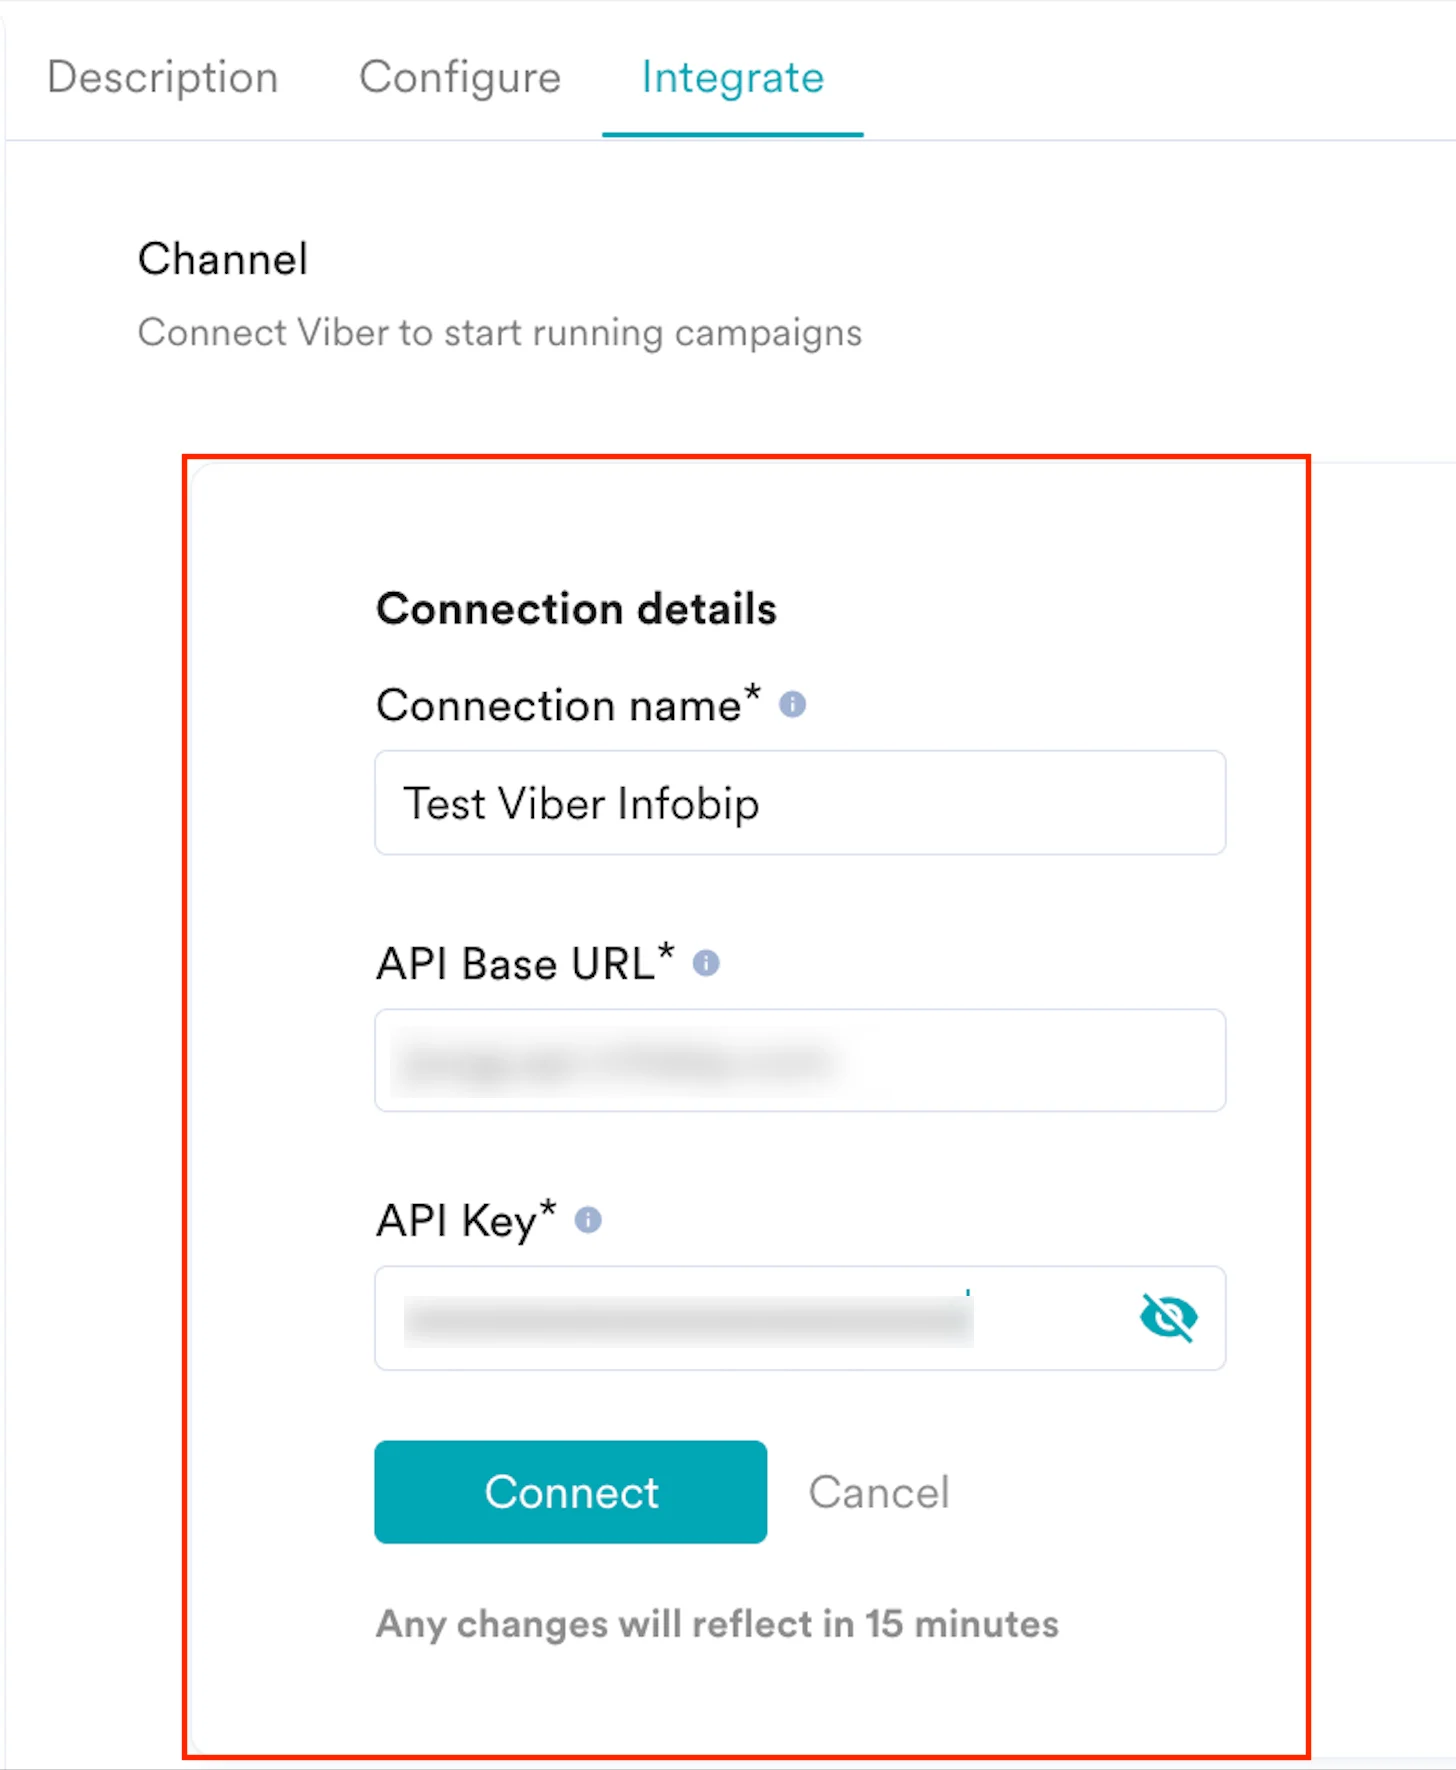
Step 1.1: Collect Users’ Viber IDs
To send messages in Viber, you must collect your users’ Viber IDs to identify and interact with them consistently. Viber users’ IDs are generated by Viber and can be used when interacting with Viber APIs.Step 1.2: Save Users Viber IDs on MoEngage
After obtaining a list of Viber users’ IDs, you must add them to MoEngage as a viber_id, a custom-tracked user attribute or property. You can do one of the following:- Pass this data to MoEngage using the User Data API
- Upload it using User Imports inside MoEngage.
Step 2: Create a Viber Campaign on MoEngage
- On the left navigation menu in the MoEngage dashboard, click Engage, and then click Campaigns
- On the All campaigns page, click + Create campaign.
- On the Create campaign dialog box, under Connected Apps, click Viber and then click the most suitable delivery type.
- Under Select audience, click Filter users by.
- On the User property tab, select the segment of users for whom viber_id exists (you can combine it with other segment criteria).
- In step 2 of the campaign creation (Content), select the send message Infobip connector and specify the content you want to send out.
- Enter the following details:
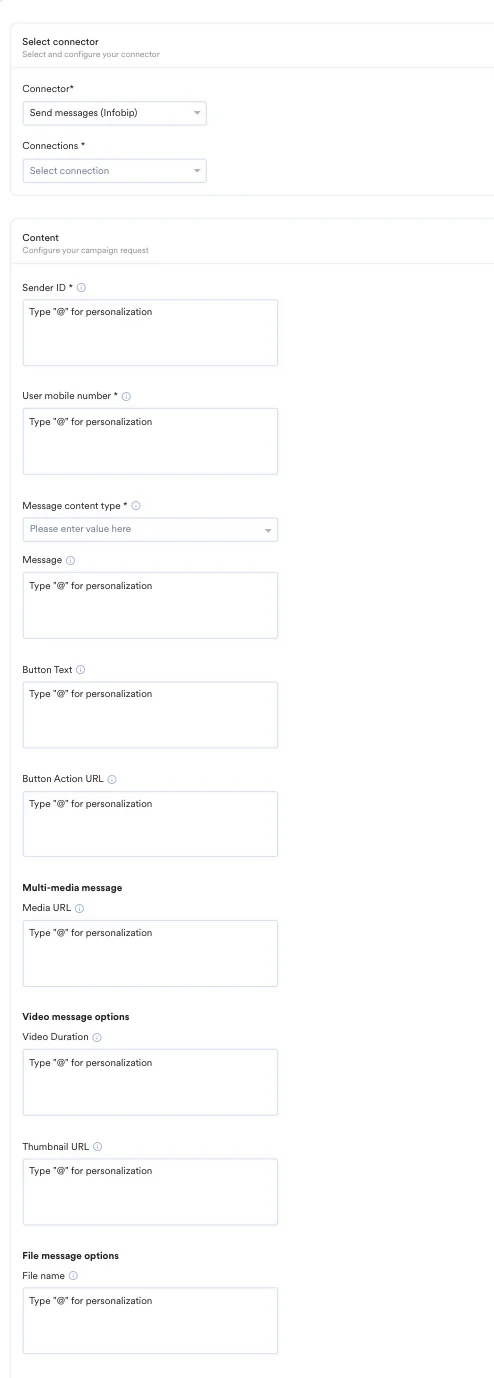
- Select the Message type: Text, Image, Video, or File. Based on the type, enter the fields in the sections below.
- Text Message
- Image Message
- Video Message
- File Message
If you select Text, enter the following fields:
- Your campaign is now ready to be tested and sent. Using the Test functionality, you can also test your connector configuration. If your test user successfully receives the message, your setup is ready.
- Publish the campaign.
Integration via 8x8 connector
PrerequisitesBefore configuring this connector, please ensure you have the following:
- 8x8 Connect Account: You must have an active 8x8 Connect portal account.
- Viber Channel Enabled: Your 8x8 Subaccount must be provisioned for Viber. For assistance with provisioning your Viber channel, contact your 8x8 account manager or 8x8 support.
- 8x8 API Access: You must have access to generate an API Key and locate your Subaccount ID within the 8x8 Connect portal.
Step 1: Connect Viber on the App Marketplace
To connect the 8x8 connector on the App marketplace, perform the following steps:- On the left navigation menu in the MoEngage UI, click App marketplace.
- On the App Marketplace page, search for Viber.
- Click the Viber tile.
- On the Viber page, go to the Integrate tab.
- Click the Add integration down arrow key and then click Send messages (8x8).
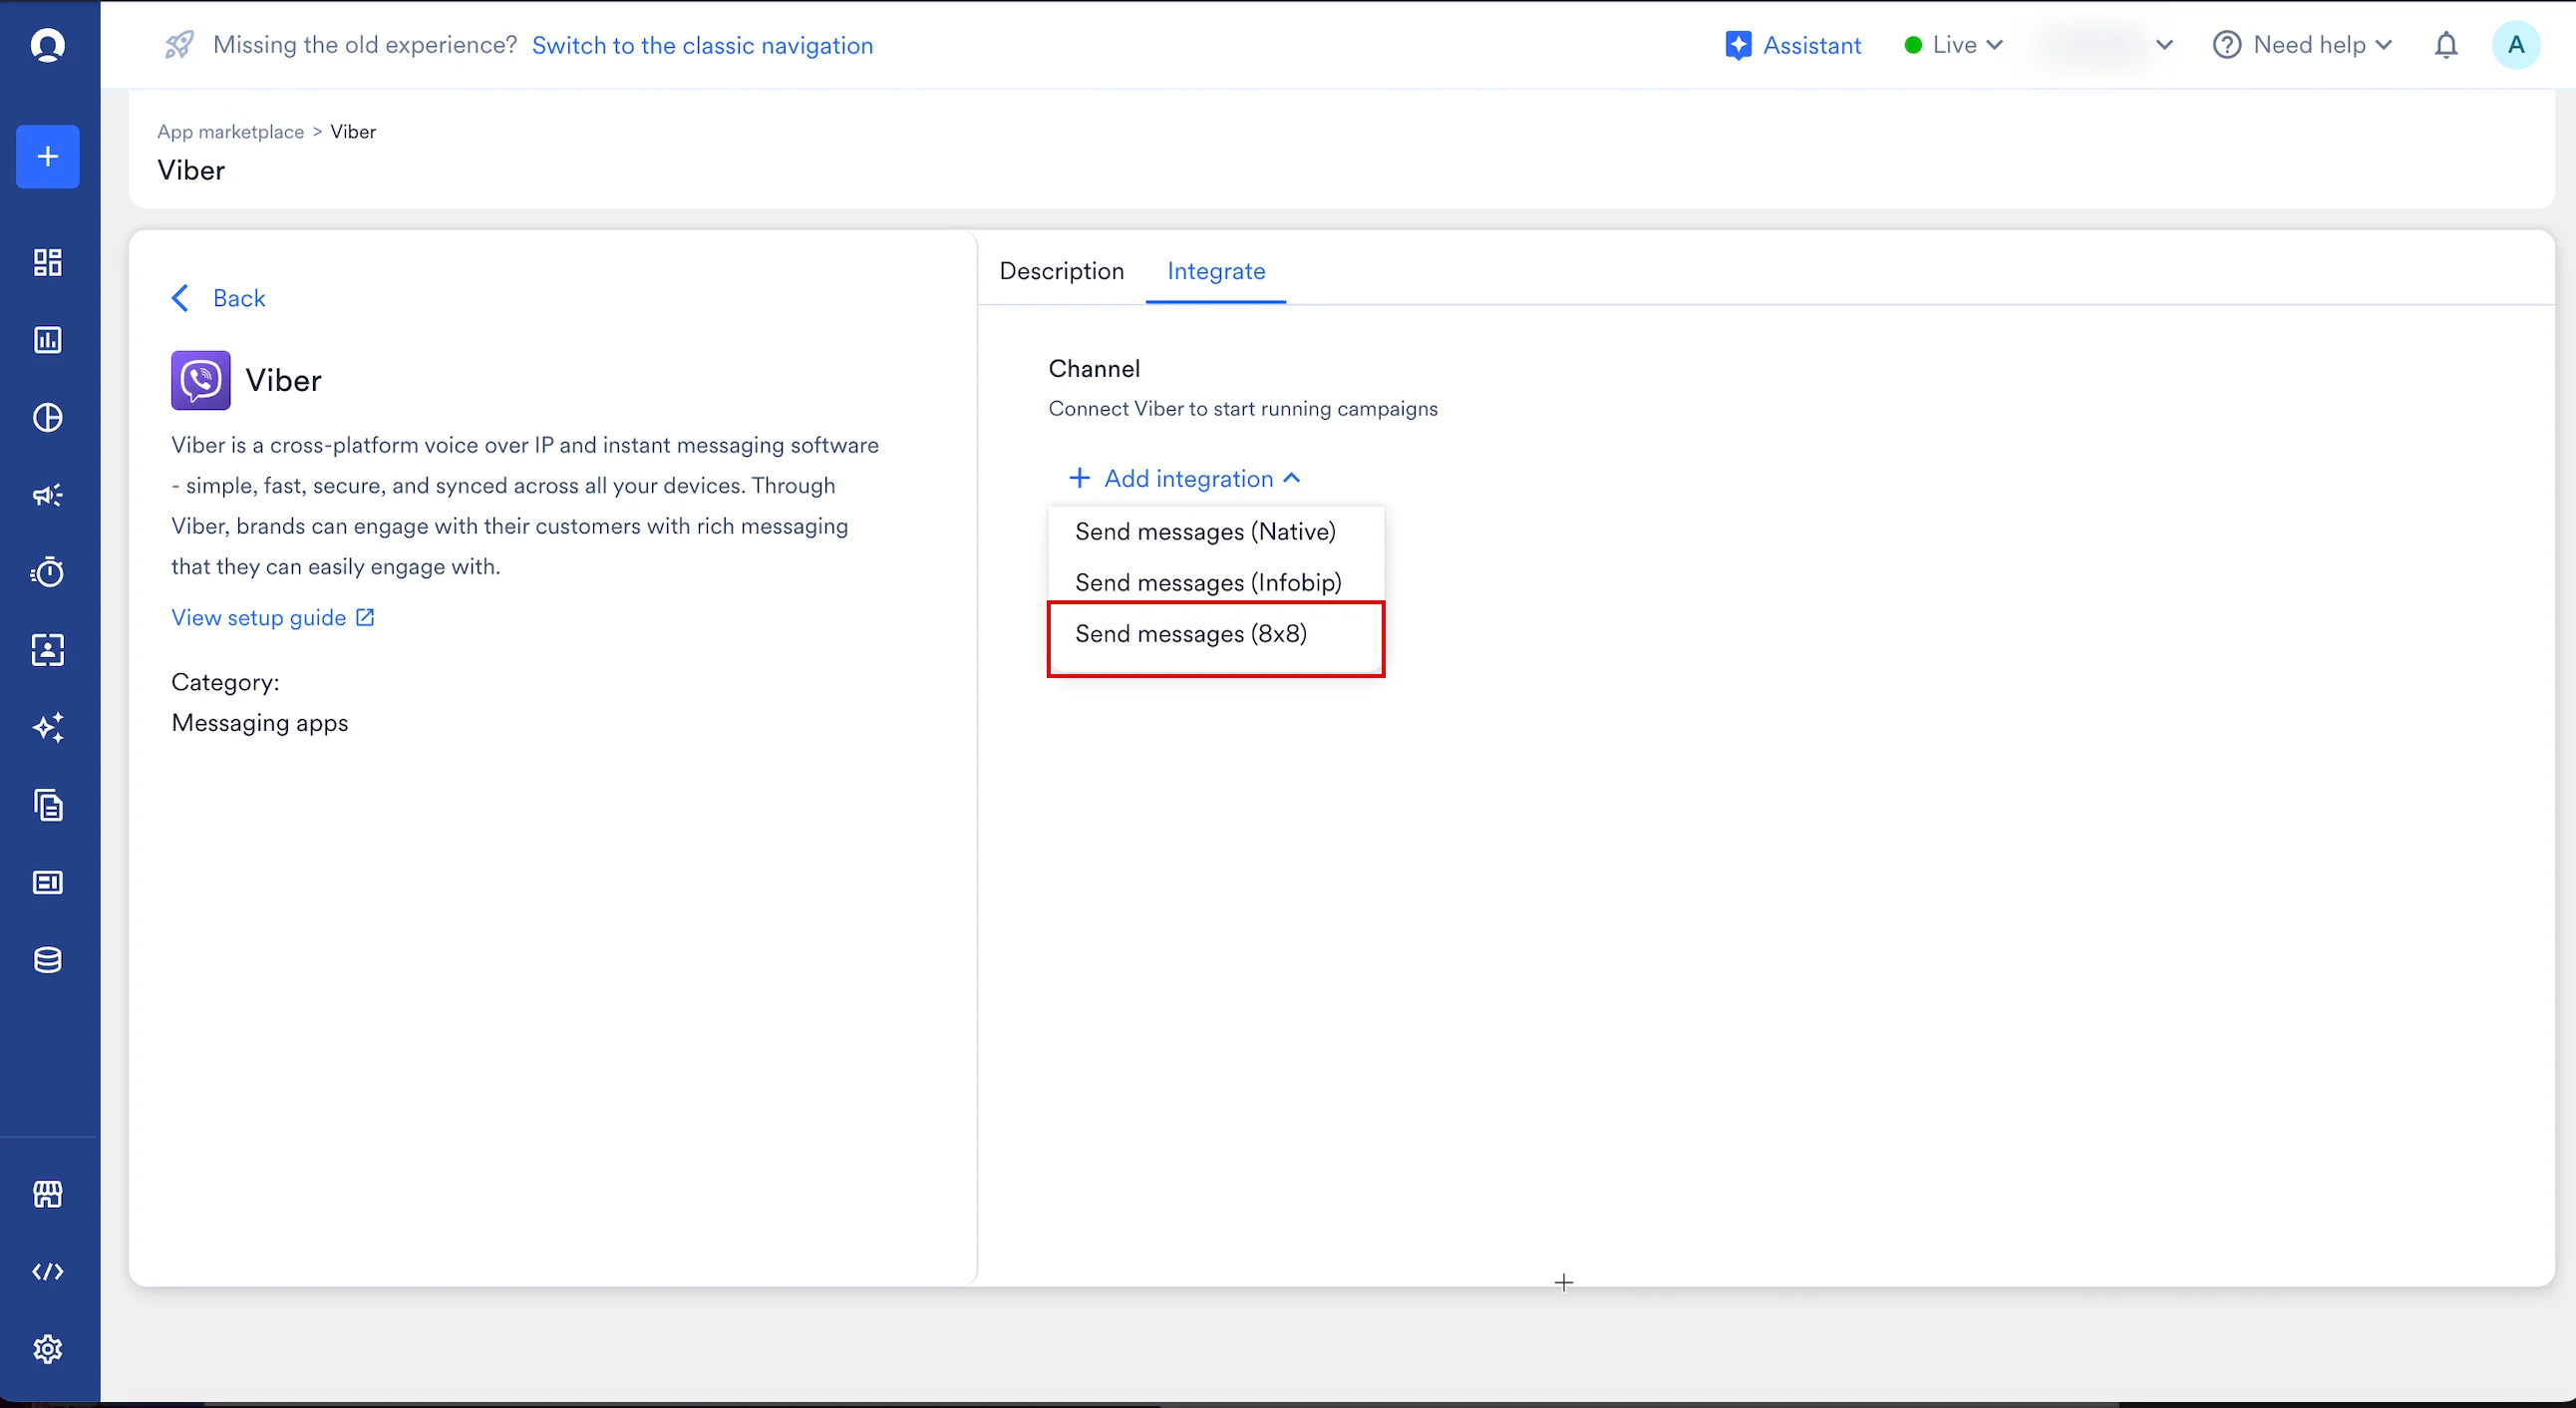
- Enter the following details:
- After filling in the fields, click Connect to complete the connector setup.
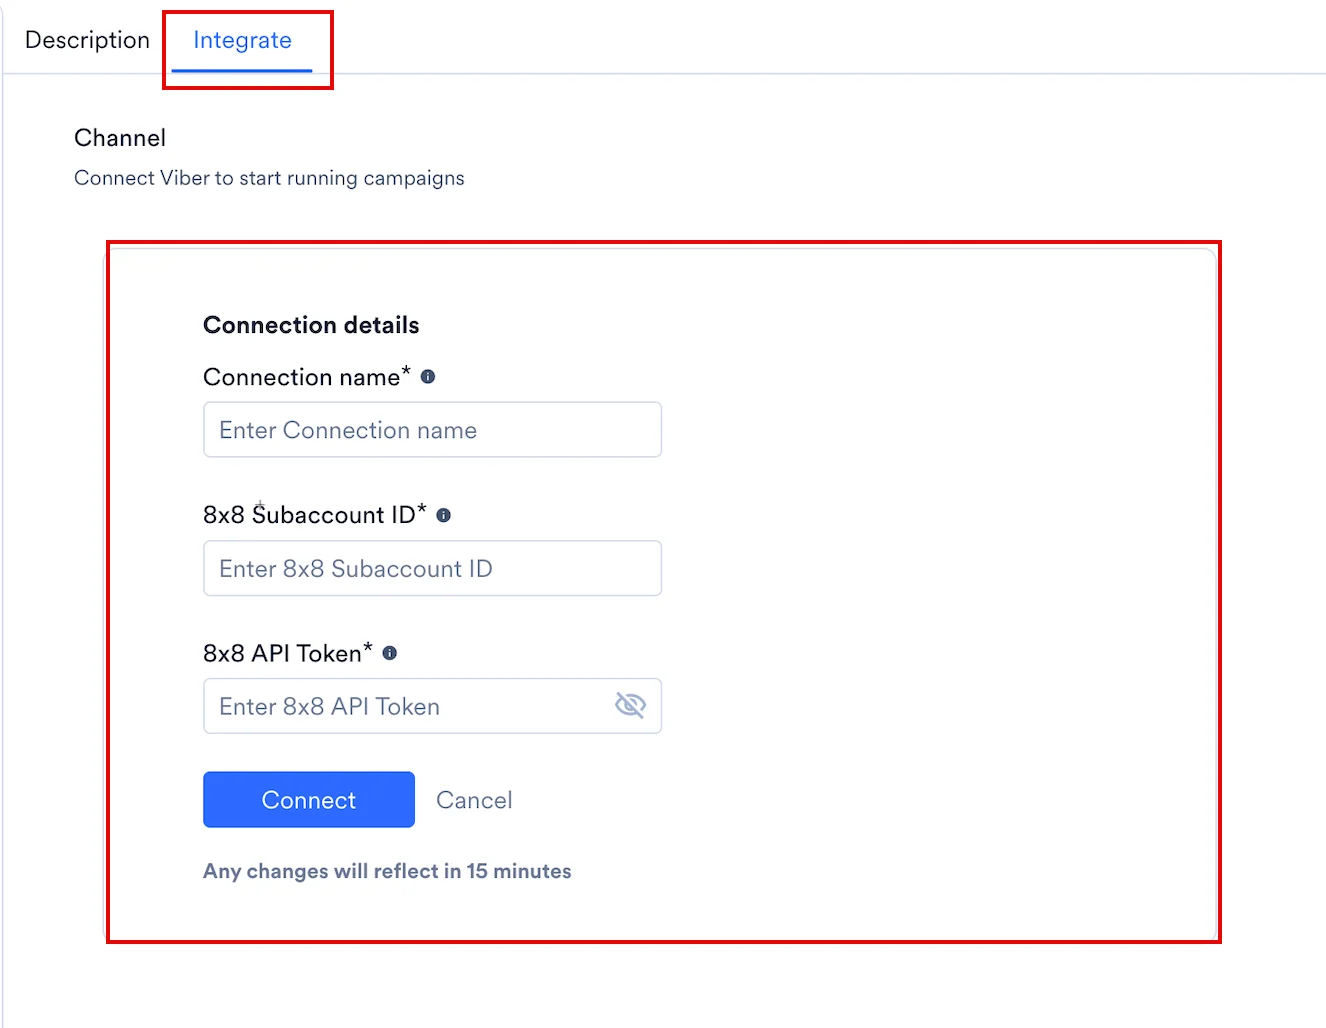
Step 2: Create a 8x8 Connector Campaign on MoEngage
To create a campaign on MoEngage, perform the following steps:- On the left navigation menu in the MoEngage UI, click Engage, and then click Campaigns.
- On the All campaigns page, click + Create campaign.
- On the Create campaign dialog box, under Connected Apps, click Viber and then click the most suitable delivery type.
- Under Select audience, click Filter users by.
- On the User property tab, select the segment of users for whom viber_id exists (you can combine it with other segment criteria).
- In step 2 of the campaign creation (Content), select the 8x8 Viber connector and specify the content you want to send out.
- Enter the following details:
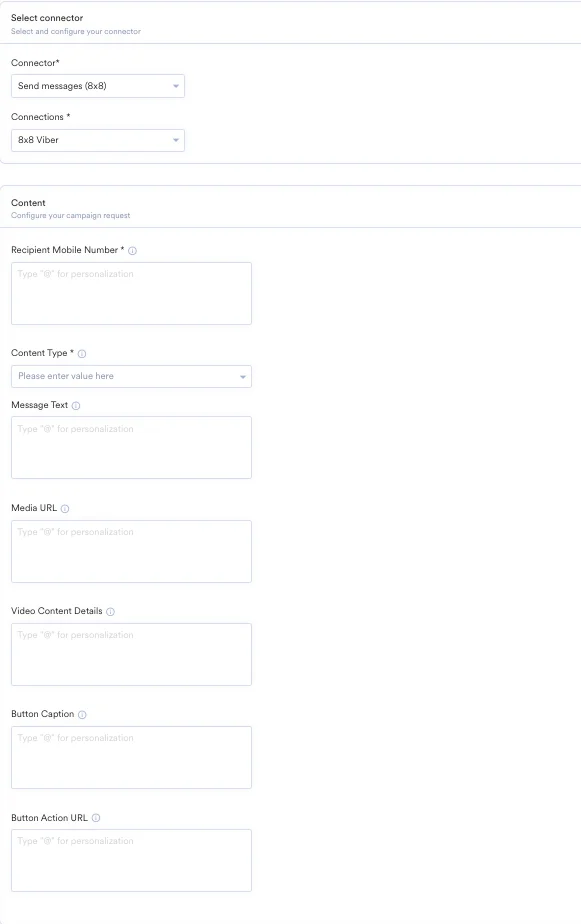
- Text Message
- Image Message
- Video Message
- File Message
If you select Text, enter the following fields:
Message Combinations
The connector intelligently handles different combinations of content:- Text + Button: Sends a text message with a CTA button.
- Image + Button: Sends a message containing an image and a CTA button.
- Video + Button: Sends a video or file message that also includes a CTA button.
- Media Only: To send a message with only an Image, Video, or File, select the Content Type and provide the Media URL (and Video Content Details, if applicable).
Analytics and Delivery Tracking
The 8x8 Connector automatically tracks the delivery status of your campaigns. The following MoEngage events are created based on the API response from 8x8:- Connected App Campaign Sent: This event is triggered when the 8x8 API successfully accepts the message request (receives a 200 OK response).
- Connected App Campaign Failed: This event is triggered if the 8x8 API returns any error (a response code other than 200), indicating the message could not be sent.
Send a Viber Message to the Channel or Groups
- Create a new user in MoEngage to message a channel or group. Ensure the Viber ID here is your Channel or group ID.
- Select the user by creating a segment for it. Ensure only one user is included in the segment. When multiple users are selected for the campaign, the message gets sent to the channel or group many times.
- In Step 2 of Create Campaign, enter the Viber ID of your channel or group. You can also use personalization here.
Campaign Analytics
MoEngage campaigns provide powerful analytics that allow you to analyze your campaign performances. Each channel in MoEngage provides in-depth metrics that help you quantify your campaign goals. For more information on the MoEngage Analytics functionalities, refer to Campaign Analytics. By default, we provide the following metrics for Viber campaigns:- Attempted: After removing the users who breached the frequency capping (FC), Attempted is calculated as the number of users who qualified for the Viber campaigns and to whom we attempted to send messages.
- Failed: Number of users for whom Viber did not send any message or the users for whom we failed to find any value against the user or event attributes used in the campaign.
- Successfully sent: The campaign is marked as successful when Viber APIs accept the request to send the message to users/groups/rooms (with a 200 status code). For more information on Viber Message API responses, refer to their help documentation.