Introduction
Amazon Redshift is a fast and powerful, fully managed, petabyte-scale data warehouse service that forms part of the larger cloud-computing platform Amazon Web Services.MoEngage × Redshift
The MoEngage and Redshift integration exports Campaign Interaction Events data directly to your Amazon Redshift cluster.Integration
- Ensure you have an Amazon Web Services account with permission to create/edit Redshift clusters, roles, and policies.
- Optional: To create a new user, you need to have access to create a new user in your Redshift Cluster.
- Exports to Redshift are part of the Streams add-on. Contact your dedicated MoEngage CSM (customer success manager) to enable it for your account
Step 1: Make sure your Redshift cluster is publicly accessible
Make sure your Redshift Cluster has the “Publicly Accessible” setting turned on.- When creating a new Redshift Cluster, under the “Network and Security” section, select the “Turn on Publicly accessible” option.
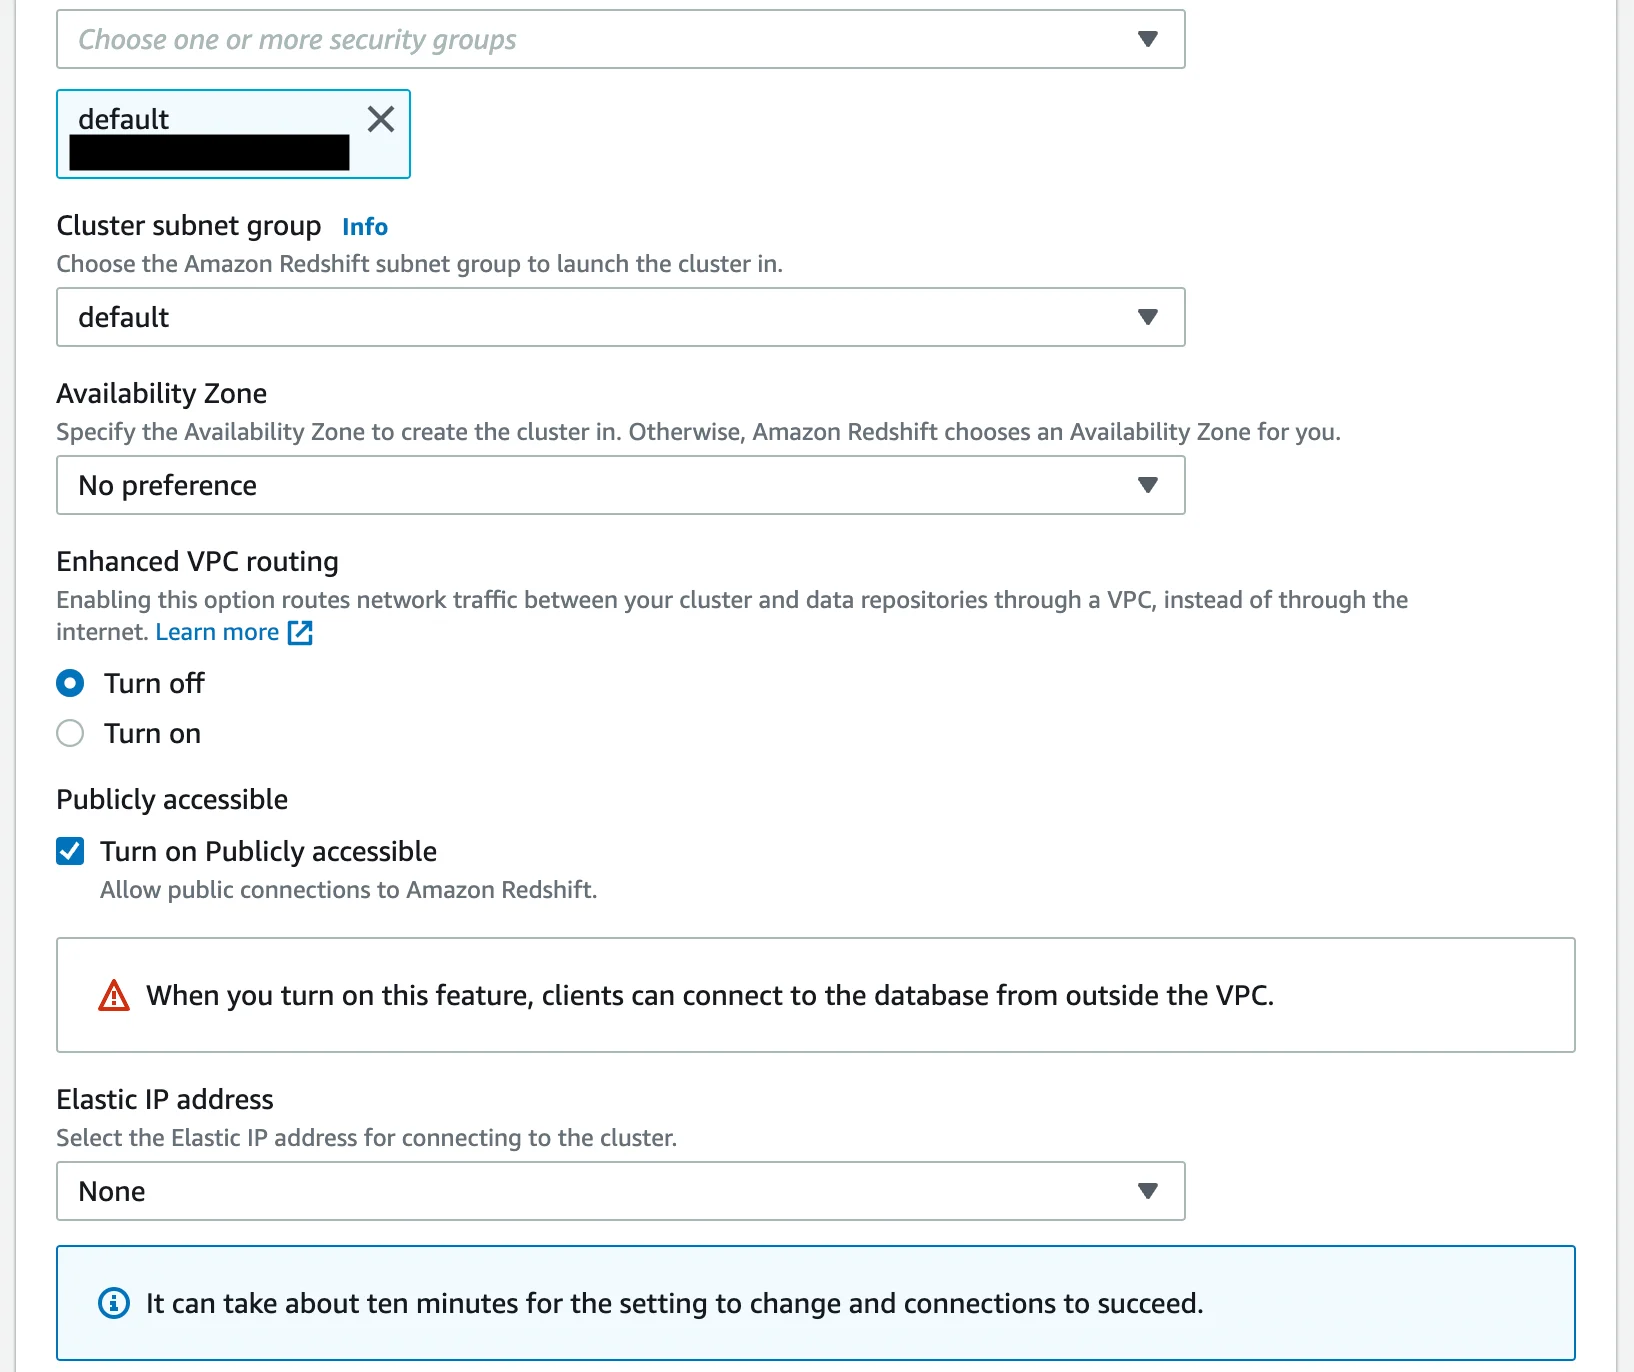
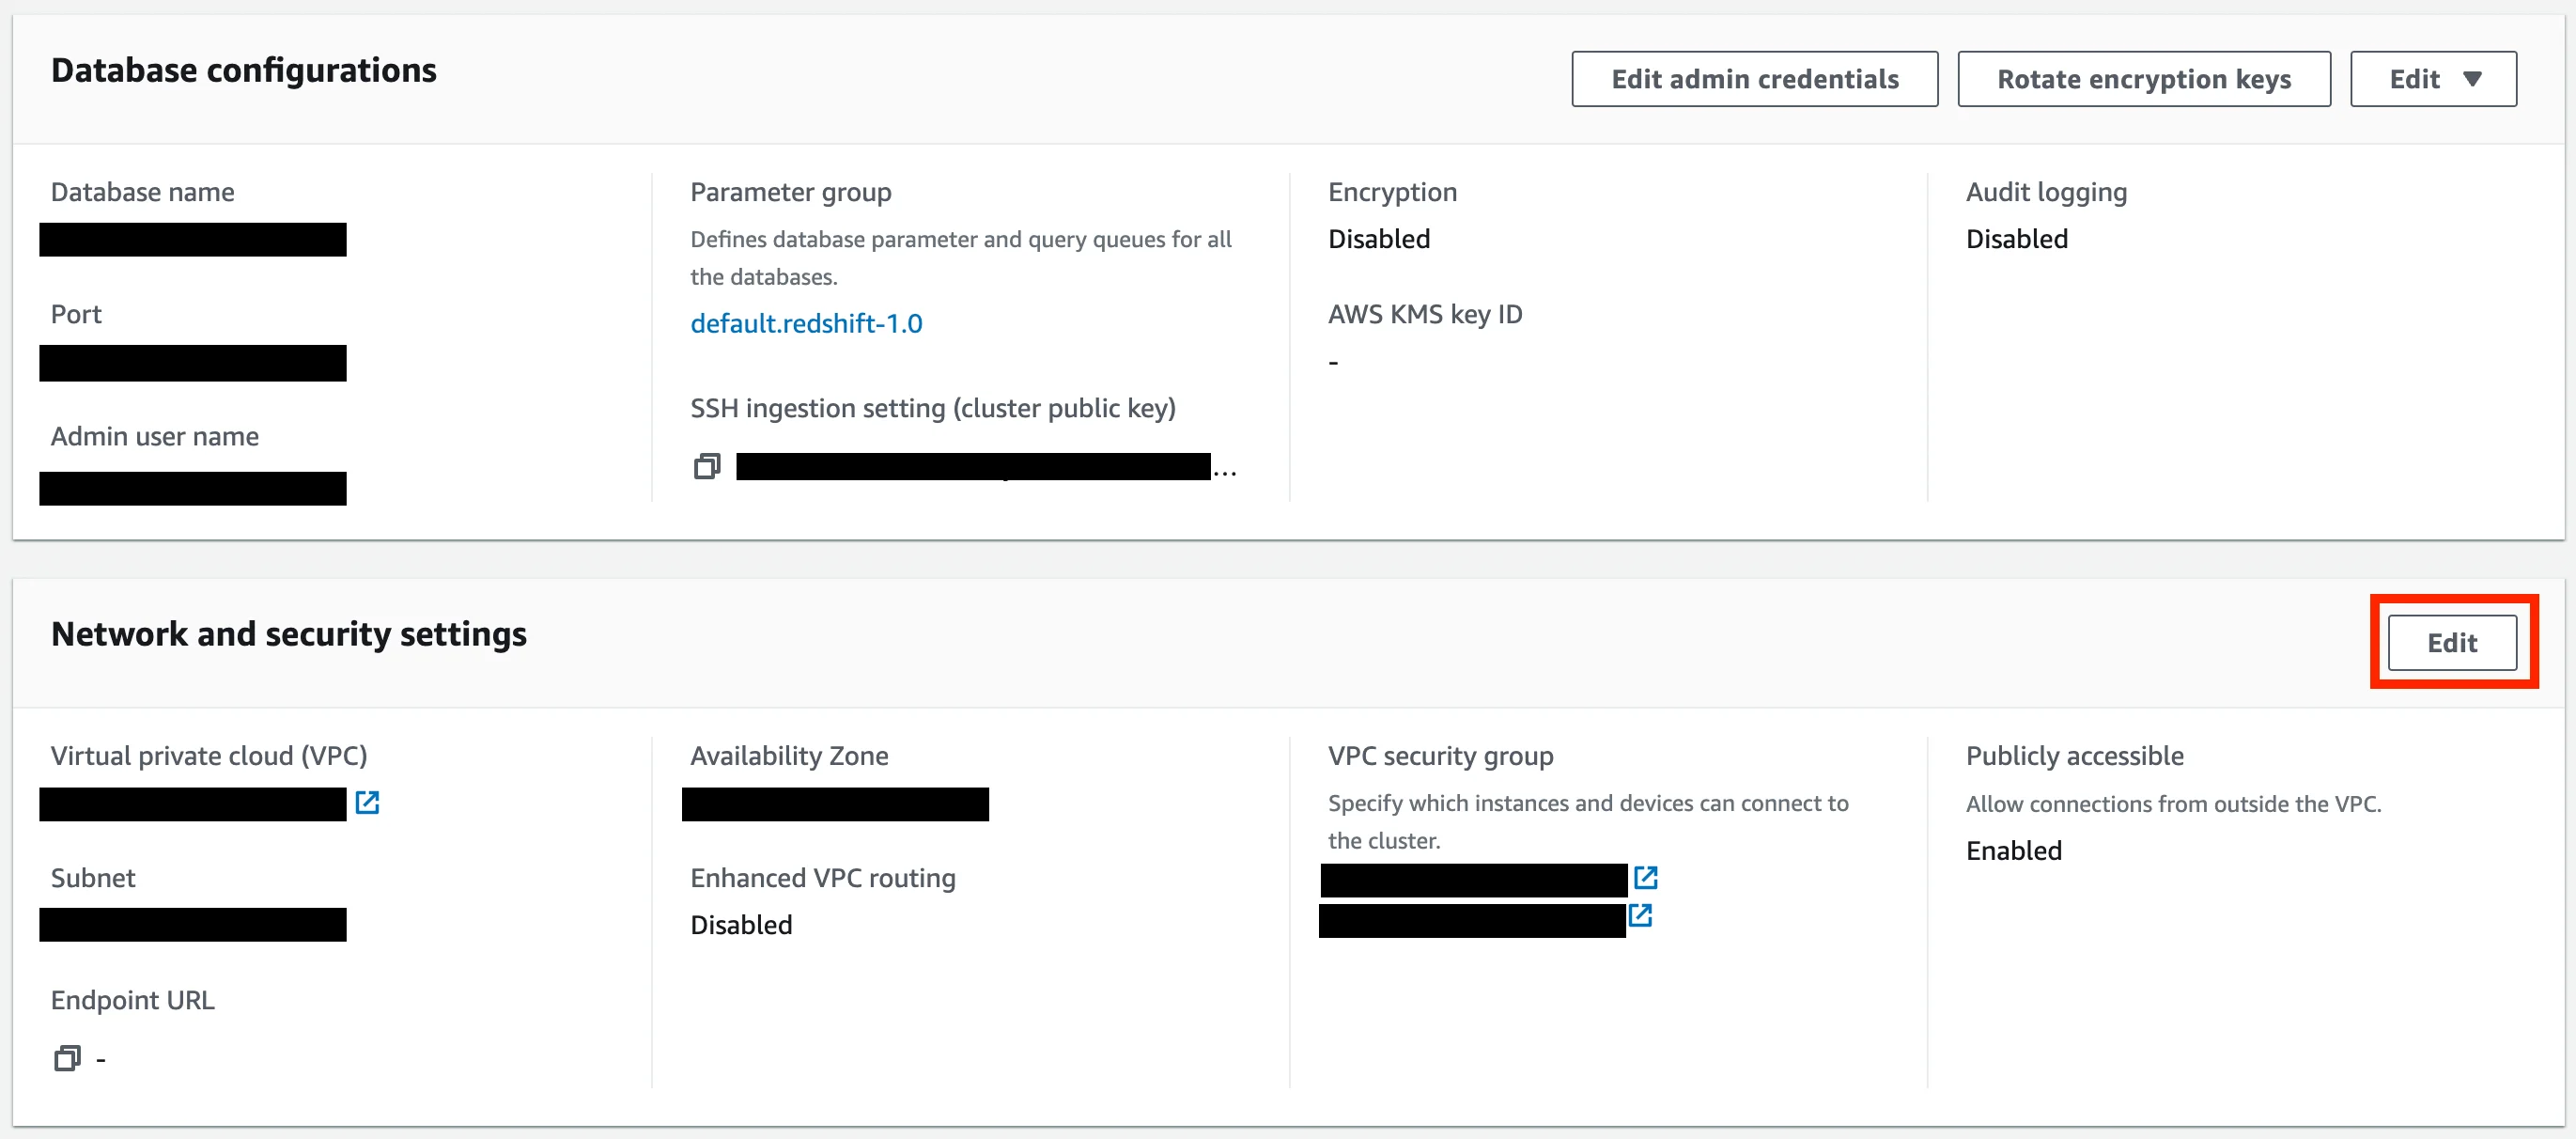
- If you already have a Redshift cluster, under the Properties tab, look for Network and Security section. Click on the “Edit” button.

Step 2: Create a new database user for MoEngage
We will connect to your Redshift cluster using the credentials you provide. It is recommended to create a new user with limited permissions just for MoEngage. You can also provide an existing user’s credentials. To create a new dedicated user, run the below commands in your Redshift cluster:Step 3: Allow MoEngage IPs to access your cluster
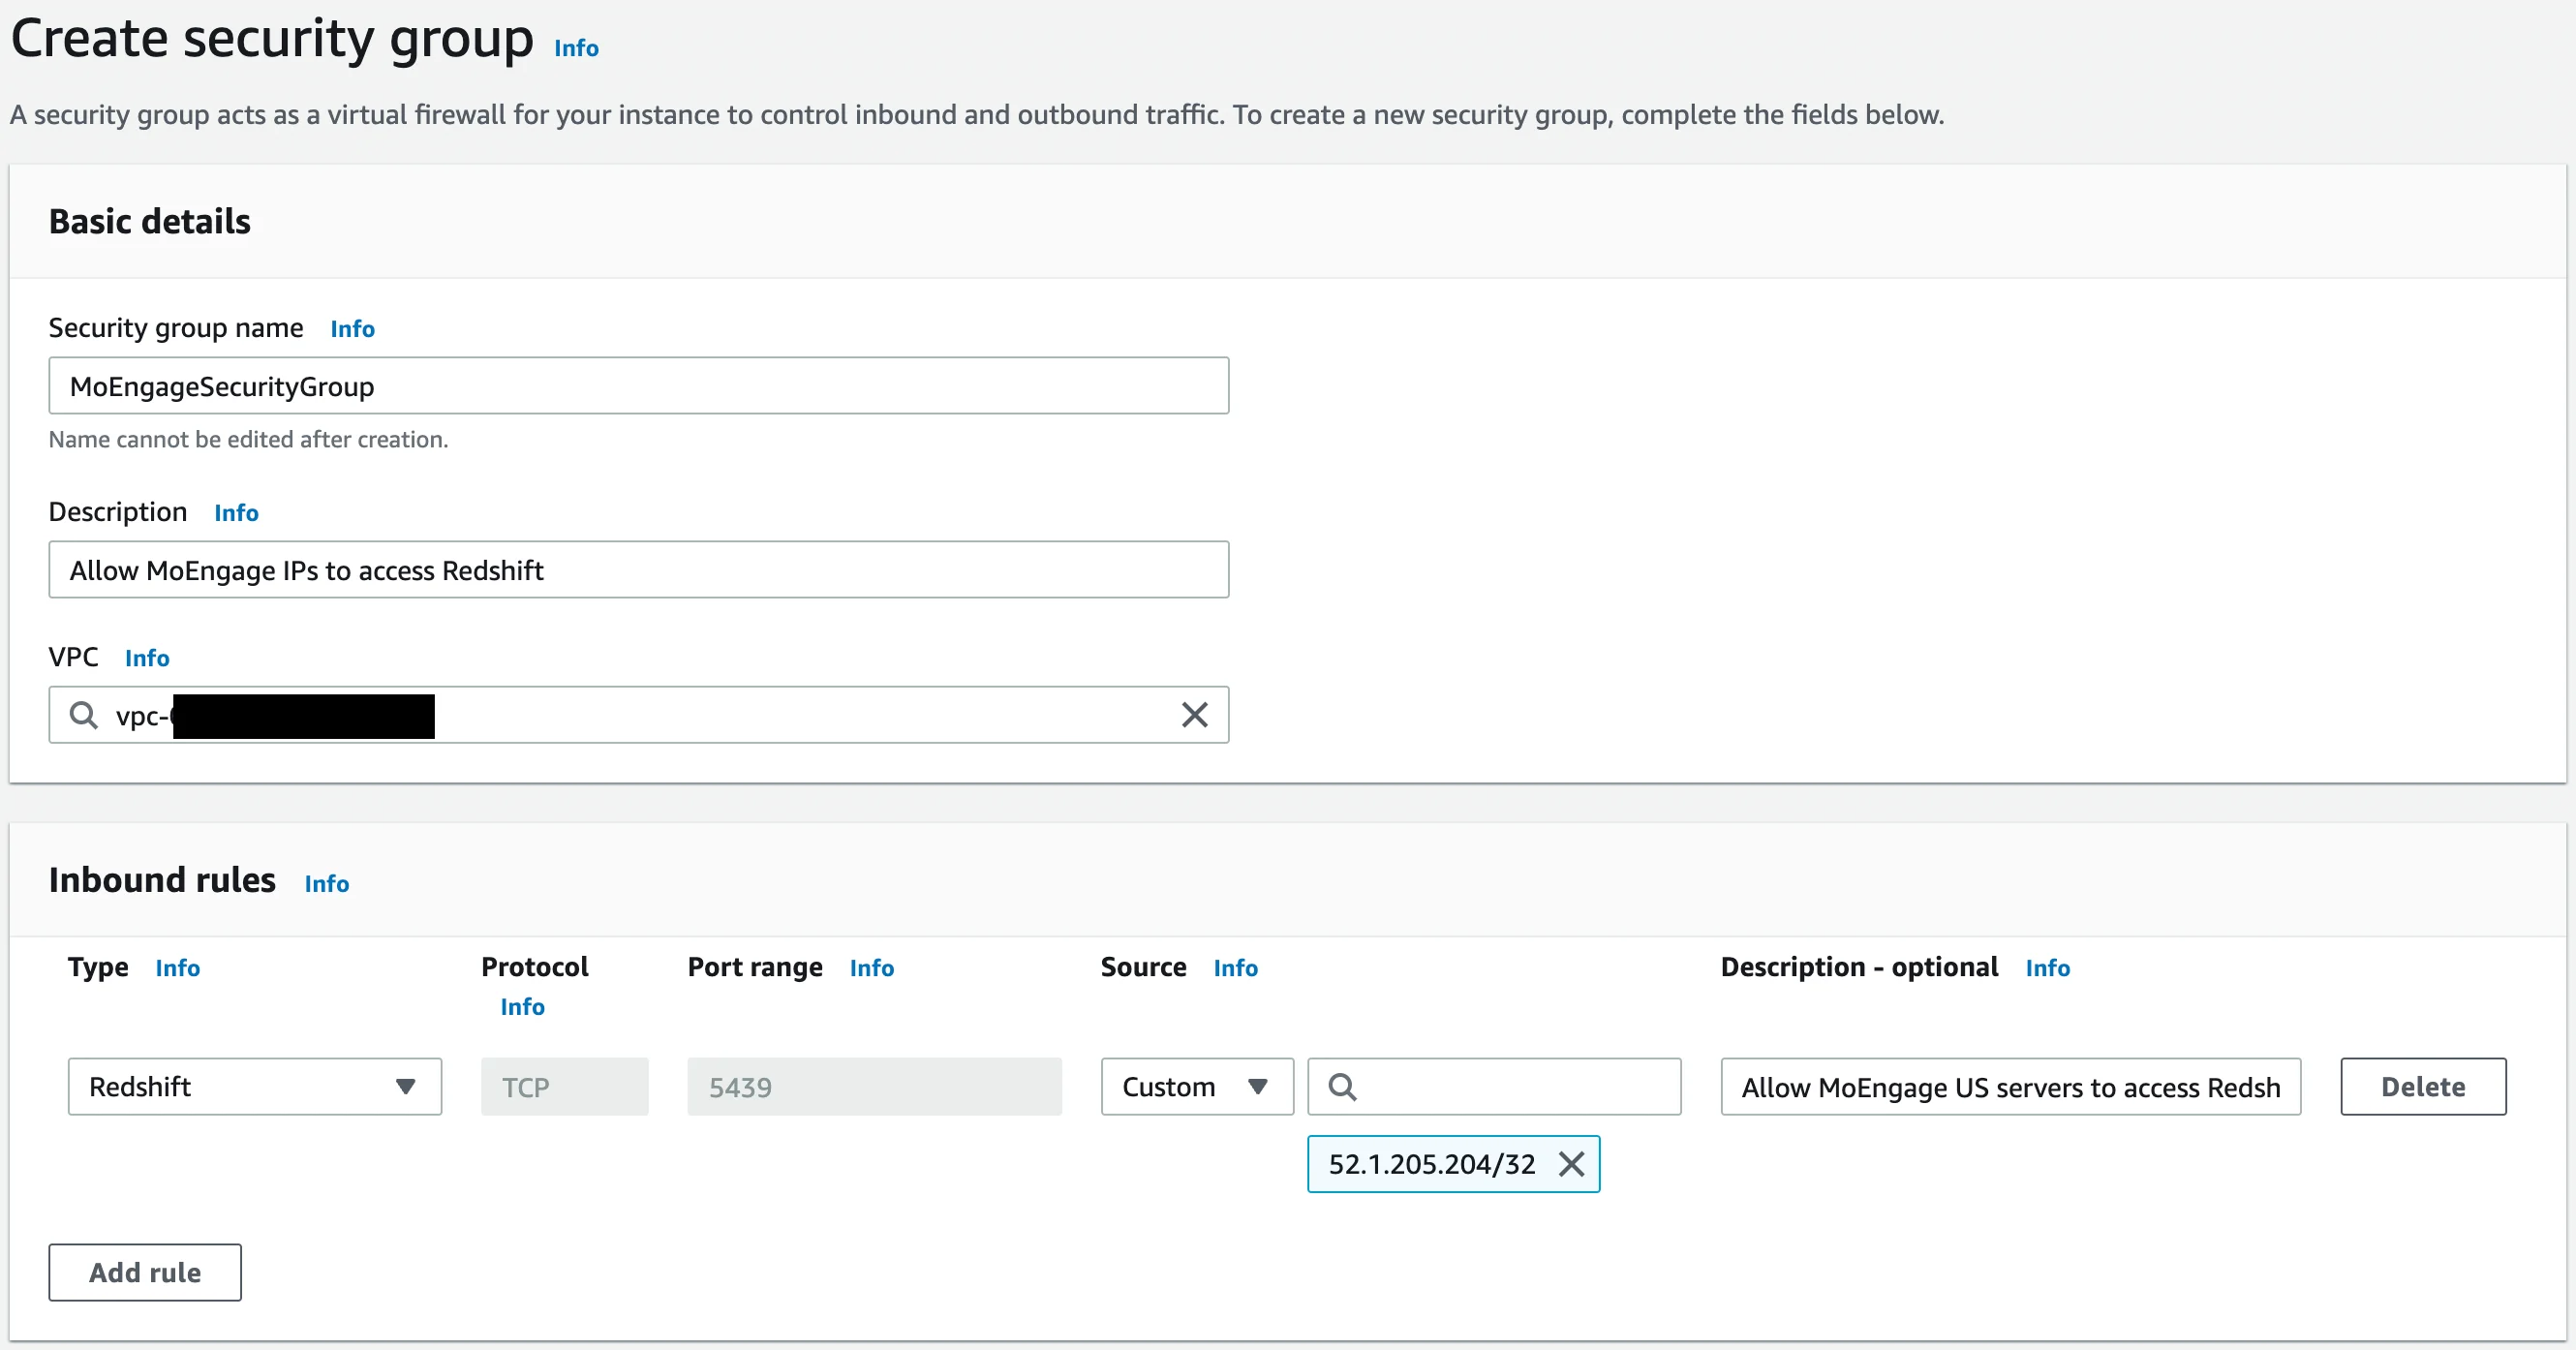
You can either choose to create a new security group or edit your existing one.Create a new Security Group
From your EC2 Console, under “Network & Security”, open the Security Groups page. Click on the “Create security group” button.- Give your Security Group a name, and an optional description.
- Select the VPC (by default, it is already selected).
- Add a new inbound rule with the following details:
| Property | Value |
|---|---|
| Type | Redshift |
| Protocol | TCP |
| Port range | 5439 |
| Source | From the dropdown, select Custom. In the CIDR block: Depending on your MoEngage Dashboard’s data center, you need to enter the corresponding CIDR. Refer to the table below. |
| Description | Give an optional description. |
| Data Center Region | CIDR block |
|---|---|
| DC-01 | 52.1.205.204/32 |
| DC-02 | 18.195.110.23/32 |
| DC-03 | 3.6.251.95/32 |
| DC-04 | 10.22.3.193/32 |
- Leave the outbound rules empty.
- Click on “Create security group” when done.
Edit an existing Security Group
From your EC2 Console, under “Network & Security”, open the Security Groups page. From the list of your Security Groups, open the one you want to edit.- Click on the “Actions” button on the security group page and select “Edit inbound rules”.
- Add a new inbound rule according to the table provided above.
- Click “Save rules” when done.
Attach the Security Group to your Redshift Cluster
- From your Redshift Console, open your Redshift cluster. Go to the Properties tab.
- In the “Network & Security settings” section, click on the “Edit” button.
- Under the VPC security groups, select the Security Group you just created/edited.
- Click “Save changes” when done.
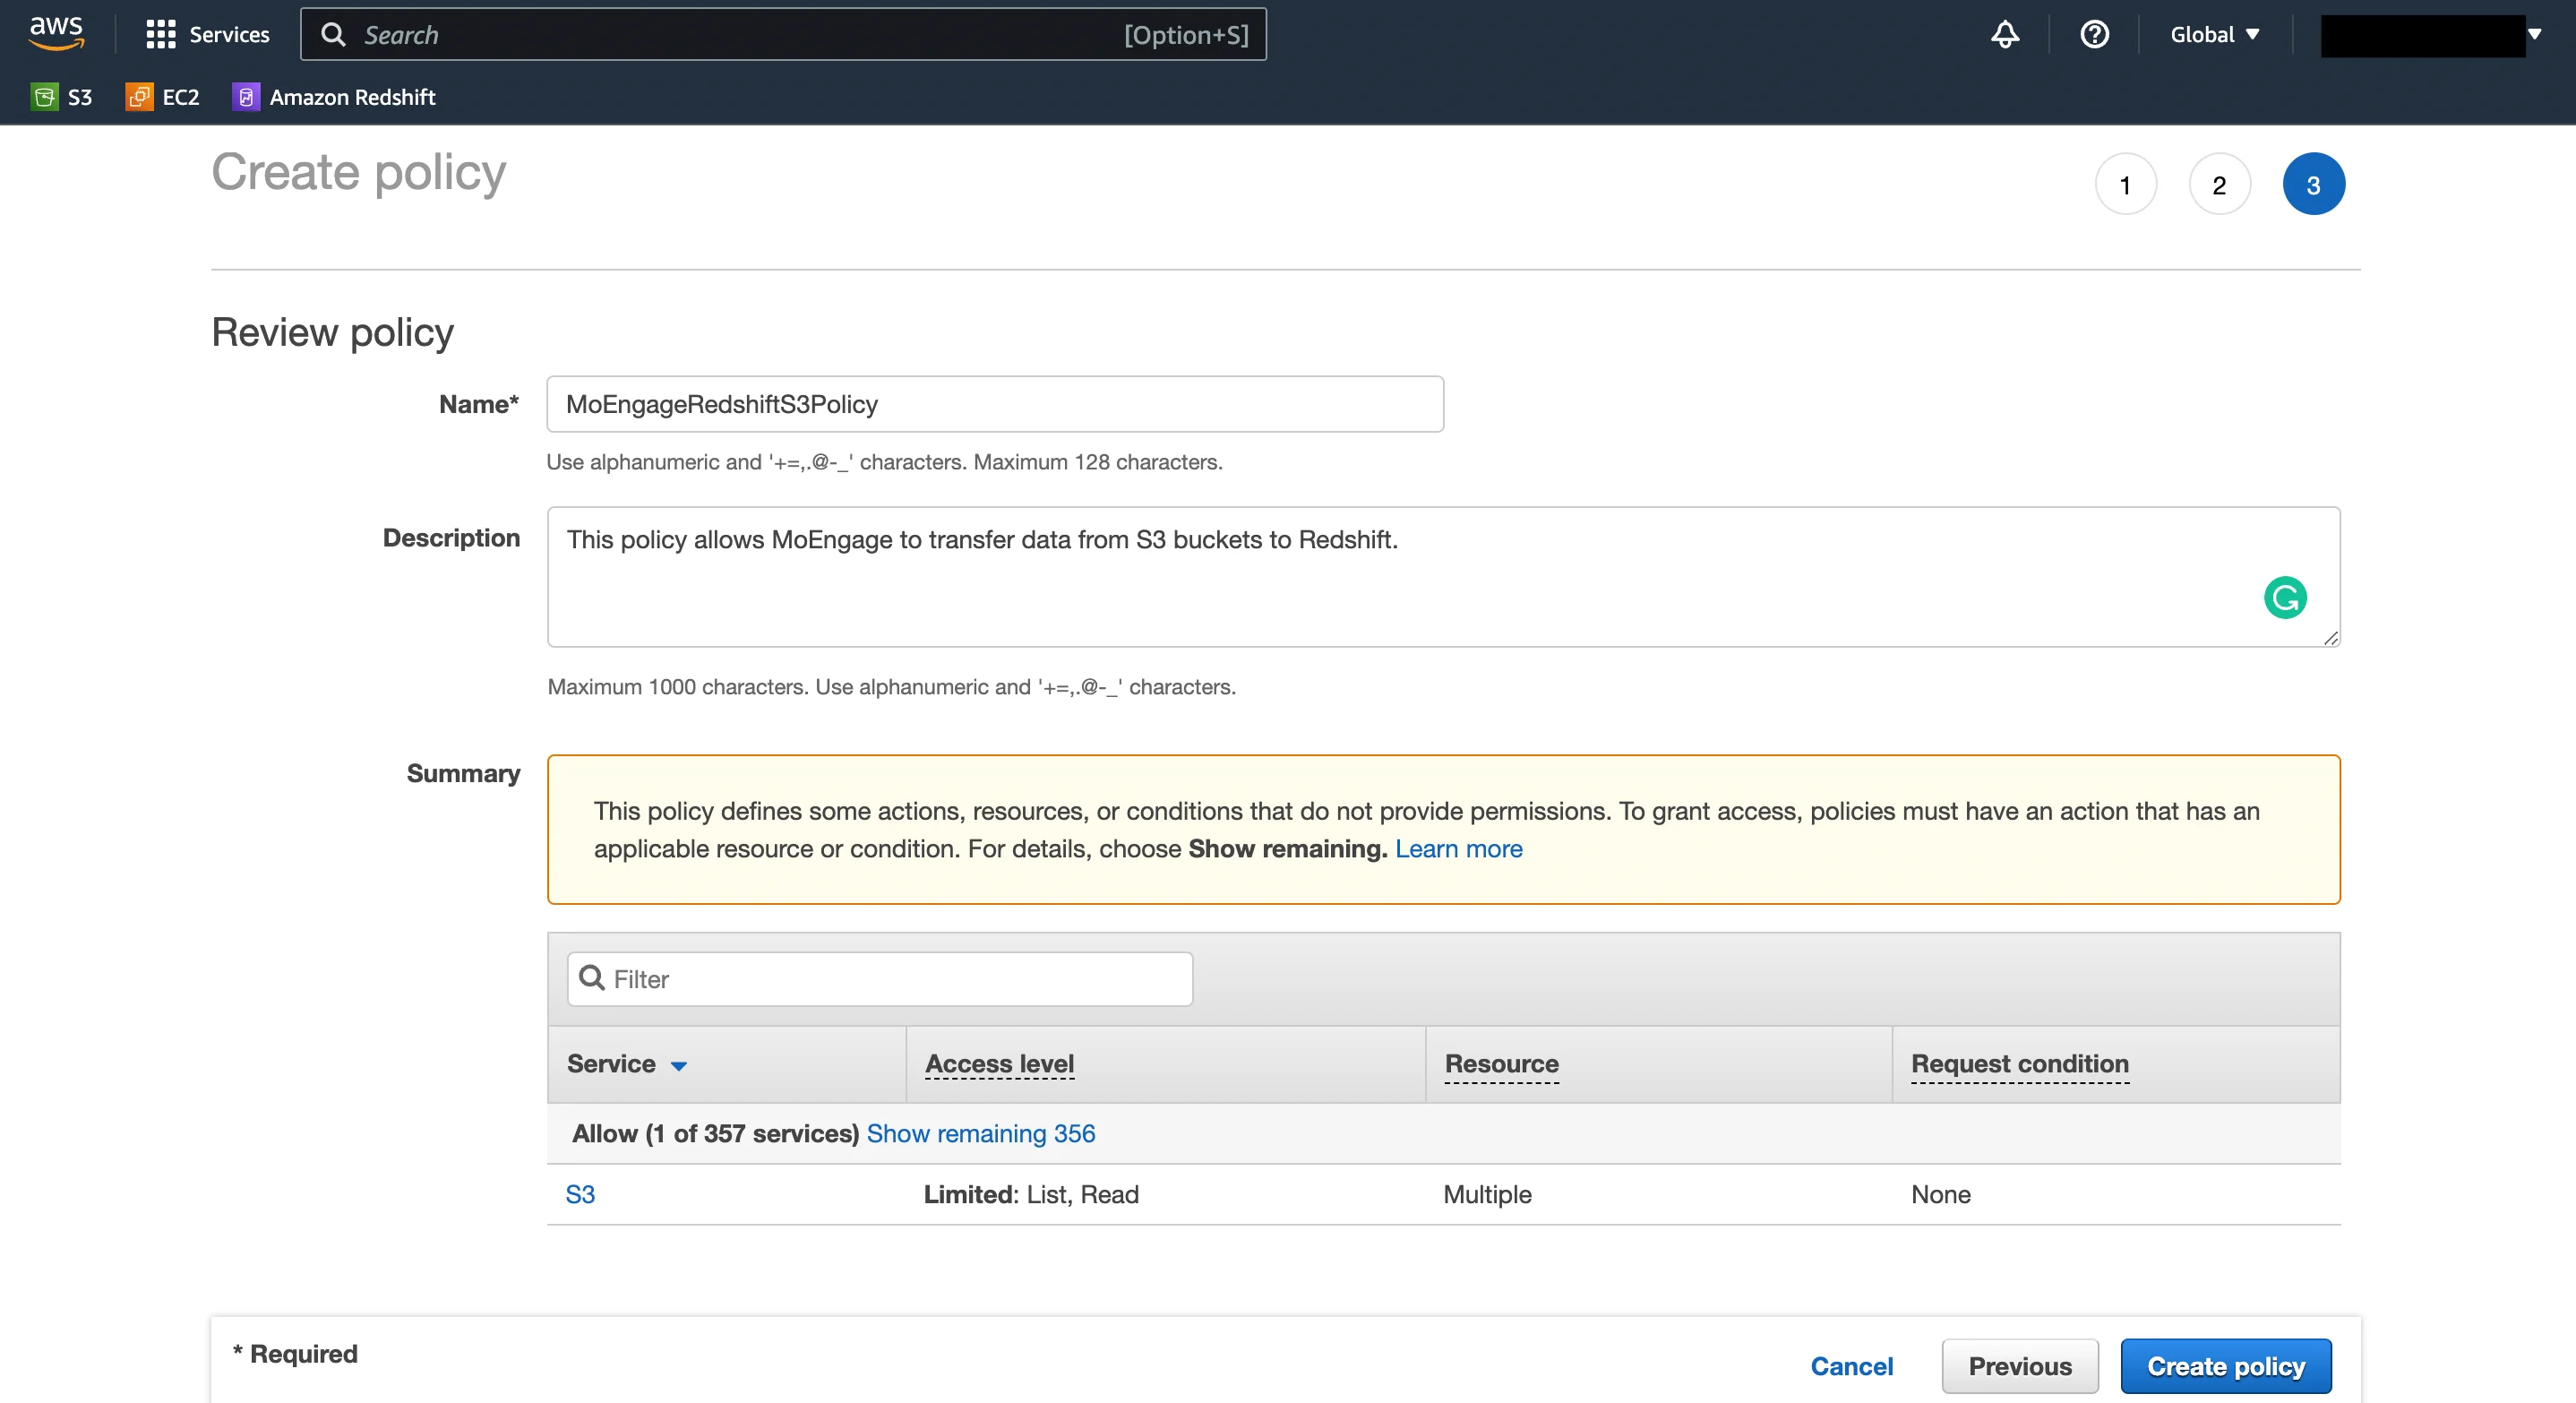
Step 4: Create a new IAM Policy
You need to create a new IAM Policy that will allow us to transfer data from S3 to your Redshift cluster.
- From the IAM Console, under Access Management, go to Policies. Click on the “Create policy” button.
- On the Create Policy page, switch to the JSON tab and paste the following policy:
<bucket-arn> will change based on your MoEngage Data Center Region:
| Data Center Region | <bucket-arn> | Resource Array |
|---|---|---|
| DC-01 | arn:aws:s3:::moe-warehouse-exports-us-east-1 | "Resource": ["arn:aws:s3:::moe-warehouse-exports-us-east-1", "arn:aws:s3:::moe-warehouse-exports-us-east-1/*"] |
| DC-02 | arn:aws:s3:::moe-warehouse-exports-eu-central-1 | "Resource": ["arn:aws:s3:::moe-warehouse-exports-eu-central-1", "arn:aws:s3:::moe-warehouse-exports-eu-central-1/*"] |
| DC-03 | arn:aws:s3:::moe-warehouse-exports-ap-south-1 | "Resource": ["arn:aws:s3:::moe-warehouse-exports-ap-south-1", "arn:aws:s3:::moe-warehouse-exports-ap-south-1/*"] |
| DC-04 | arn:aws:s3:::moe-warehouse-exports-us-east-2 | "Resource": ["arn:aws:s3:::moe-warehouse-exports-us-east-2", "arn:aws:s3:::moe-warehouse-exports-us-east-2/*"] |
<bucket-arn> with the one corresponding to your MoEngage Data Center region.
 Click “Next” and optionally, add tags. Then click on “Next: Review”.
- Give the Policy a name, and an optional description. Click “Create policy” when ready.
Step 5: Create a new Redshift IAM role
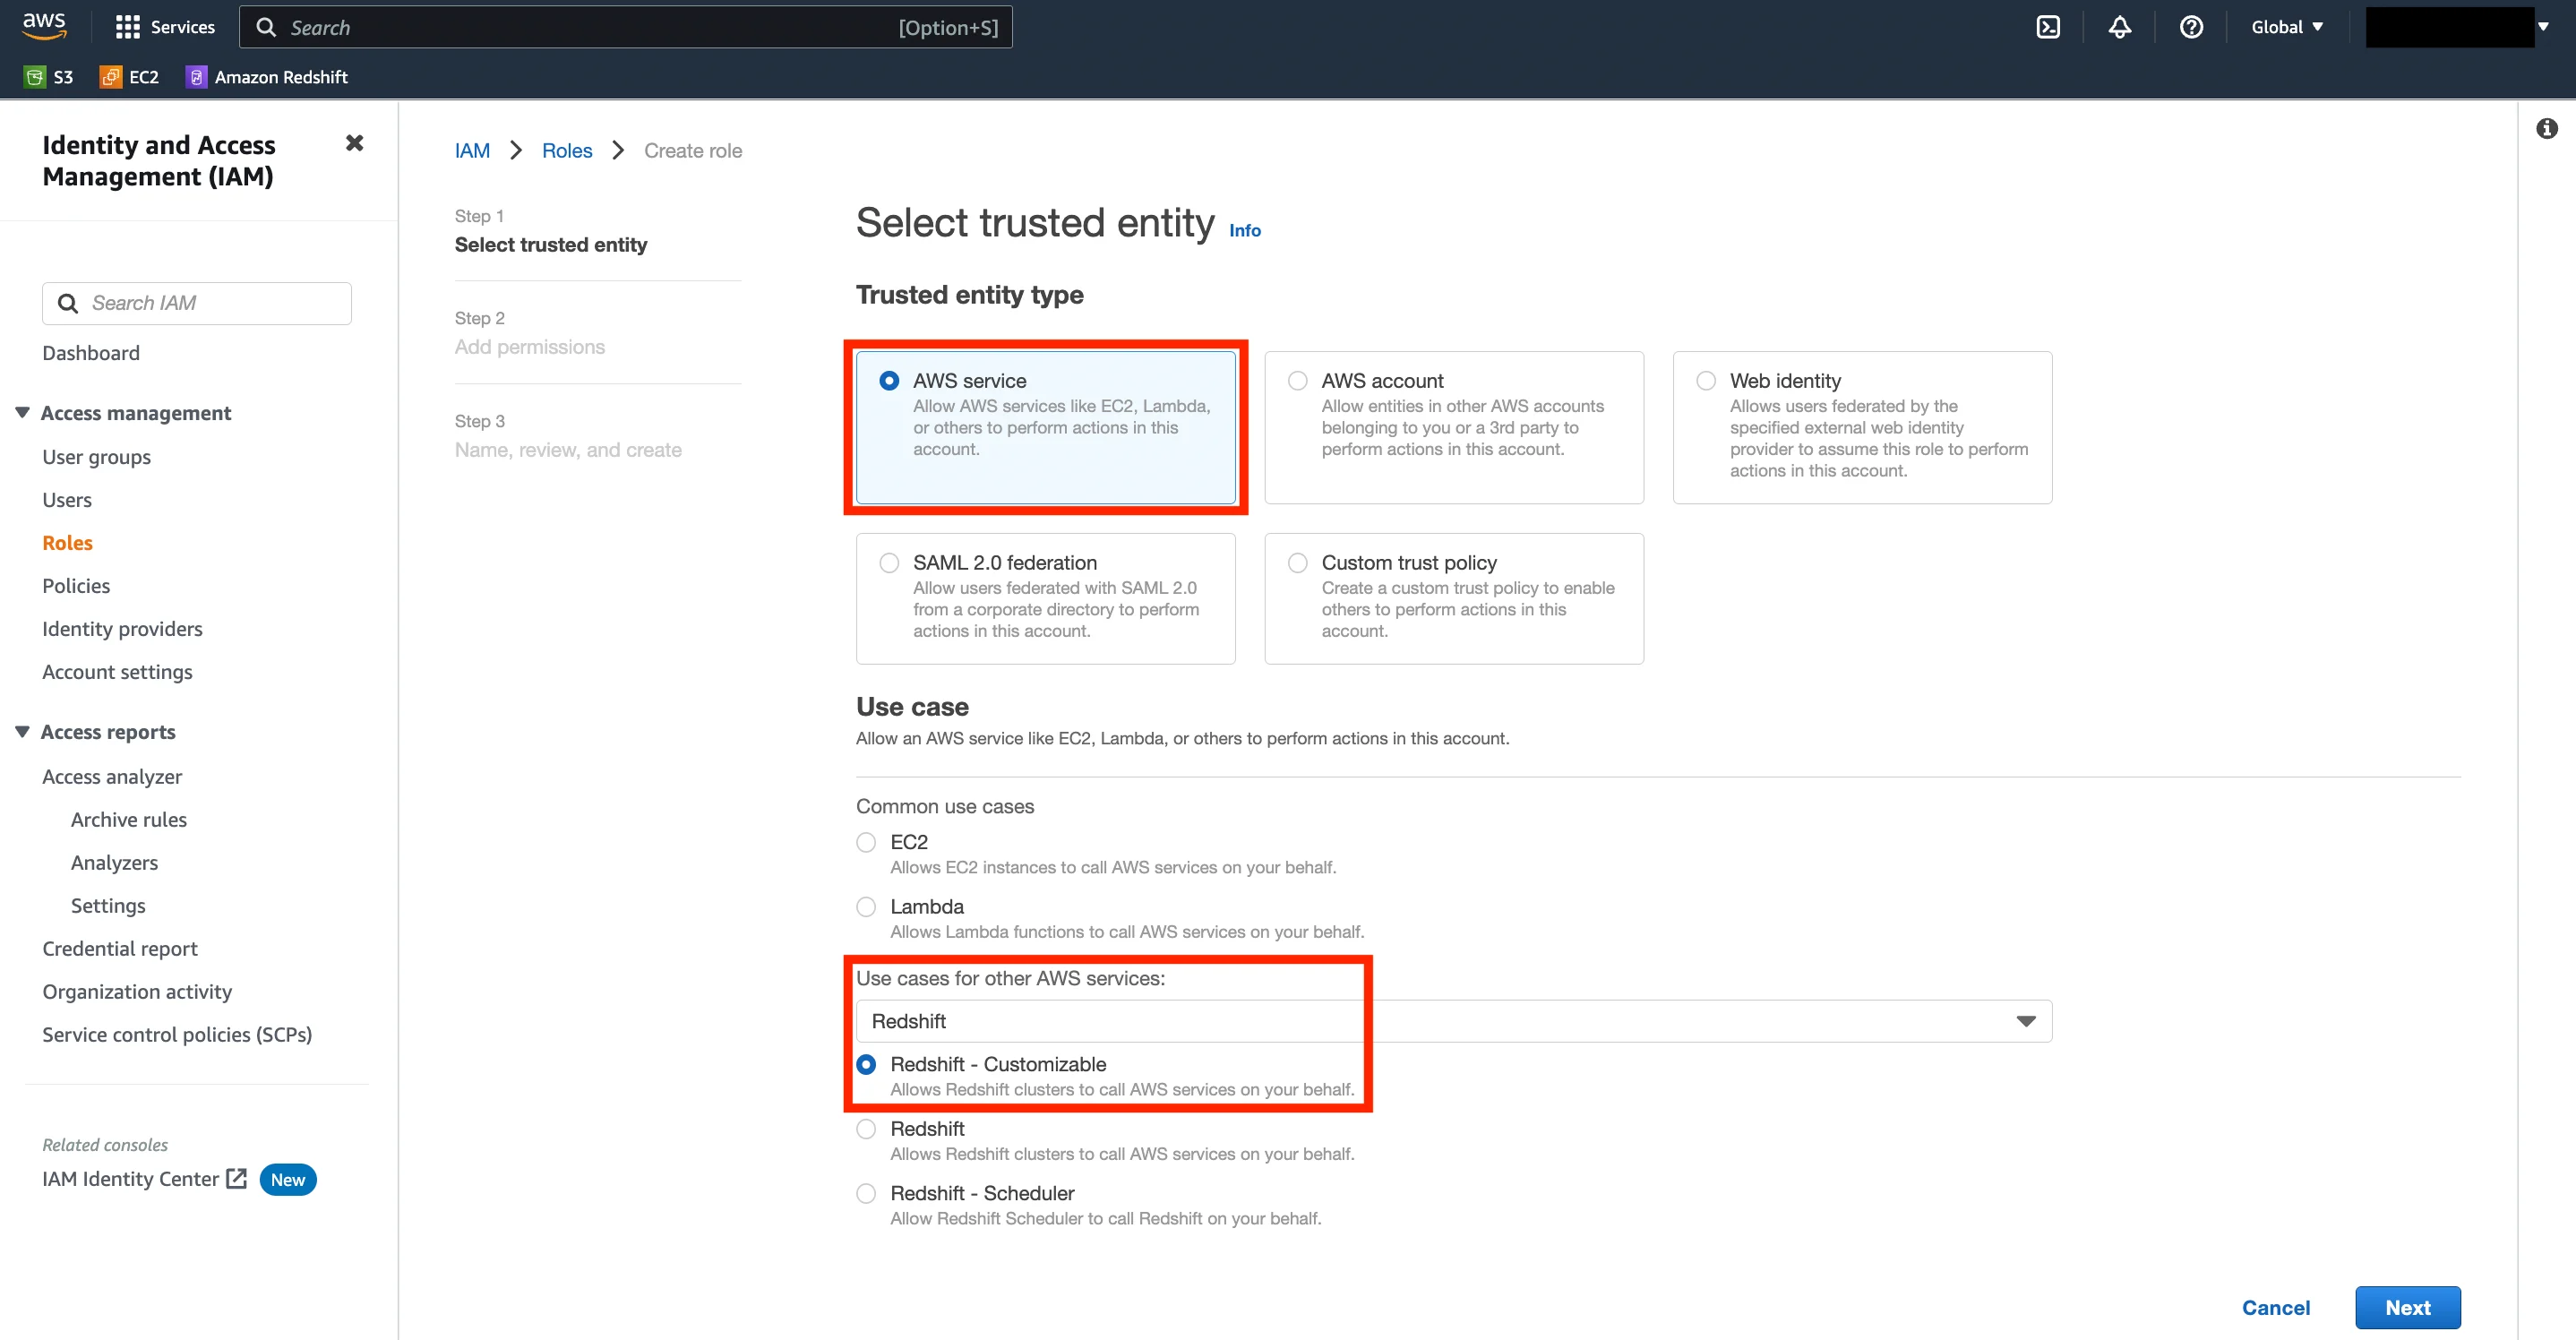
This role will allow our servers to write data to your Redshift clusters.- From the IAM Console, under Access Management, go to Roles. Click on the “Create role” button.
- Choose the Trusted entity type as “AWS service”. Under Use Case, select “Redshift ” from “Use cases for other AWS services”. Under the types of Redshift use cases, select “Redshift - Customizable ”. Click “Next” when ready.
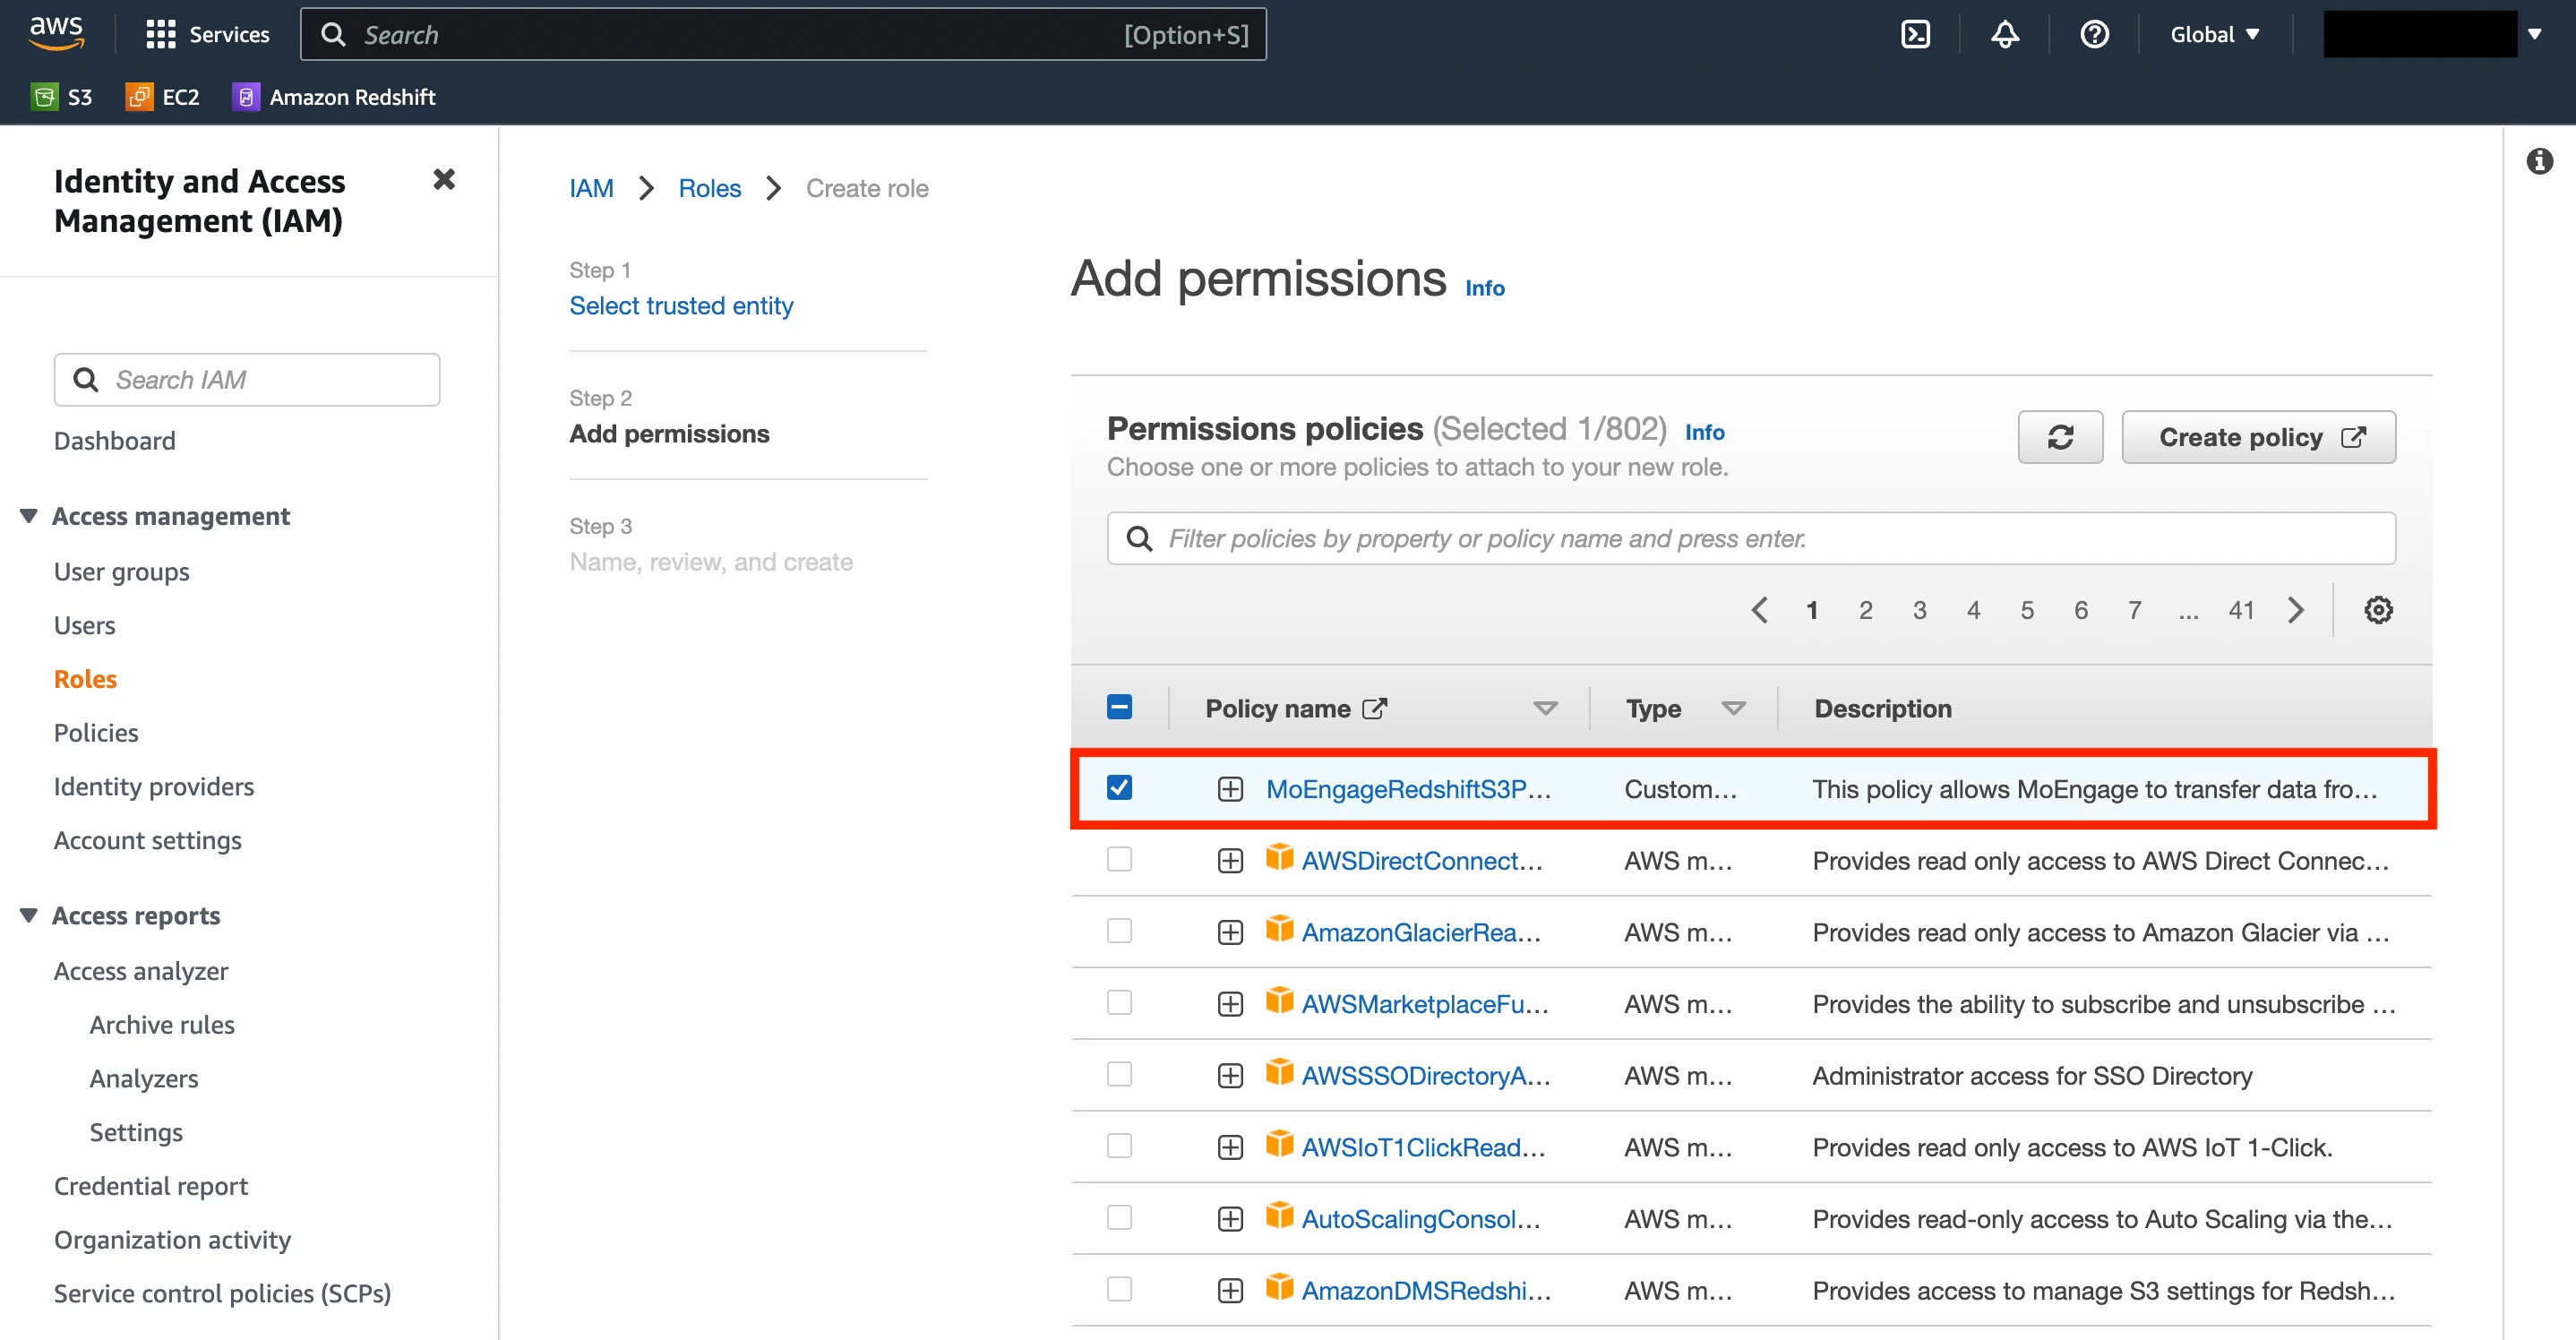
- In the next step, select the policy that you created in Step 4. Click Next when done.
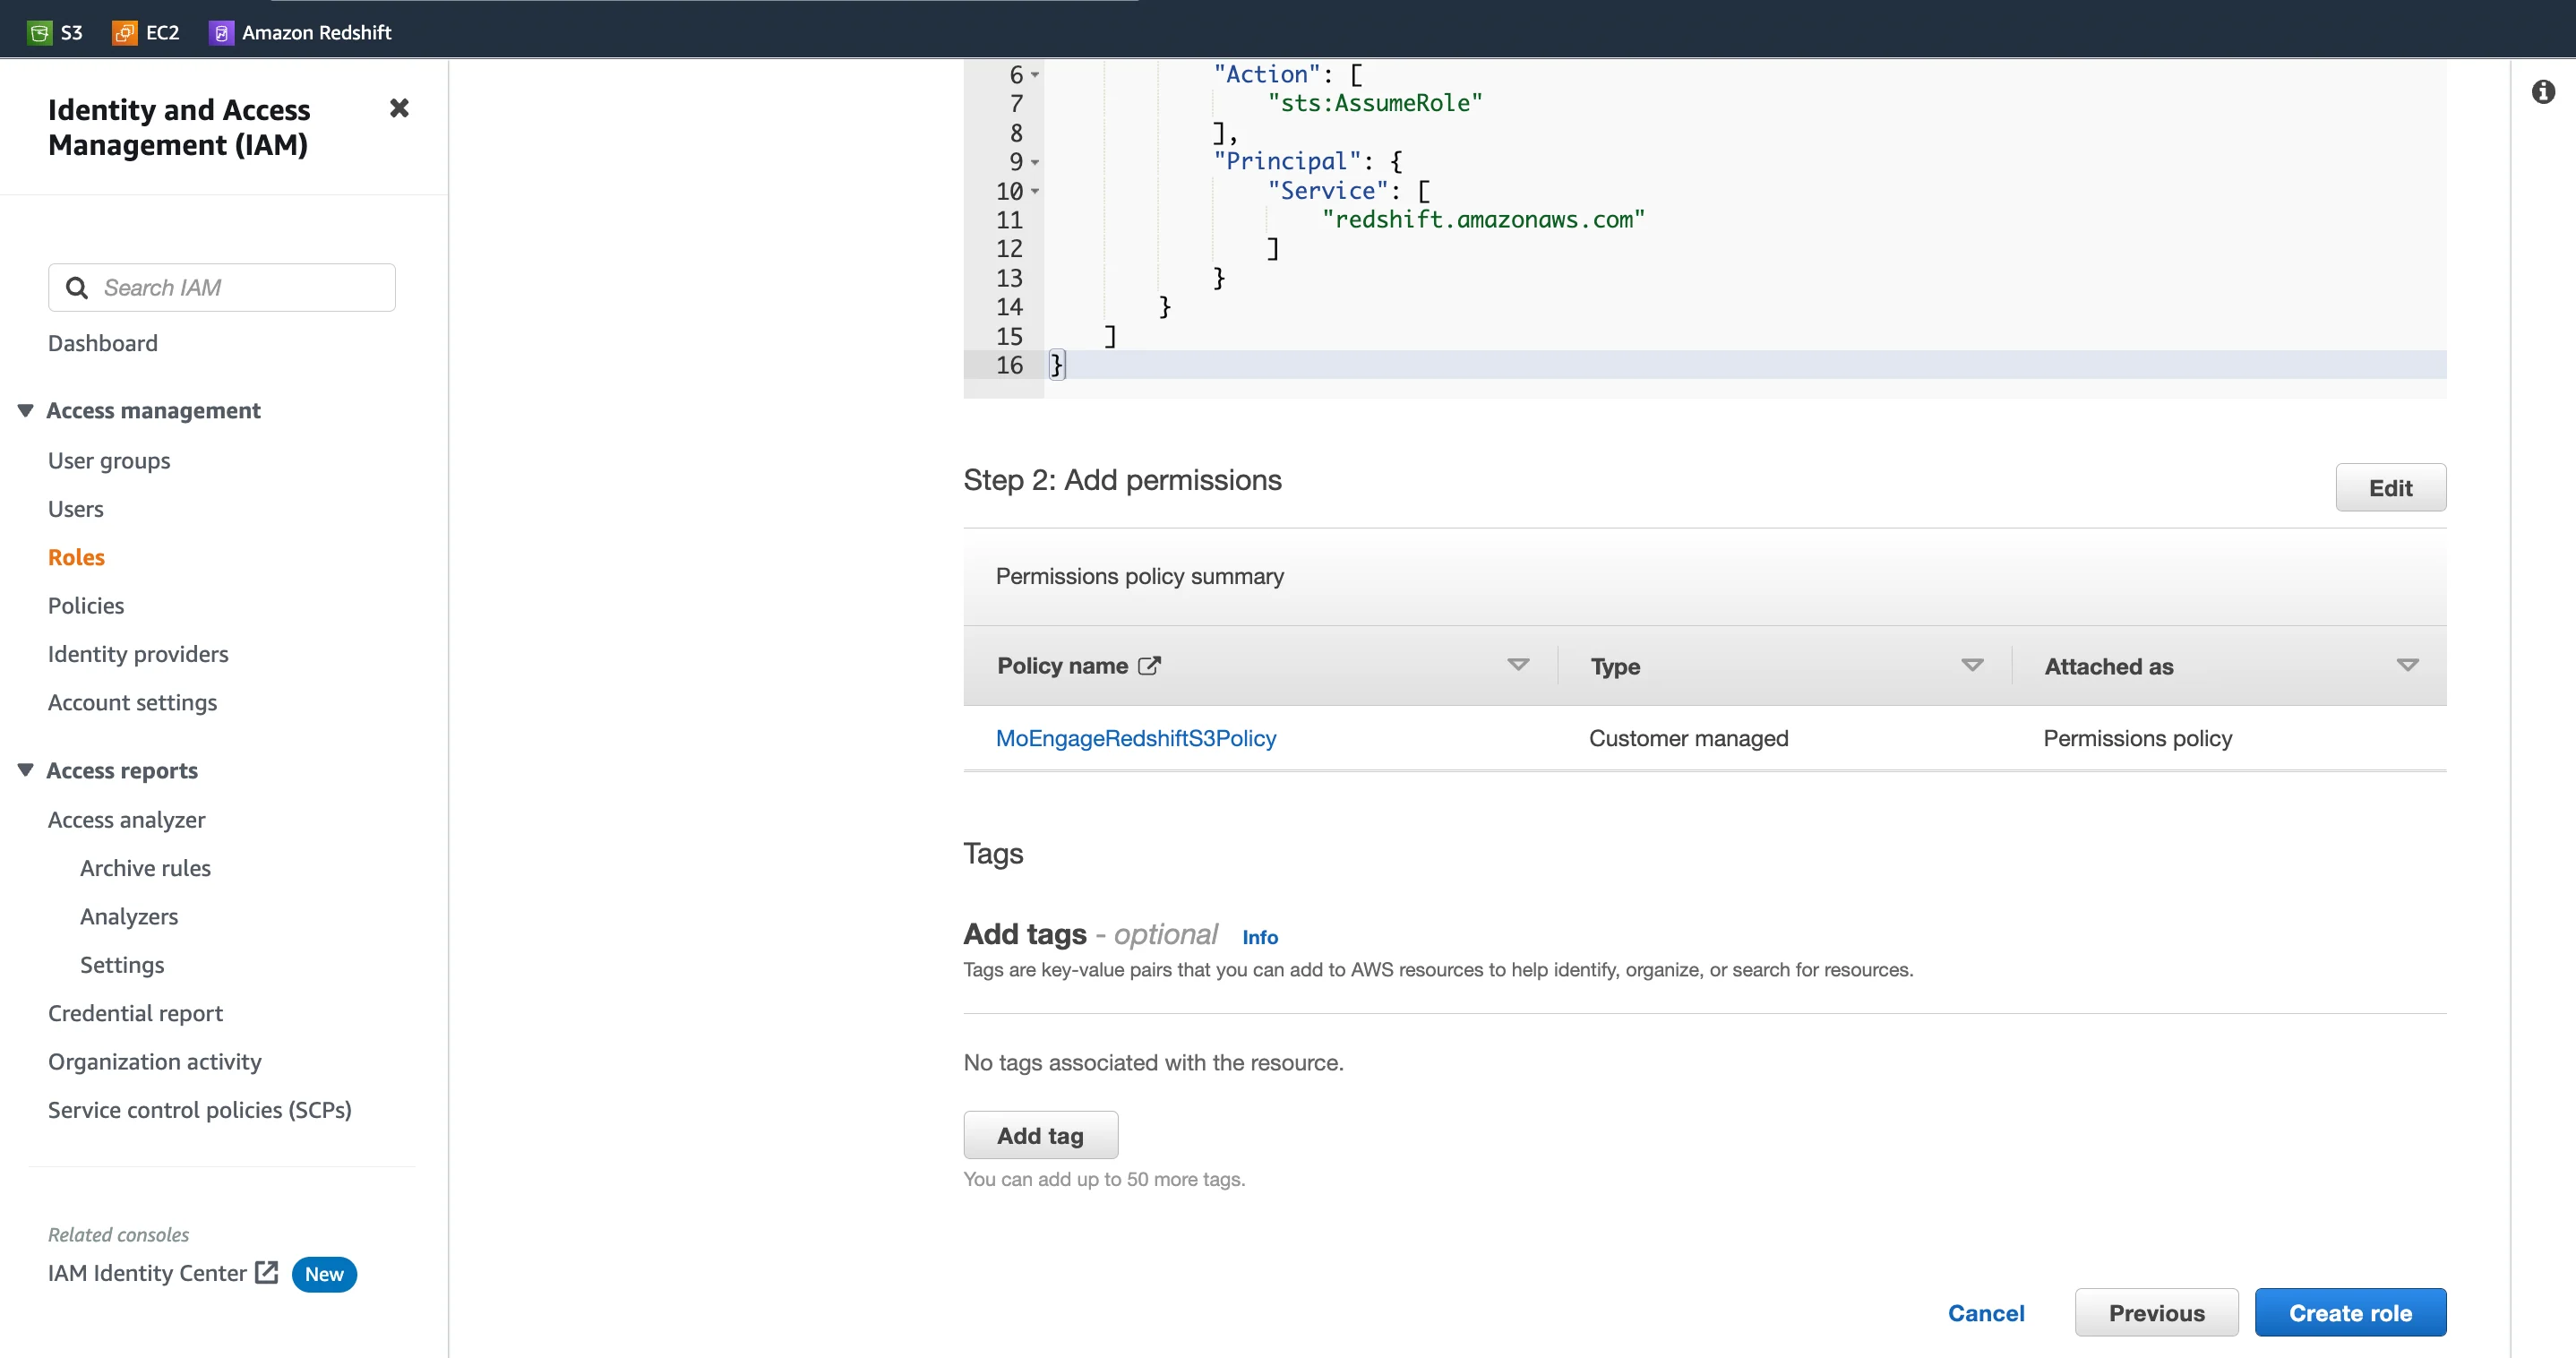
- Give your role a name, and review if you have attached the correct policy that you made earlier. Click on Create Role when ready.
Step 6: Attach this role to your Redshift cluster
From the Redshift Console, open your Redshift cluster.- Under the Properties tab, go to the “Associated IAM roles” section.
- Click on the “Manage IAM roles” button, and then select the “Associate IAM roles” option.
- From the popup modal, select the Role that you just created in Step 5.
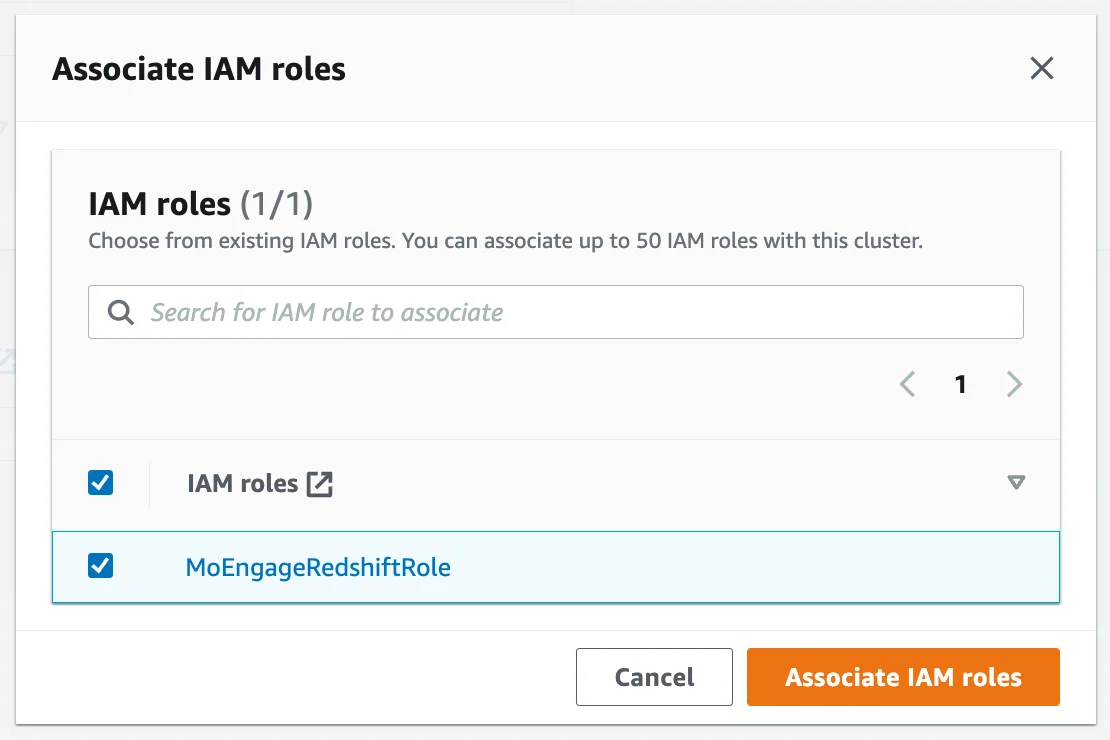
- Click on “Associate IAM roles” to attach this role to your Redshift cluster.
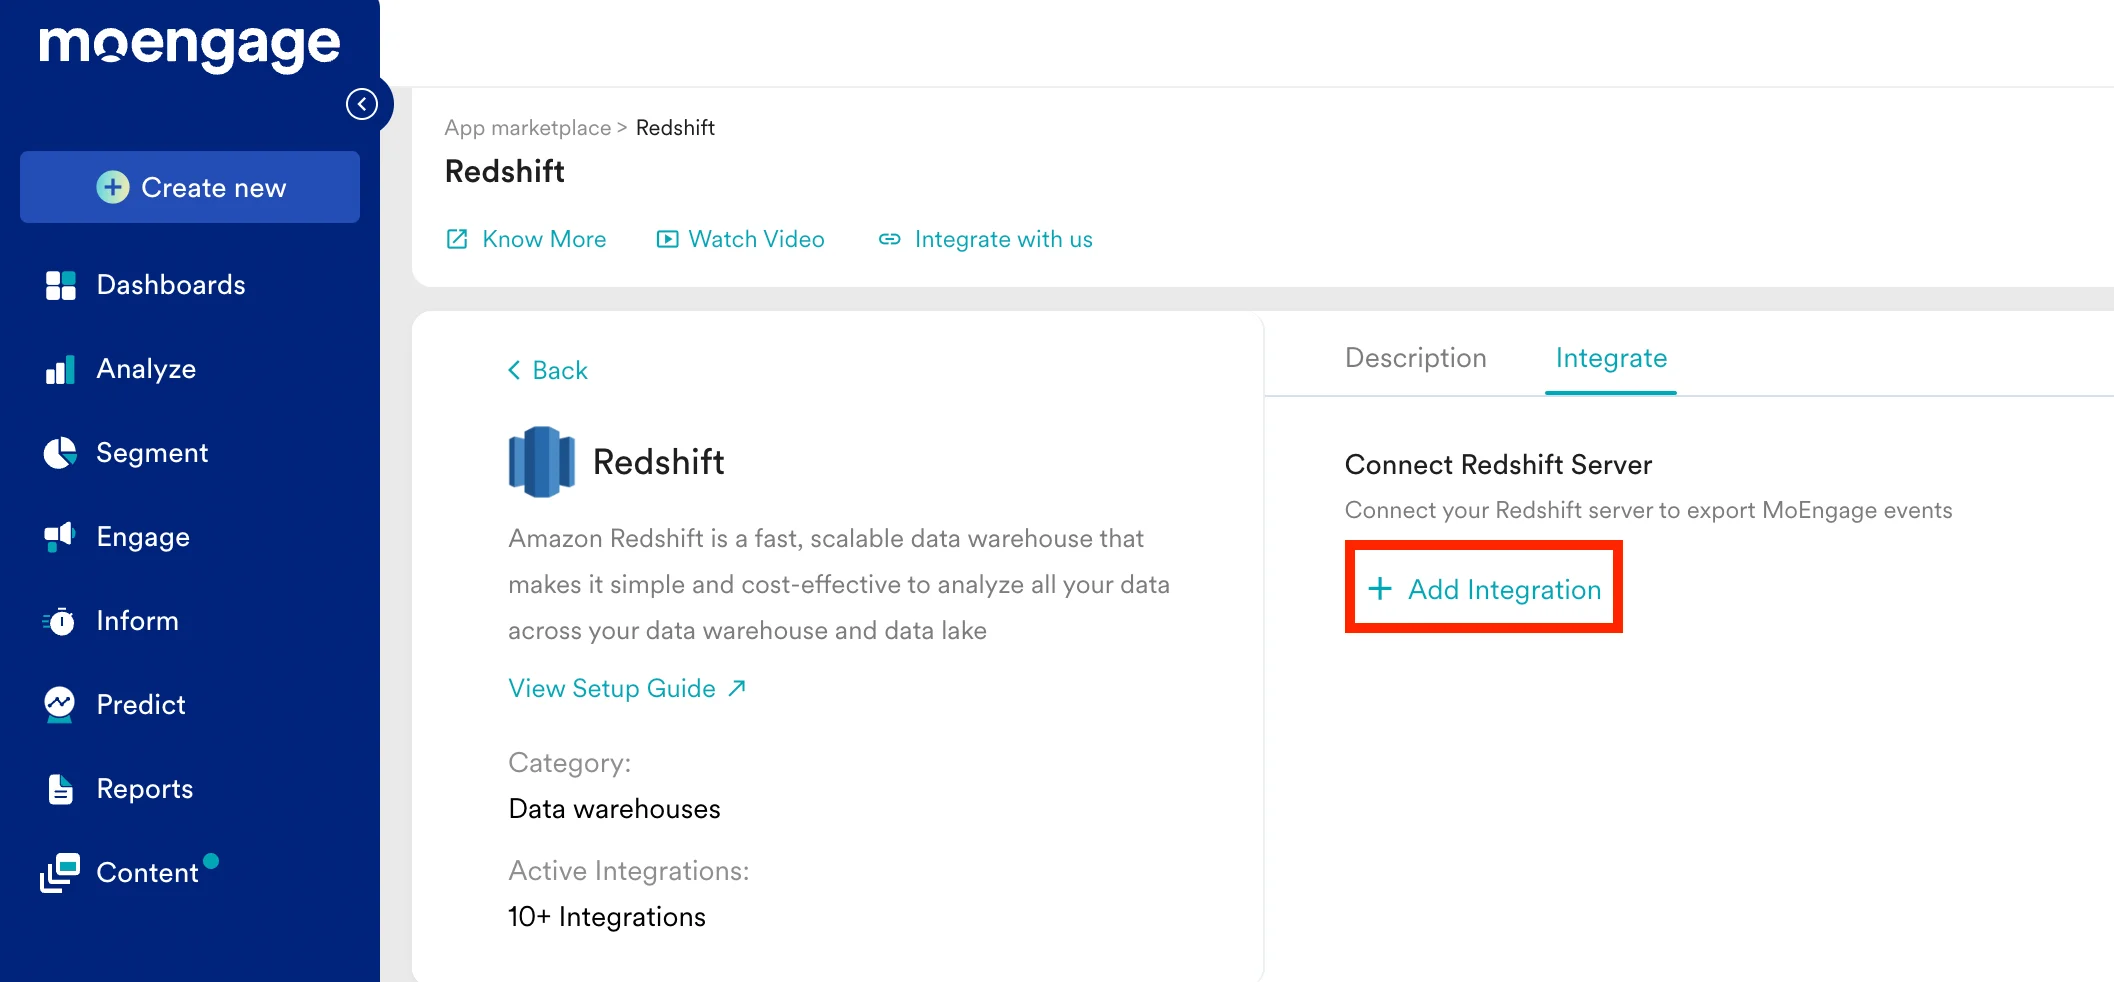
Step 7: Enable the Redshift Integration on the MoEngage App Marketplace
- On your MoEngage Dashboard, go to the App Marketplace.
- Search for “Redshift”.
- Go to the “Integrate” tab, and click on ”+ Add Integration”.
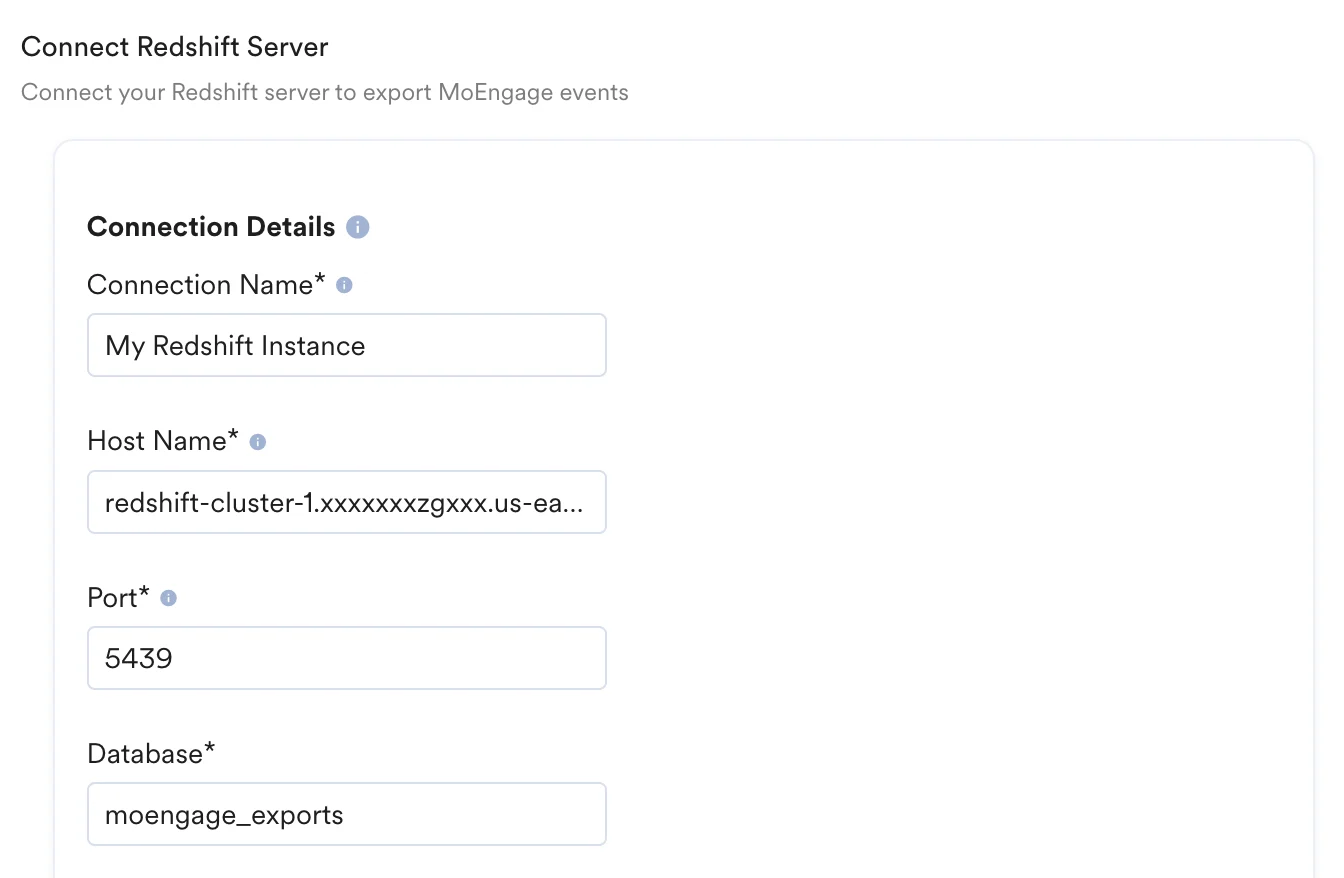
- Fill out the connection details of your Redshift cluster.
| Field | Description | Example |
|---|---|---|
| Connection Name | Give this connection an identifiable name. | My Redshift Instance 1 |
| Host Name | On your AWS Console, navigate to your Redshift cluster. Under General information, the hostname is listed as your Redshift endpoint. Paste the part before the colon :. For example, if the Endpoint is redshift-cluster-1.xxxxxxxzgxxx.us-east-1.redshift.amazonaws.com:5439/dev then your Host Name will be redshift-cluster-1.xxxxxxxzgxxx.us-east-1.redshift.amazonaws.com. 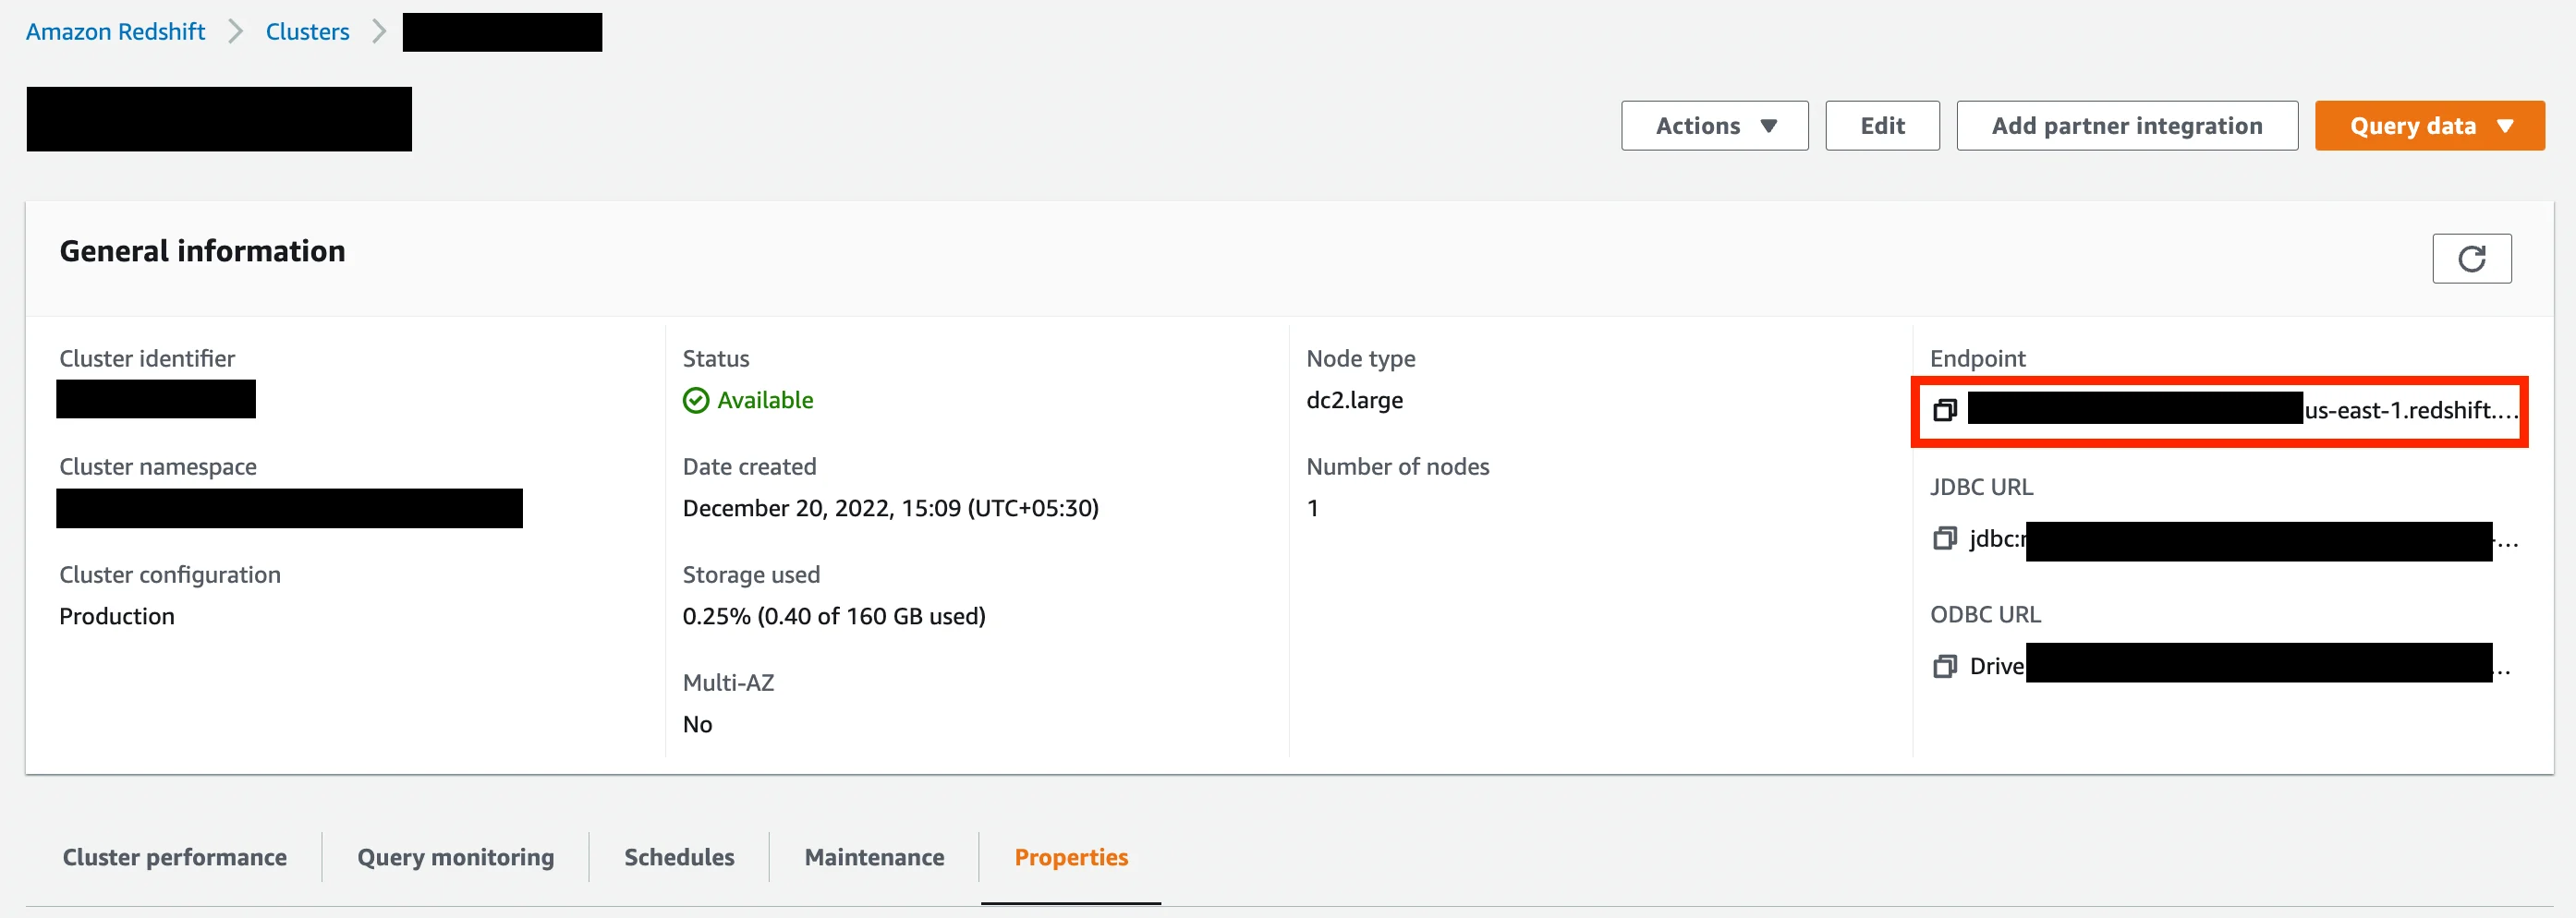 | Format should be [name].[id].[region].redshift.amazonaws.com |
| Port | Enter your port number. On your AWS Console, navigate to your Redshift cluster. Under the Properties tab, find your port number and database name in the Database configurations. By default, the Redshift port number is 5439. 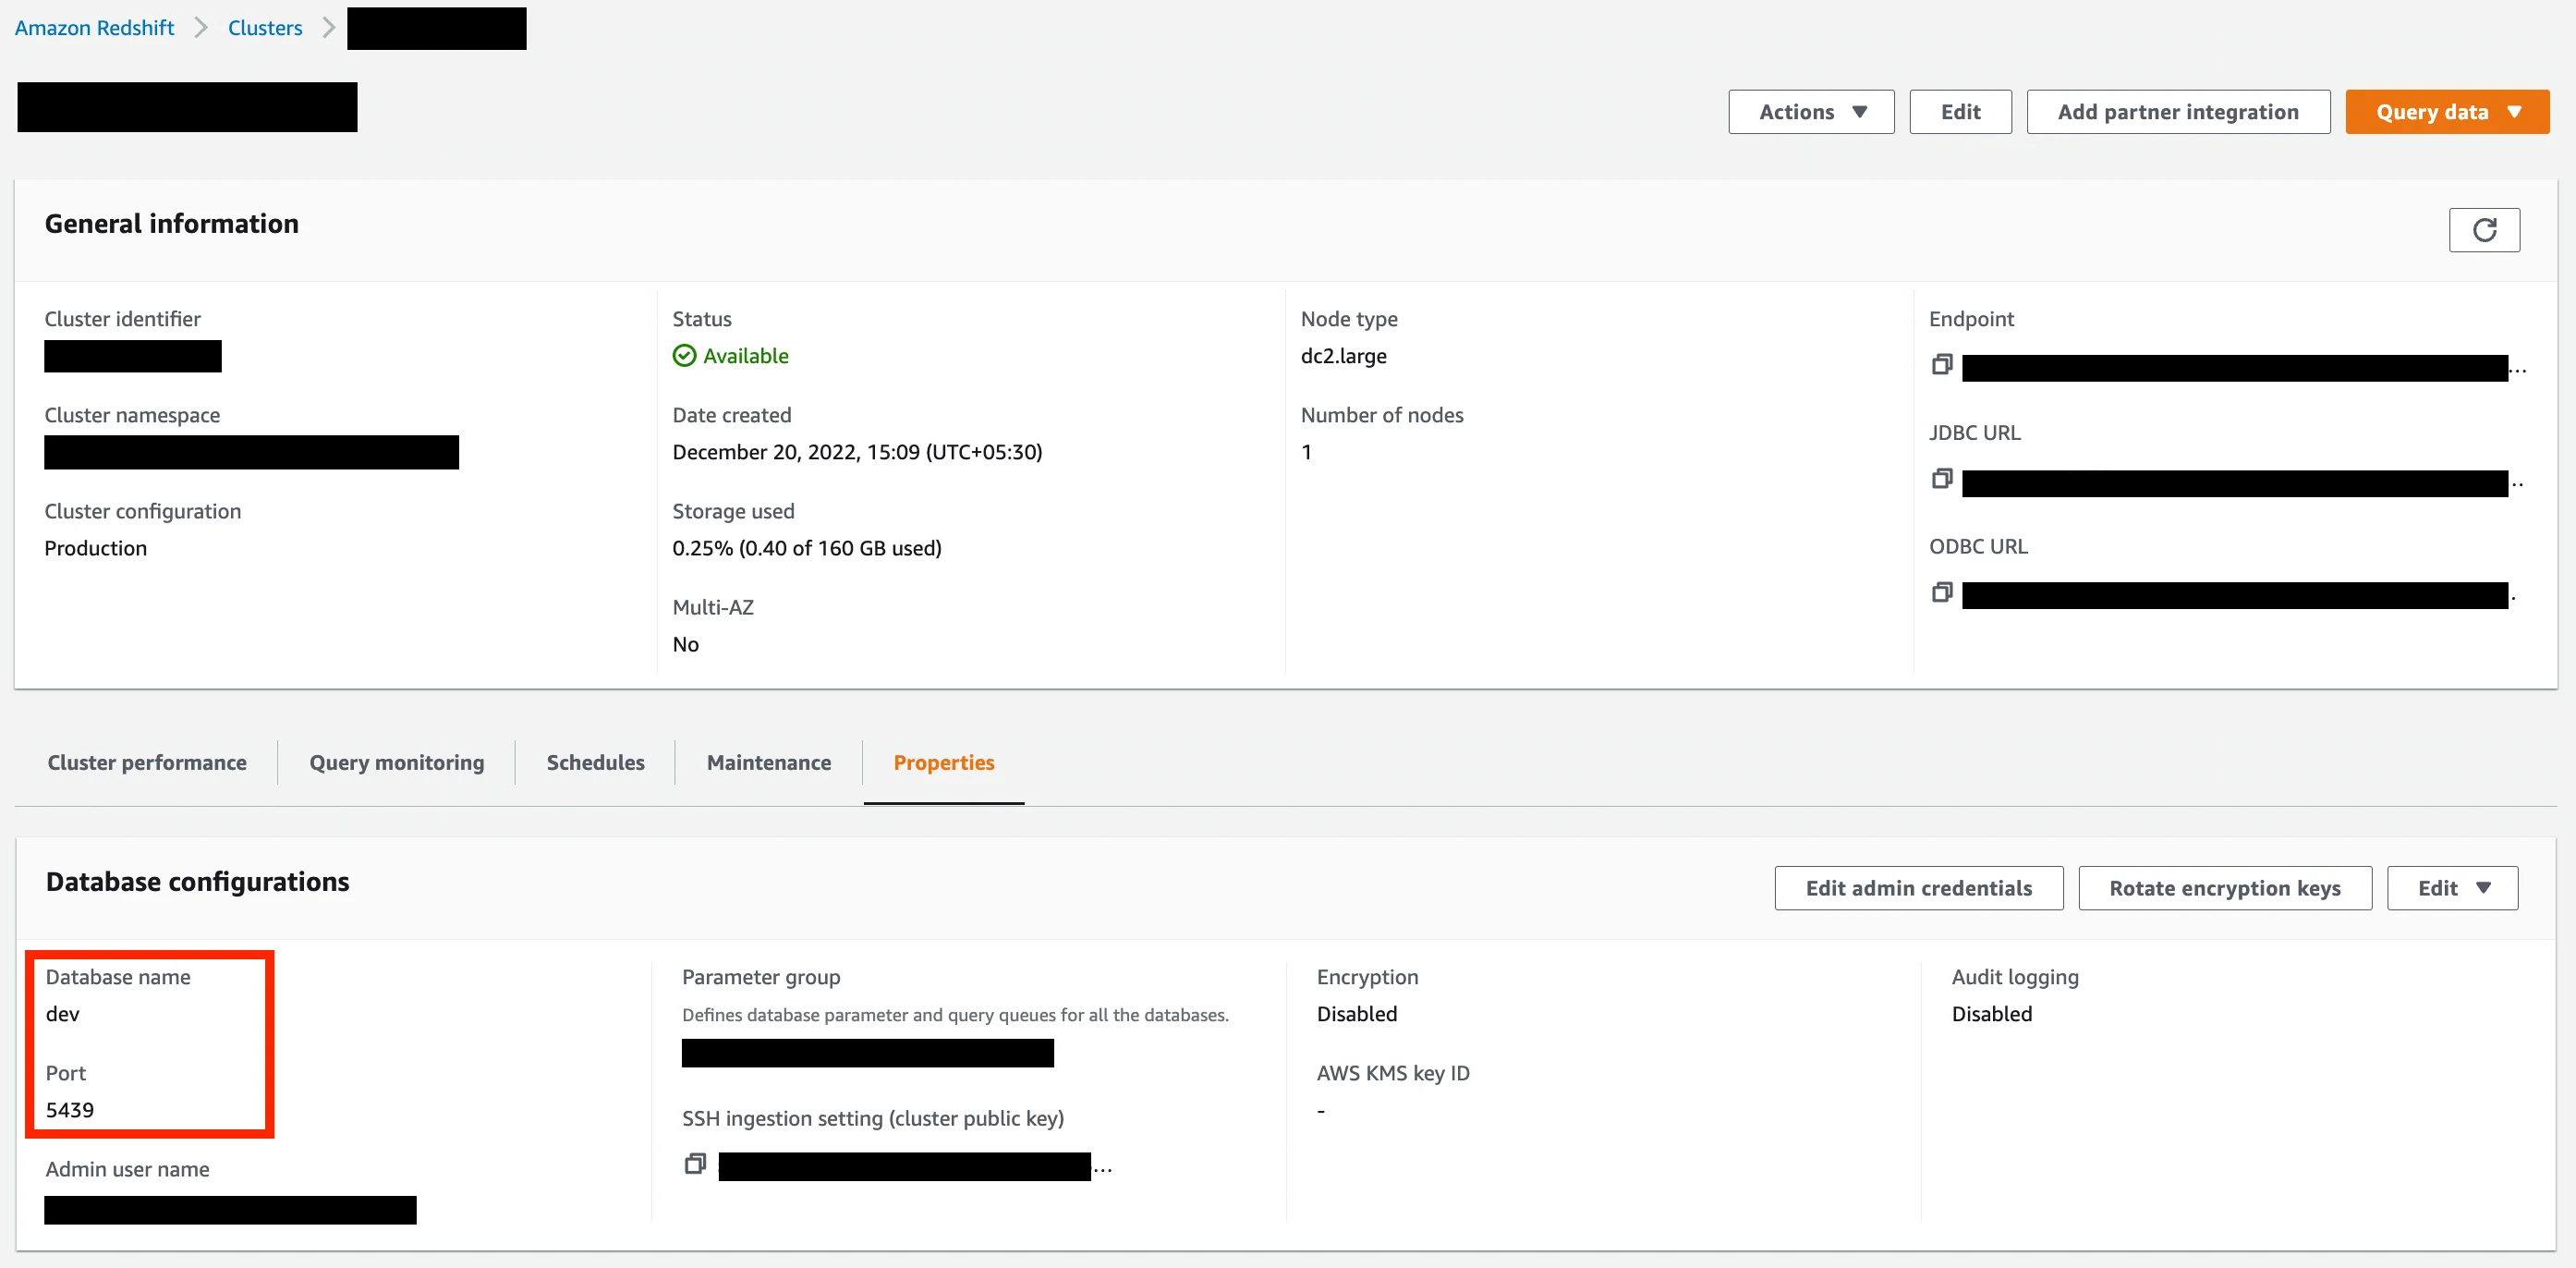 | 5439 |
| Database | The name of your Redshift database. | moengage_exports |
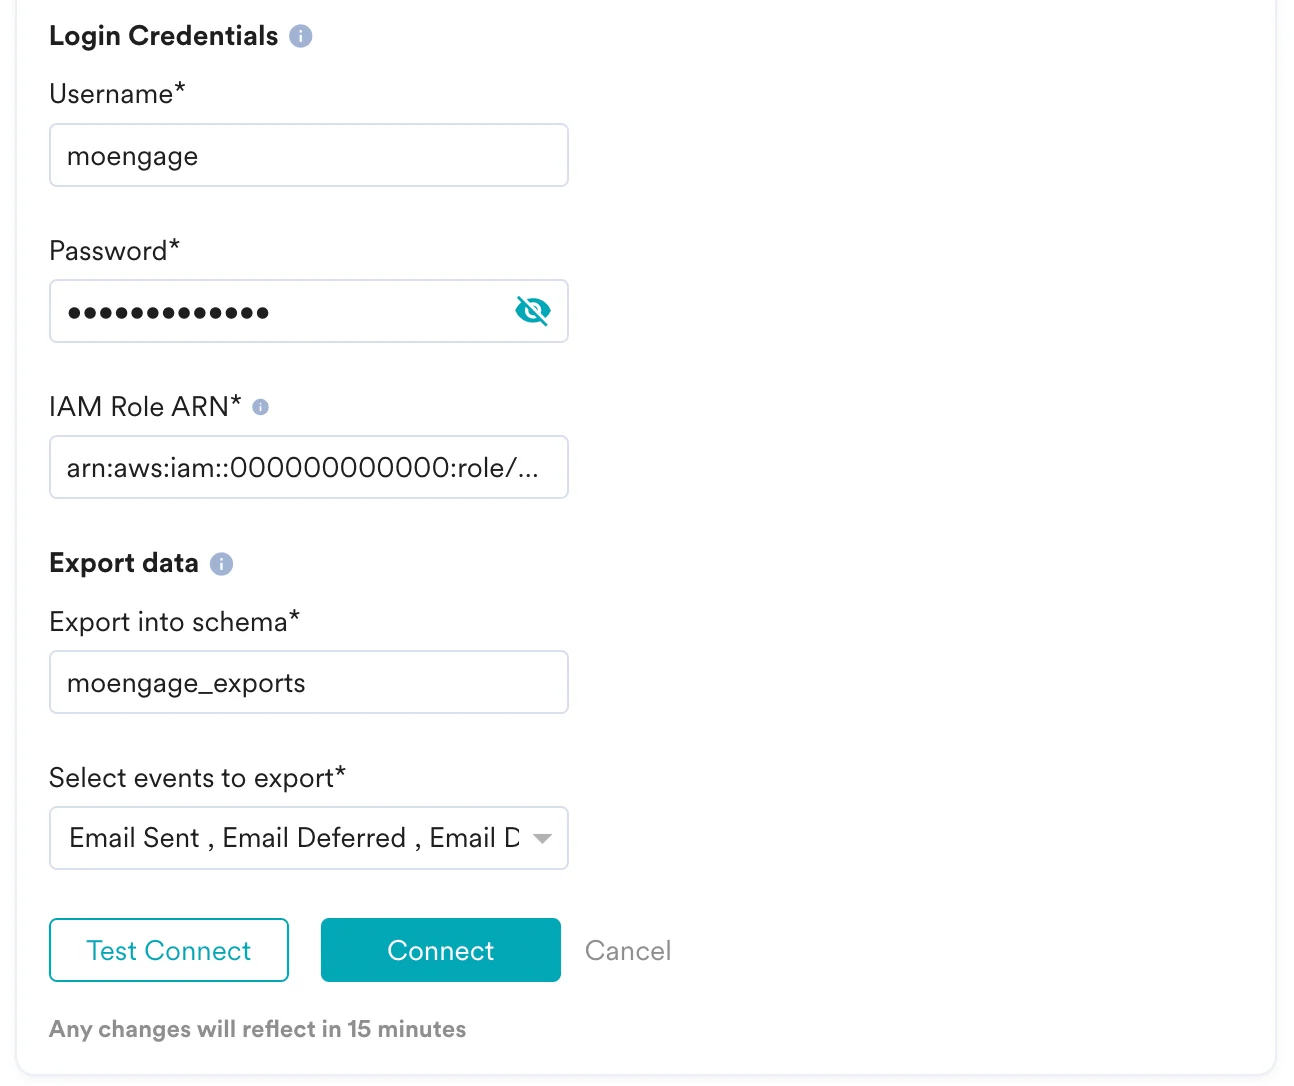
| Username | Enter the username you want MoEngage to connect as. This can either be an existing user, or the one you created in Step 2. | — |
| Password | Enter the password of the database user. | — |
| IAM Role ARN | Enter the ARN of the IAM Role you created in Step 5. To find the ARN, on your AWS Console, go to IAM Console. In the side menu, under Access Management, click on Roles. Select the IAM Role you created in Step 5. Under the Summary section, you will find the ARN listed. Copy and paste it into the input field. 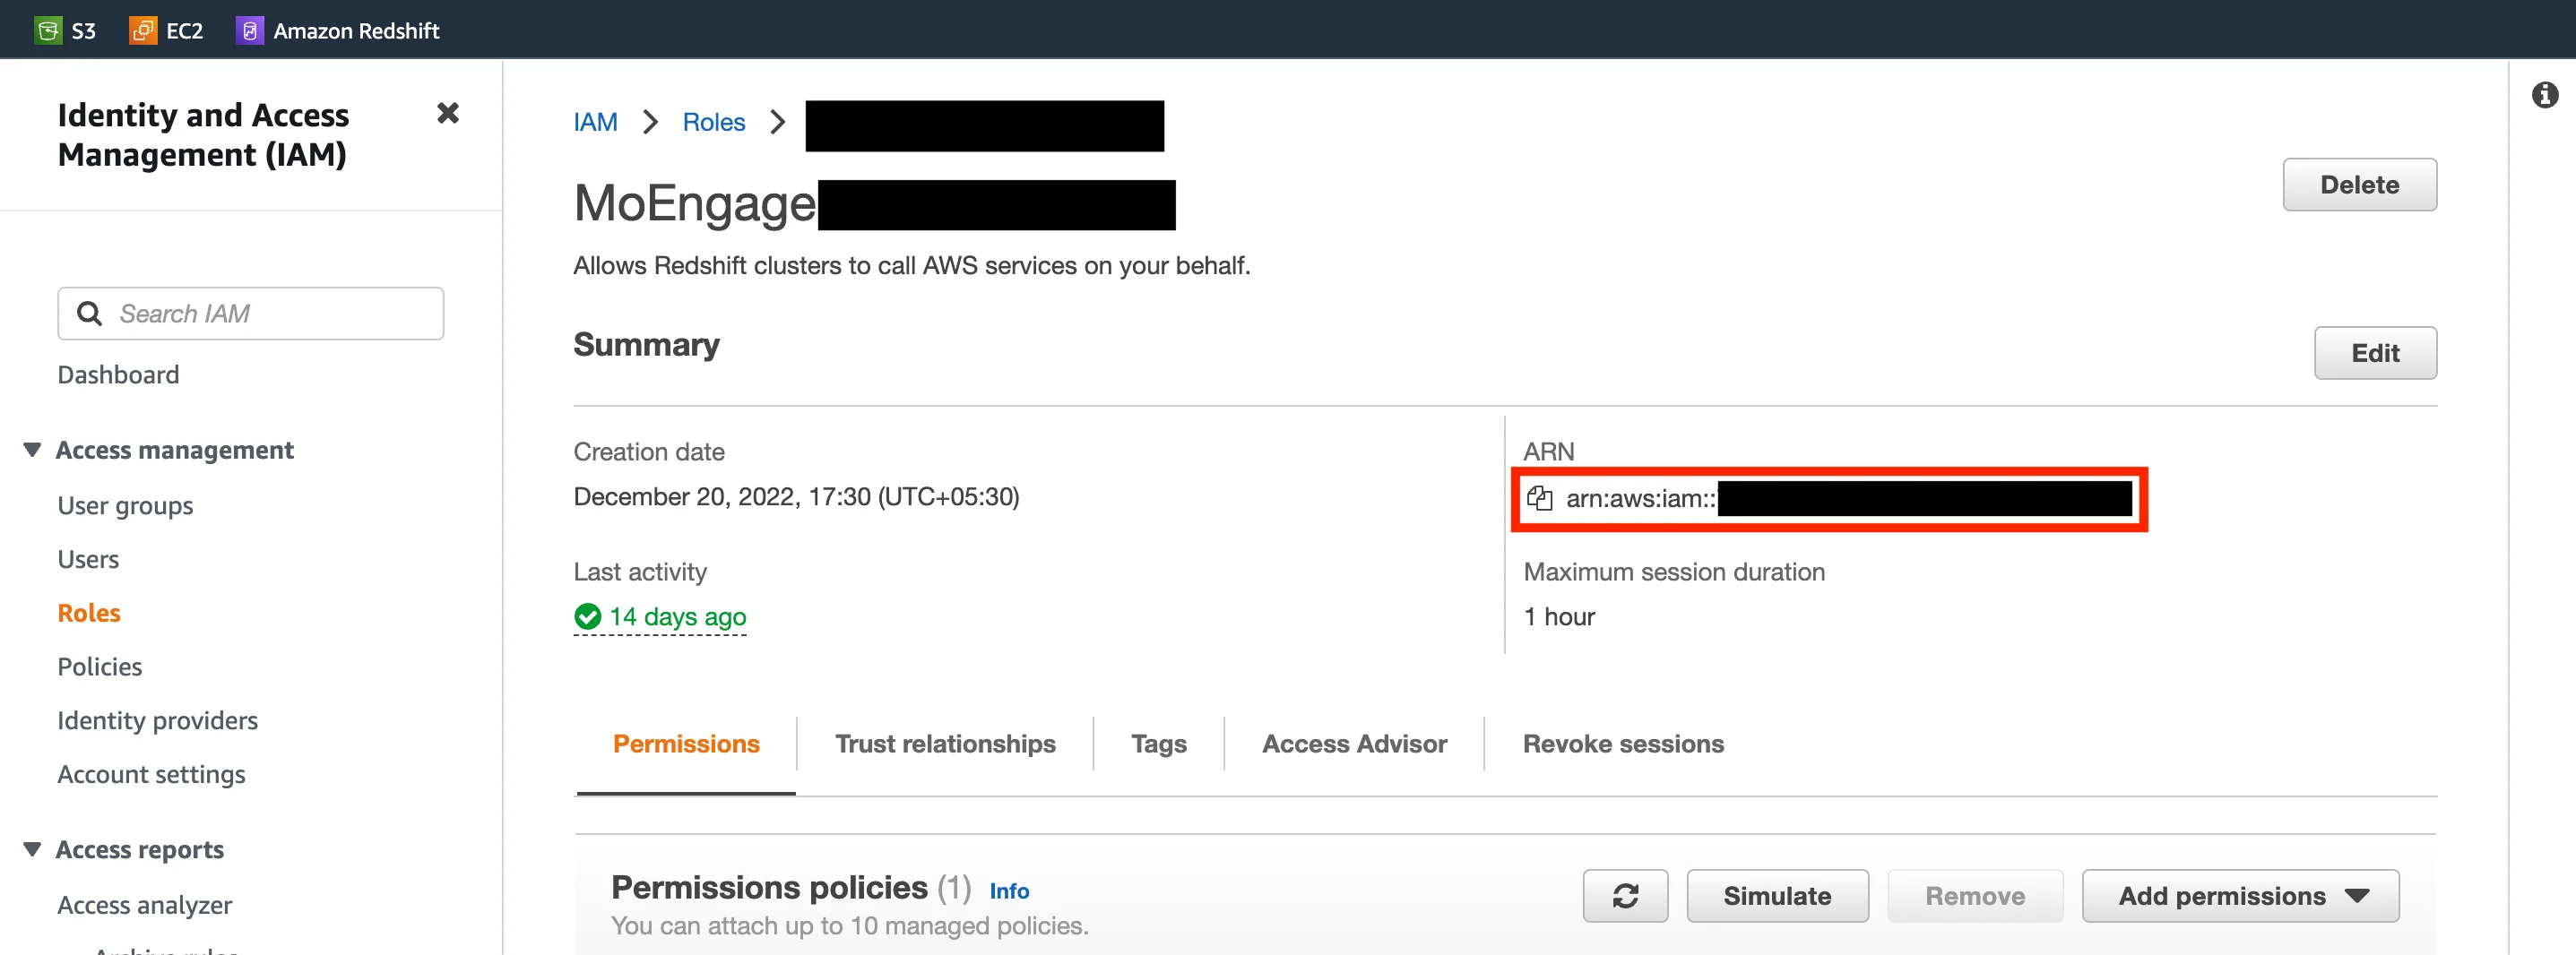 | Format should be arn:aws:iam::[aws-account-id]:role/[role-name] |
| Export into schema | MoEngage will create tables in the schema you provide. Unless specifically configured, the usual value for schema name is “public”. | — |
| Select events to export | Select which events you want to export to your Redshift cluster. | — |
- Optionally, you can choose to test the connection. MoEngage will attempt to verify if the details you entered are correct. If there is an issue, an error will be shown that you can rectify.
- Once the test connection is successful, you can save the connection details and MoEngage will begin exporting events shortly to your Redshift cluster.
Verify if you are receiving the data correctly
MoEngage will create the following two tables in your schema:test_connection_moengage- We will use this table to verify if your connection details are valid from time to timetest_connection_moengage- We will use this table to verify if your connection details are valid from time to time.moengage_events- We will dump (append) all your events in this tablemoengage_events- We will dump (append) all your events in this table.
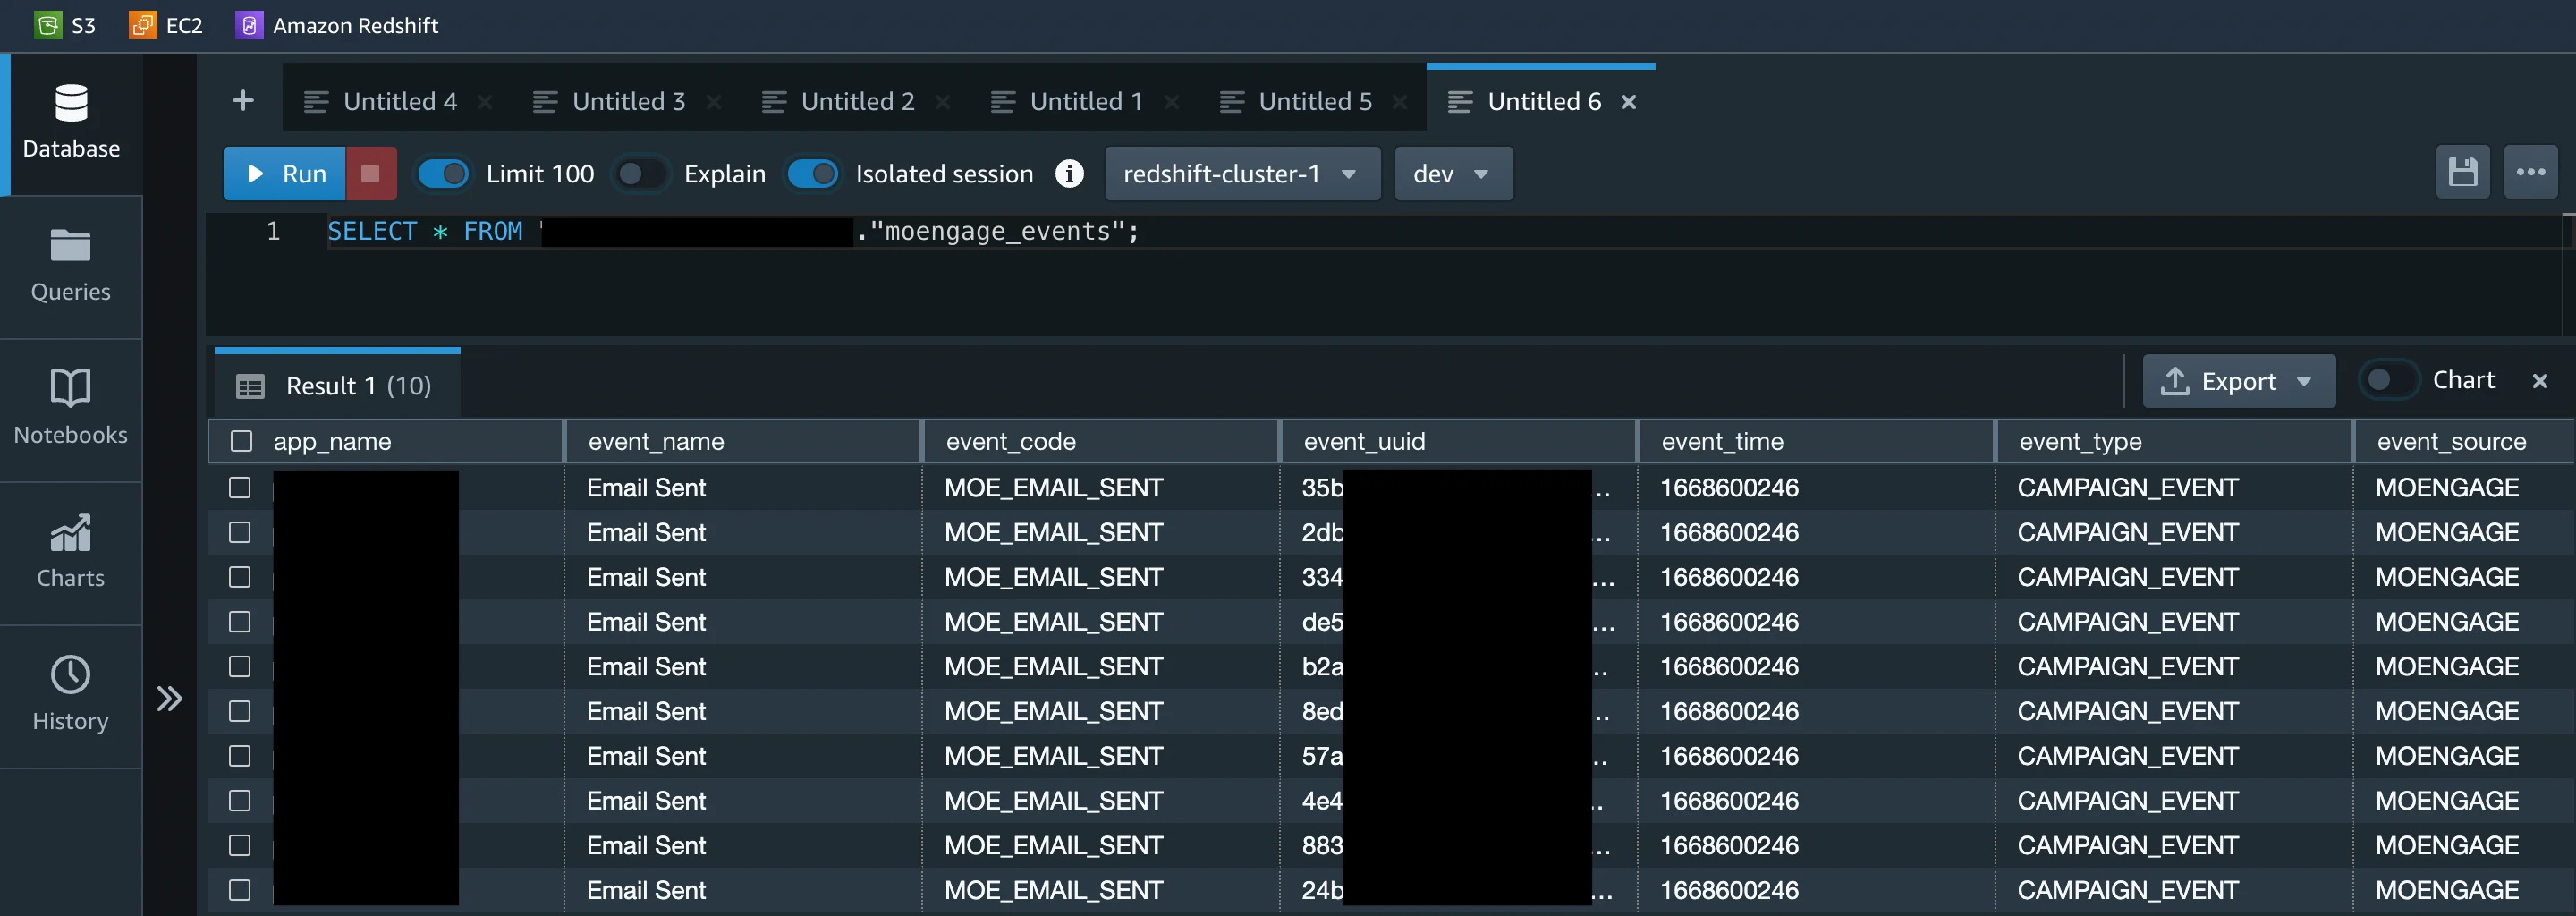
moengage_events tableYou can verify if data is correctly flowing in your warehouse by querying moengage_events table:
Supported Datetime Formats
| Date and Time Format | Examples |
|---|---|
"datetime_format": "YYYY-MM-DD" |
|
"datetime_format": "YYYY/MM/DD" |
|
"datetime_format": "DD/MM/YYYY" |
|
"datetime_format": "DD-MM-YYYY" |
|
"datetime_format": "DD-MM-YYYY hh:mm:ss" |
|
"datetime_format": "DD/MM/YYYY hh:mm:ss" |
|
"datetime_format": "YYYY-MM-DD hh:mm:ss" |
|
"datetime_format": "YYYY/MM/DD hh:mm:ss" |
|
"datetime_format": "DD-MM-YYYYThh:mm:ss.s" |
|
"datetime_format": "DD/MM/YYYYThh:mm:ss.s" |
|
"datetime_format": "DD-MM-YYYYThh:mm:ssTZD" |
|
"datetime_format": "DD/MM/YYYYThh:mm:ssTZD" |
|
"datetime_format": "YYYY-MM-DD hh:mm:ss.s" |
|
"datetime_format": "YYYY/MM/DD hh:mm:ss.s" |
|
"datetime_format": "YYYY-MM-DDThh:mm:ssTZD" |
|
"datetime_format": "YYYY/MM/DDThh:mm:ssTZD" |
|
"datetime_format": "YYYY-MM-DDThh:mm:ss.sTZD" |
|
"datetime_format": "YYYY/MM/DDThh:mm:ss.sTZD" |
|
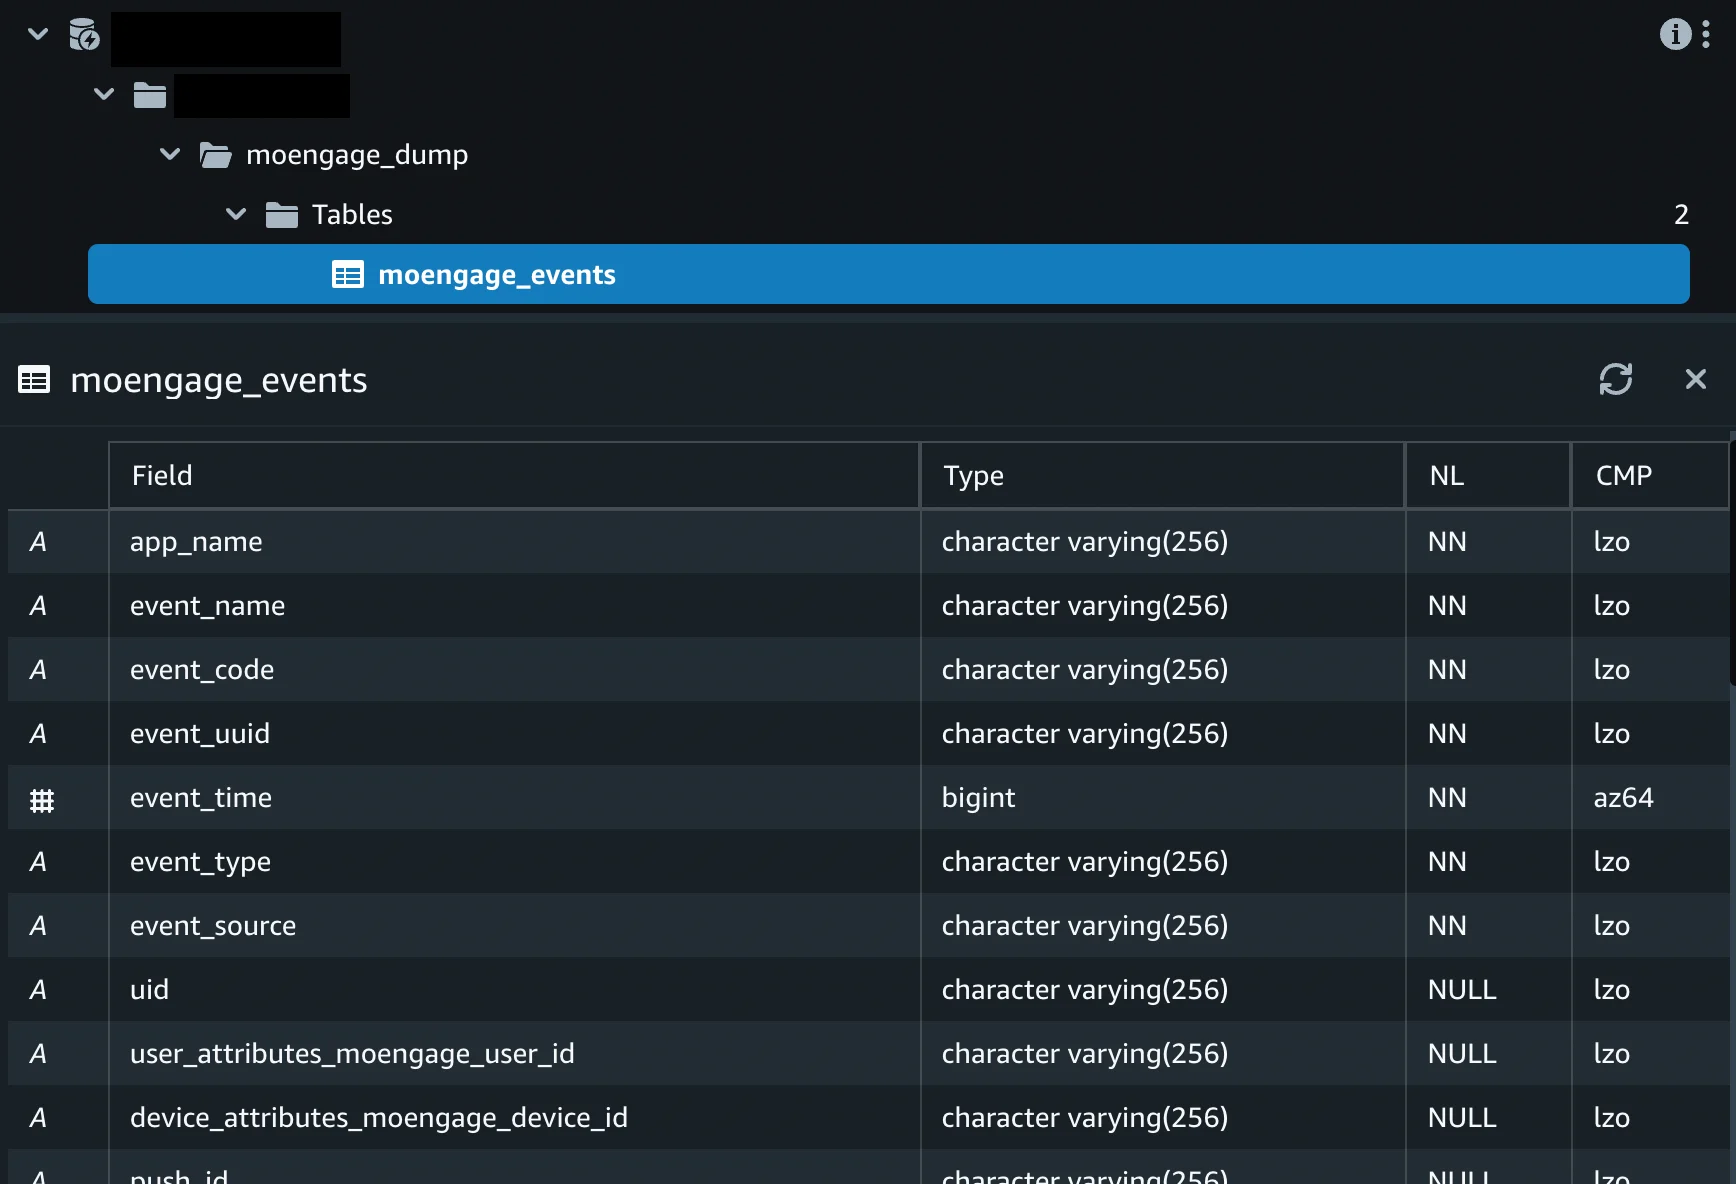
Sample Table Structure
The final table definition will depend on the exact configurations of your exports.| Field | Type | NL |
|---|---|---|
app_name | character varying(256) | NN |
event_name | character varying(256) | NN |
event_code | character varying(256) | NN |
event_uuid | character varying(256) | NN |
event_time | bigint | NN |
event_type | character varying(256) | NN |
event_source | character varying(256) | NN |
uid | character varying(256) | NULL |
user_attributes_moengage_user_id | character varying(256) | NULL |
device_attributes_moengage_device_id | character varying(256) | NULL |
push_id | character varying(512) | NULL |
email_address | character varying(256) | NULL |
mobile_number | character varying(256) | NULL |
event_attributes_app_version | character varying(256) | NULL |
event_attributes_sdk_version | character varying(256) | NULL |
event_attributes_platform | character varying(256) | NULL |
event_attributes_campaign_id | character varying(256) | NULL |
event_attributes_campaign_name | character varying(256) | NULL |
event_attributes_campaign_type | character varying(256) | NULL |
event_attributes_campaign_channel | character varying(256) | NULL |
event_attributes_readable_campaign_id | character varying(256) | NULL |
event_attributes_parent_campaign_id | character varying(256) | NULL |
event_attributes_parent_flow_id | character varying(256) | NULL |
event_attributes_parent_flow_name | character varying(256) | NULL |
event_attributes_variation_id | character varying(256) | NULL |
event_attributes_locale_id | character varying(256) | NULL |
event_attributes_locale_name | character varying(256) | NULL |
event_attributes_url | character varying(256) | NULL |
event_attributes_timestamp | bigint | NULL |
event_attributes_first_session | boolean | NULL |
event_attributes_logged_in_status | character varying(256) | NULL |
event_attributes | super | NULL |
user_attributes | super | NULL |
device_attributes | super | NULL |
created_at | character varying(256) | NULL |
Export Frequency
We will dump the data at hourly intervals.Frequently Asked Questions
How soon will I start getting the data?
How soon will I start getting the data?
It typically takes up to 30 minutes for the automated data exports to be set up for your account and for you to start seeing data there.
Can I export additional events at a later time?
Can I export additional events at a later time?
Yes, if you need to export new events at a later time, you can always edit your configuration on the App Marketplace and get the new events added to your exports.
Can I export historical data using Automated Data Exports?
Can I export historical data using Automated Data Exports?
As of now, you cannot export historical data using Automated Data Exports. Once configured, you will start seeing data for each event from the time you enabled your exports.
Is there any pricing involved for Automated Data Exports?
Is there any pricing involved for Automated Data Exports?
If your billing plan does not cover this already and you need to get this enabled at a later time, you would need to work with your Customer Success Manager to get this included in your billing plan. Based on the amount of data that MoEngage will place in your Data warehouse/Partner/API on a monthly basis, this could lead to additional charges.
Does Data Exports guarantee the latest user attributes?
Does Data Exports guarantee the latest user attributes?
No, Data Exports is primarily built to export your Events in near real-time and user attributes in MoEngage are updated asynchronously so it is currently not possible to guarantee the latest values of user attributes in the exports.