Overview
Gmail annotations help customers conveniently view and engage with your promotions from their inboxes. Annotating emails enhances the content of your emails within the Promotions folder by incorporating elements like images, deals, and expiration dates from which customers can directly access the information without opening the emails. You can annotate emails to display the following features in the Promotions tab of Gmail:- This feature applies to recipients who use Gmail as their mailbox provider.
- This feature applies only to emails in the Promotions tab of Gmail.
- This feature works only for personal email IDS and not Google Workspace accounts.
- Deal Annotations are rendered for all users on mobile and desktop devices.
- The Product Carousel is rendered only on the mobile app, and its rendering depends on various factors determined by Google. For more information, refer to the Prerequisite section.
- Due to limitations around personalization, the click tracking of promo URLs is not supported.
- Product Carousel are currently not visible for users who are located in the European Union. This restriction does not apply to the United Kingdom (UK). Conversely, the Deal Annotation feature remains fully functional and is visible within the European Union without requiring any special allowlisting.
Advantages of Email Annotations
Annotating emails in email campaigns can offer several advantages:- Enhanced visual appeal: Annotations allow the incorporation of elements like images, making the emails more visually engaging and captivating for recipients.
- Better interaction: Annotations enable your customers to interact with promotions directly from their inbox, promoting higher engagement and action, such as clicking the annotated text or image.
- Improved accessibility: Annotations allow your customers to access more promotional information without opening the entire email, saving time and effort. This can increase the likelihood of customers exploring and engaging with the promoted content.
- Enhanced promotional value: Annotations provide a platform to highlight key aspects of the promotions, such as deals and expiration dates. This makes it easier for your customers to get essential details, increasing their interest in the offer.
- Convenient mobile experience: Annotations target recipients who use Gmail on their mobile devices. They enhance the mobile experience, taking advantage of the increasing smartphone dependence on email browsing.
Prerequisite
- SPF, DKIM, and DMARC authentications must be configured for the sending domain as follows:
- If you use MoEngage as your email sender, the SPF, DKIM, and DMARC authentication configurations are completed as part of onboarding.
- If you use your own email service provider, check if the SPF, DKIM, and DMARC authentication configuration is set up correctly.
- The sender domain (not email ID) must be allowed to be listed with Google. For this, an email must be sent to p-gmail-outreach@google.com.
- The Product Carousel is subject to a Density Cap limitation, which requires it to be deployed to a bulk audience for proper rendering. While there is no explicit definition of bulk, an audience size exceeding 100 individuals is considered a fair estimation.
- It should be noted that sending a marked-up email to oneself for testing purposes won’t result in annotations appearing in the inbox. However, marketers can preview the annotations in the MoEngage dashboard. Google also offers a tool for this purpose.
- The algorithm is believed to render annotations where the content
- abides by the ad policies of Google
- uses high-quality imagery with correct aspect ratios
- not personalized
- comes from brands with a history of engagement.
- High-quality images with specified aspect ratios must be used while creating Deal Annotations and Product Carousel. The aspect ratios are mentioned here.
Configure Gmail Annotations in MoEngage
Perform the following steps to configure Gmail annotations while creating an email campaign:- Navigate to Step 2: Create Content in email campaigns.
- Select the templates from any of the following options:
- Drag and drop editor
- Custom HTML editor
- My saved templates
- After selecting the template, navigate to the Email details section.
- In the Gmail annotation tab, click Add Gmail annotation.
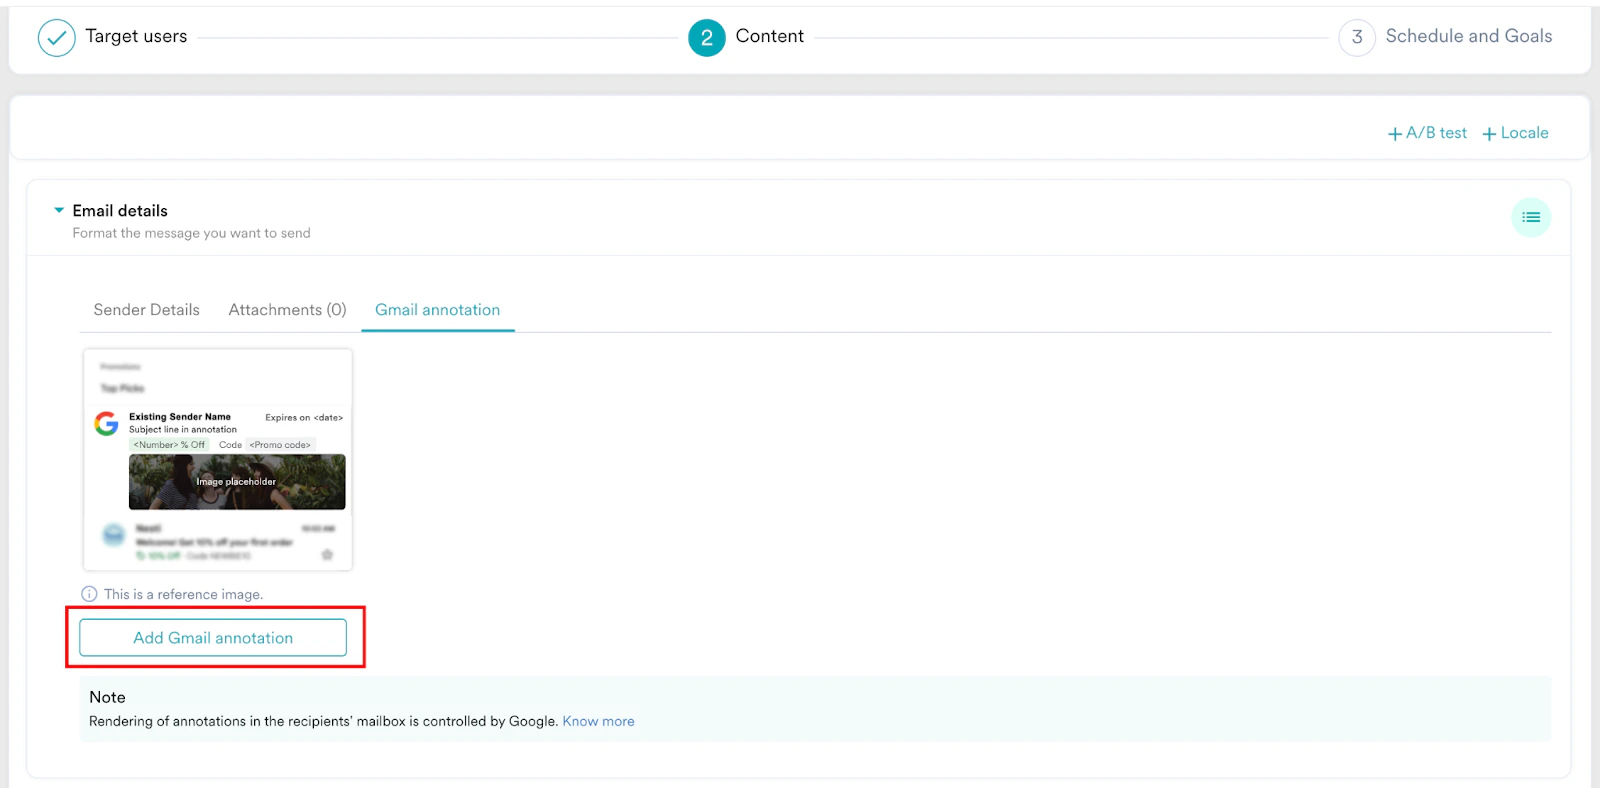
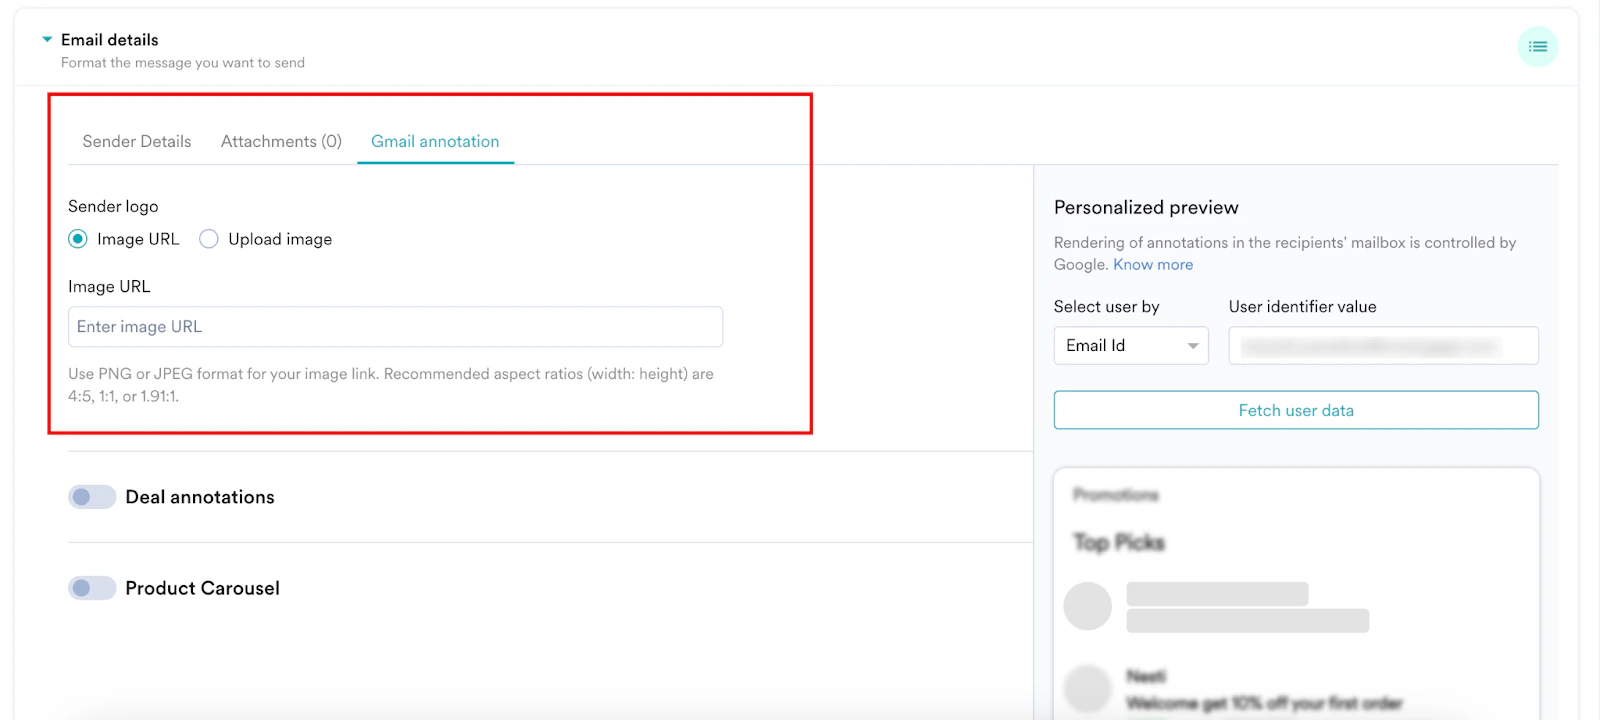
- In the expanded view of the page, to add the Sender logo, click one of the following options:
- Image URL: Add the image URL in PNG or JPEG format. For example, https://www.example.com/image.png. For best practices regarding logo URL, refer here.
To personalize the sender logo, refer to Personalize Email Content. - Upload image: Upload the image using the drag-and-drop option or upload it from the computer. For best practices regarding images, refer here.
- Image URL: Add the image URL in PNG or JPEG format. For example, https://www.example.com/image.png. For best practices regarding logo URL, refer here.
Create a Deal Annotation
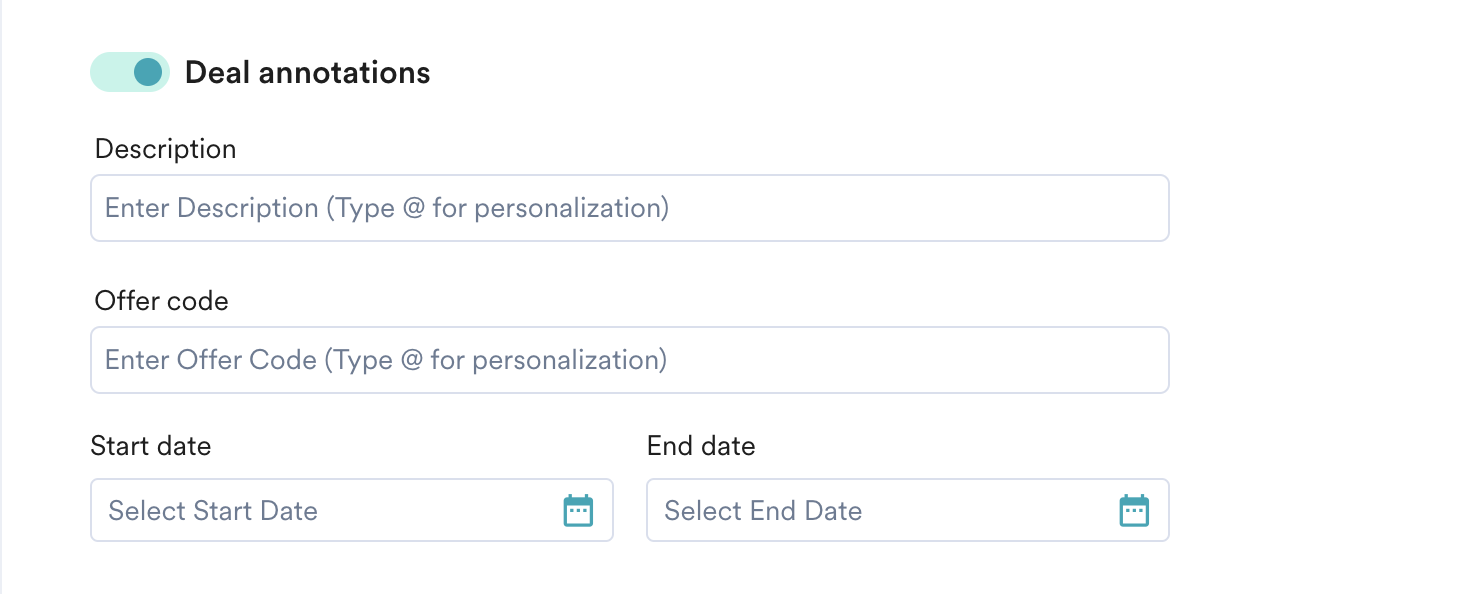
A deal annotation displays text-based details about a promotion, such as a promotion code or expiration date. Perform the following steps to create a deal card:- After adding the sender logo, turn the Deal annotations toggle on and enter the following details:
Field Description Description Type a description for the deal card. This text is displayed as a deal badge. Make sure that you do not use more than four words or full sentence in this box, this may truncates the added description. For example, 40% off or Sale is here. For best practices regarding deal badge, refer here. Offer code Type the discount or promotion code for the offer. Make sure that you the limit the characters added for optimal rendering. For example, DEAL60. For best practices regarding discount code, refer here. Start date Select your offer’s start date and time. End date Select your offer’s end date and time. Ensure that your offer’s end date is aligned with the campaign start date. If this condition is not satisfied, the Google annotation may not be displayed in the recipient inbox. - You can preview the contents of your deal annotation under the Personalized Preview section. Note that you can personalize all the above boxes of Deal annotation. To know more about personalization, refer to Personalize Email Content.
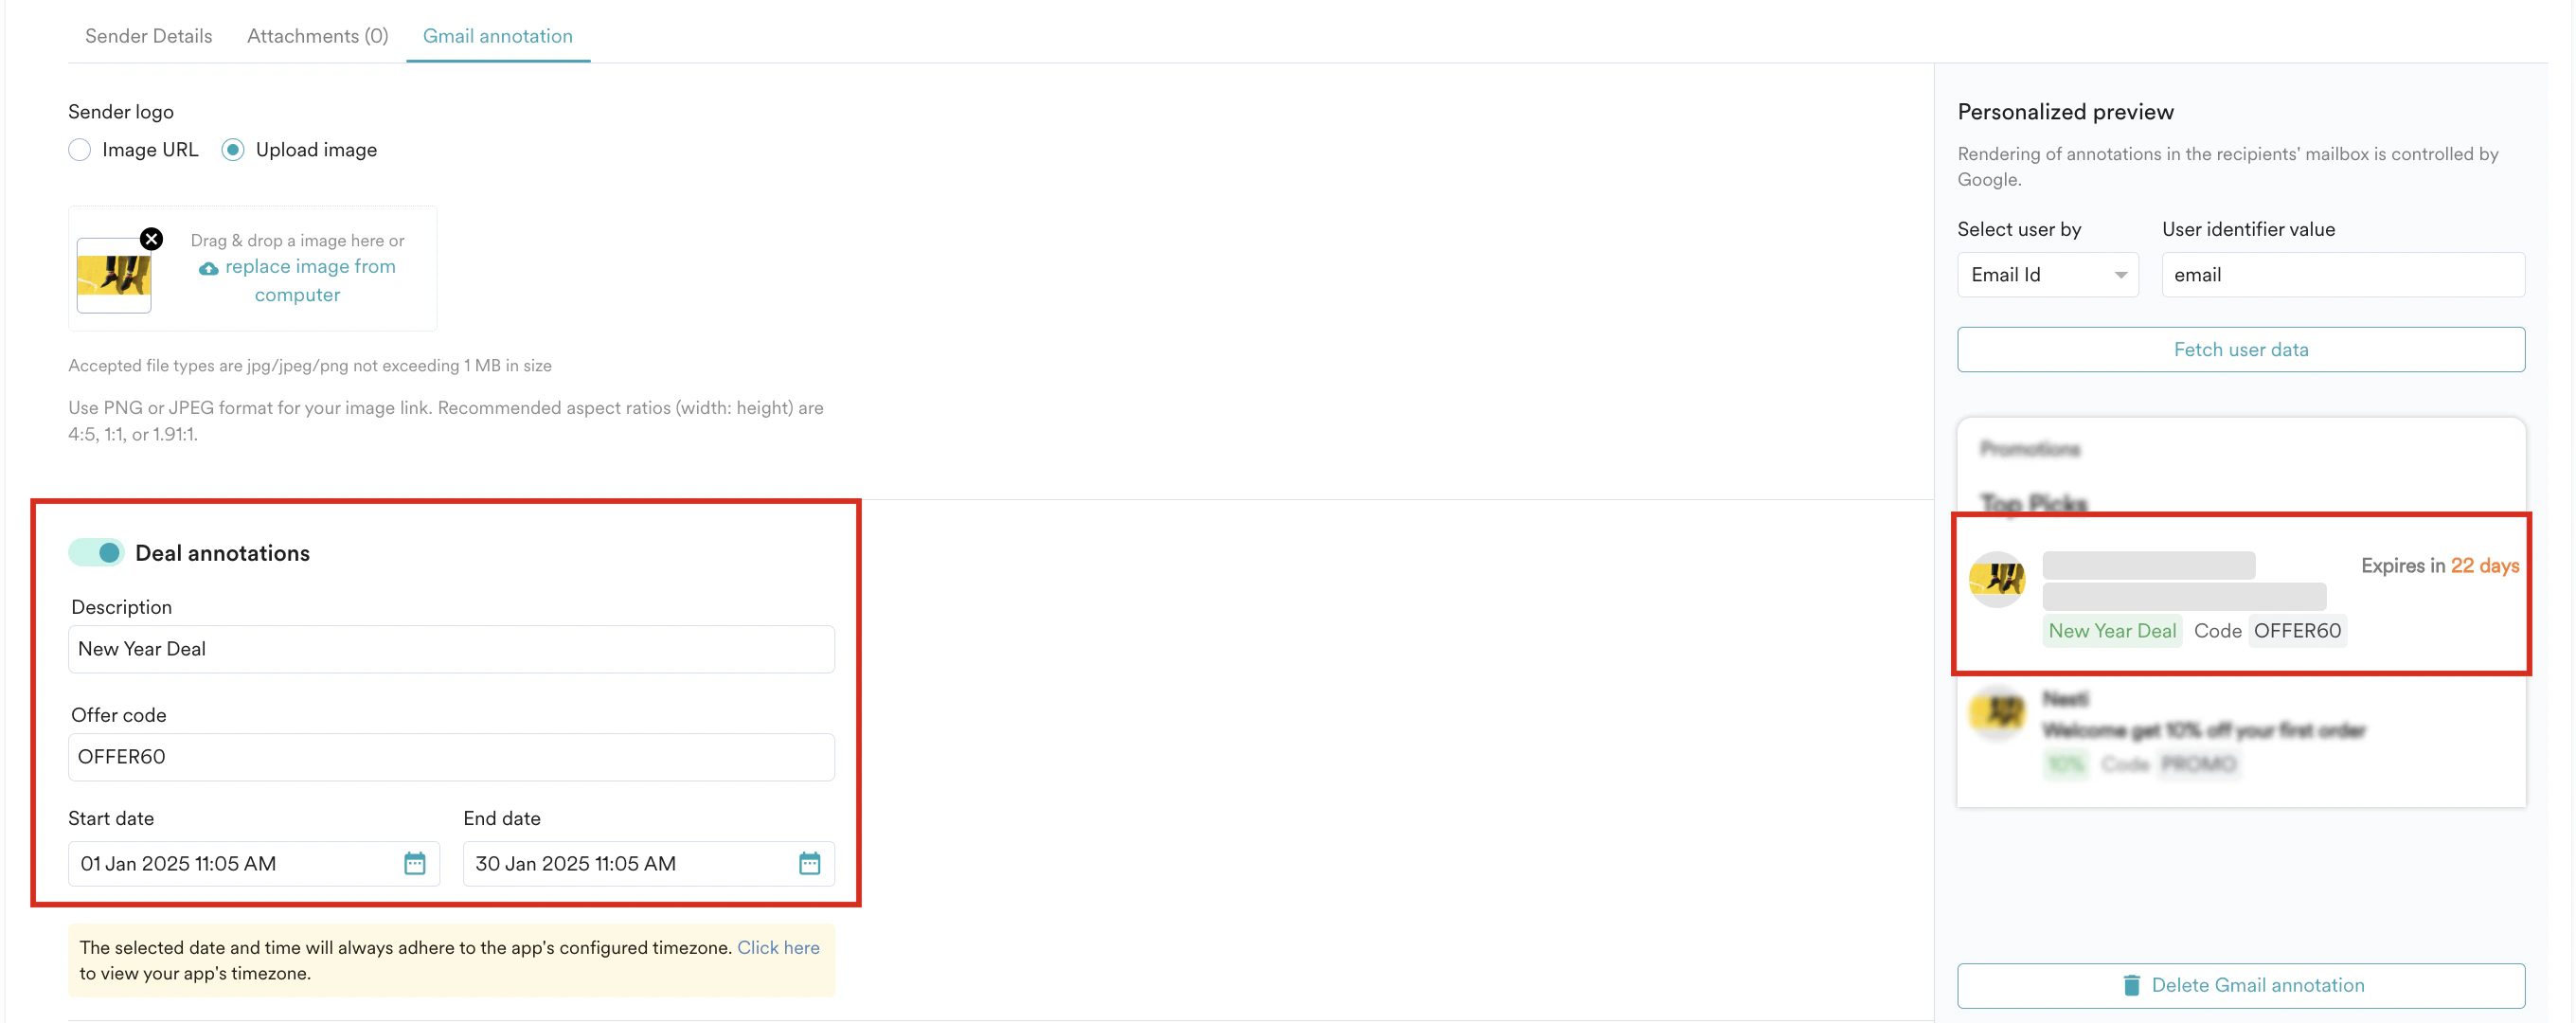
- After personalizing, click Fetch user data in the Personalised Preview section to view the personalized data in the preview.
- Click Delete Gmail annotation to delete the created deal annotation.
Create a Product Carousel
A product carousel displays multiple image previews for a promotion. You can add a maximum of 10 unique image previews in a carousel. MoEngage provides the following options for adding a product carousel:Using Manual Option
This option allows you to keep the list of products added to the carousel the same for all your targeted customers. This option is selected by default, and you must add at least two products to the carousel.Perform the following steps to create a product carousel using the manual option. You must provide the following details for each product you want to add to the carousel: Under the Product 1 tab, add the following details for Product 1; similarly, under the Product 2 tab, add the following details for Product 2. You can add a maximum of 10 products to the carousel by clicking + Add product.
- After adding the sender logo, turn the Product carousel toggle on
- Select the Manual option and enter the following details:
Field Description Currency Select the currency of the price. Image Add images to the carousel using one of the following options: - Image URL: The URL to your image in PNG or JPEG format. For example, https://www.example.com/image.png. You can personalize each image in the product carousel. For more information, refer to Personalize Email Content.
- Upload Image: Upload the image using the drag-and-drop option or upload it from the computer. For best practices regarding images, refer here.
Promo URL Type the promotion URL. Your customers visit this URL when clicking the image in the promotions emails. Headline Type a short description of the promotion displayed under the preview image. Note that all the products added must have a headline. If you miss adding a headline for one product, it fails to display headlines for all products. Original Price Type the original price of the products to be displayed on the carousel. Note that all the products added must have an original price. If you miss adding the original price for one product, this fails to display headlines for all products. Discount type Select the type of discount. The following options are available: - Discounted Price: This option considers the amount added in the Discount value field as the price amount and subtracts this amount from the original price. For example, if the Original Price is 700, the Discount type is Discounted Price, and the Discount value is 50, then 50 from the original price will be reduced.
- Discounted Percentage: This option considers the amount added in the Discount value field in percentage and subtracts this percentage from the original price. For example, if the Original Price is 700, the Discount type is Discounted Percentage, and the Discount value is 50, then 50% of the original price will be reduced.
In both cases, the email recipient views the Original Price as struck off and the Discounted Price emboldened, as shown in the following image: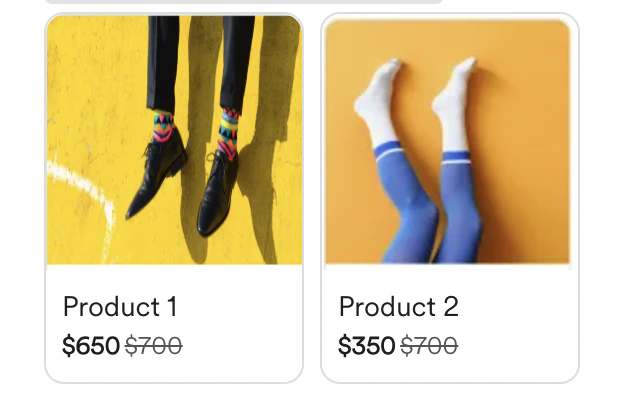
Discount value Type the discount value for your products in the carousel. 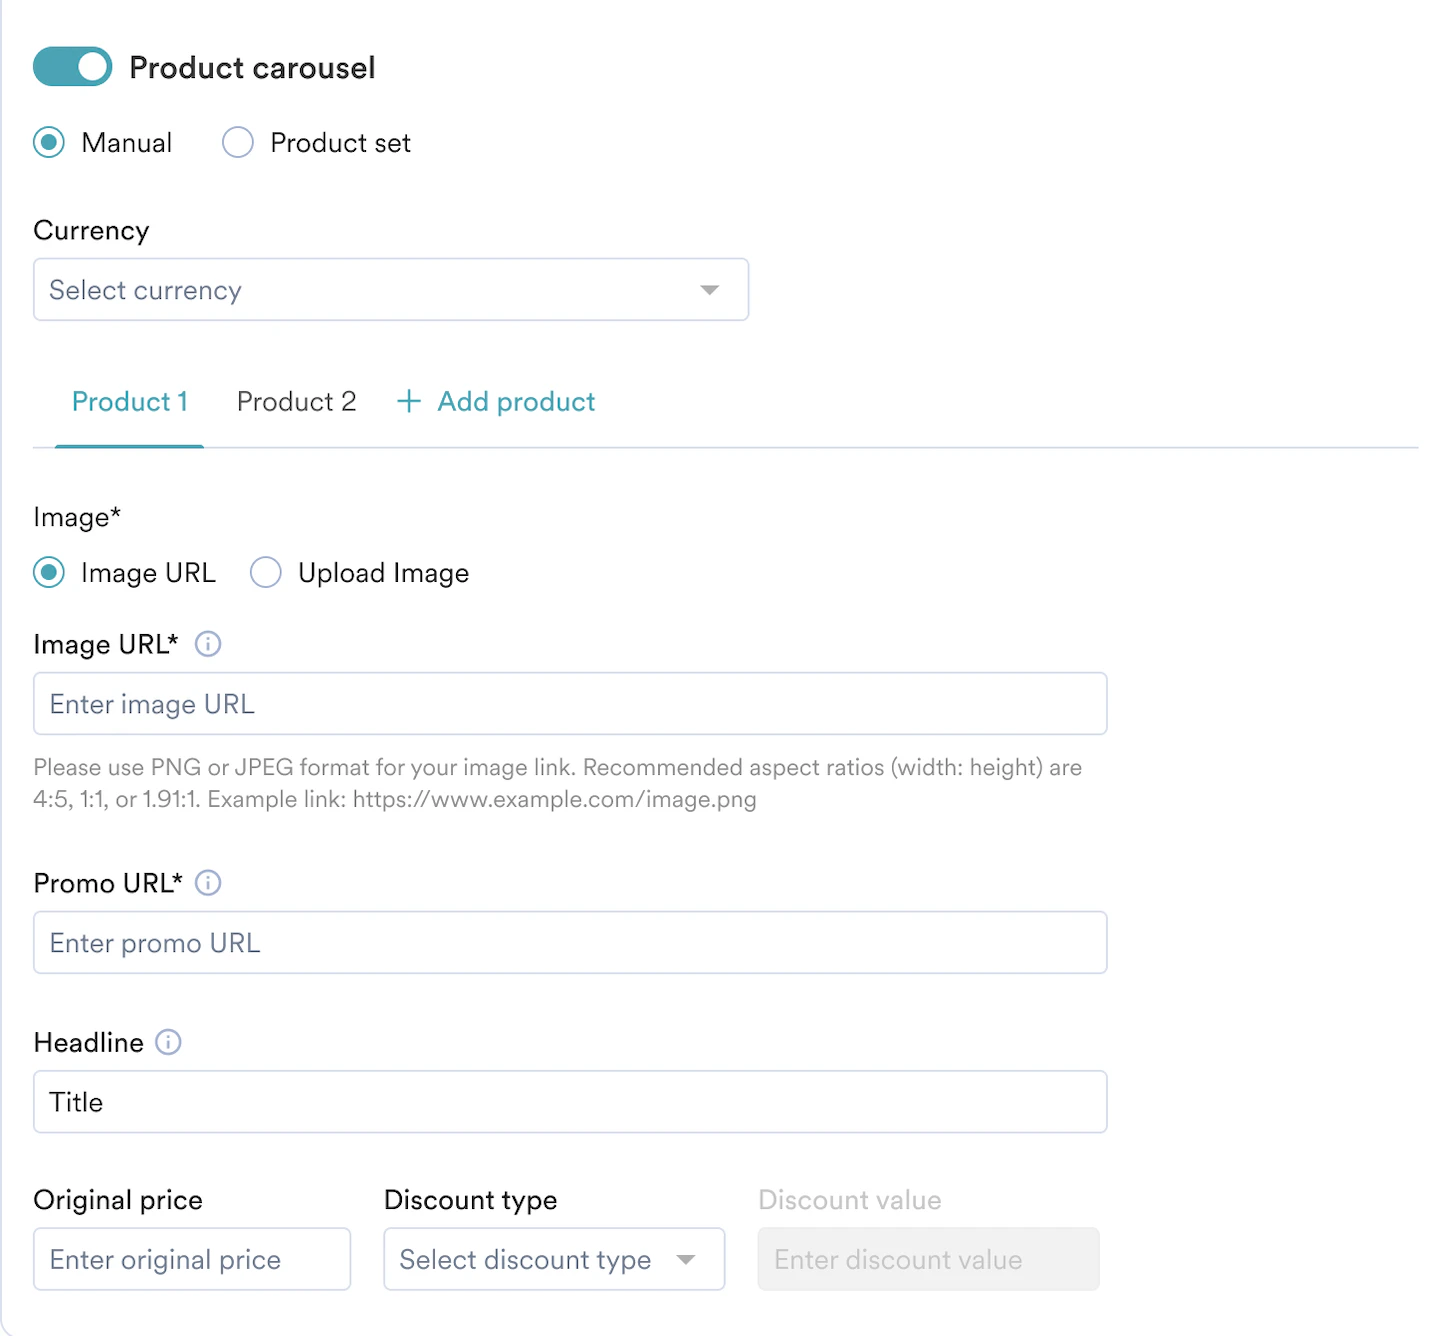
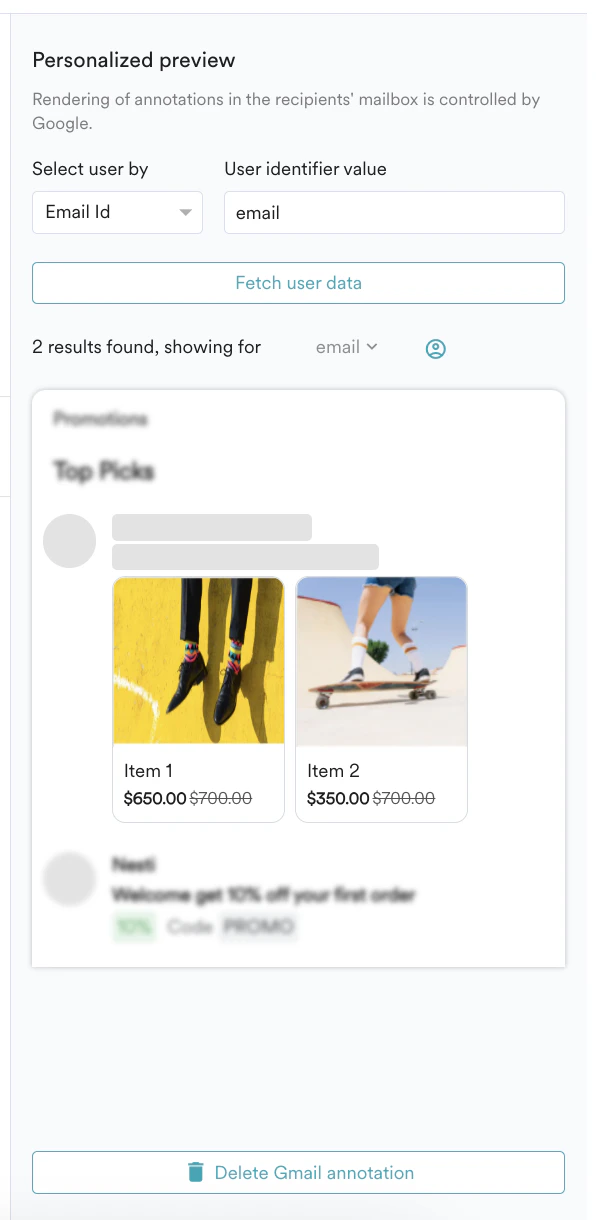
- You can preview the contents of your product carousel under the Preview section. Note that all the above fields of the Product Carousel can be personalized. To know more about personalization, refer to Personalize Email Content.
- Click Delete Gmail annotation to delete the created product carousel.
Using Product Set Option
The product set option lets you fetch a list of products relevant to a particular customer to create a carousel. This option allows you to connect the product catalog to MoEngage and use the product information while creating email annotations. This helps to provide personalized suggestions based on the items in the catalog.Note that you must provide the following details for each product to be added to the carousel.
This option is available only for enterprise customers. If you are not able to view this, contact your MoEngage Customer Success Account Manager.
- After adding the sender logo, turn the Product carousel toggle on
- Select the Product set option and enter the following details:
Field Description Product set Select the product set from which you want to fetch the products. The products from this product set will be displayed in the carousel. By default, the Image, Promo URL, and Title fields are pre-populated with the image_link, link, and title based on the column name containing this information. Image By default, the Image list is pre-populated with the image_link. However, as per your requirement, you can select the column name that contains the information about the image link. Promo URL Your customers are directed to this URL when they click the image in the Promotions emails. By default, the Promo URL list is pre-populated with the link. However, as per your requirement, you can select the column name that contains the information about the Promo URL. Headline By default, the Headline list is pre-populated with the title. However, as per your requirement, you can select the column name that contains the information about the title. Currency Select the currency of the price. Original Price Select the column name containing the original price information. Discount type Select the type of discount. The following options are available: - Discounted Price: This option considers the amount added in the Discount value field as the price amount and subtracts this amount from the original price. For example, if the Original Price is 700, the Discount type is Discounted Price, and the Discount value is 50, then 50 from the original price will be reduced.
- Discounted Percentage: This option considers the amount added in the Discount value field in percentage and subtracts this percentage from the original price. For example, if the Original Price is 700, the Discount type is Discounted Percentage, and the Discount value is 50, then 50% of the original price will be reduced.
In both cases, the email recipient views the Original Price as struck off and the Discounted Price emboldened, as shown in the following image:Discount value Select the column name containing the discount value information. Number of products from Product Set Select the number of products to be fetched from the product set to be displayed in the carousel. Note that you must select a minimum of 2 products and a maximum of 10 products to be displayed in the carousel. 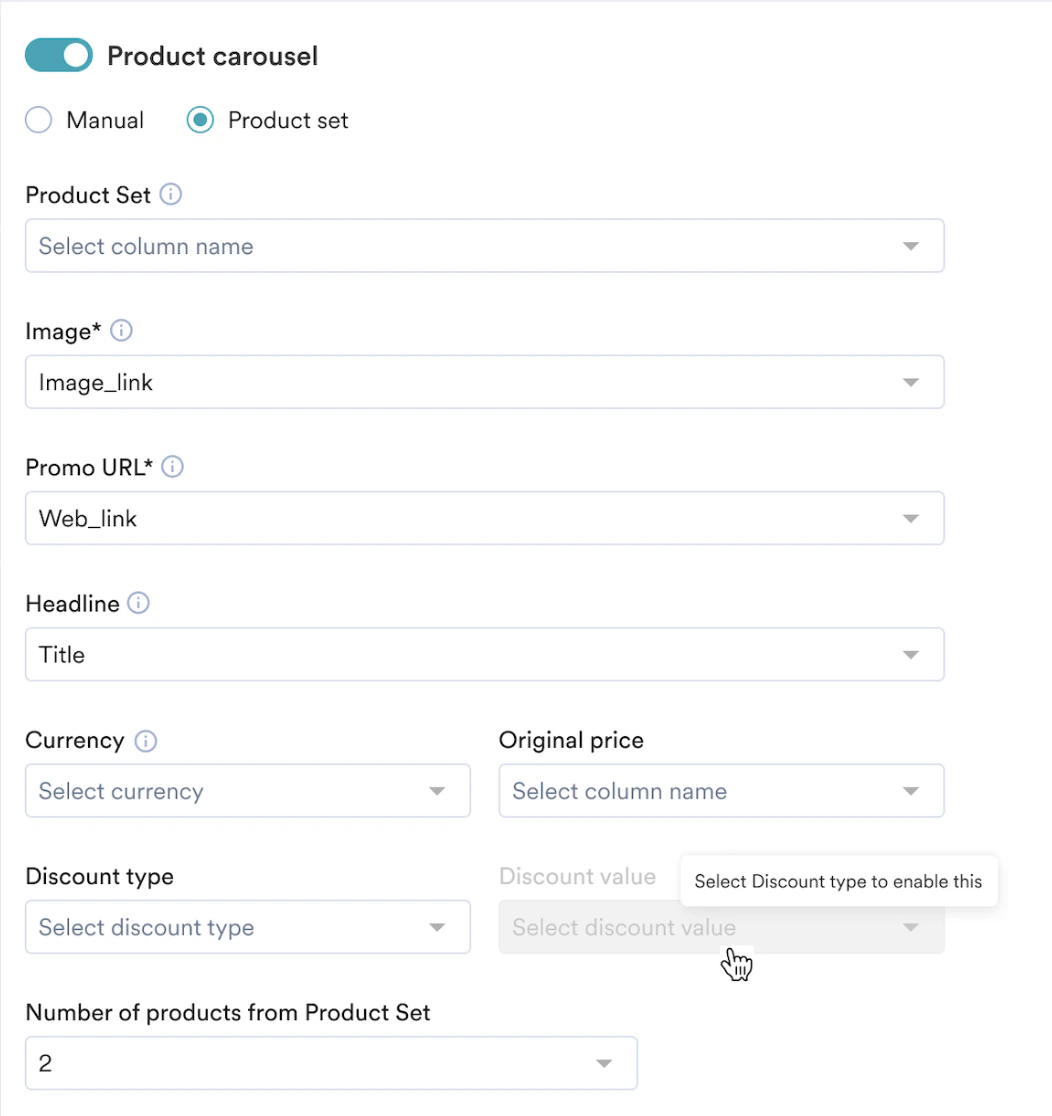
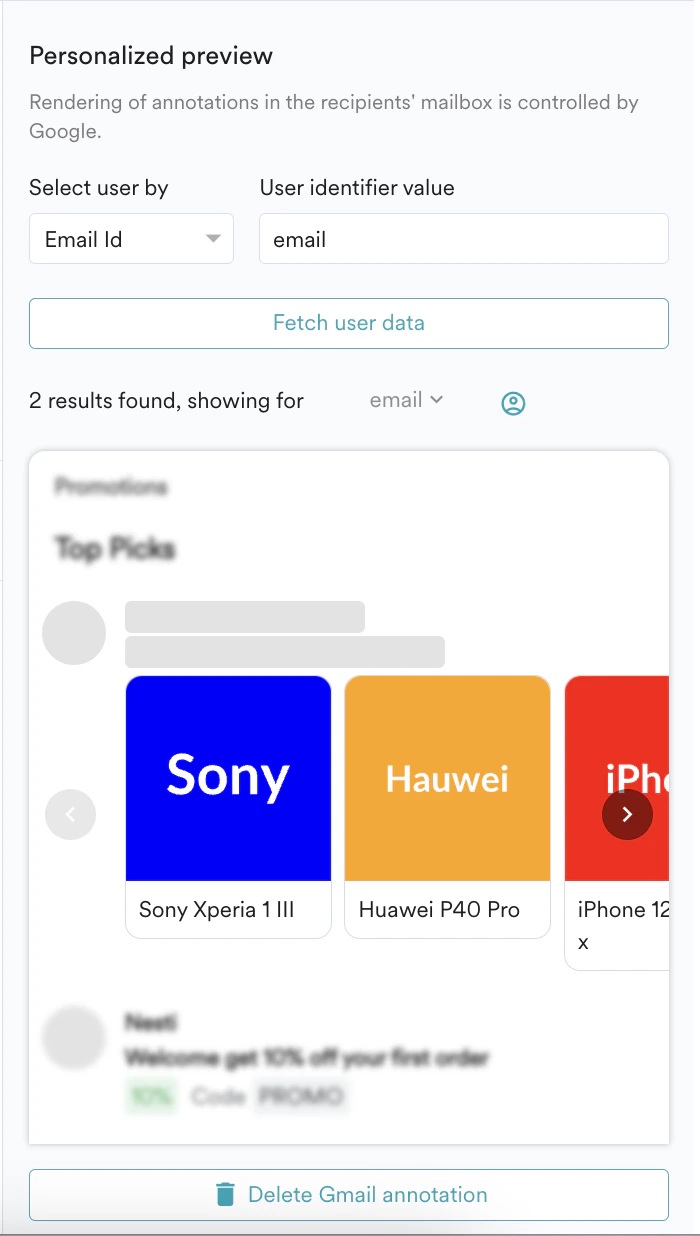
- You can preview Personalized preview of the product carousel by selecting the user and identifier value.
- Click Delete Gmail annotation to delete the created product carousel.
View Created Email Annotations
After creating the email annotations, you can view the created annotations. Perform the following steps to view the created email annotations.- Log in to the MoEngage dashboard.
- On the left navigation menu in the MoEngage dashboard, click Engage.
- In the All campaigns page, select the campaign for which you created email annotations.
- In the Campaign analytics and info page, click the Info tab and navigate to the Gmail annotations section.
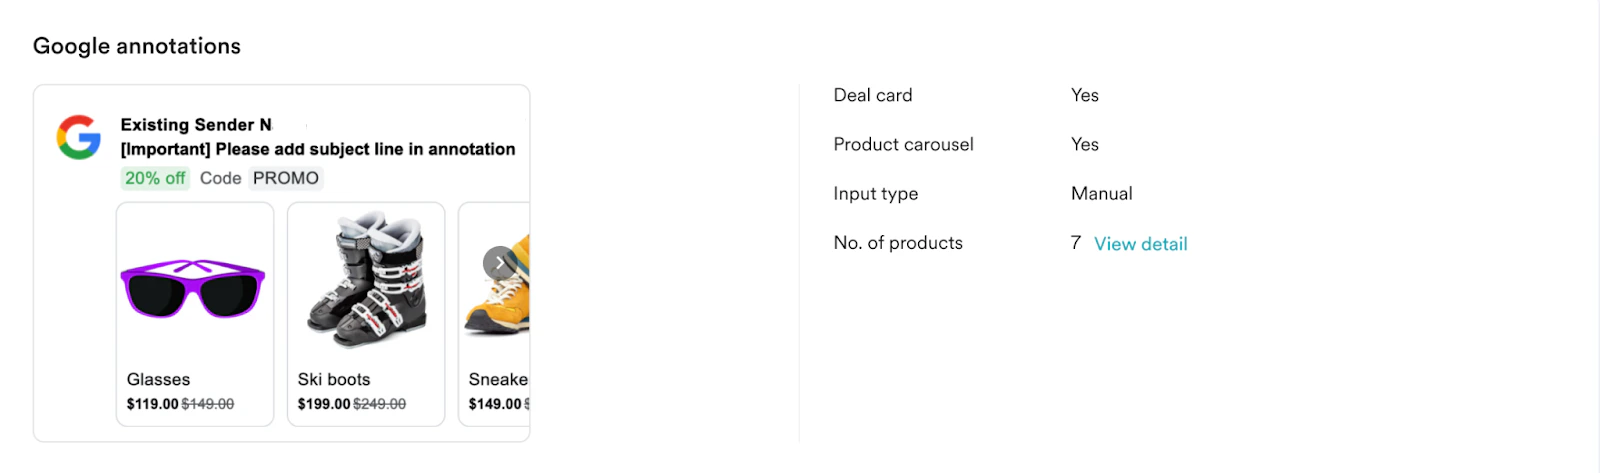
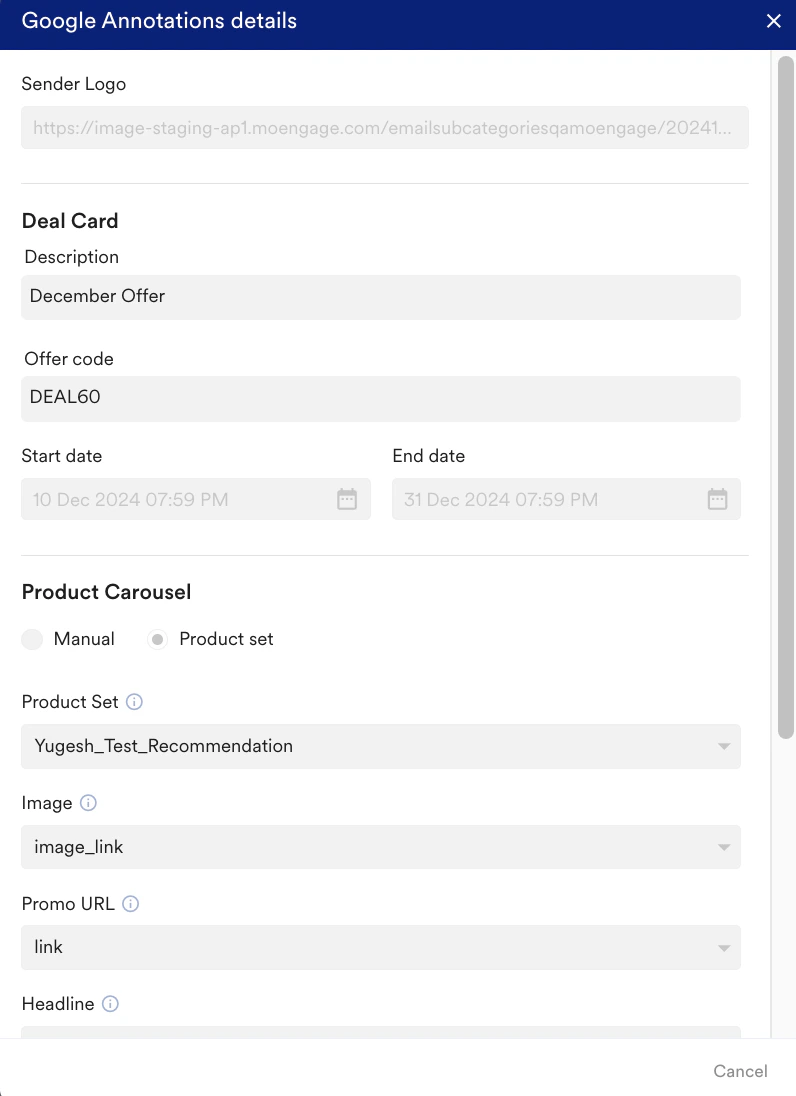
- Click View details in the Gmail Annotations section to view the annotation details.
- For Product Carousels, you can view details of each product under the respective product headlines.