Amazon Connect × MoEngage
The integration of MoEngage and Amazon Connect empowers businesses to automate their customer engagement process through seamless data synchronization. With this integration, you can:- Automatically create MoEngage user profiles when new customers contact your support center.
- Track customer service interactions as events for behavioral segmentation.
- Trigger personalized campaigns based on contact center outcomes.
- Consolidate contact center data with marketing data for complete customer insights.
Use Cases
Integrating Amazon Connect with MoEngage helps you solve the following key use cases:- Real-time user profile creation : When a prospect calls your support line for the first time, their phone number and any information collected during the call (including name, email, and inquiry type) are automatically sent to MoEngage to create a new user profile. This enables immediate enrollment to nurture campaigns.
- Event tracking and segmentation : Every customer service interaction is logged as an event in MoEngage, including details such as queue name, agent ID, call duration, and resolution status. This enables segmentation based on support history (for example, “Users who contacted support about billing in the last 30 days”).
- Profile enrichment for vip customers : High-value customers identified during calls can be tagged with special attributes (for example, customer_segment: “VIP”), automatically enrolling them in premium engagement campaigns and priority support workflows.
Prerequisites
To set up the integration, ensure you have the following:
- An active Amazon Connect instance with administrator access.
- Access to AWS Lambda with permissions to create functions.
- MoEngage API Credentials.
- On the MoEngage UI, navigate to Settings > Account > APIs.
- Copy the ID under Workspace ID (earlier app id).
- Copy the Data under API keys.
- Data Center IDs are assigned when signing up with MoEngage. Your data center ID can be identified from the dashboard URL. For example, if your dashboard URL is https://dashboard-04.moengage.com/v4/#/auth, your data center is data center 04, and the data center ID is DC-04. For more information, refer to Data Centers in MoEngage.
Step 1: AWS Lambda Configuration
First, create the Lambda function that receives data from Amazon Connect and sends it to the MoEngage API (for example, Customer API or Event API) using the customer’s unique MoEngage App ID and API Key.Step 1.1: Create the Lambda Function
To create the Lambda function, perform the following steps:- Navigate to the AWS Lambda Console and click Create function.
- Choose Author from scratch.
- Configure the function:
- Function name : Type a descriptive name (for example, MoEngage-Connect-Handler).
- Runtime : Select your desired runtime. For example, let’s consider Python 3.11.
For more information, refer to Lambda Developer Guide.
- Click Create function.

Step 1.2: Add code and Dependencies
To add code and dependencies, perform the following steps:- Add Code : Navigate to the Code tab and paste your function’s code. This code must read the incoming event from Connect, build the JSON payload for your API, and send it. See the
moengage_lambda_handler.pyfile for a production-ready example based on our testing. - Add Dependencies (Layers) : If your code requires libraries not included in Lambda (like requests for Python), add them.
- Scroll to the Layers section in your Lambda function page and click Add a layer.
- Select AWS layers and choose a pre-built layer (for example,
AWSSDKPandas-Python311includes therequestslibrary).
- Deploy : Click Deploy to save your code and layer changes.
Step 1.3: Configure Lambda Permissions and Copy ARN
To configure lambda permissions and copy ARN, perform the following steps:- Grant Permissions : Your function must have a resource-based policy that allows Amazon Connect to call it.
- Navigate to the Configuration >Permissions tab.
- Scroll to Resource-based policy and click Add permissions.
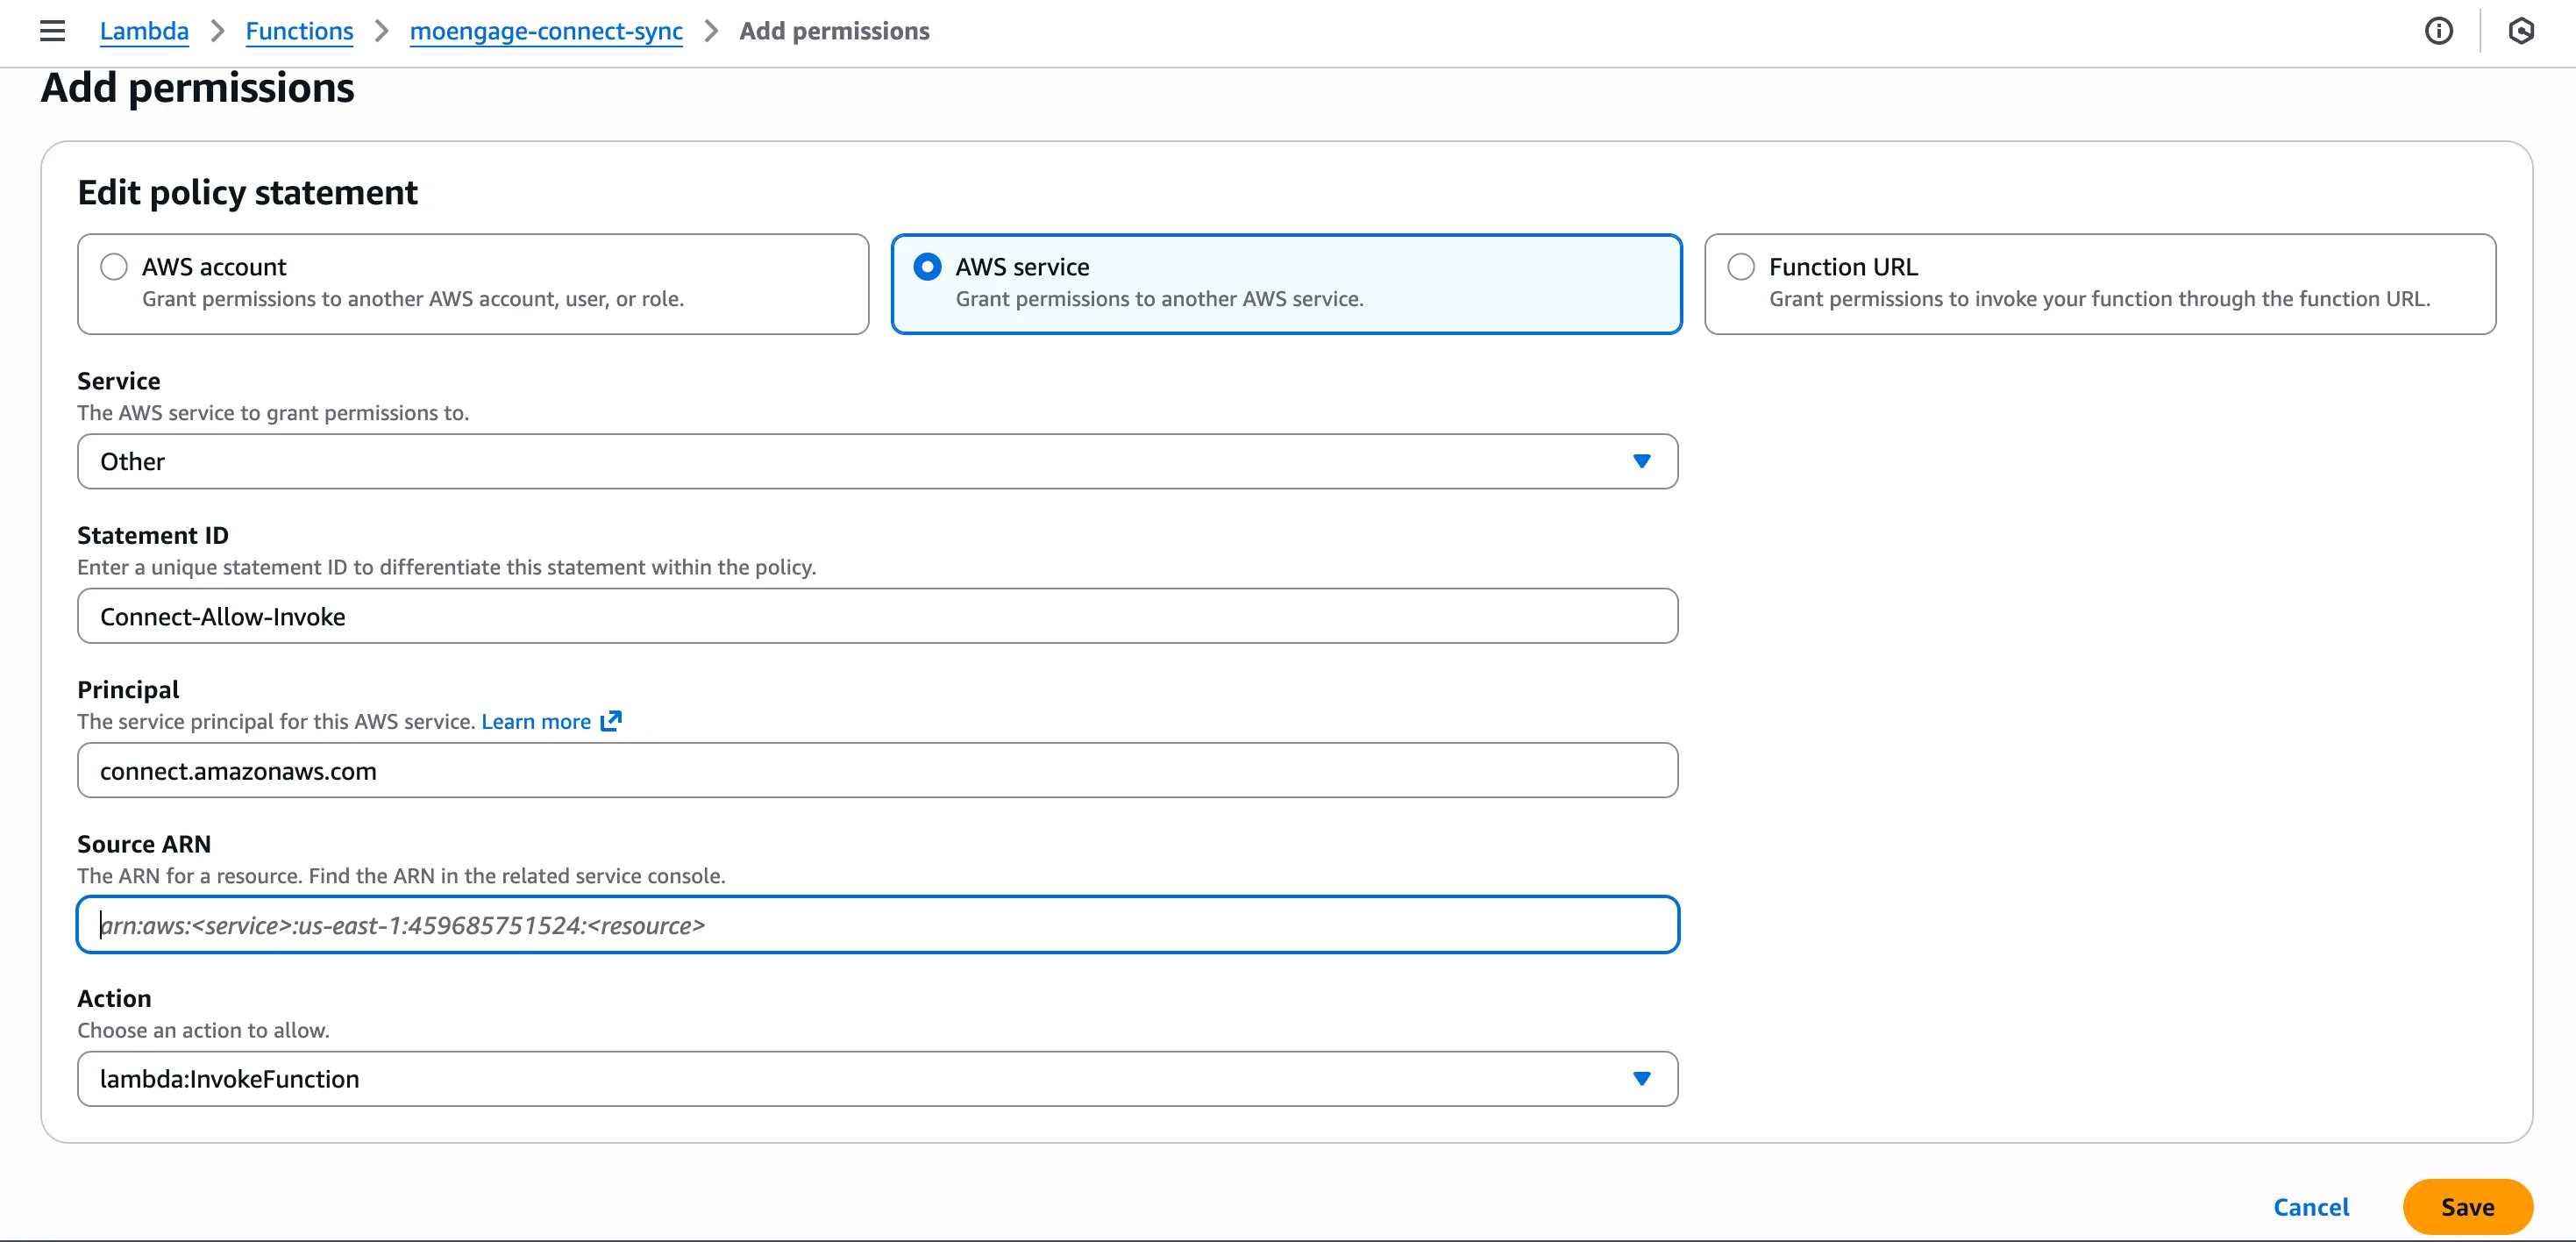
- Select AWS service. If Amazon Connect is not in the Service list, select Other.
- Fill in the fields:
- Statement ID :
Connect-Allow-Invoke(A unique identifier for this specific permission rule. This name clearly describes the statement’s purpose: Allowing Connect to Invoke the Lambda function) - Principal :
connect.amazonaws.com(This is the Service Principal (the official identity) of the Amazon Connect service within AWS. By setting the Principal to this value, you are explicitly granting the Amazon Connect service the right to act on your Lambda function). - Source ARN : Your Amazon Connect Instance ARN (for example,
arn:aws:connect:us-east-1:ACCOUNT_ID:instance/INSTANCE_ID). - Action :
lambda:InvokeFunction
- Statement ID :
- Click Save.
- Copy ARN : Copy your Lambda function’s ARN from the top of the page. You will need this for the next step.
- You can begin with the provided sample code, which utilizes the Data API for customer creation. Modify this code to suit your specific requirements or develop your own from scratch. On the Code tab, overwrite the existing default code with the sample.
Step 2: Amazon Connect Configuration
To configure the Amazon Connect, perform the following steps:Step 2.1: Create or Modify Contact Flow
To create or modify the contact flow, perform the following steps:- Log in to your Amazon Connect instance.
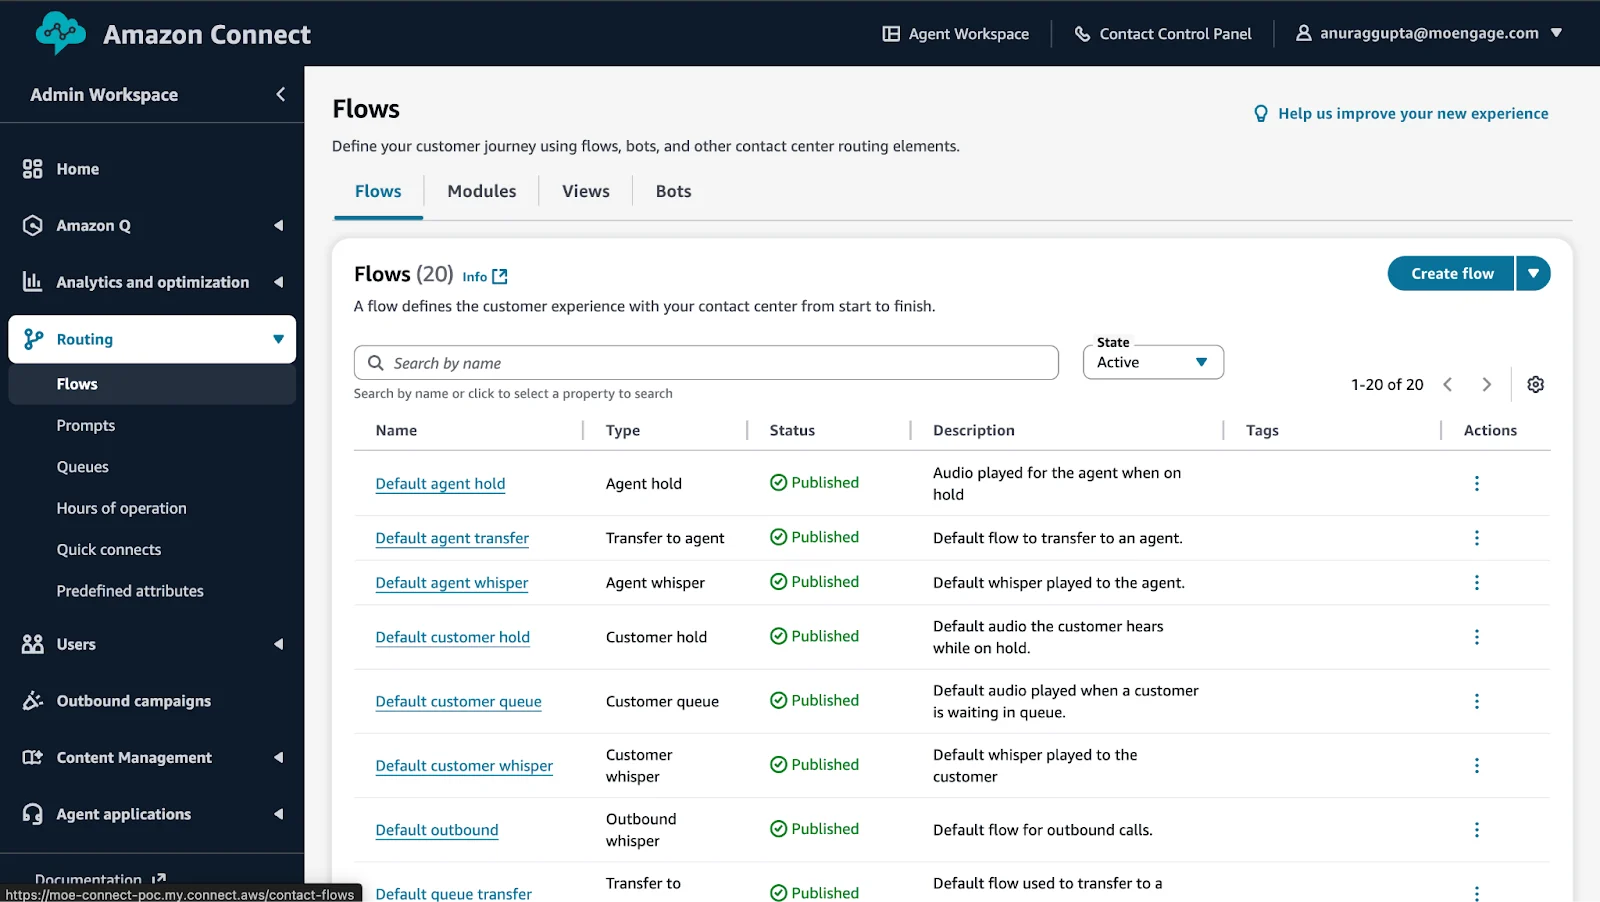
- Navigate to Routing > Flows.
- Click Create contact flow or edit an existing flow.
- Add the following blocks to your flow:
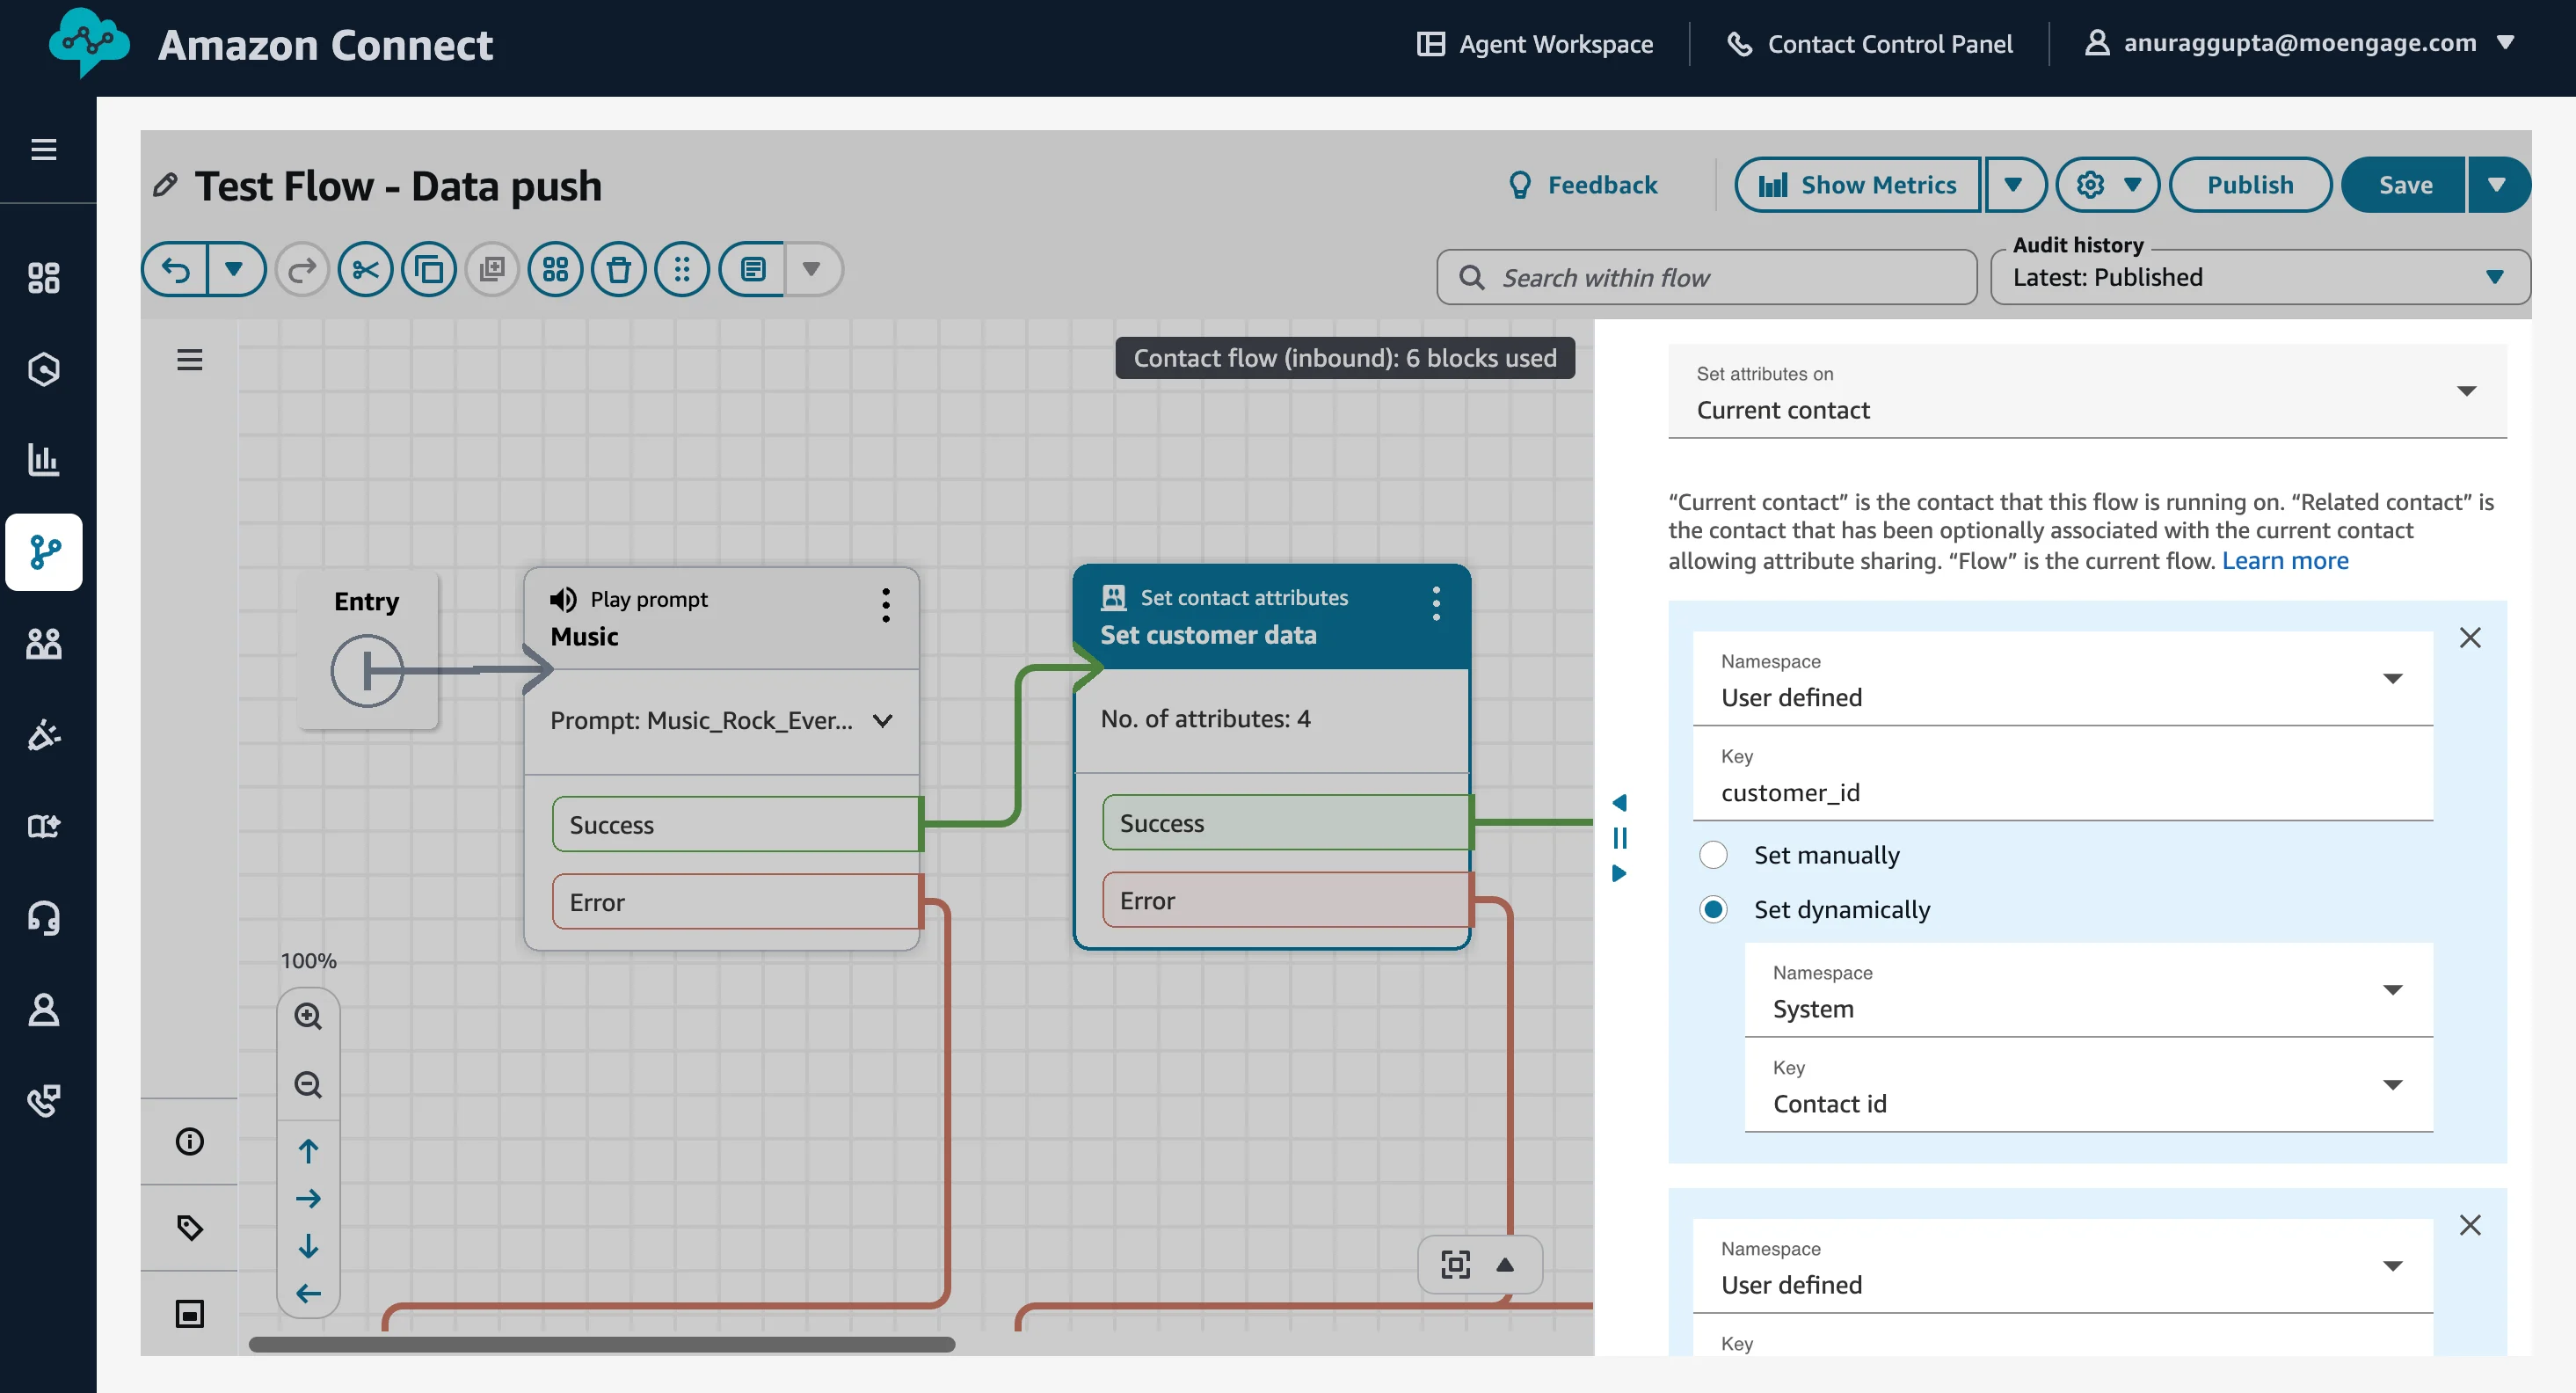
- Set contact attributes block : This block captures customer data to send to MoEngage.
- Drag a Set contact attributes block into your flow.
- Configure Attributes.
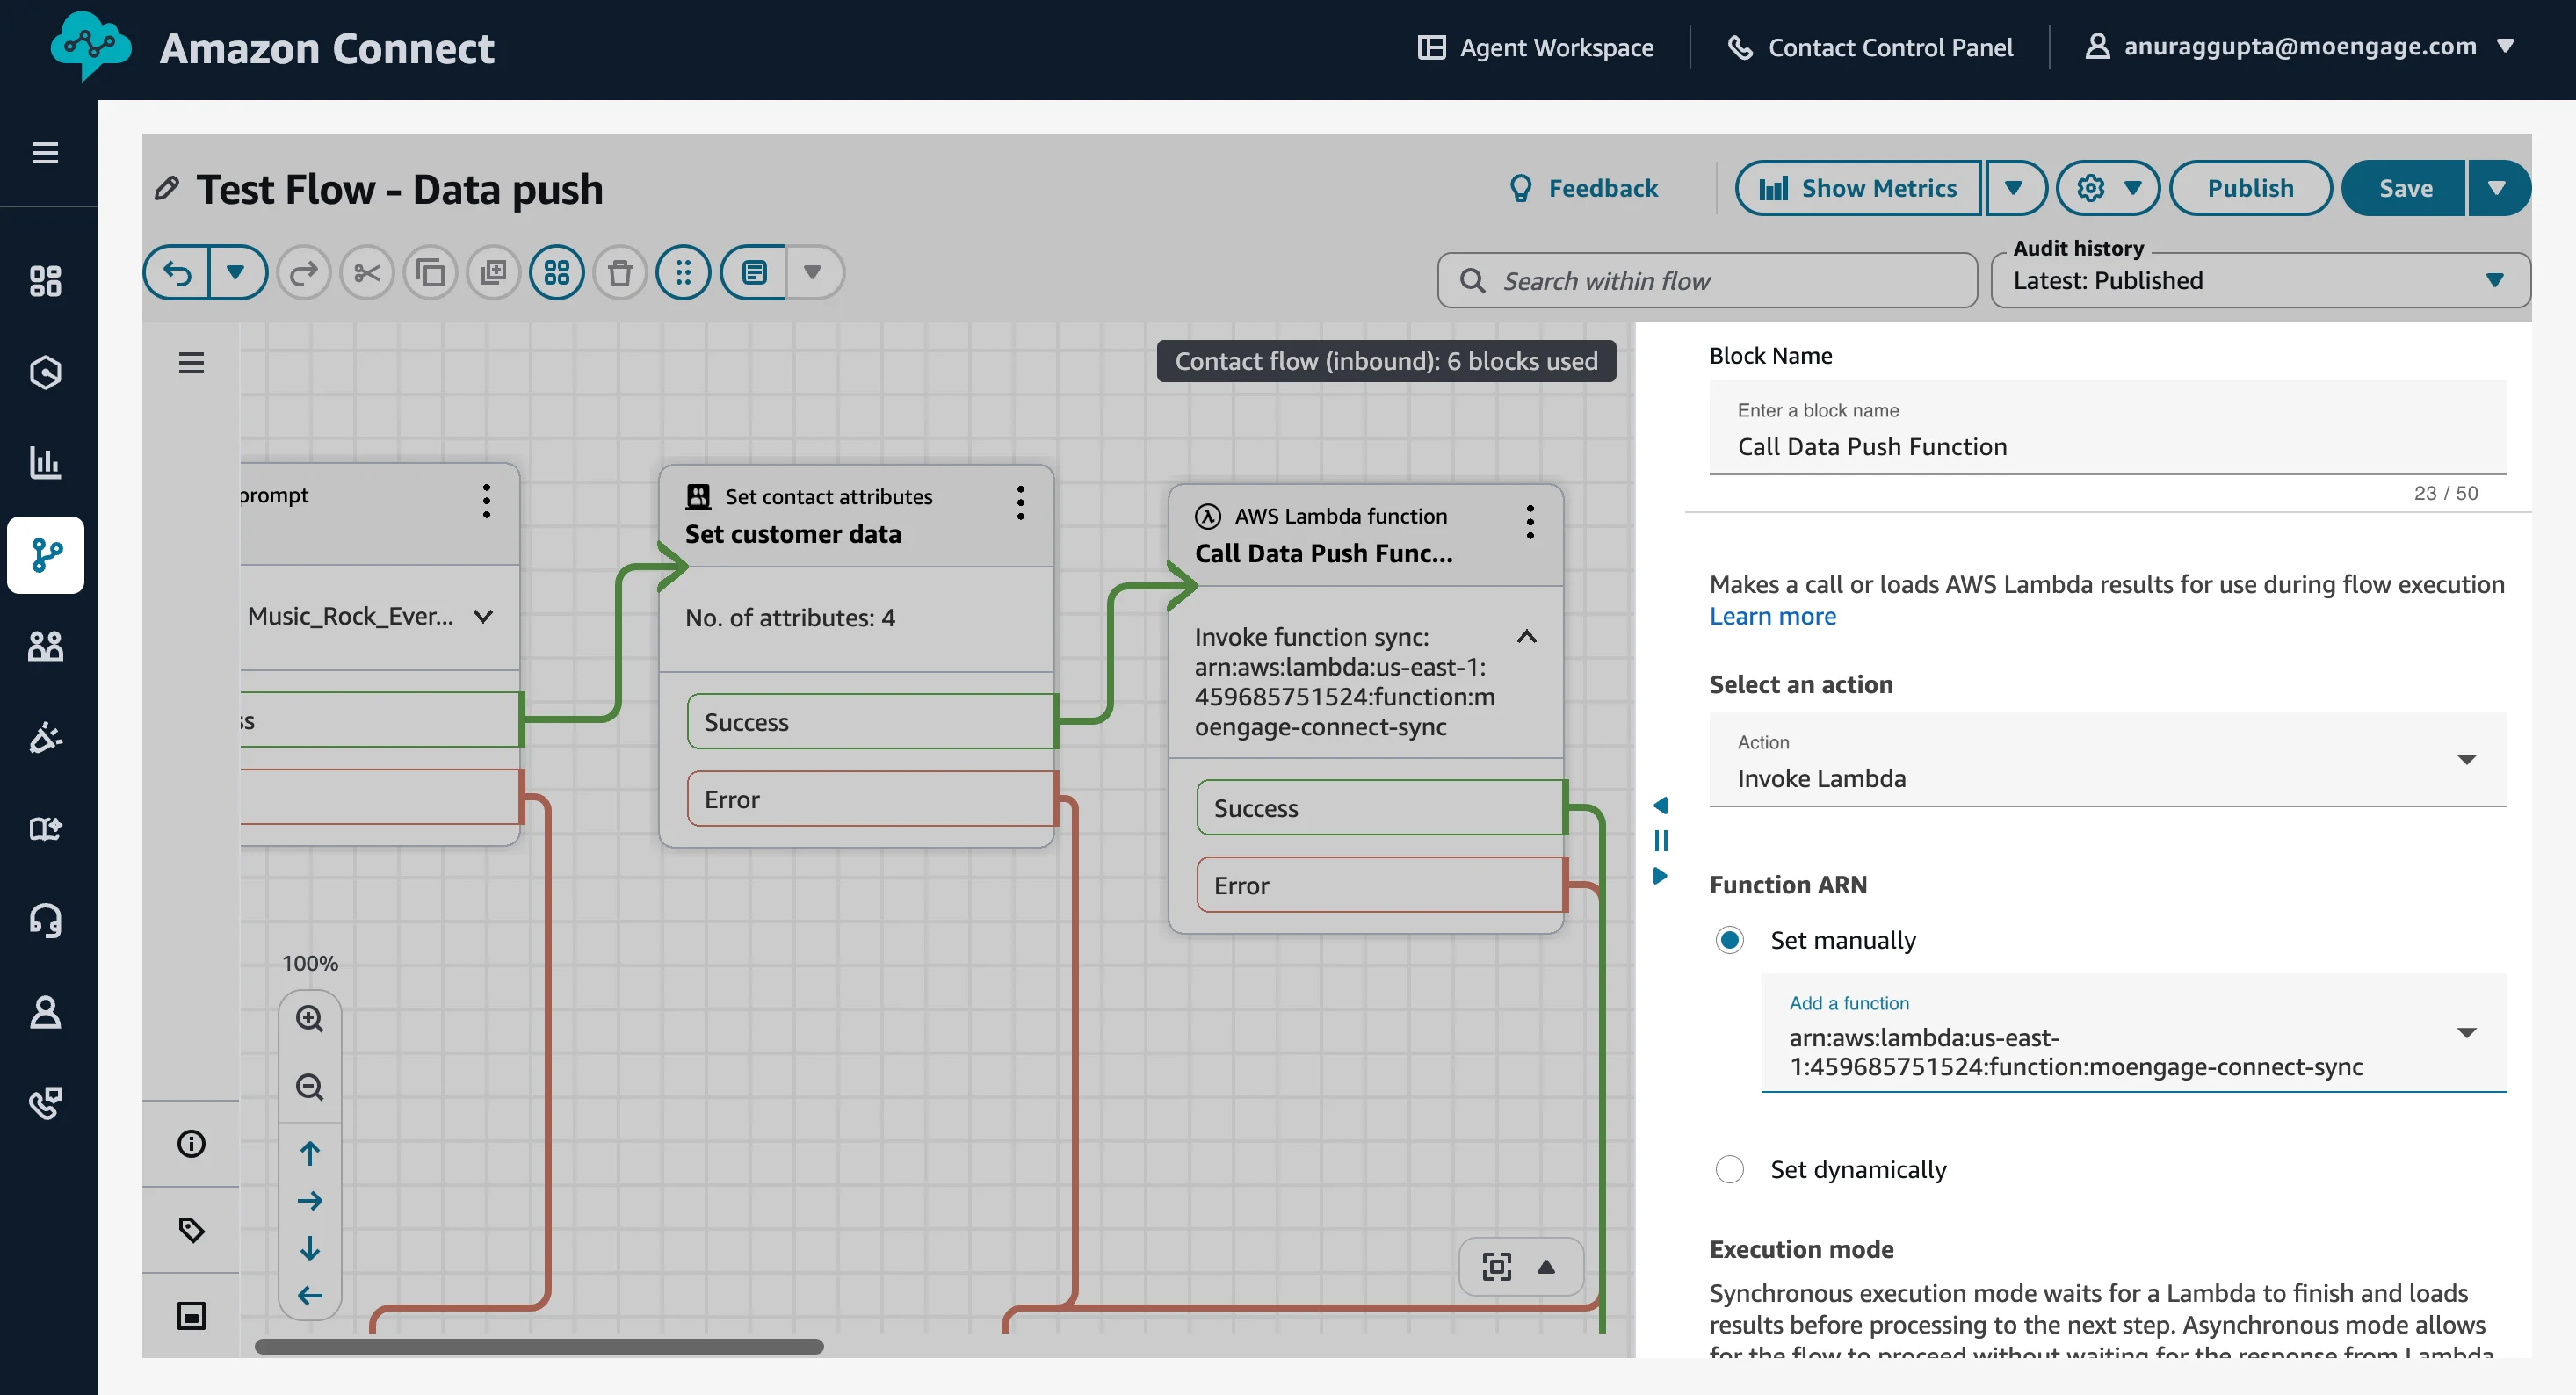
- Invoke the AWS Lambda Function Block:
- Drag an Invoke AWS Lambda function block.
- You can select your Lambda function from the drop-down menu or copy and paste the function ARN from the AWS Lambda section.
- Leave Function input parameters empty (the function will receive all contact data automatically).
- Connect the flow.
- Connect your blocks (Entry Point > Set contact attributes > Invoke AWS Lambda function(continue with your flow)).
Step 2.2: Publish and Assign the Contact Flow
To publish and assign the contact flow, perform the following steps:- Click Save to save your changes.
- Click Publish to activate the flow.
- Assign the flow to a phone number or queue.
Step 3: Testing and Validation
Step 3.1: Verify Lambda Execution
To verify Lambda execution, perform the following steps:- Go to your Lambda function in the AWS Console.
- Navigate to Monitor >View CloudWatch logs.
- Open the latest log stream and verify successful execution:
- Check that user payload contains expected data.
- Confirm that there are no error messages.
Step 3.1: Verify Data in MoEngage
To verify the data in MoEngage, perform the following steps:
- On the left navigation menu in the MoEngage UI, click Segment >User Search.
- Search for the test customer using the customer ID or phone number..
- Verify user profile contains contact center attributes.