> ## Documentation Index
> Fetch the complete documentation index at: https://moengage.com/docs/llms.txt
> Use this file to discover all available pages before exploring further.
# Brand Book
> Manage your brand's visual identity from one place upload logos, define colors, configure fonts, and set styles for consistent execution across all campaigns.
The MoEngage **Brand Book** is a centralized brand hub that manages, stores, and distributes core brand identity assets across the MoEngage marketing platform. This tool enables brands to establish a single source of truth for their visual identity, facilitating consistent execution across multi-channel campaigns (Email, SMS, Push, Landing Pages, Pop-up messages, and In-App Messages).
When you publish brand elements such as logos, colors, fonts, and buttons your changes apply instantly across all active workspaces and channels.
Each workspace is limited to one active brand book. Currently, this feature is exclusive to **In-App campaigns** and does not support [Portfolio](/docs/user-guide/settings/account/portfolio/portfolio).
## Access the Brand Book
The brand book is managed at the account level. To access it, perform the following steps:
1. On the sidebar menu in MoEngage, point to the **Settings** icon  . The Settings menu expands.
2. Click **Account**, and then click **Brand Book**.
. The Settings menu expands.
2. Click **Account**, and then click **Brand Book**.
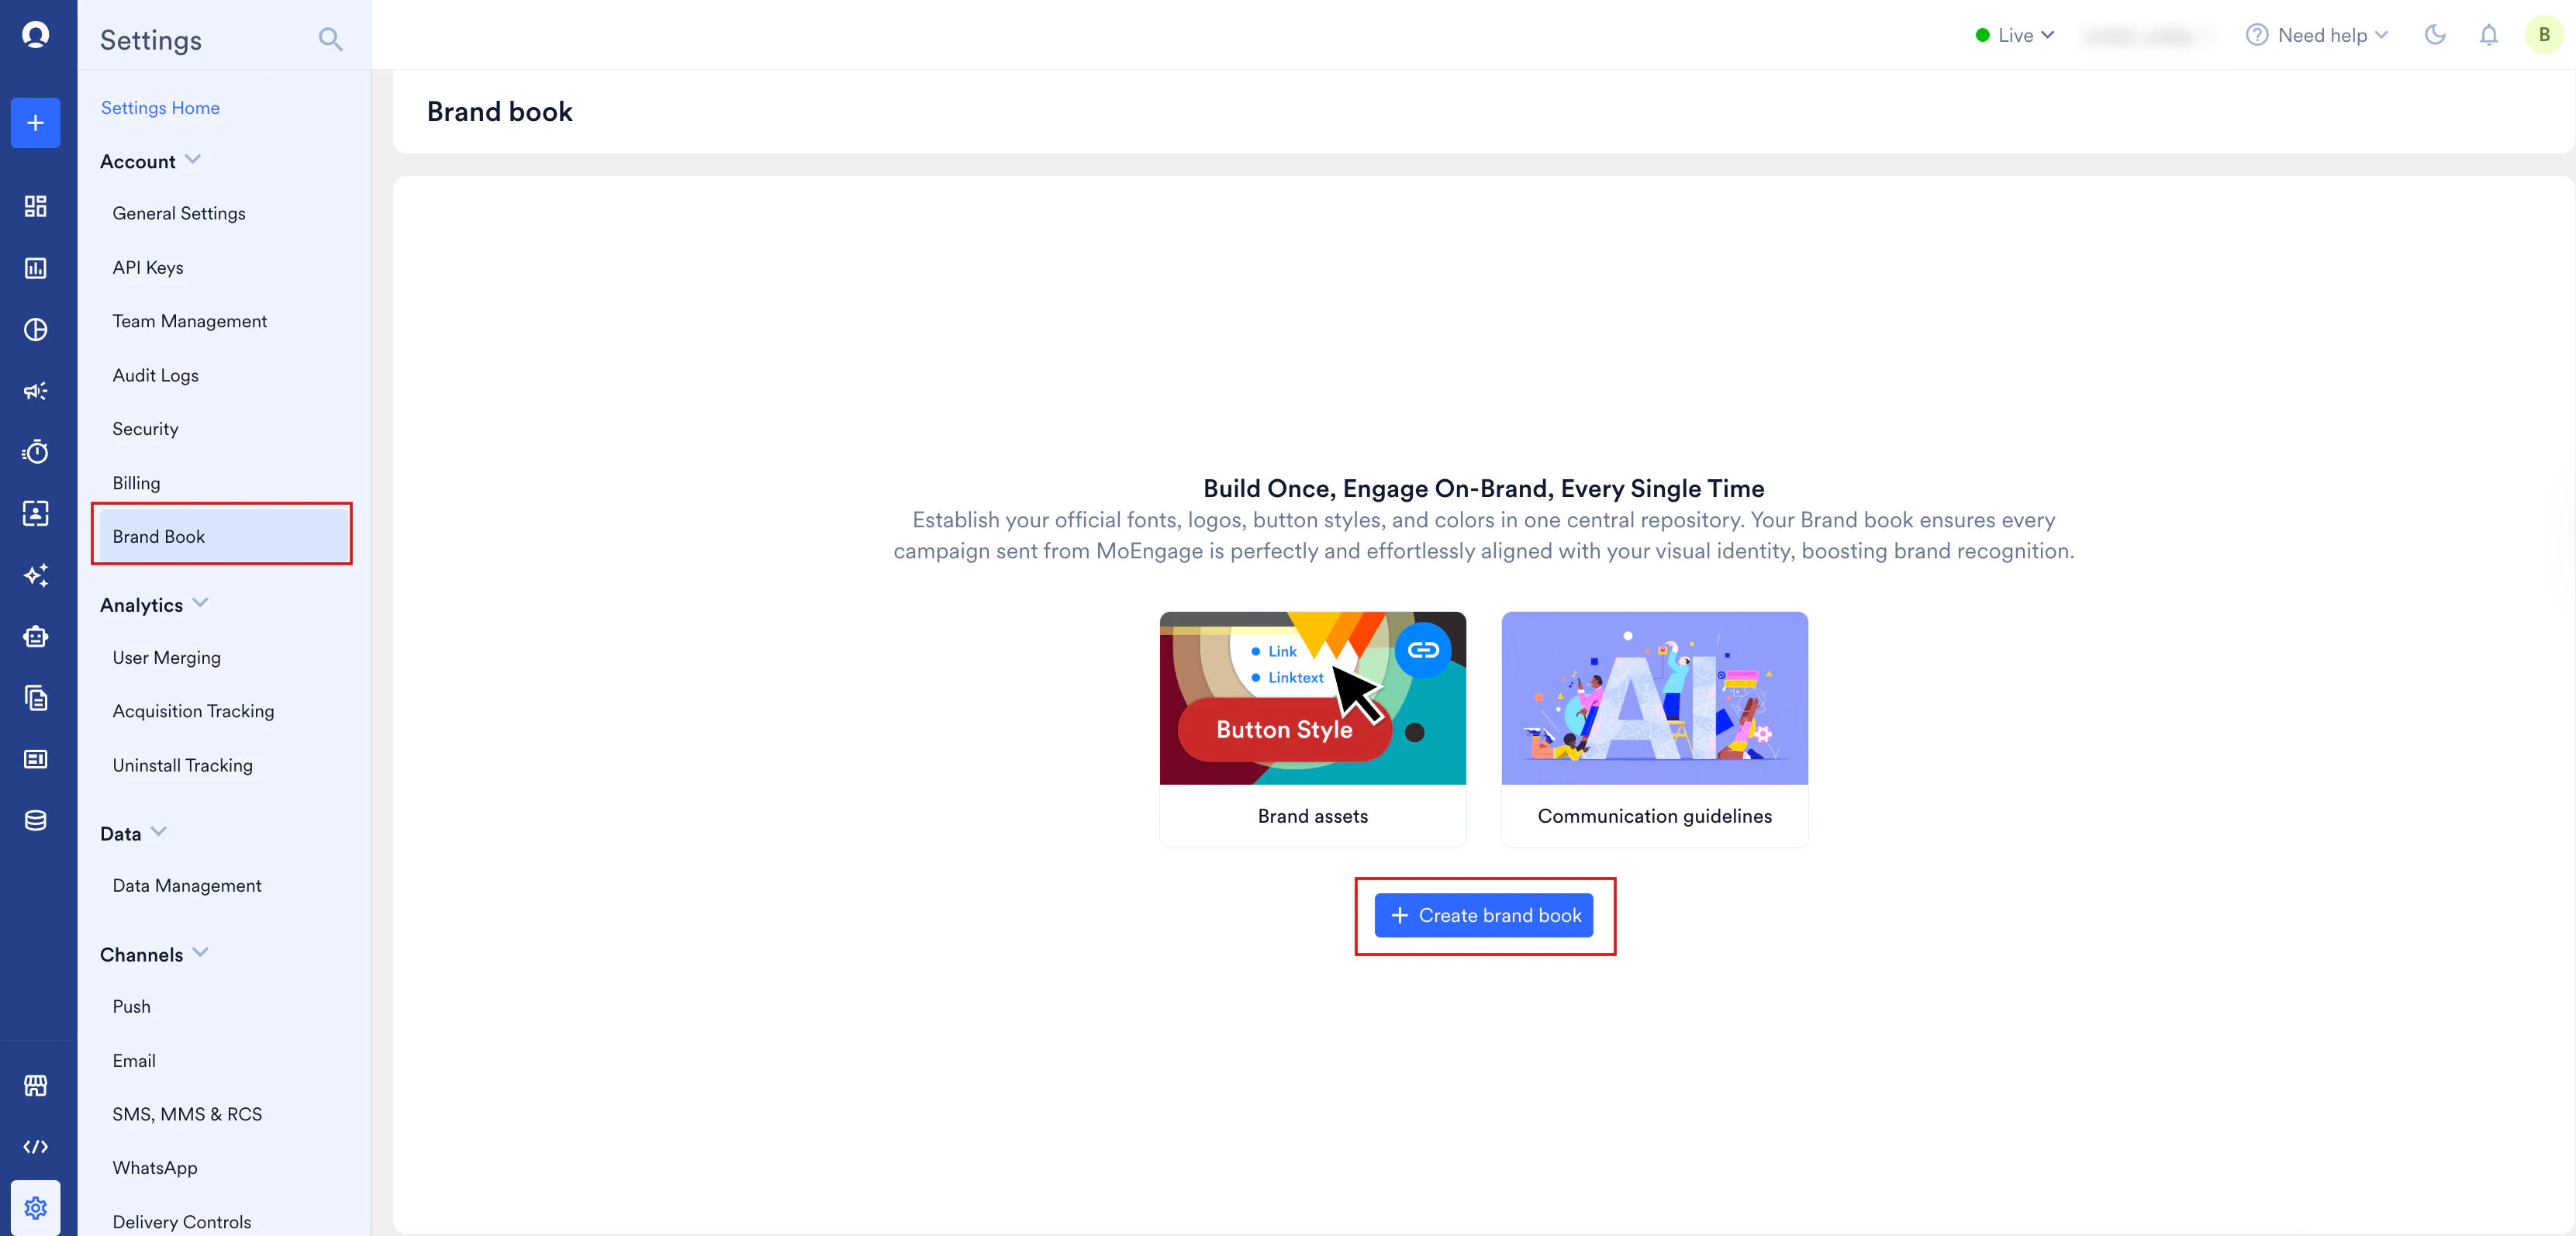 The **Brand Book** is positioned as a standalone option in the navigation pane, separated from standard configuration settings.
## Permissions and Access Control
The system enforces role-based access control for managing brand assets. Review your assigned permissions inside your current workspace to verify your access:
| Workspace Account Role | Access Permission Level | Functional Details |
| ---------------------- | ------------------------ | ------------------------------------------------------------------------------------------------ |
| **Admin / Manager** | Read, Create, and Modify | Full access to upload brand assets, change fonts, delete files, and publish your brand settings. |
## Create Your Brand Book
When you configure your brand book, select one of the following creation methods:
* [Import Through Website URL](#method-1-import-through-website-url)
* [Manual Setup from Scratch](#method-2-manual-setup-from-scratch)
### Method 1: Import Through Website URL
The platform fetches your visual identity directly from your brand's live website. To import via website URL, perform the following steps:
1. On the **Brand Book** landing page, click **Create brand book**. The **Create brand book** dialog box appears.
2. In the **Enter your brand website URL** box, type or paste your web address (for example, `https://www.example.com`). Leading and trailing whitespace is removed automatically.
3. Click **Import**.
The **Brand Book** is positioned as a standalone option in the navigation pane, separated from standard configuration settings.
## Permissions and Access Control
The system enforces role-based access control for managing brand assets. Review your assigned permissions inside your current workspace to verify your access:
| Workspace Account Role | Access Permission Level | Functional Details |
| ---------------------- | ------------------------ | ------------------------------------------------------------------------------------------------ |
| **Admin / Manager** | Read, Create, and Modify | Full access to upload brand assets, change fonts, delete files, and publish your brand settings. |
## Create Your Brand Book
When you configure your brand book, select one of the following creation methods:
* [Import Through Website URL](#method-1-import-through-website-url)
* [Manual Setup from Scratch](#method-2-manual-setup-from-scratch)
### Method 1: Import Through Website URL
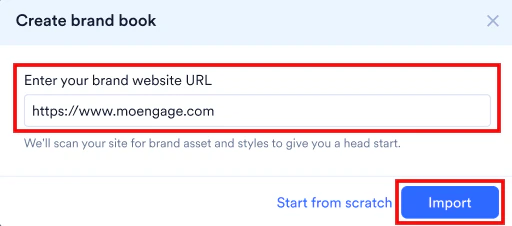
The platform fetches your visual identity directly from your brand's live website. To import via website URL, perform the following steps:
1. On the **Brand Book** landing page, click **Create brand book**. The **Create brand book** dialog box appears.
2. In the **Enter your brand website URL** box, type or paste your web address (for example, `https://www.example.com`). Leading and trailing whitespace is removed automatically.
3. Click **Import**.
 ### Method 2: Manual Setup from Scratch
If your target site is protected by corporate access firewalls, or if you prefer full manual control, define your style parameters from scratch:
1. On the **Brand Book** page, click **Create Brand Book**. The **Create brand book** dialog box appears.
2. Click **Enter manually**.
### Method 2: Manual Setup from Scratch
If your target site is protected by corporate access firewalls, or if you prefer full manual control, define your style parameters from scratch:
1. On the **Brand Book** page, click **Create Brand Book**. The **Create brand book** dialog box appears.
2. Click **Enter manually**.
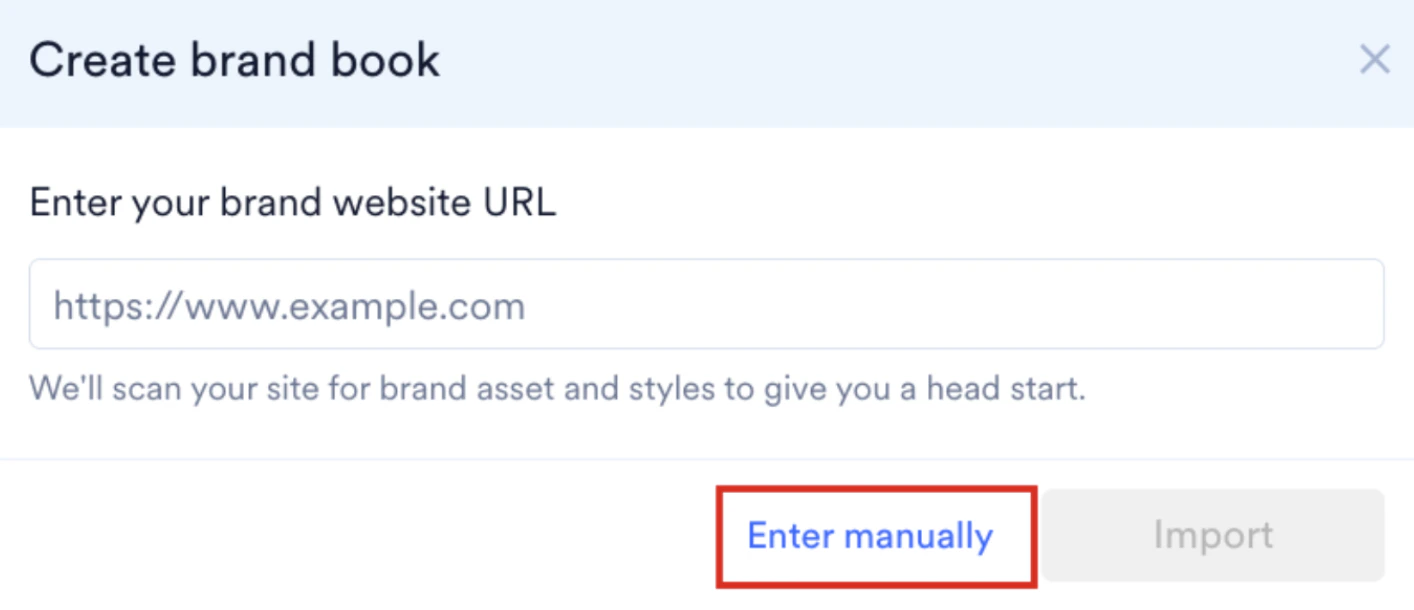 The brand book page appears, where you can configure your individual brand panels (logos, colors, fonts, and button styles).
## Configure Brand Assets
The asset manager is divided into visual modules under the **Brand Assets** tab. You can save and publish your details one module at a time. Partial configurations are valid, and you can return to add details later.
Manage your official logos to enable selection inside campaign visual editors. To upload and manage your brand logos, perform the following steps:
1. In the **Foundation** panel, click **Logo Style** to expand the section.
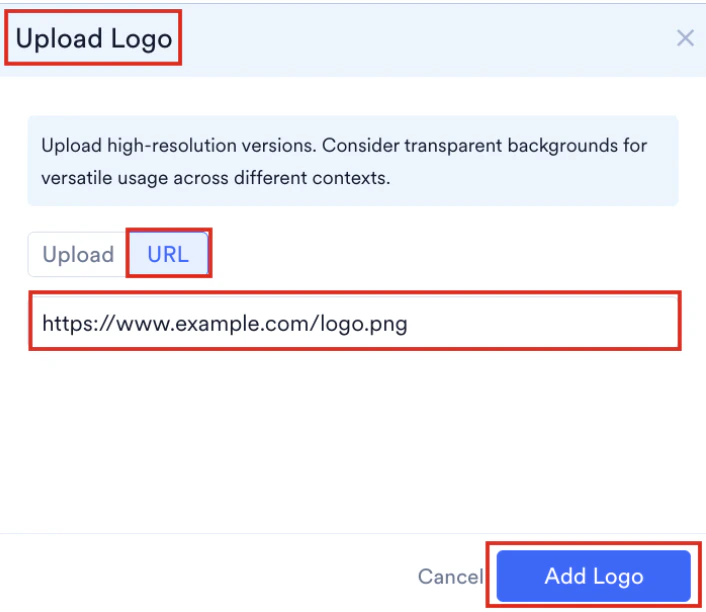
2. Click **+ Add Logo** on the right side of the panel. The **Upload Logo** dialog box opens.
The brand book page appears, where you can configure your individual brand panels (logos, colors, fonts, and button styles).
## Configure Brand Assets
The asset manager is divided into visual modules under the **Brand Assets** tab. You can save and publish your details one module at a time. Partial configurations are valid, and you can return to add details later.
Manage your official logos to enable selection inside campaign visual editors. To upload and manage your brand logos, perform the following steps:
1. In the **Foundation** panel, click **Logo Style** to expand the section.
2. Click **+ Add Logo** on the right side of the panel. The **Upload Logo** dialog box opens.
 3. To upload a local image file:
1. Click the **Upload** tab.
2. Drag and drop your logo file into the target zone, or click **upload from computer** to browse files. The uploader supports `.ico`, `.png`, `.gif`, `.svg`, and `.jpg` formats, with a maximum file size of 5 MB.
3. To upload a local image file:
1. Click the **Upload** tab.
2. Drag and drop your logo file into the target zone, or click **upload from computer** to browse files. The uploader supports `.ico`, `.png`, `.gif`, `.svg`, and `.jpg` formats, with a maximum file size of 5 MB.
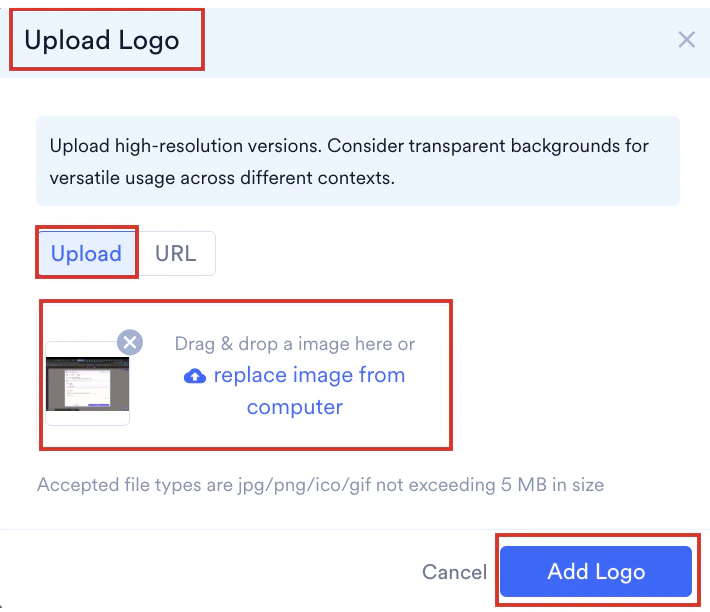 4. To import an image from a public web server:
1. Click the **URL** tab.
2. In the **Add URL here (only 1 URL at a time)** box, type or paste the direct image link (for example, `https://www.example.com/logo.png`). The URL must point directly to an image file.
3. Click **Add Logo**.
4. To import an image from a public web server:
1. Click the **URL** tab.
2. In the **Add URL here (only 1 URL at a time)** box, type or paste the direct image link (for example, `https://www.example.com/logo.png`). The URL must point directly to an image file.
3. Click **Add Logo**.
 5. (Optional) Under the **Logo Name** column, click the text box to enter a custom descriptor name containing between 5 and 150 characters.
 6. To manage your uploaded brand logos, do any of the following:
1. **To copy the direct file path**: Click the **Logo URL** icon
6. To manage your uploaded brand logos, do any of the following:
1. **To copy the direct file path**: Click the **Logo URL** icon  in the row of the logo, and copy its absolute web path to your clipboard.
2. **To delete a logo**: Under **Actions**, click the delete icon
in the row of the logo, and copy its absolute web path to your clipboard.
2. **To delete a logo**: Under **Actions**, click the delete icon  in the row of the logo, and then click **Delete** in the **Delete Logo** confirmation dialog box.
* You can add up to 10 logos per brand book.
* If long file names in the **Logo File** column are truncated with an ellipsis (...), hover to see the full name.
Set up your brand colors to keep your designs consistent and prevent unapproved color choices. To configure your brand color palettes, perform the following steps:
1. In the **Foundation** panel, click **Brand Colors** to expand the section.
2. Click **+ Add Color** on the right side of the panel. A new color row is added to the table.
in the row of the logo, and then click **Delete** in the **Delete Logo** confirmation dialog box.
* You can add up to 10 logos per brand book.
* If long file names in the **Logo File** column are truncated with an ellipsis (...), hover to see the full name.
Set up your brand colors to keep your designs consistent and prevent unapproved color choices. To configure your brand color palettes, perform the following steps:
1. In the **Foundation** panel, click **Brand Colors** to expand the section.
2. Click **+ Add Color** on the right side of the panel. A new color row is added to the table.
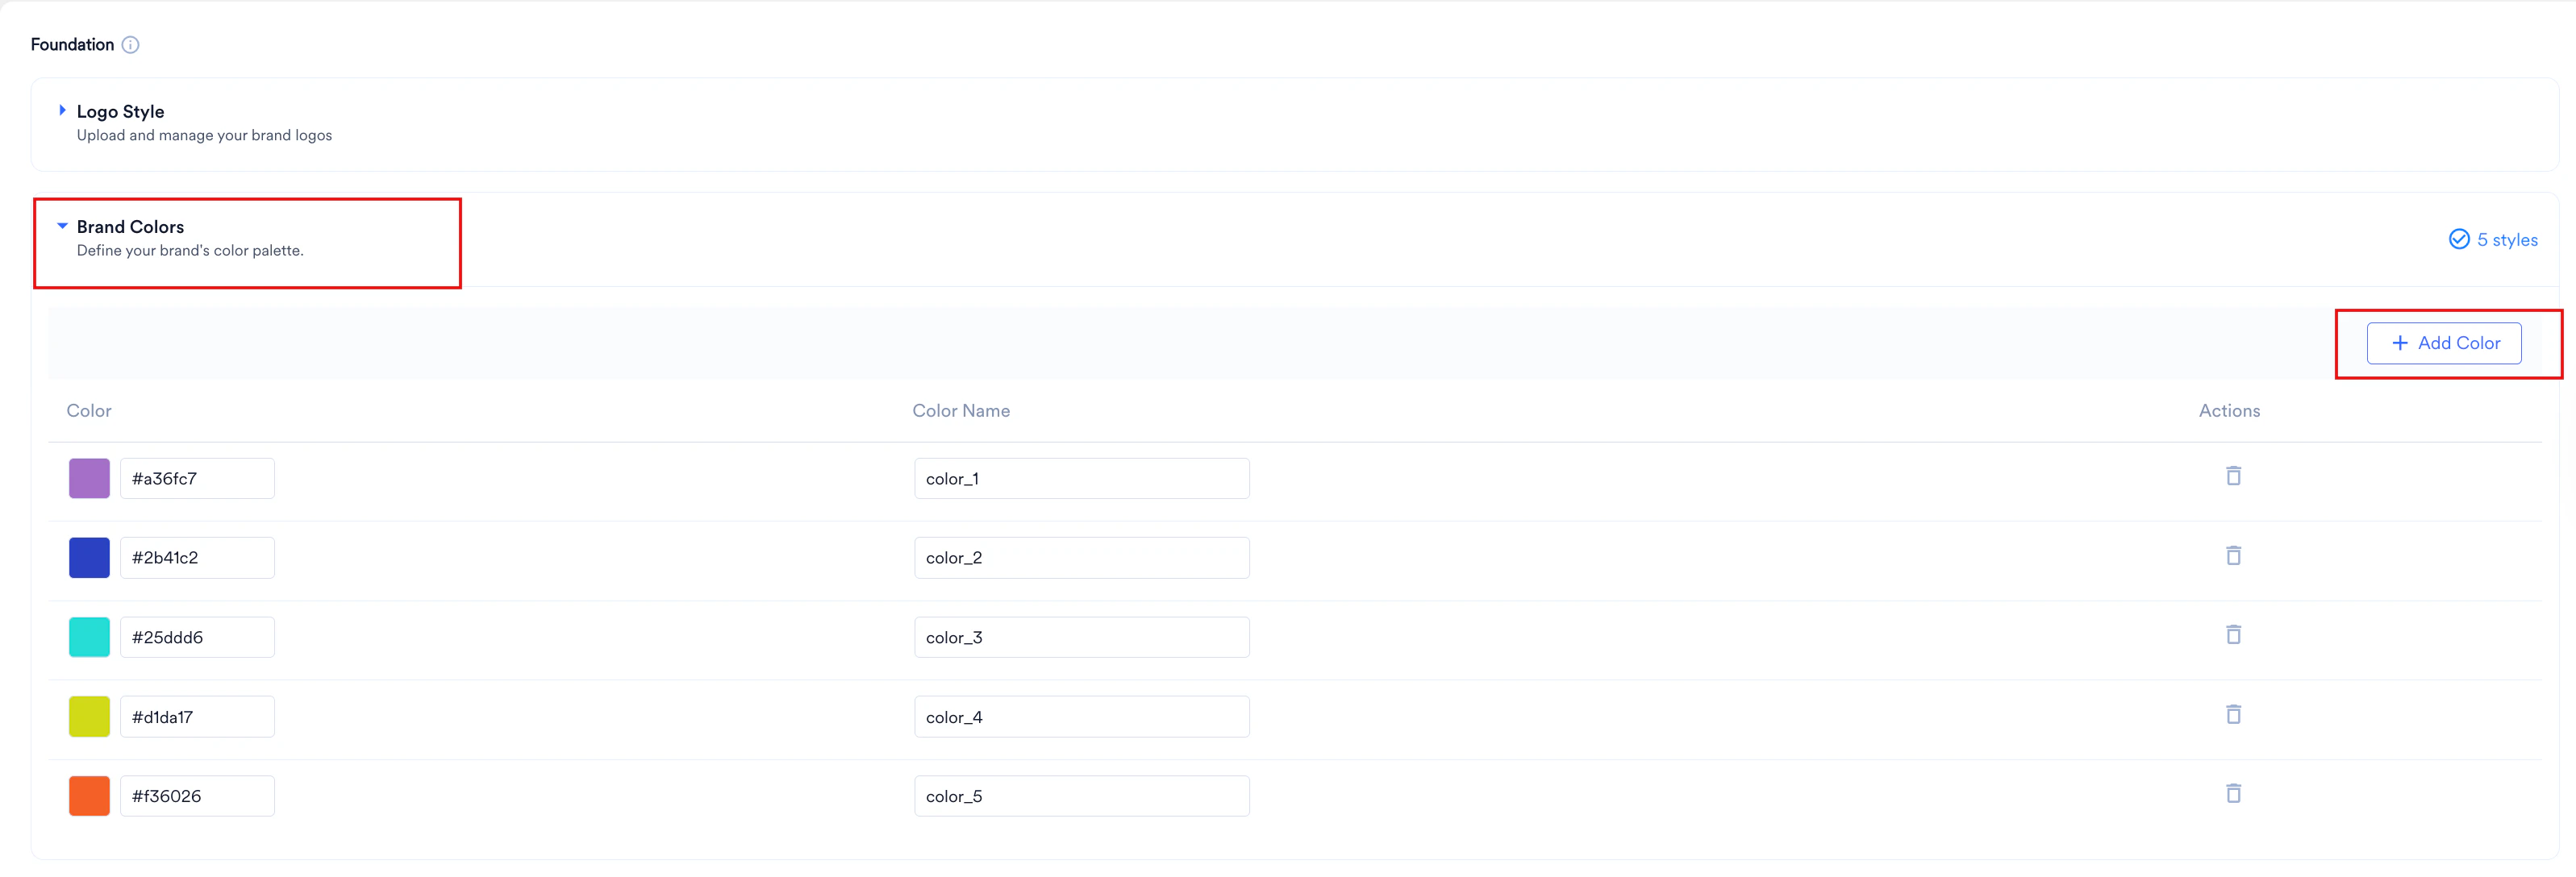 3. In the **Color** column, do one of the following:
1. Click the text box to type a six-digit hex code (for example, `#aa0566`).
3. In the **Color** column, do one of the following:
1. Click the text box to type a six-digit hex code (for example, `#aa0566`).
 4. Click the color preview box to open the color picker, where you can drag the pointer to select a color, or type custom values in the **Hex** box, or in the **R** (red), **G** (green), **B** (blue), and **A** (alpha) boxes. Duplicate hex codes are not allowed within the same palette.
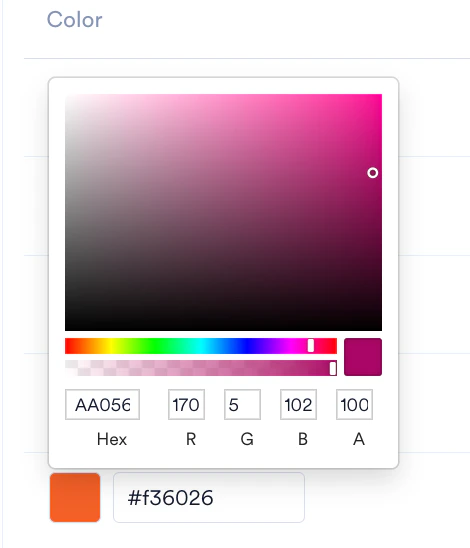 5. In the **Color Name** column, click the text box, and then type a unique descriptive name containing between 5 and 50 characters (for example, *Primary Brand Orange*).
 6. To remove a color from your palette, click the delete icon
  in the **Actions** column.
You can add up to 10 colors per brand book.
Upload custom typography files and map fallbacks to maintain consistency when custom fonts cannot be displayed. To upload and configure your custom fonts, perform the following steps:
1. In the **Foundation** panel, click **Fonts** to expand the section.
2. Click **+ Add font** on the right side of the panel. The **Add Font** wizard opens.
in the **Actions** column.
You can add up to 10 colors per brand book.
Upload custom typography files and map fallbacks to maintain consistency when custom fonts cannot be displayed. To upload and configure your custom fonts, perform the following steps:
1. In the **Foundation** panel, click **Fonts** to expand the section.
2. Click **+ Add font** on the right side of the panel. The **Add Font** wizard opens.
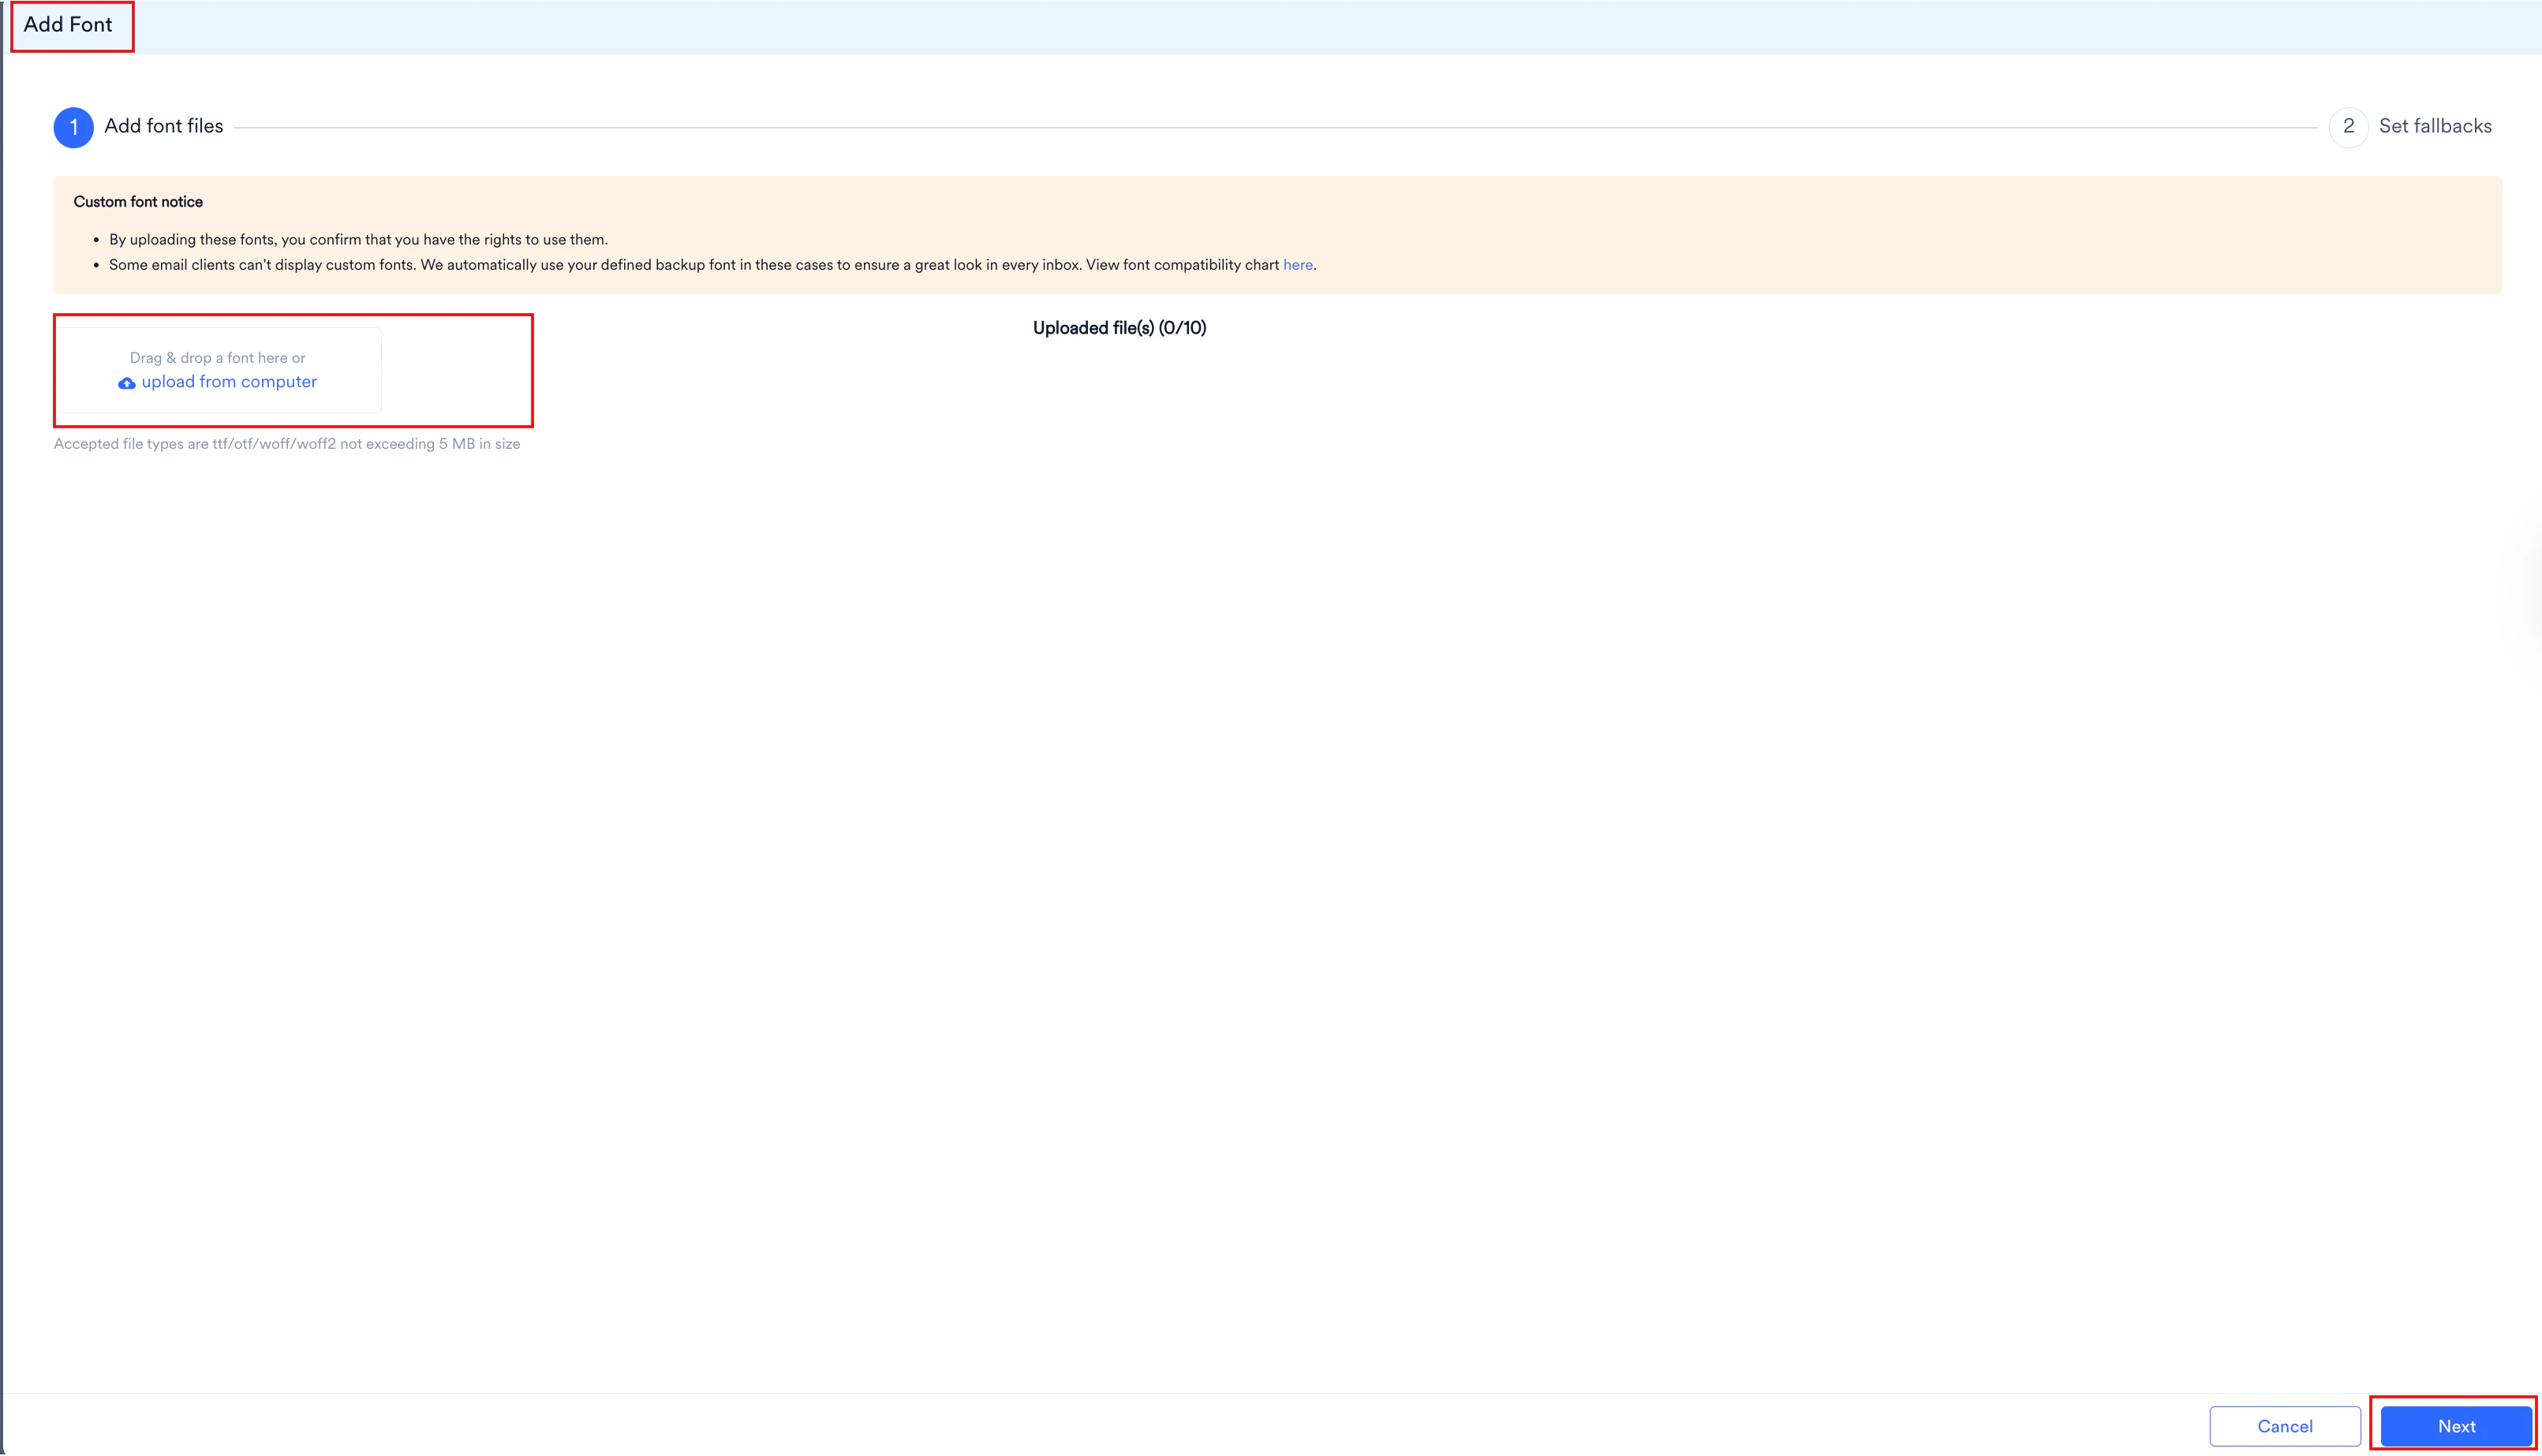
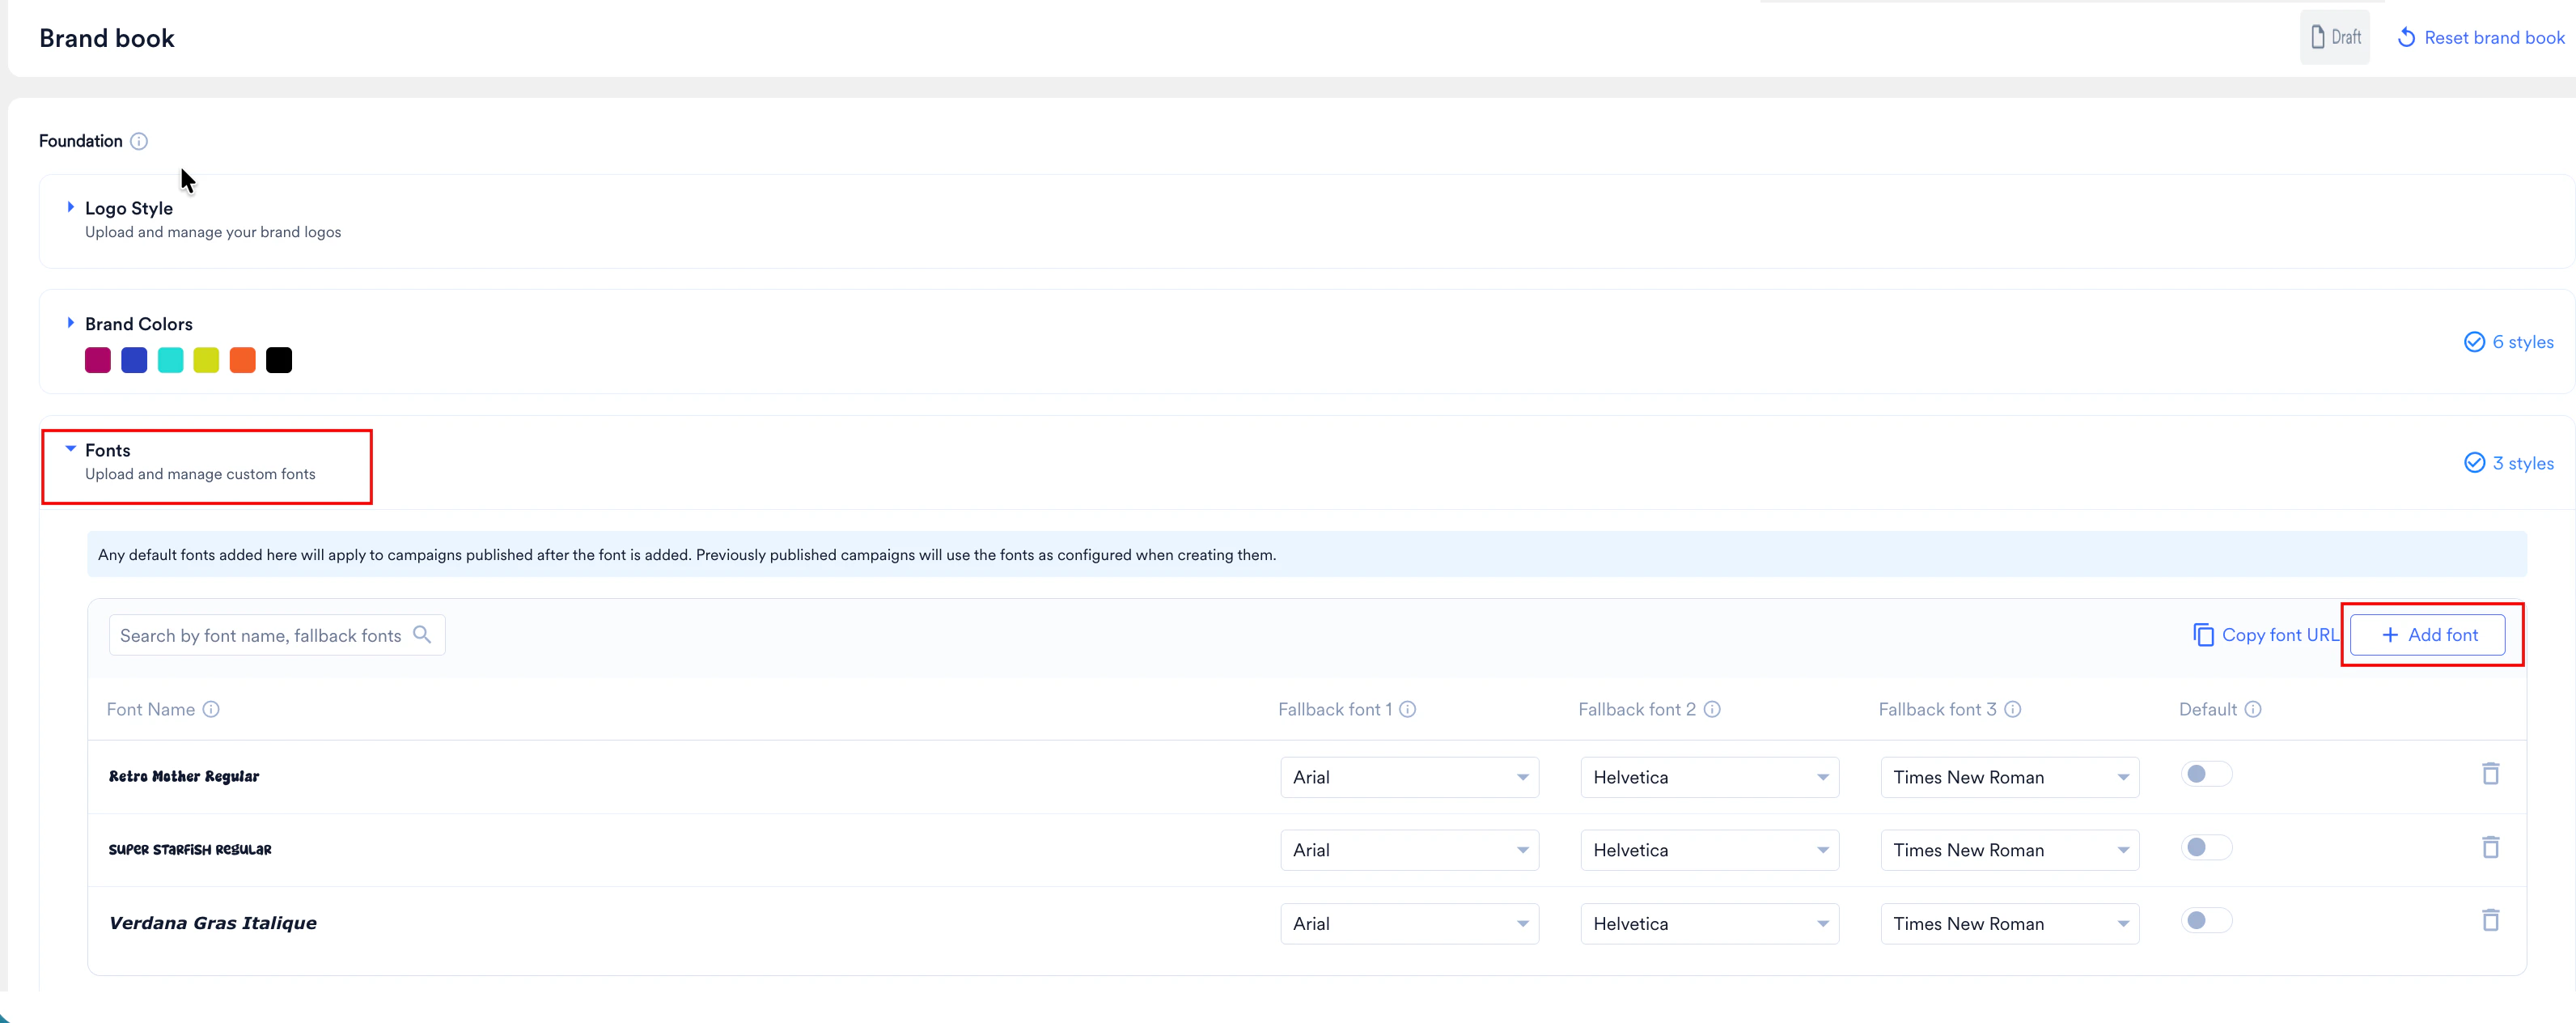 3. In step 1 (**Add font files**):
1. Drag and drop your font files into the target zone, or click **upload from computer** to select them. The uploader supports `.ttf`, `.otf`, `.woff`, and `.woff2` formats, with a maximum file size of 5 MB per file.
You can upload up to 10 font files per brand book.
2. Click **Next**.
3. In step 1 (**Add font files**):
1. Drag and drop your font files into the target zone, or click **upload from computer** to select them. The uploader supports `.ttf`, `.otf`, `.woff`, and `.woff2` formats, with a maximum file size of 5 MB per file.
You can upload up to 10 font files per brand book.
2. Click **Next**.
 4. In step 2 (**Set fallbacks**):
1. Choose your fallback priority across the **Fallback font 1**, **Fallback font 2**, and **Fallback font 3** drop-down lists. These fallbacks render in your recipient's inbox if their client does not support your custom font.
2. Click **Publish**.
4. In step 2 (**Set fallbacks**):
1. Choose your fallback priority across the **Fallback font 1**, **Fallback font 2**, and **Fallback font 3** drop-down lists. These fallbacks render in your recipient's inbox if their client does not support your custom font.
2. Click **Publish**.
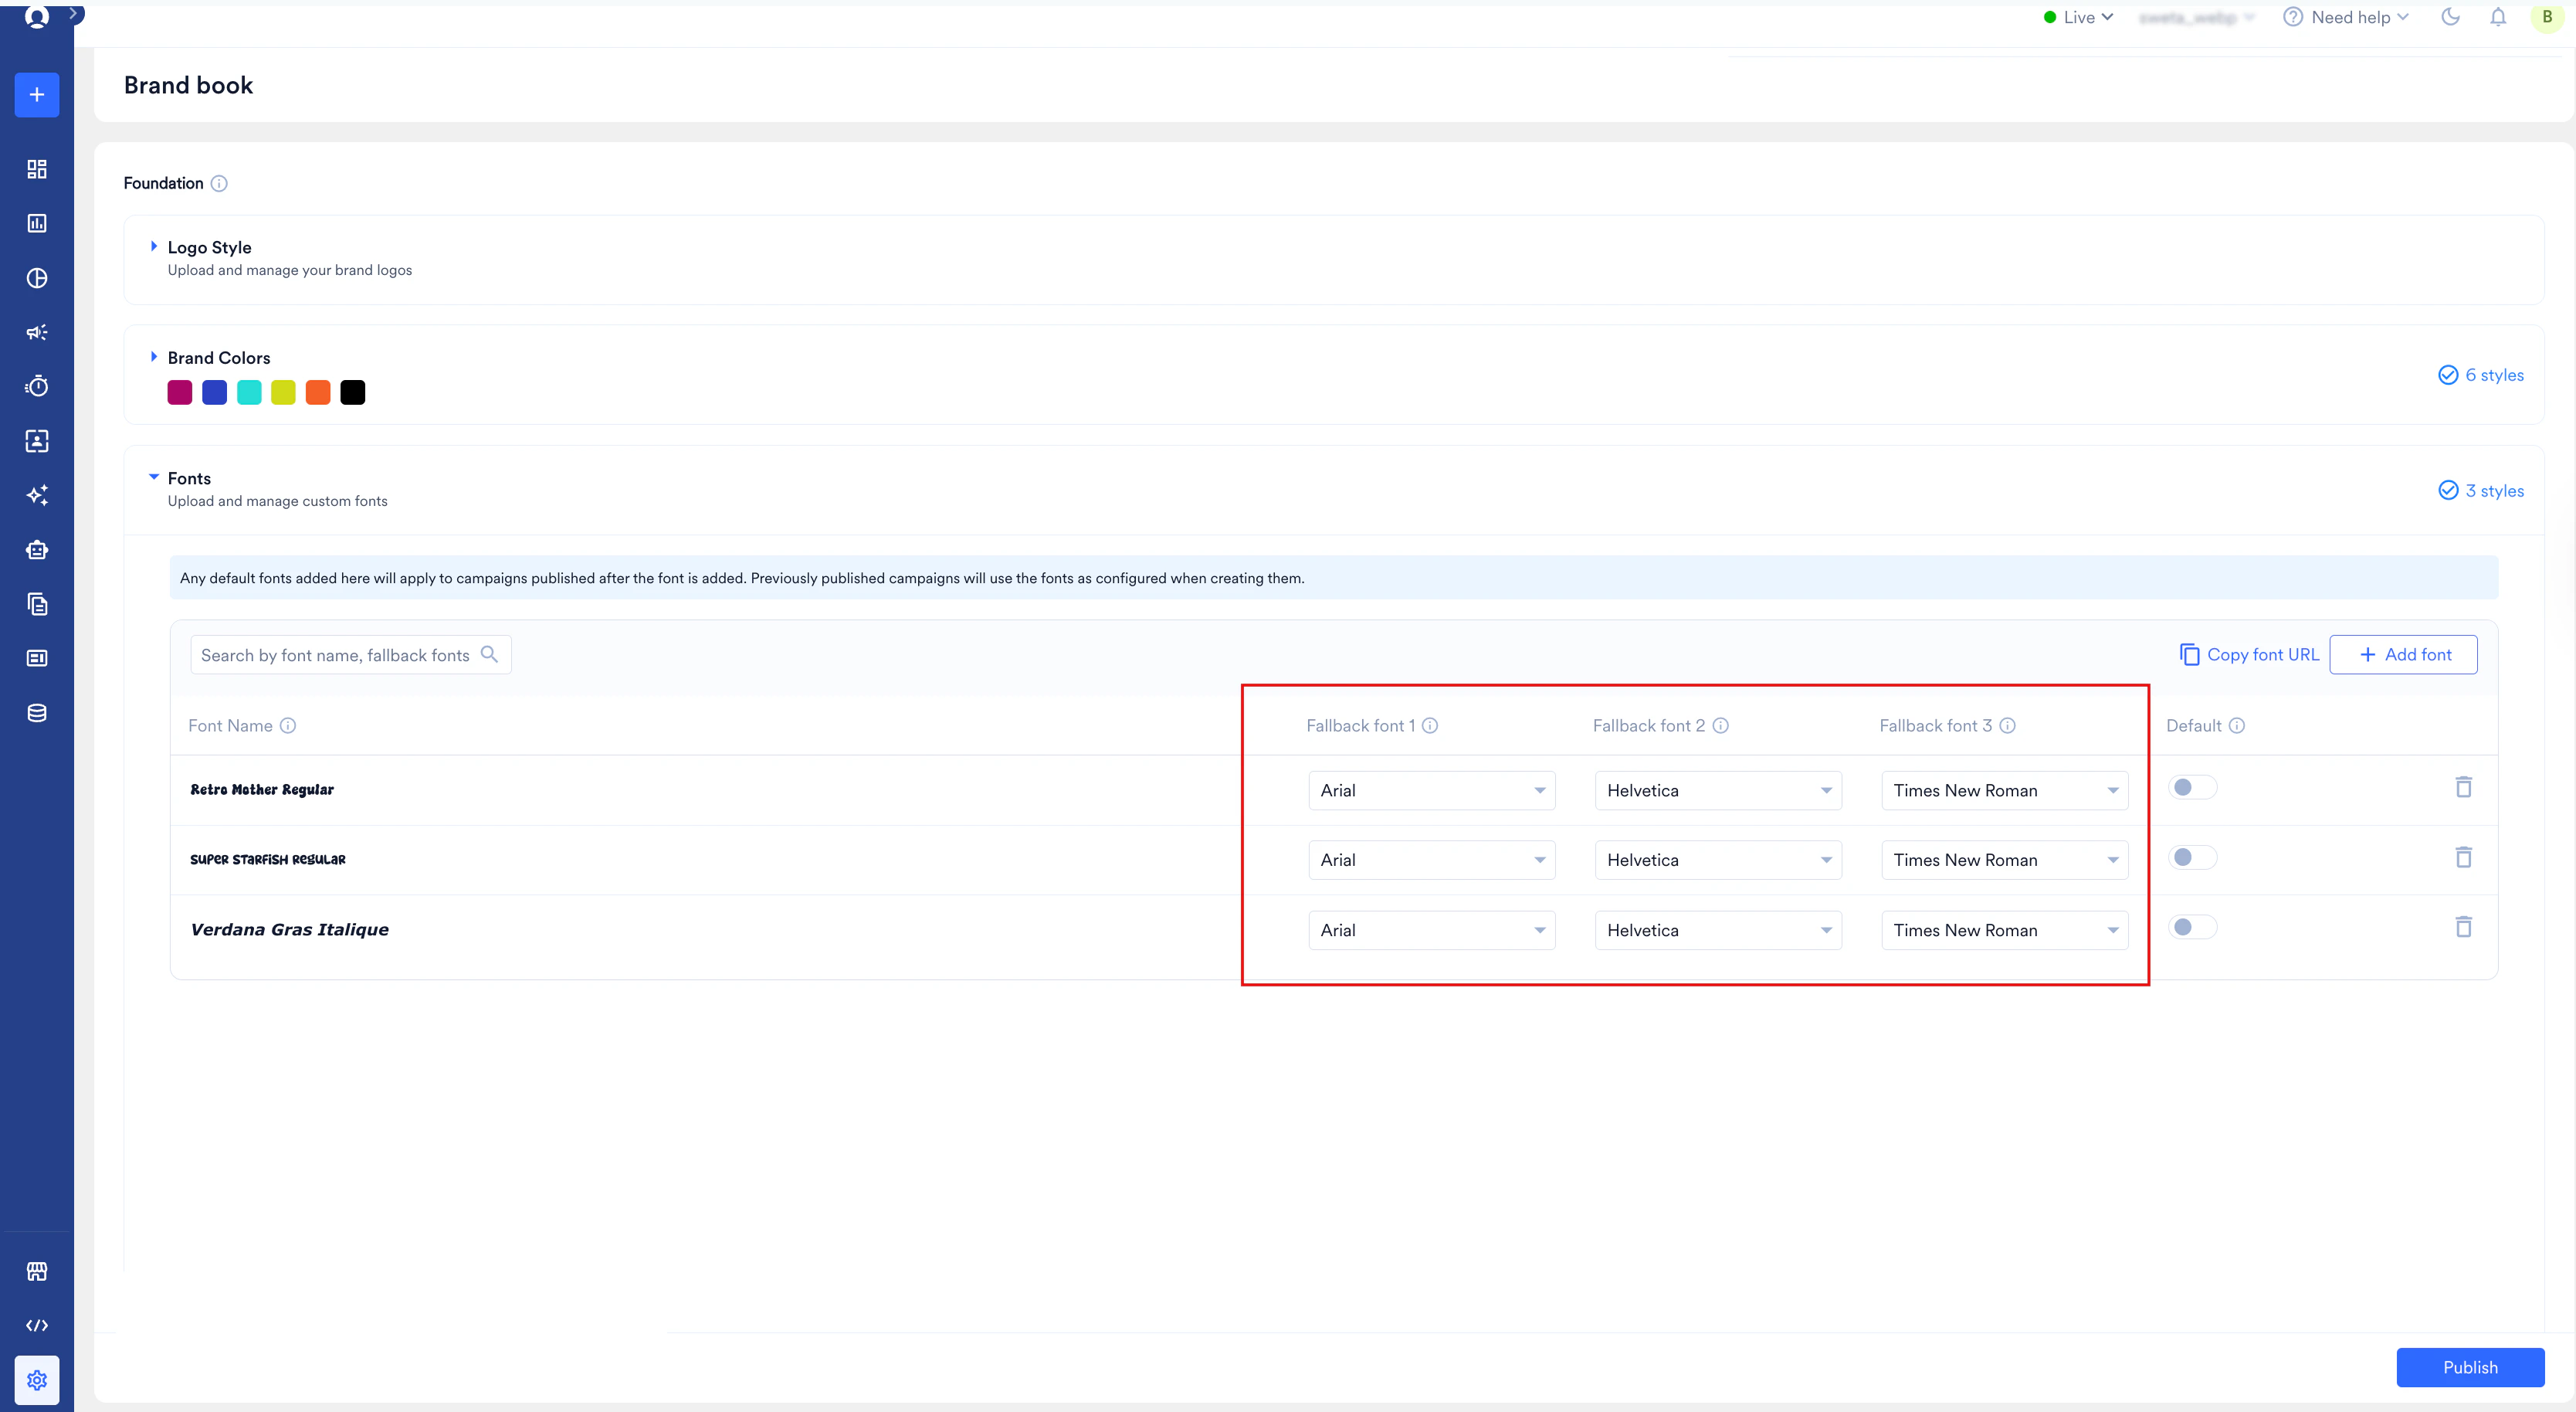 5. To copy the direct file path of an uploaded font, select the font row in the table and click **Copy font URL**.
6. To manage your uploaded fonts, do any of the following:
1. **To search**: In the **Search by font name, fallback fonts** box, type the name of the font or fallback you want to find.
2. **To copy the direct file path**: Click the row of the custom font in the table, and then click **Copy font URL**.
3. **To set or remove a default font**: In the **Default** column, turn on the toggle for the font you want to use as your default. Turning on a default font automatically applies it to all campaigns published after the font is added. Previously published campaigns continue using the fonts that were configured when they were created. To stop using the font as the default, turn off the switch.
5. To copy the direct file path of an uploaded font, select the font row in the table and click **Copy font URL**.
6. To manage your uploaded fonts, do any of the following:
1. **To search**: In the **Search by font name, fallback fonts** box, type the name of the font or fallback you want to find.
2. **To copy the direct file path**: Click the row of the custom font in the table, and then click **Copy font URL**.
3. **To set or remove a default font**: In the **Default** column, turn on the toggle for the font you want to use as your default. Turning on a default font automatically applies it to all campaigns published after the font is added. Previously published campaigns continue using the fonts that were configured when they were created. To stop using the font as the default, turn off the switch.
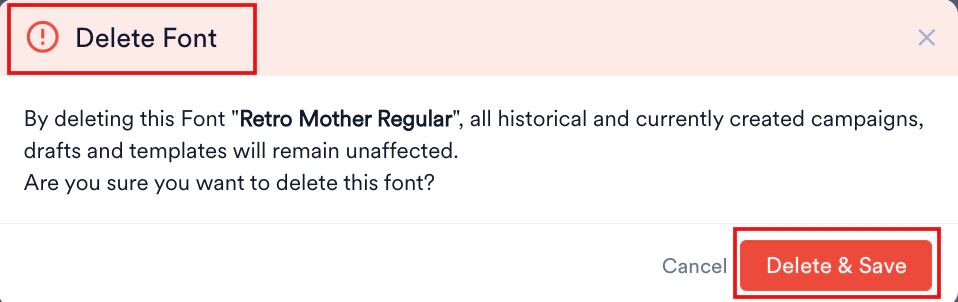
 7. **To remove a custom font**: Under **Actions**, click the delete icon
  in the row of the font, and then click **Delete & Save** in the **Delete Font** confirmation dialog box.
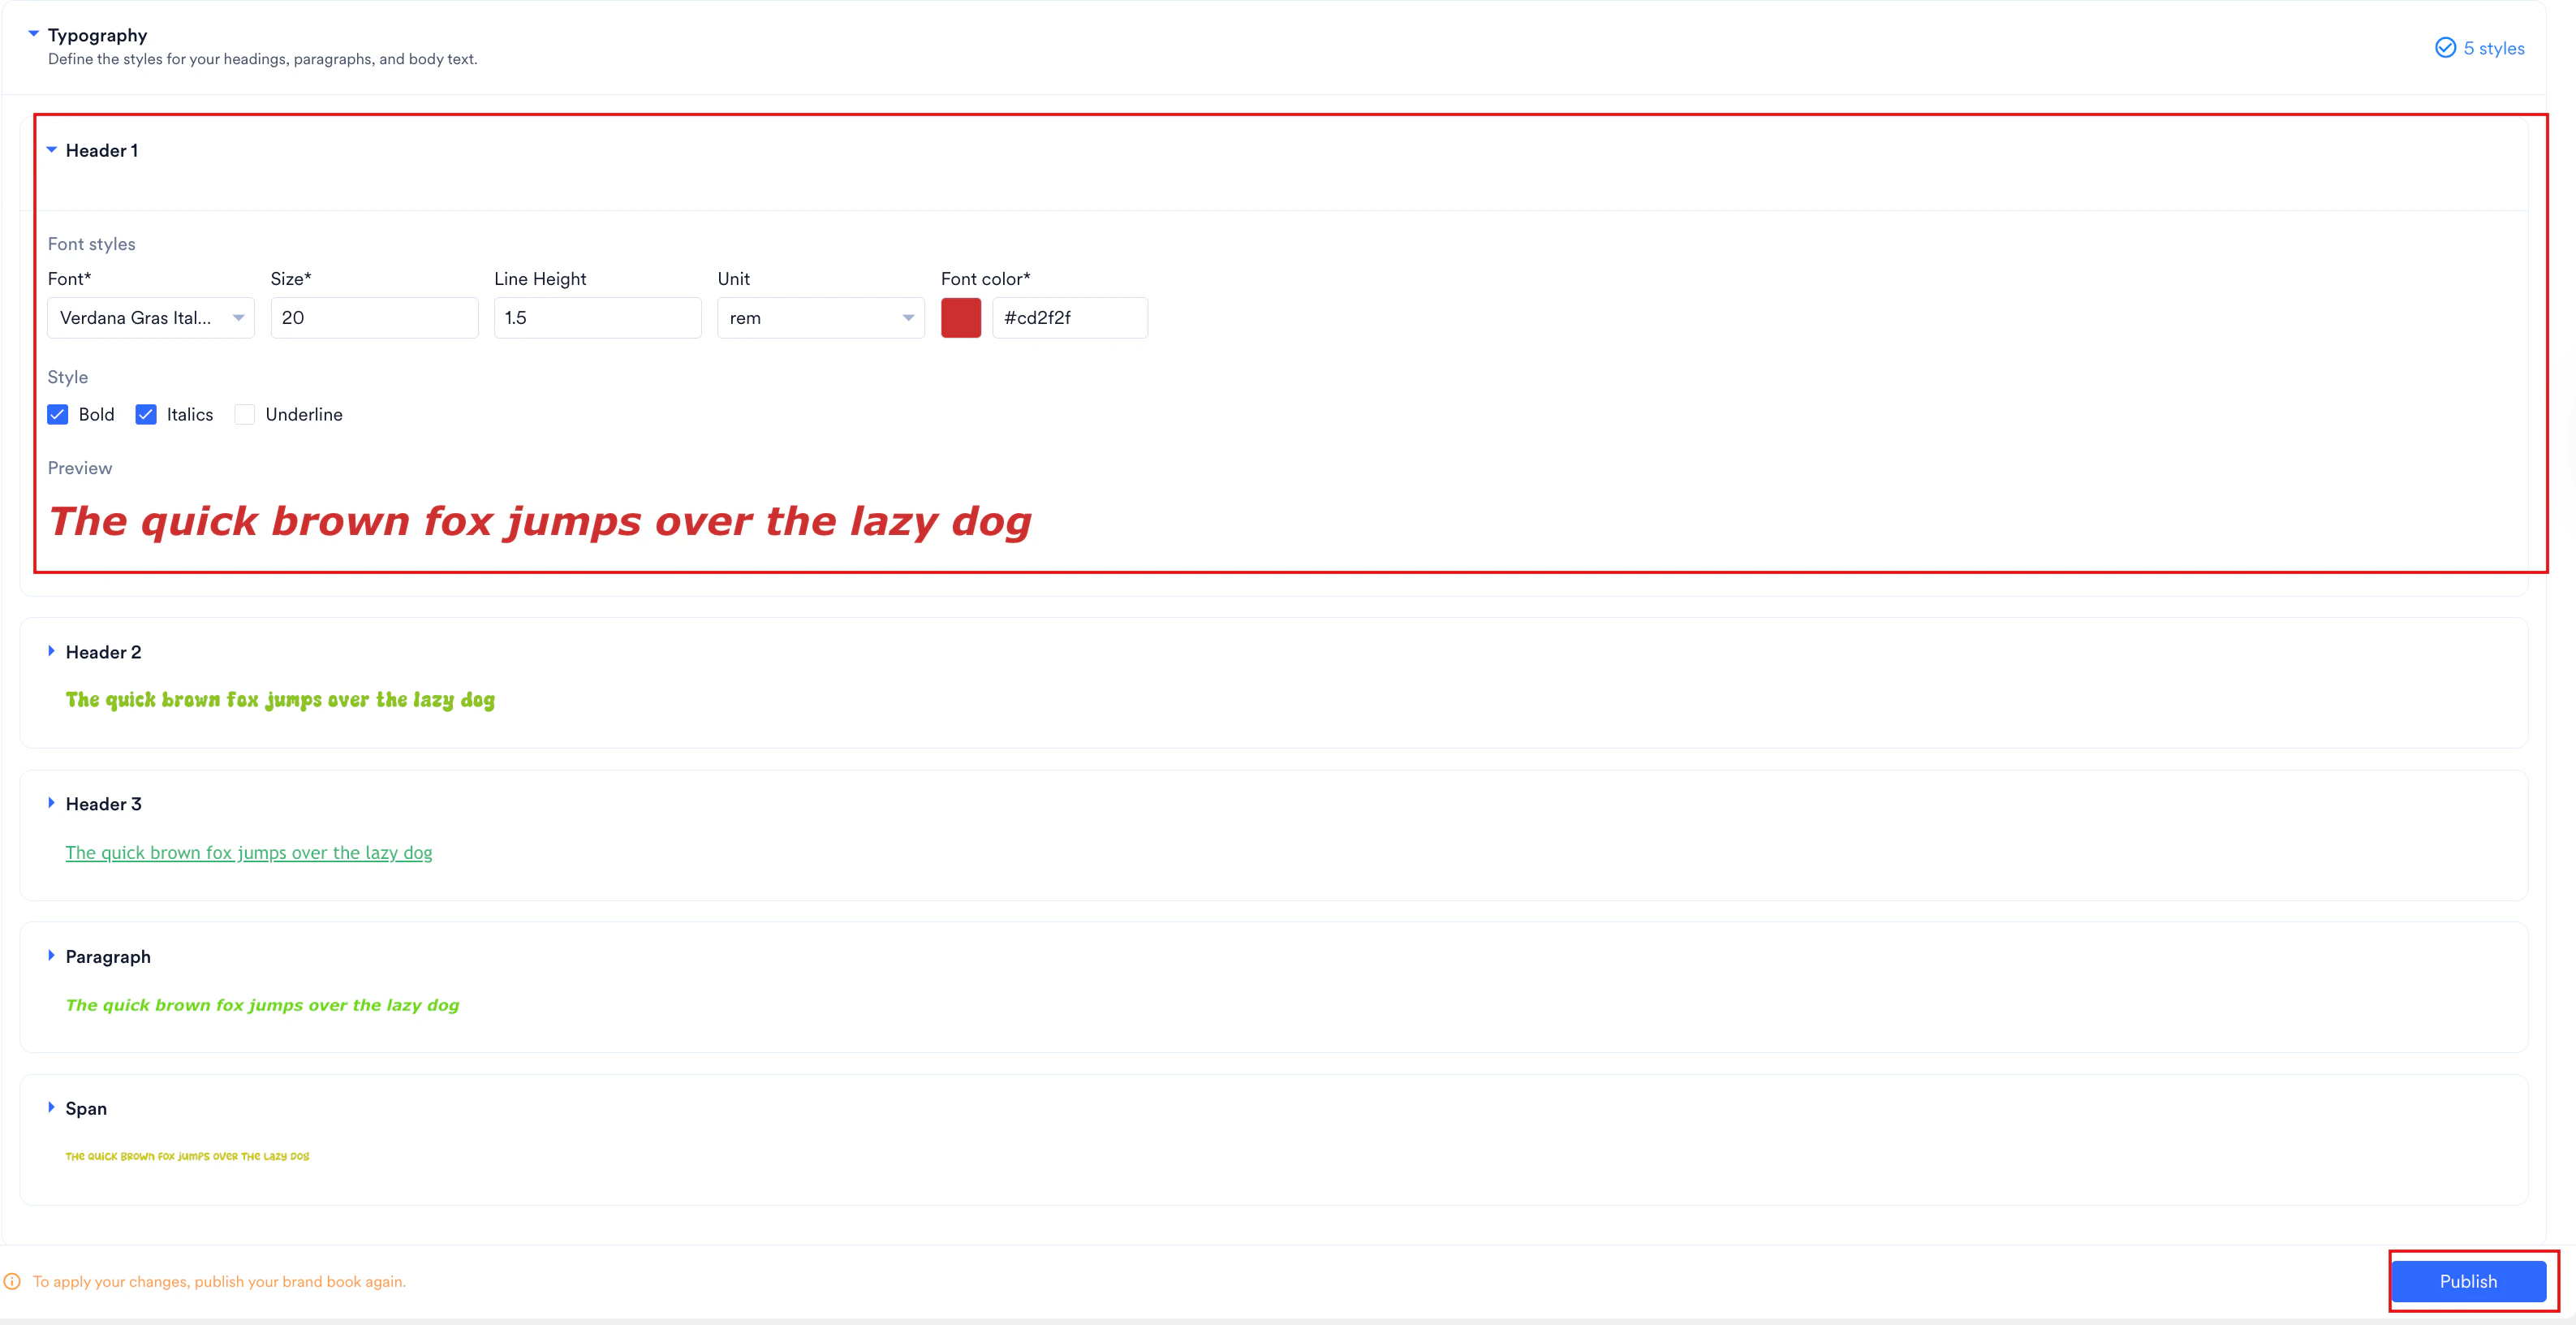
 Define specific typography styles across five core tags: **Header 1 (H1)**, **Header 2 (H2)**, **Header 3 (H3)**, **Paragraph**, and **Span**. To configure your brand typography styles, perform the following steps:
1. In the **Building Blocks** panel, click **Typography** to expand the section.
2. Select the typography element you want to modify (**Header 1**, **Header 2**, **Header 3**, **Paragraph**, or **Span**).
Define specific typography styles across five core tags: **Header 1 (H1)**, **Header 2 (H2)**, **Header 3 (H3)**, **Paragraph**, and **Span**. To configure your brand typography styles, perform the following steps:
1. In the **Building Blocks** panel, click **Typography** to expand the section.
2. Select the typography element you want to modify (**Header 1**, **Header 2**, **Header 3**, **Paragraph**, or **Span**).
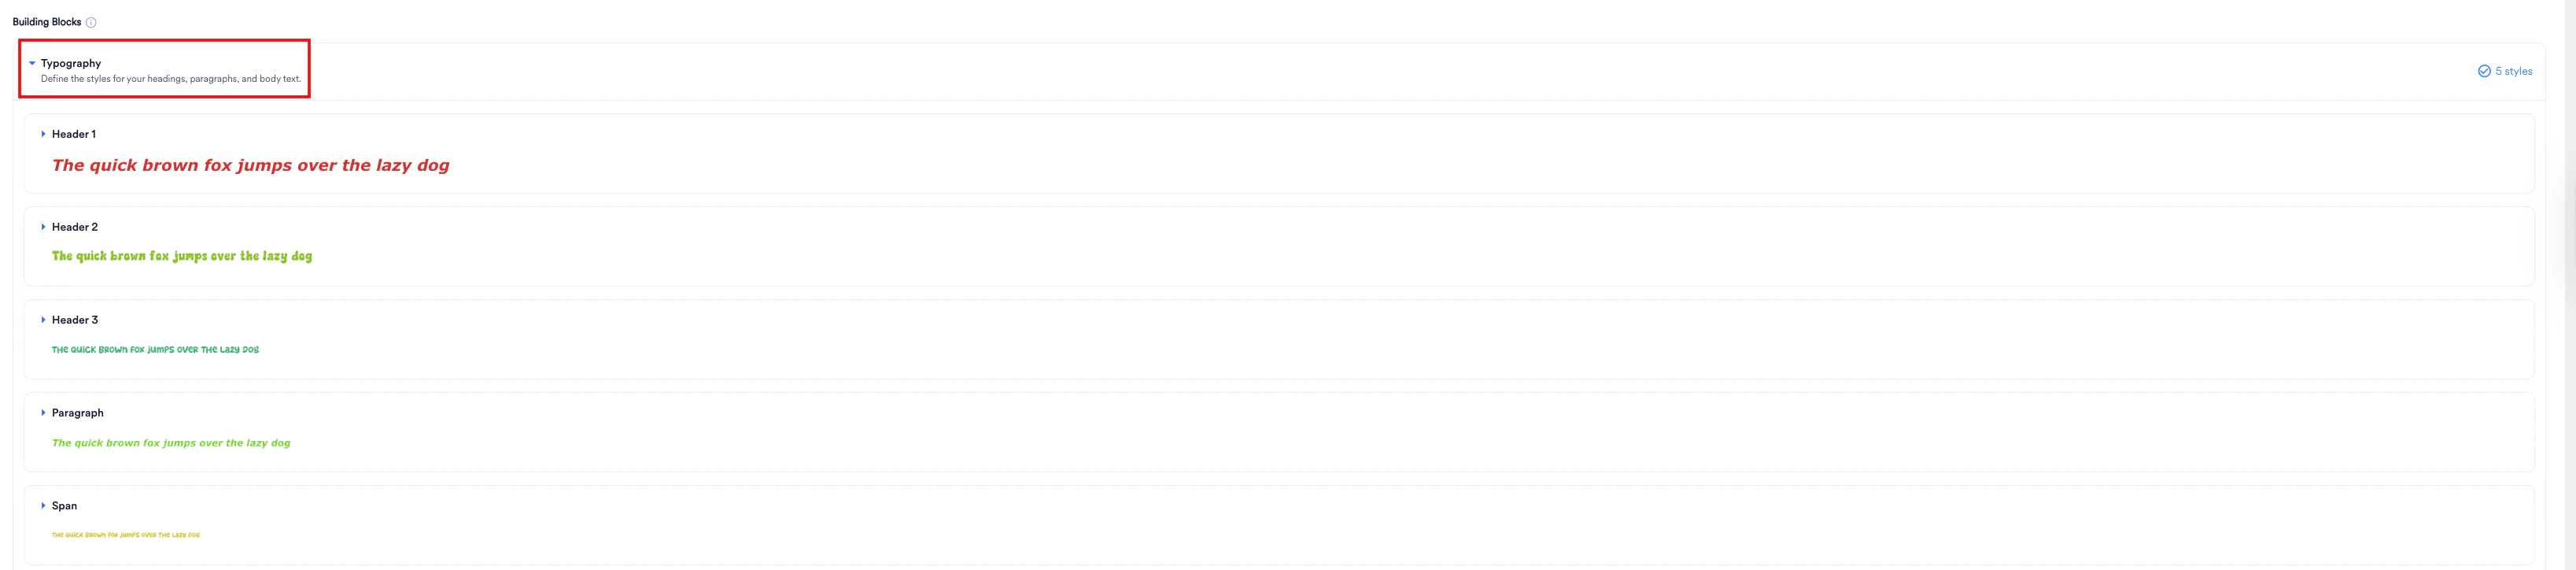 3. Under **Font styles**, configure your visual parameters:
1. In the **Font** list, select your preferred brand typeface (for example, **Inter**).
2. In the **Size** box, type a numerical value (for example, `14`).
3. In the **Line Height** box, enter a custom spacing value (for example, `1.5`).
4. In the **Unit** list, select either **px** or **rem**.
5. In the **Font color** box, type a six-digit hex code (for example, `#cd2f2f`) or click the color block.
4. Under **Style**, select or clear the check boxes for **Bold**, **Italics**, or **Underline**.
5. Review the changes in the **Preview** section, which displays the standard string: *"The quick brown fox jumps over the lazy dog"*.
6. Click **Publish**.
3. Under **Font styles**, configure your visual parameters:
1. In the **Font** list, select your preferred brand typeface (for example, **Inter**).
2. In the **Size** box, type a numerical value (for example, `14`).
3. In the **Line Height** box, enter a custom spacing value (for example, `1.5`).
4. In the **Unit** list, select either **px** or **rem**.
5. In the **Font color** box, type a six-digit hex code (for example, `#cd2f2f`) or click the color block.
4. Under **Style**, select or clear the check boxes for **Bold**, **Italics**, or **Underline**.
5. Review the changes in the **Preview** section, which displays the standard string: *"The quick brown fox jumps over the lazy dog"*.
6. Click **Publish**.
 **Size and line height ranges**
* When unit is **px**: accepts integer values between 1 and 48.
* When unit is **rem**: accepts decimal values between 0 and 3.
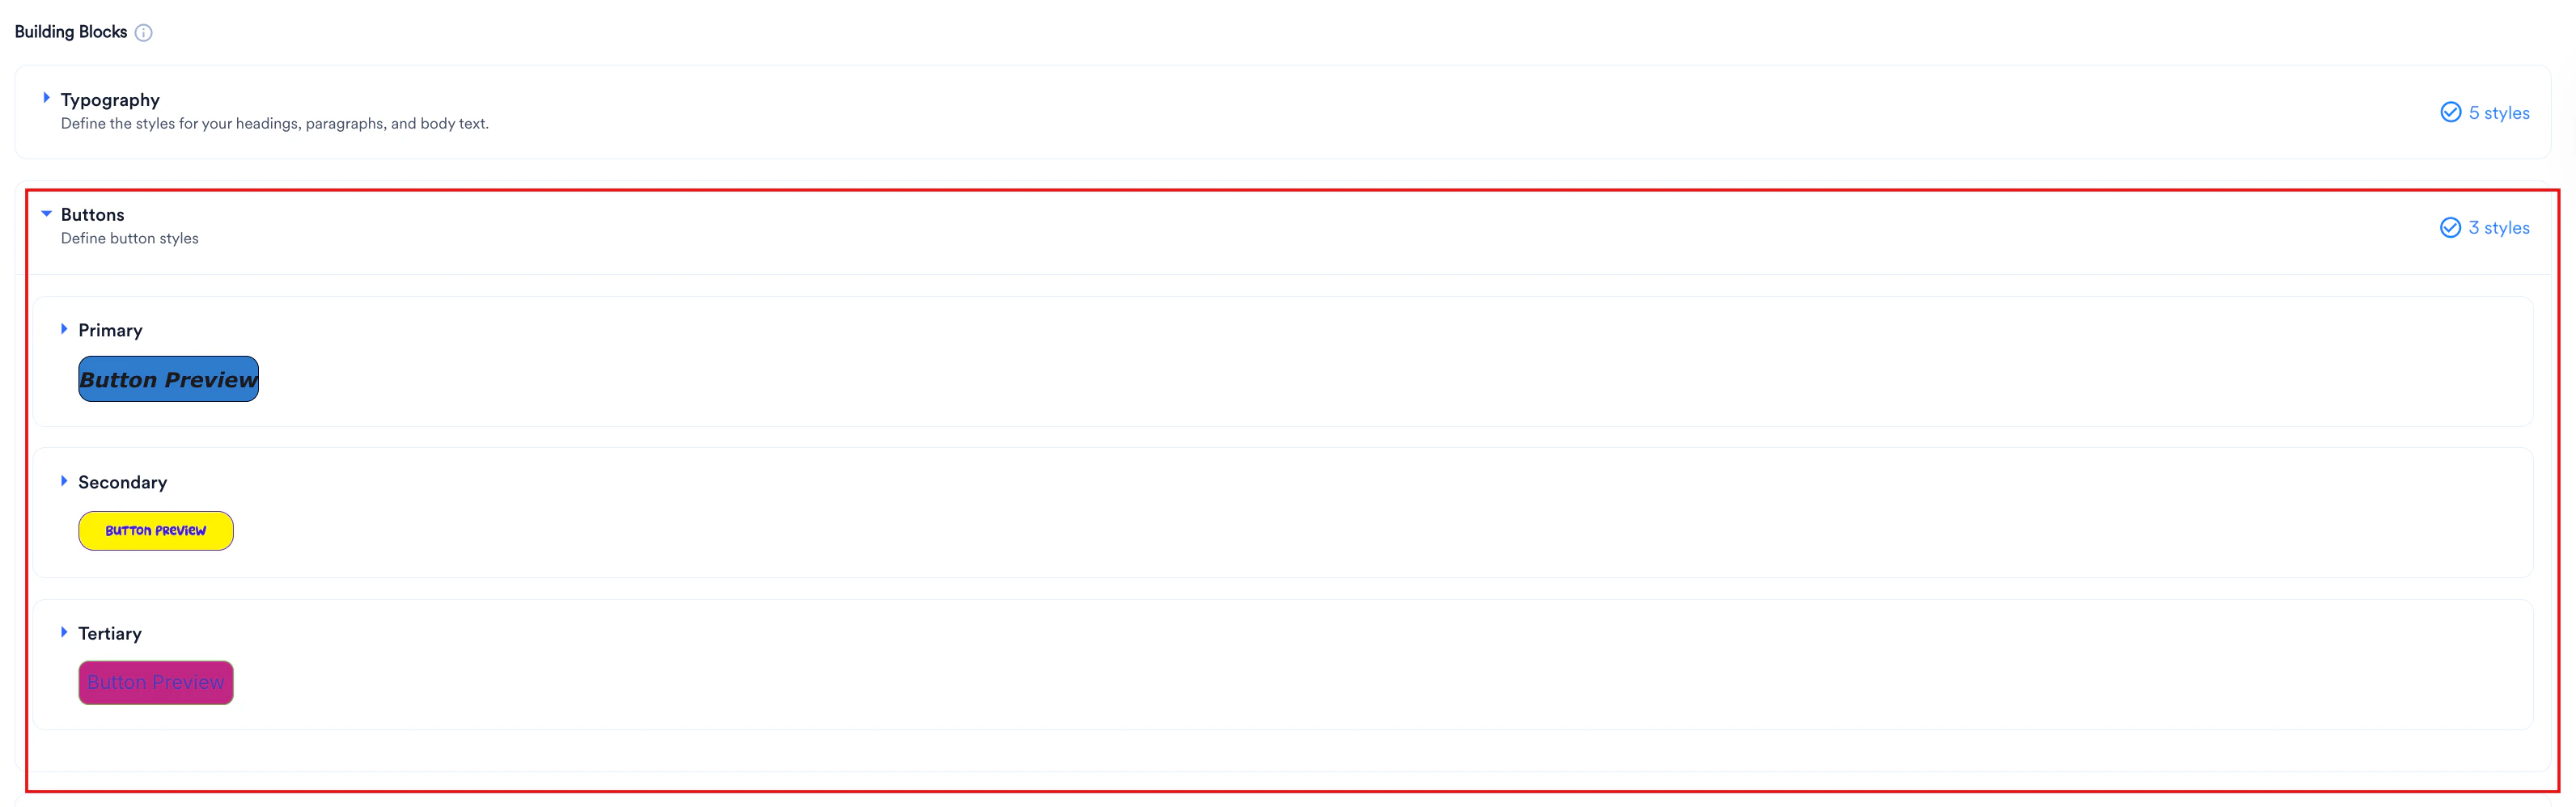
Define layout structures and interactive attributes for three button tiers: **Primary**, **Secondary**, and **Tertiary**. To configure your brand button styles, perform the following steps:
1. In the **Building Blocks** panel, click **Buttons** to expand the section.
2. Select the button tier you want to modify (**Primary**, **Secondary**, or **Tertiary**).
**Size and line height ranges**
* When unit is **px**: accepts integer values between 1 and 48.
* When unit is **rem**: accepts decimal values between 0 and 3.
Define layout structures and interactive attributes for three button tiers: **Primary**, **Secondary**, and **Tertiary**. To configure your brand button styles, perform the following steps:
1. In the **Building Blocks** panel, click **Buttons** to expand the section.
2. Select the button tier you want to modify (**Primary**, **Secondary**, or **Tertiary**).
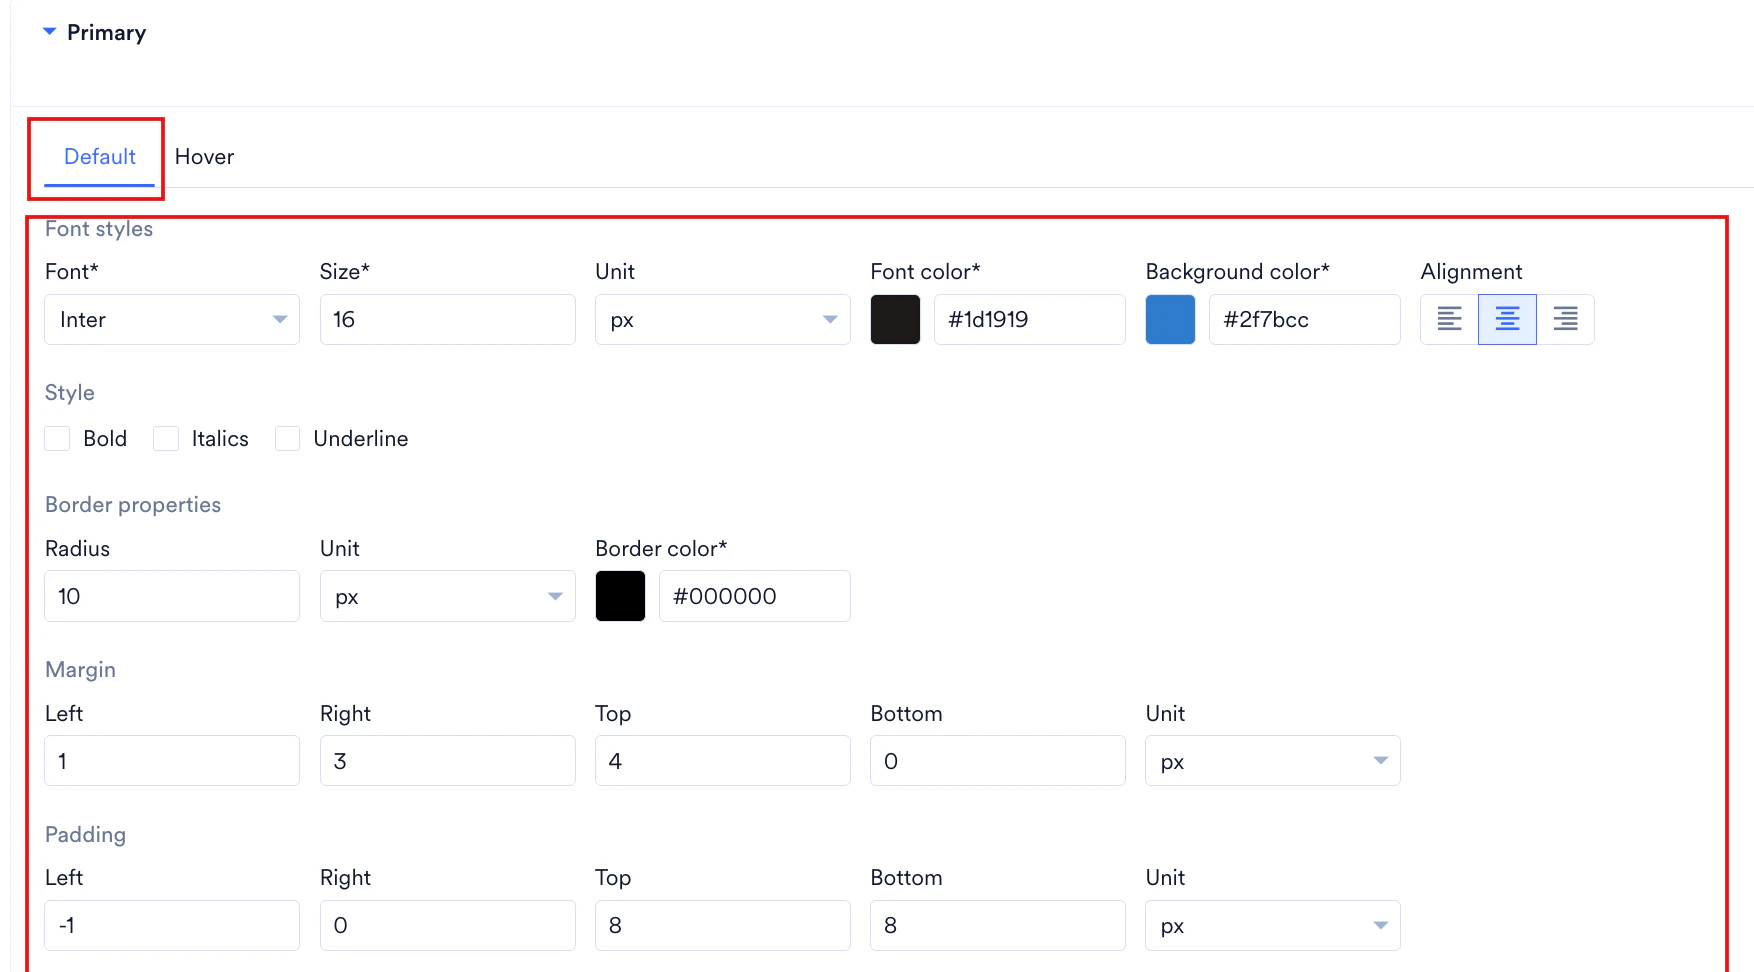
 3. To set standard rendering attributes, select the **Default** tab and configure the following parameters:
1. In the **Font** list, select your preferred brand typeface (for example, **Inter**).
2. In the **Size** box, type a numerical value for your font size (for example, `14`).
3. In the **Unit** list, select either **px** or **rem**.
4. In the **Font color** box, type a valid six-digit hex code or select the color block.
5. In the **Background color** box, type a valid six-digit hex code (for example, `#007bff`) or select the color block.
6. Under **Alignment**, click the left-align, center-align, or right-align icons to position your button text.
7. Under **Style**, select the check boxes for **Bold**, **Italics**, or **Underline** to apply font decorators.
8. Under **Border properties**, enter a numerical value in the **Radius** box (for example, `0`), select the **Unit**, and type a valid six-digit hex code in the **Border color** box.
9. Under **Margin**, enter custom numerical values in the **Left**, **Right**, **Top**, and **Bottom** boxes, and select the unit from the **Unit** list.
10. Under **Padding**, enter custom numerical values in the **Left**, **Right**, **Top**, and **Bottom** boxes (for example, `8` for Top and Bottom), and select your preferred unit.
3. To set standard rendering attributes, select the **Default** tab and configure the following parameters:
1. In the **Font** list, select your preferred brand typeface (for example, **Inter**).
2. In the **Size** box, type a numerical value for your font size (for example, `14`).
3. In the **Unit** list, select either **px** or **rem**.
4. In the **Font color** box, type a valid six-digit hex code or select the color block.
5. In the **Background color** box, type a valid six-digit hex code (for example, `#007bff`) or select the color block.
6. Under **Alignment**, click the left-align, center-align, or right-align icons to position your button text.
7. Under **Style**, select the check boxes for **Bold**, **Italics**, or **Underline** to apply font decorators.
8. Under **Border properties**, enter a numerical value in the **Radius** box (for example, `0`), select the **Unit**, and type a valid six-digit hex code in the **Border color** box.
9. Under **Margin**, enter custom numerical values in the **Left**, **Right**, **Top**, and **Bottom** boxes, and select the unit from the **Unit** list.
10. Under **Padding**, enter custom numerical values in the **Left**, **Right**, **Top**, and **Bottom** boxes (for example, `8` for Top and Bottom), and select your preferred unit.
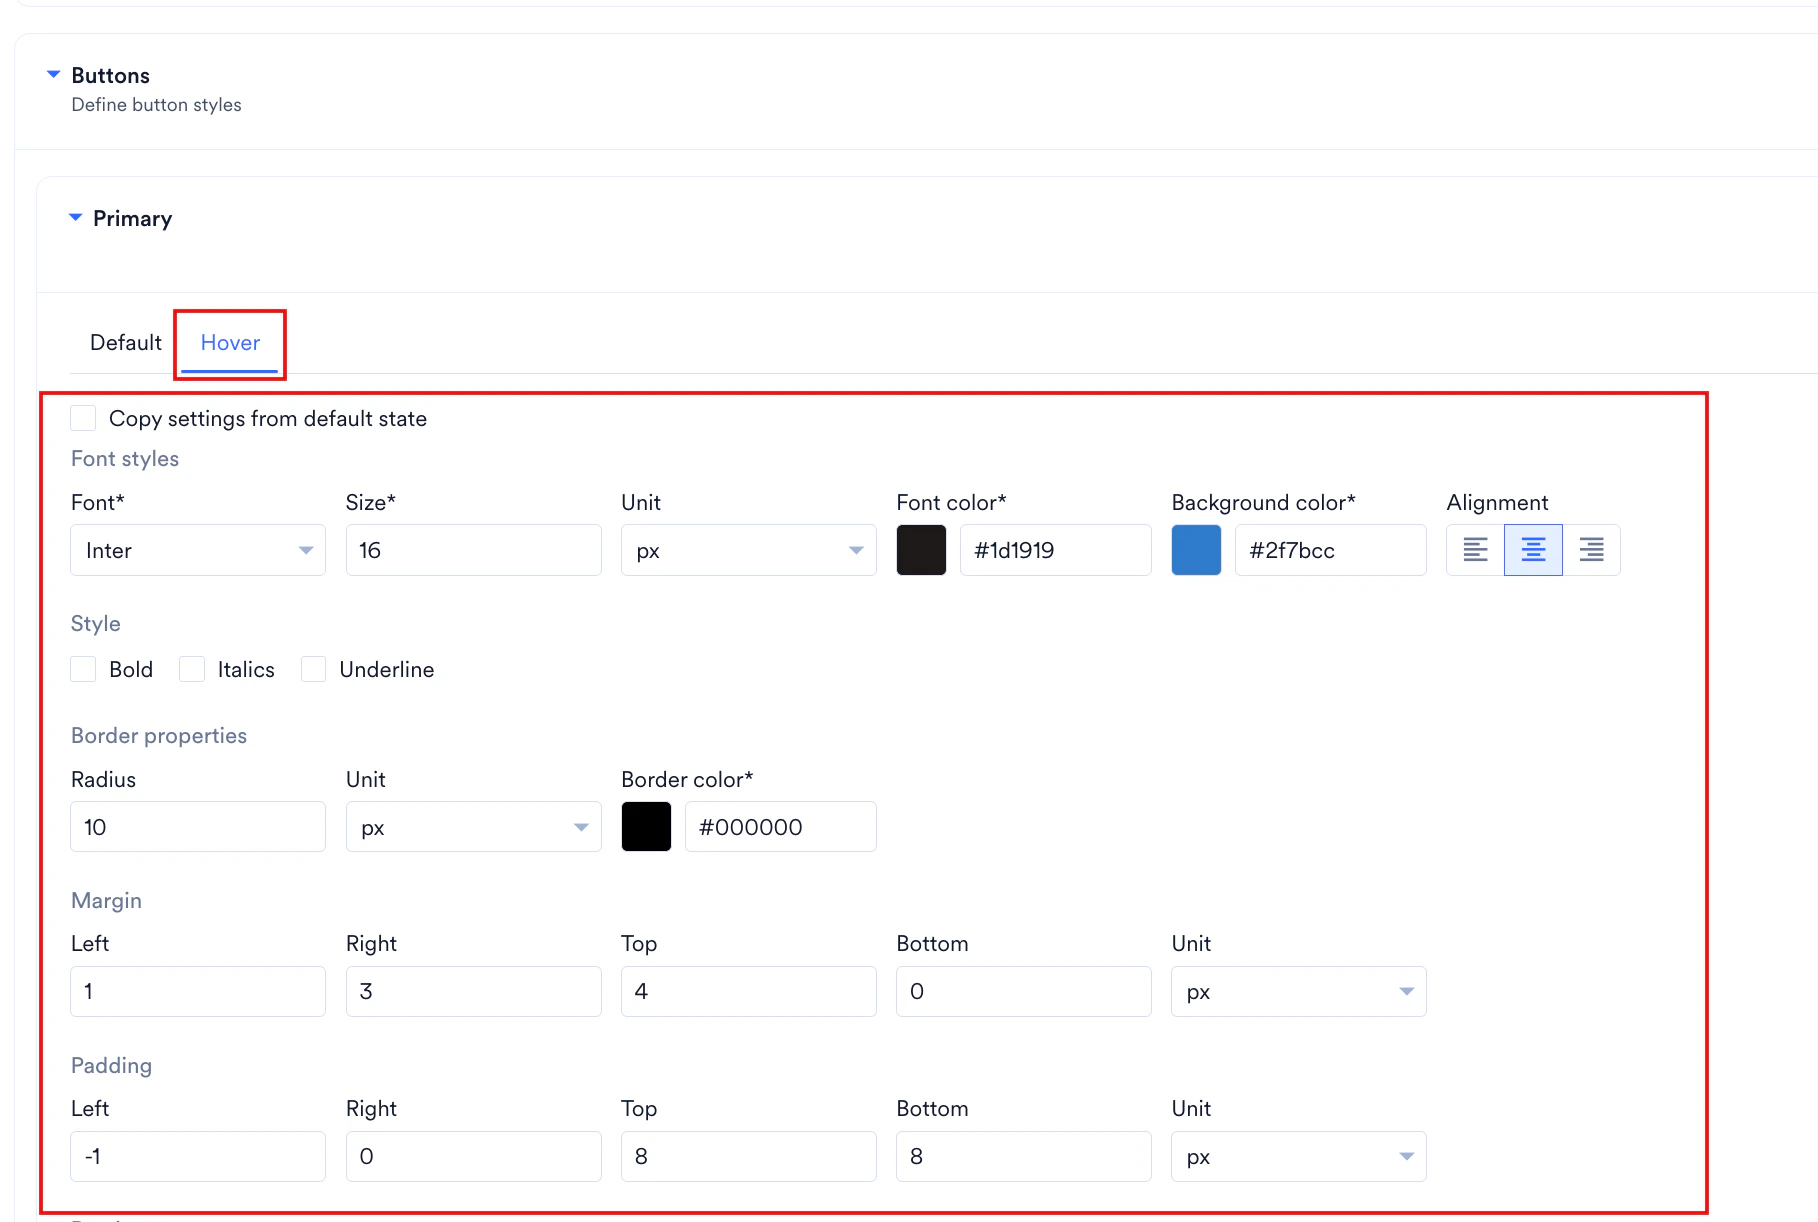
 4. To set interactive styling, select the **Hover** tab:
1. To duplicate your default settings, select the **Copy settings from default state** check box.
2. To customize your hover behavior, clear the **Copy settings from default state** check box and enter your custom values by repeating steps 1 through 10 under step 3.
4. To set interactive styling, select the **Hover** tab:
1. To duplicate your default settings, select the **Copy settings from default state** check box.
2. To customize your hover behavior, clear the **Copy settings from default state** check box and enter your custom values by repeating steps 1 through 10 under step 3.
 5. Review your configuration in the **Preview** section at the bottom of the section.
6. Click **Publish**.
5. Review your configuration in the **Preview** section at the bottom of the section.
6. Click **Publish**.
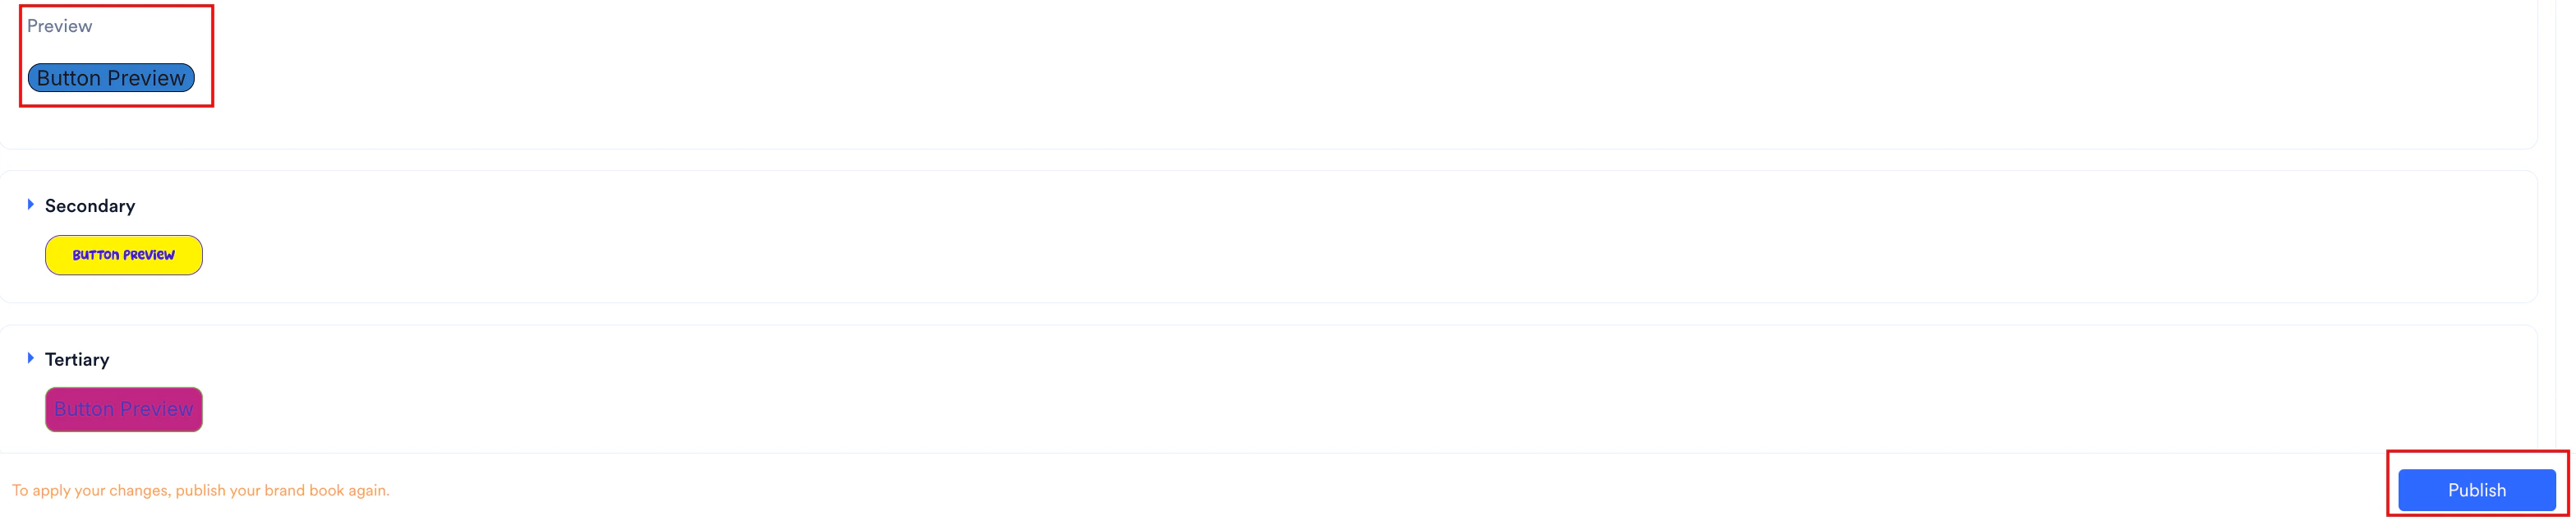 Define styling specifications for two distinct hyperlink variants to ensure consistent clickable elements in your campaigns. To configure your hyperlink styles, perform the following steps:
1. In the **Building Blocks** panel, click **Hyperlinks** to expand the section.
2. Click the hyperlink variant you want to modify (**Hyperlink 1** or **Hyperlink 2**).
Define styling specifications for two distinct hyperlink variants to ensure consistent clickable elements in your campaigns. To configure your hyperlink styles, perform the following steps:
1. In the **Building Blocks** panel, click **Hyperlinks** to expand the section.
2. Click the hyperlink variant you want to modify (**Hyperlink 1** or **Hyperlink 2**).
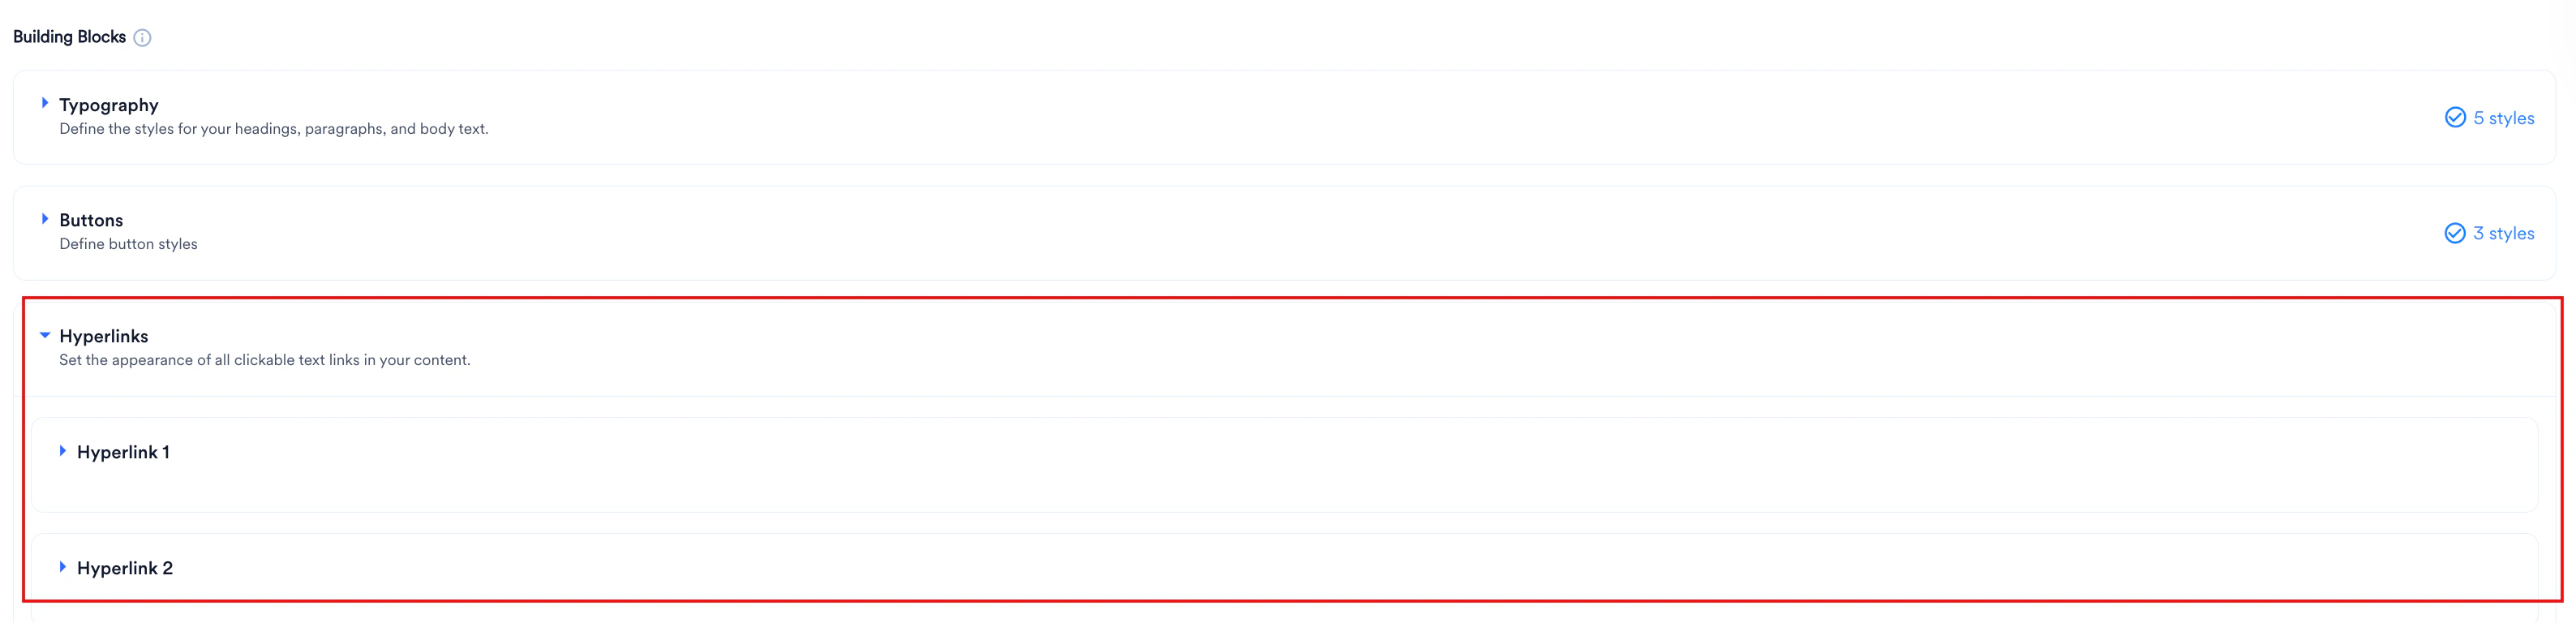 3. Click the **Default** tab and configure your base variables under **Font styles**:
1. In the **Font** list, select your preferred typeface (for example, **Inter**).
2. In the **Size** box, enter a numerical value for your font size (for example, `14`).
3. In the **Line Height** box, enter a numerical spacing value (for example, `1.5`).
4. In the **Unit** list, select either **px** or **rem**.
5. In the **Font color** box, type a valid six-digit hex code (for example, `#0000EE`) or click the color block.
6. Under **Style**, select or clear the check boxes for **Bold**, **Italics**, or **Underline**.
3. Click the **Default** tab and configure your base variables under **Font styles**:
1. In the **Font** list, select your preferred typeface (for example, **Inter**).
2. In the **Size** box, enter a numerical value for your font size (for example, `14`).
3. In the **Line Height** box, enter a numerical spacing value (for example, `1.5`).
4. In the **Unit** list, select either **px** or **rem**.
5. In the **Font color** box, type a valid six-digit hex code (for example, `#0000EE`) or click the color block.
6. Under **Style**, select or clear the check boxes for **Bold**, **Italics**, or **Underline**.
 4. To set interactive styling, select the **Hover** tab:
1. To duplicate your default settings, select the **Copy settings from default state** check box.
2. To customize your hover behavior, clear the **Copy settings from default state** check box and enter your custom values by repeating steps 1 through 6 under step 3.
4. To set interactive styling, select the **Hover** tab:
1. To duplicate your default settings, select the **Copy settings from default state** check box.
2. To customize your hover behavior, clear the **Copy settings from default state** check box and enter your custom values by repeating steps 1 through 6 under step 3.
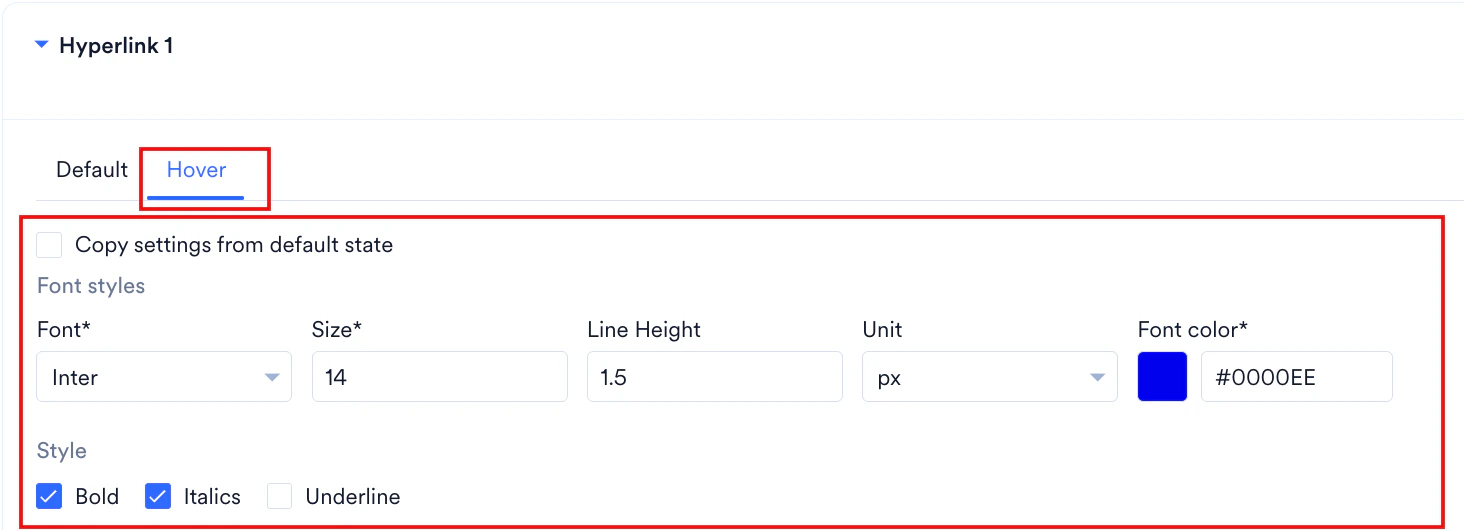 5. Verify the layout in the **Preview** section at the bottom of the section.
6. Click **Publish**.
5. Verify the layout in the **Preview** section at the bottom of the section.
6. Click **Publish**.
 ## Publish Your Brand Book
Publishing applies your configured brand assets across all your marketing channels. The flow differs slightly the first time you publish versus when you update an already published brand book.
### Publish a New Brand Book
When you finish your initial configuration, perform the following steps:
1. After you configure your assets (logos, colors, fonts, or button styles), click **Publish** in the lower-right corner of the page.
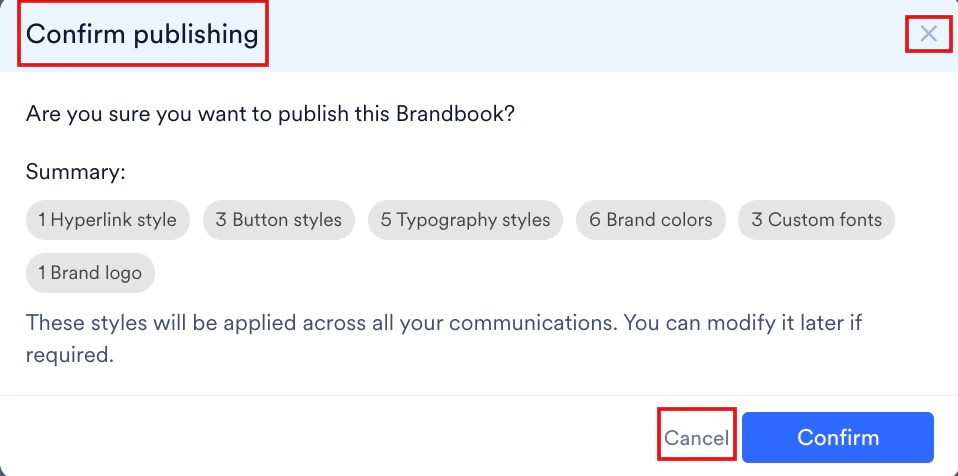
2. In the **Confirm publishing** dialog box, review the summary of the styles that are applied (for example, 2 Hyperlink styles, 3 Brand colors, 1 Brand logo).
3. Click **Confirm** to publish the brand book and apply the styles across your communications.
## Publish Your Brand Book
Publishing applies your configured brand assets across all your marketing channels. The flow differs slightly the first time you publish versus when you update an already published brand book.
### Publish a New Brand Book
When you finish your initial configuration, perform the following steps:
1. After you configure your assets (logos, colors, fonts, or button styles), click **Publish** in the lower-right corner of the page.
2. In the **Confirm publishing** dialog box, review the summary of the styles that are applied (for example, 2 Hyperlink styles, 3 Brand colors, 1 Brand logo).
3. Click **Confirm** to publish the brand book and apply the styles across your communications.
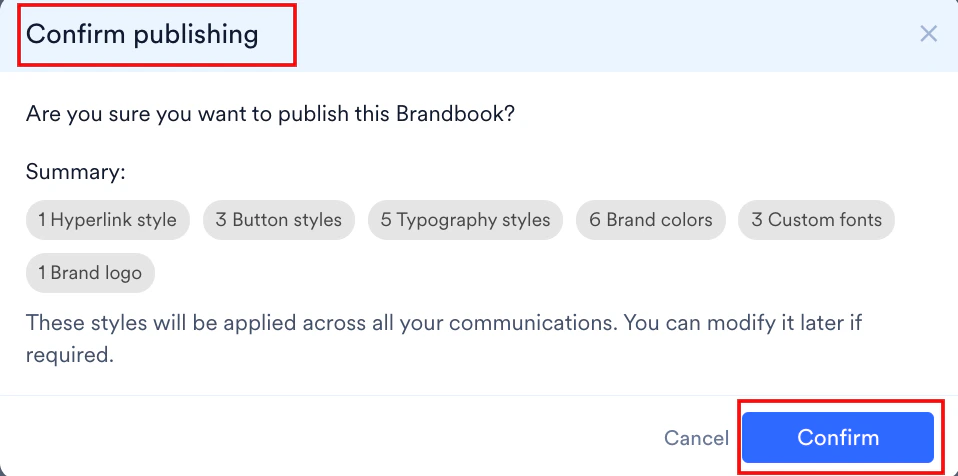 * **To exit without publishing**: Click **Cancel** or the close icon (×). Your configuration remains in draft mode until you publish it.
 ### Republish Your Brand Book
When you edit a brand book that has already been published, perform the following steps:
1. After you update or add brand assets, verify that the orange notification banner appears at the bottom of the workspace.
To apply your changes, publish your brand book again.
2. Verify that the yellow **Unpublished Changes**
### Republish Your Brand Book
When you edit a brand book that has already been published, perform the following steps:
1. After you update or add brand assets, verify that the orange notification banner appears at the bottom of the workspace.
To apply your changes, publish your brand book again.
2. Verify that the yellow **Unpublished Changes**  indicator appears in the top header alongside the **Reset brand book**
  icon.
3. Click **Publish** in the lower-right corner of the workspace.
4. In the **Confirm publishing** dialog box, review the summary of queued changes.
5. Click **Confirm** to publish your updates and apply them across your communications.
icon.
3. Click **Publish** in the lower-right corner of the workspace.
4. In the **Confirm publishing** dialog box, review the summary of queued changes.
5. Click **Confirm** to publish your updates and apply them across your communications.
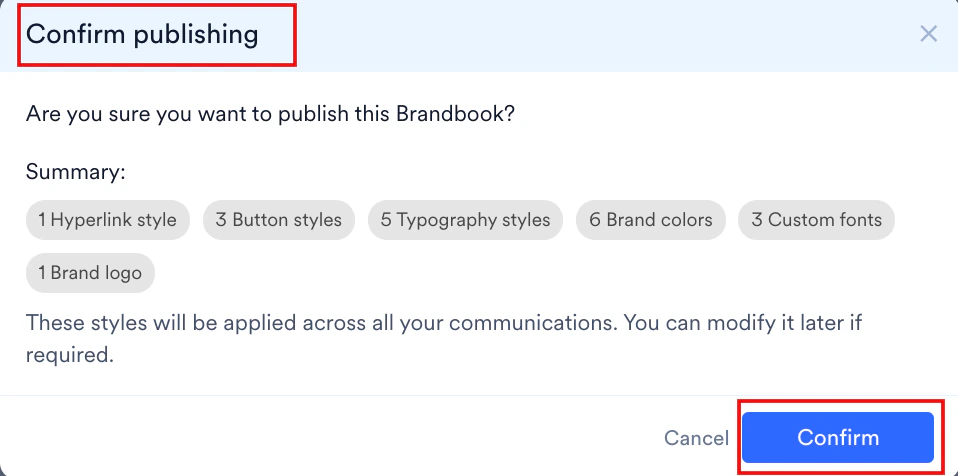 6. **To exit without publishing**: Click **Cancel** or the close icon (×). Your configuration remains in draft mode until you publish it.
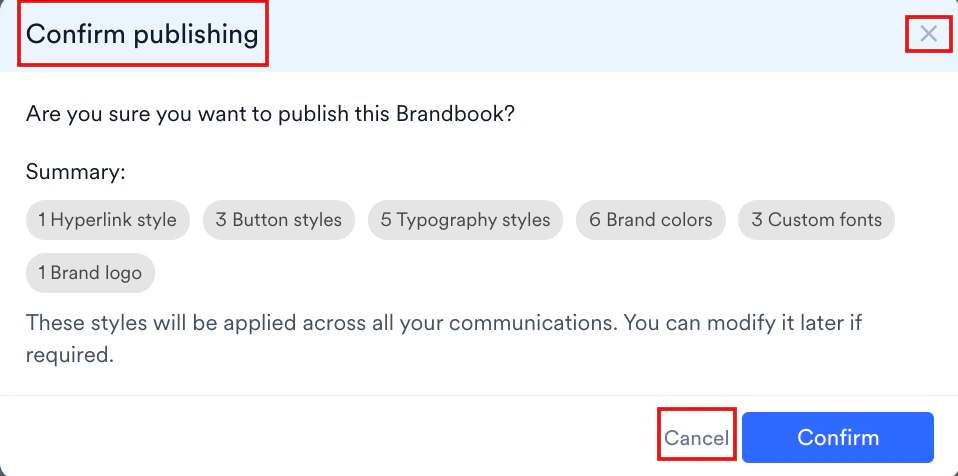 Published styles are applied across all your communications. You can modify the brand book later if required.
## FAQs
In the current scope of the feature, only a single master brand book can be configured and used across an entire workspace. By default, this master configuration applies across all teams.
Automatic ingestion relies on background crawling scripts. If your website incorporates strict cross-origin resource sharing (CORS) rules, access restrictions, or web application firewalls, the background scanner is blocked from accessing those assets. Logos hosted behind authentication or fonts loaded from private CDNs are also often skipped. In these cases, use the manual workflow to update your brand book assets.
Publishing modifications to your brand book immediately updates the default options available inside the asset color pickers and typography menus for new campaigns. However, existing live experiences and pre-saved campaign templates do not update their styled layouts automatically. Changes to existing editor elements must be managed manually within the visual editor interface.
Published styles are applied across all your communications. You can modify the brand book later if required.
## FAQs
In the current scope of the feature, only a single master brand book can be configured and used across an entire workspace. By default, this master configuration applies across all teams.
Automatic ingestion relies on background crawling scripts. If your website incorporates strict cross-origin resource sharing (CORS) rules, access restrictions, or web application firewalls, the background scanner is blocked from accessing those assets. Logos hosted behind authentication or fonts loaded from private CDNs are also often skipped. In these cases, use the manual workflow to update your brand book assets.
Publishing modifications to your brand book immediately updates the default options available inside the asset color pickers and typography menus for new campaigns. However, existing live experiences and pre-saved campaign templates do not update their styled layouts automatically. Changes to existing editor elements must be managed manually within the visual editor interface.