> ## Documentation Index
> Fetch the complete documentation index at: https://moengage.com/docs/llms.txt
> Use this file to discover all available pages before exploring further.
# Dashboard Overview
> Get started with the MoEngage dashboard. Access user segments, targeted campaigns, analytics, and insights all from one central interface.
From the MoEngage dashboard, you can create user segments, send targeted campaigns for your app or website, and access analytics including uninstalls, acquisitions, retention cohorts, campaign performance, and conversion data.
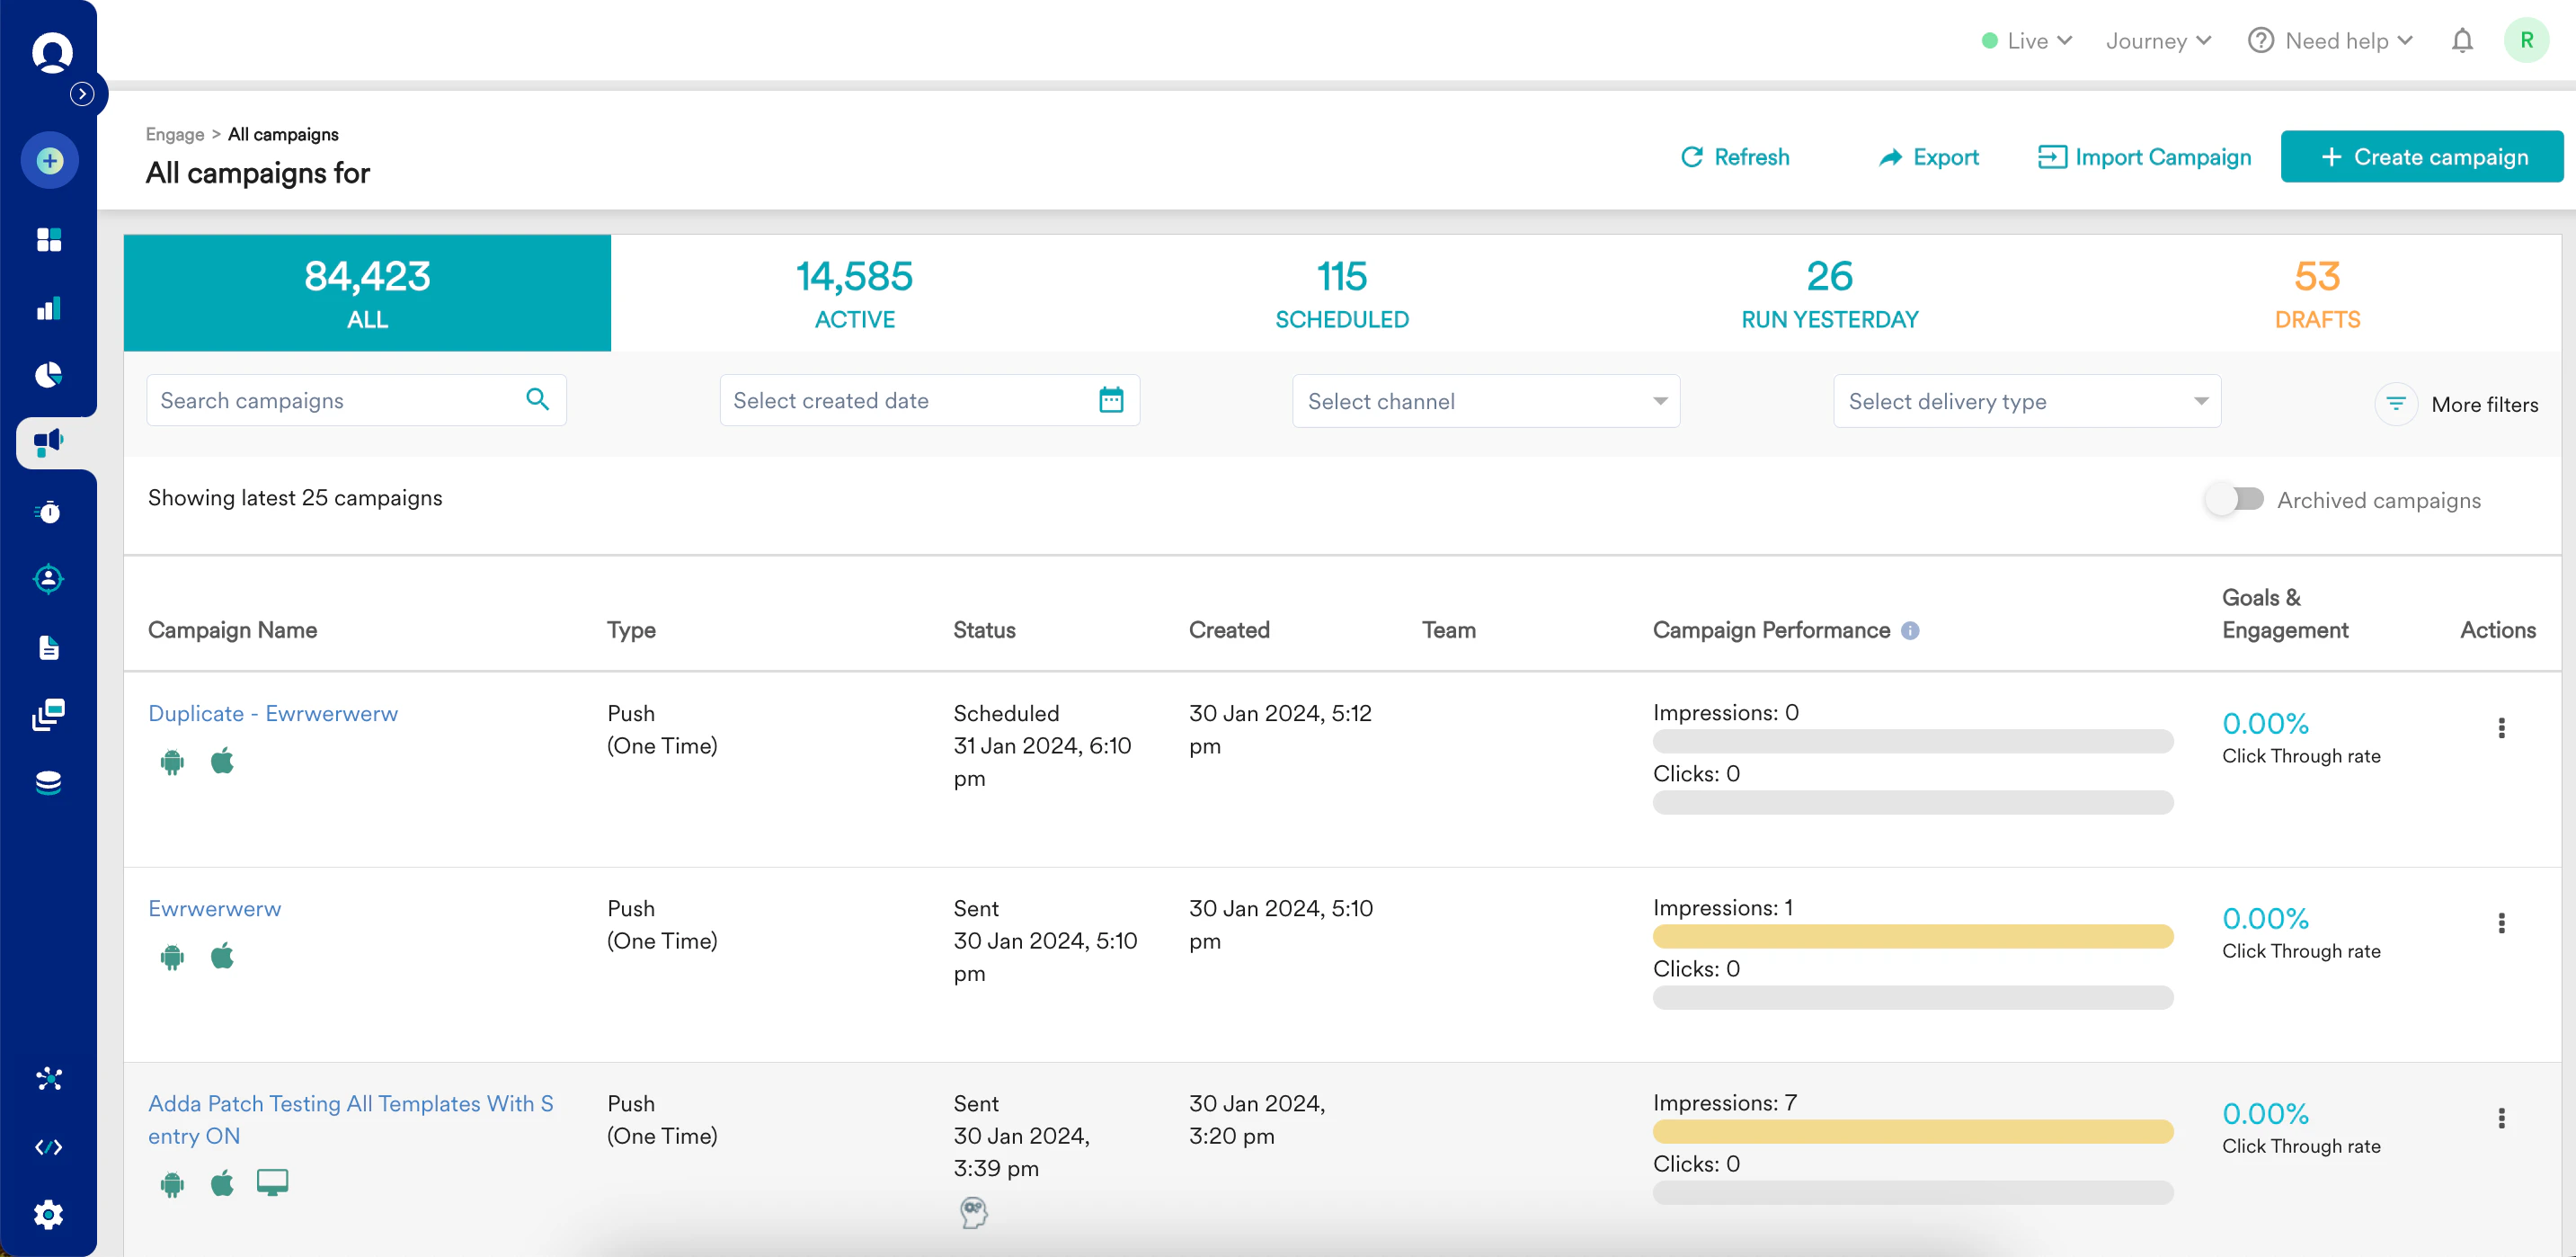 # Navigating the Dashboard
The left navigation sidebar gives you access to the main sections of MoEngage:
* **Campaigns & Channels** — Create and manage campaigns across push, email, SMS, in-app, and other channels.
* **Flows** — Build automated multi-step journeys for your users.
* **Analyze** — Access analytics, cohorts, funnels, and campaign performance reports.
* **Segment** — Create and manage user segments.
* **Settings** — Configure your workspace, channels, integrations, and team access.
At the top right you'll find:
* Your **profile icon** — Access My Profile, switch appearance, and manage your workspace settings.
* The **workspace switcher** — Switch between workspaces or add a new one.
* **Need Help** — Access documentation, videos, and support.
# First-Time Setup
The first time when you log in to MoEngage, the Dashboard is available as a Test environment. You can integrate MoEngage with your app or web and get user or event data.
Make your environment Live after integration or tracking of events is complete and your app is released or your website is live.
# Live and Test Environments
Every MoEngage workspace has two environments: **Test** and **Live**. You switch between them using the toggle on the top navigation bar.
# Navigating the Dashboard
The left navigation sidebar gives you access to the main sections of MoEngage:
* **Campaigns & Channels** — Create and manage campaigns across push, email, SMS, in-app, and other channels.
* **Flows** — Build automated multi-step journeys for your users.
* **Analyze** — Access analytics, cohorts, funnels, and campaign performance reports.
* **Segment** — Create and manage user segments.
* **Settings** — Configure your workspace, channels, integrations, and team access.
At the top right you'll find:
* Your **profile icon** — Access My Profile, switch appearance, and manage your workspace settings.
* The **workspace switcher** — Switch between workspaces or add a new one.
* **Need Help** — Access documentation, videos, and support.
# First-Time Setup
The first time when you log in to MoEngage, the Dashboard is available as a Test environment. You can integrate MoEngage with your app or web and get user or event data.
Make your environment Live after integration or tracking of events is complete and your app is released or your website is live.
# Live and Test Environments
Every MoEngage workspace has two environments: **Test** and **Live**. You switch between them using the toggle on the top navigation bar.
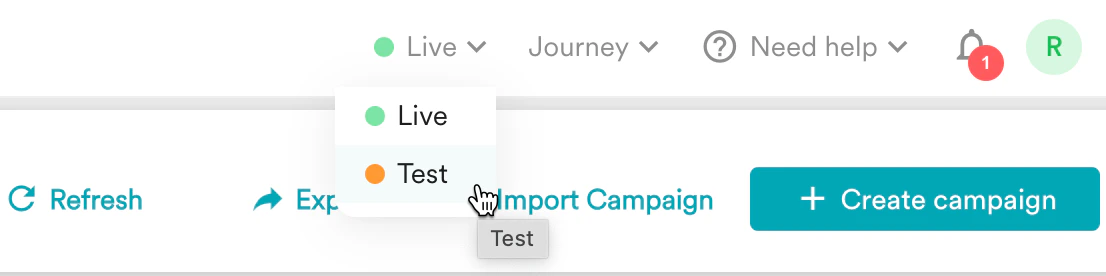 Both environments share the same Workspace ID (found under **Settings** > **Account** > **General settings**), but all other settings are independent.
| | Test | Live |
| -------------------- | --------------------------------------------------- | ------------------------------------------------ |
| **Purpose** | Integration, debugging, and QA | Production user data and campaigns |
| **Data routing** | SDK sends data when build is DEBUG | SDK sends data when build is RELEASE |
| **Team permissions** | All team members have full feature access | Restricted by role to prevent accidental changes |
| **Data processing** | Faster — helps speed up initial integration testing | Standard |
Apart from Team management, Billing, and your Profile settings, all other settings are separate for the Test and Live environments and available in the sidebar.
When you begin integrating any MoEngage SDKs, all your testing of user data or events data is visible in the Test environment. This enables you to test your integration and verify data before you go live or release your app or web.
For more information, refer to [Test Users](/docs/user-guide/getting-started/integration/test-users).
# Workspaces
A workspace is the core unit in MoEngage — it holds your campaigns, user data, analytics, and settings for a single app or business unit. You can have multiple workspaces under one login.
## Switch Between Workspaces
Click the workspace arrow in the top navigation bar to see all workspaces you have access to, then click a workspace name to switch to it.
Both environments share the same Workspace ID (found under **Settings** > **Account** > **General settings**), but all other settings are independent.
| | Test | Live |
| -------------------- | --------------------------------------------------- | ------------------------------------------------ |
| **Purpose** | Integration, debugging, and QA | Production user data and campaigns |
| **Data routing** | SDK sends data when build is DEBUG | SDK sends data when build is RELEASE |
| **Team permissions** | All team members have full feature access | Restricted by role to prevent accidental changes |
| **Data processing** | Faster — helps speed up initial integration testing | Standard |
Apart from Team management, Billing, and your Profile settings, all other settings are separate for the Test and Live environments and available in the sidebar.
When you begin integrating any MoEngage SDKs, all your testing of user data or events data is visible in the Test environment. This enables you to test your integration and verify data before you go live or release your app or web.
For more information, refer to [Test Users](/docs/user-guide/getting-started/integration/test-users).
# Workspaces
A workspace is the core unit in MoEngage — it holds your campaigns, user data, analytics, and settings for a single app or business unit. You can have multiple workspaces under one login.
## Switch Between Workspaces
Click the workspace arrow in the top navigation bar to see all workspaces you have access to, then click a workspace name to switch to it.
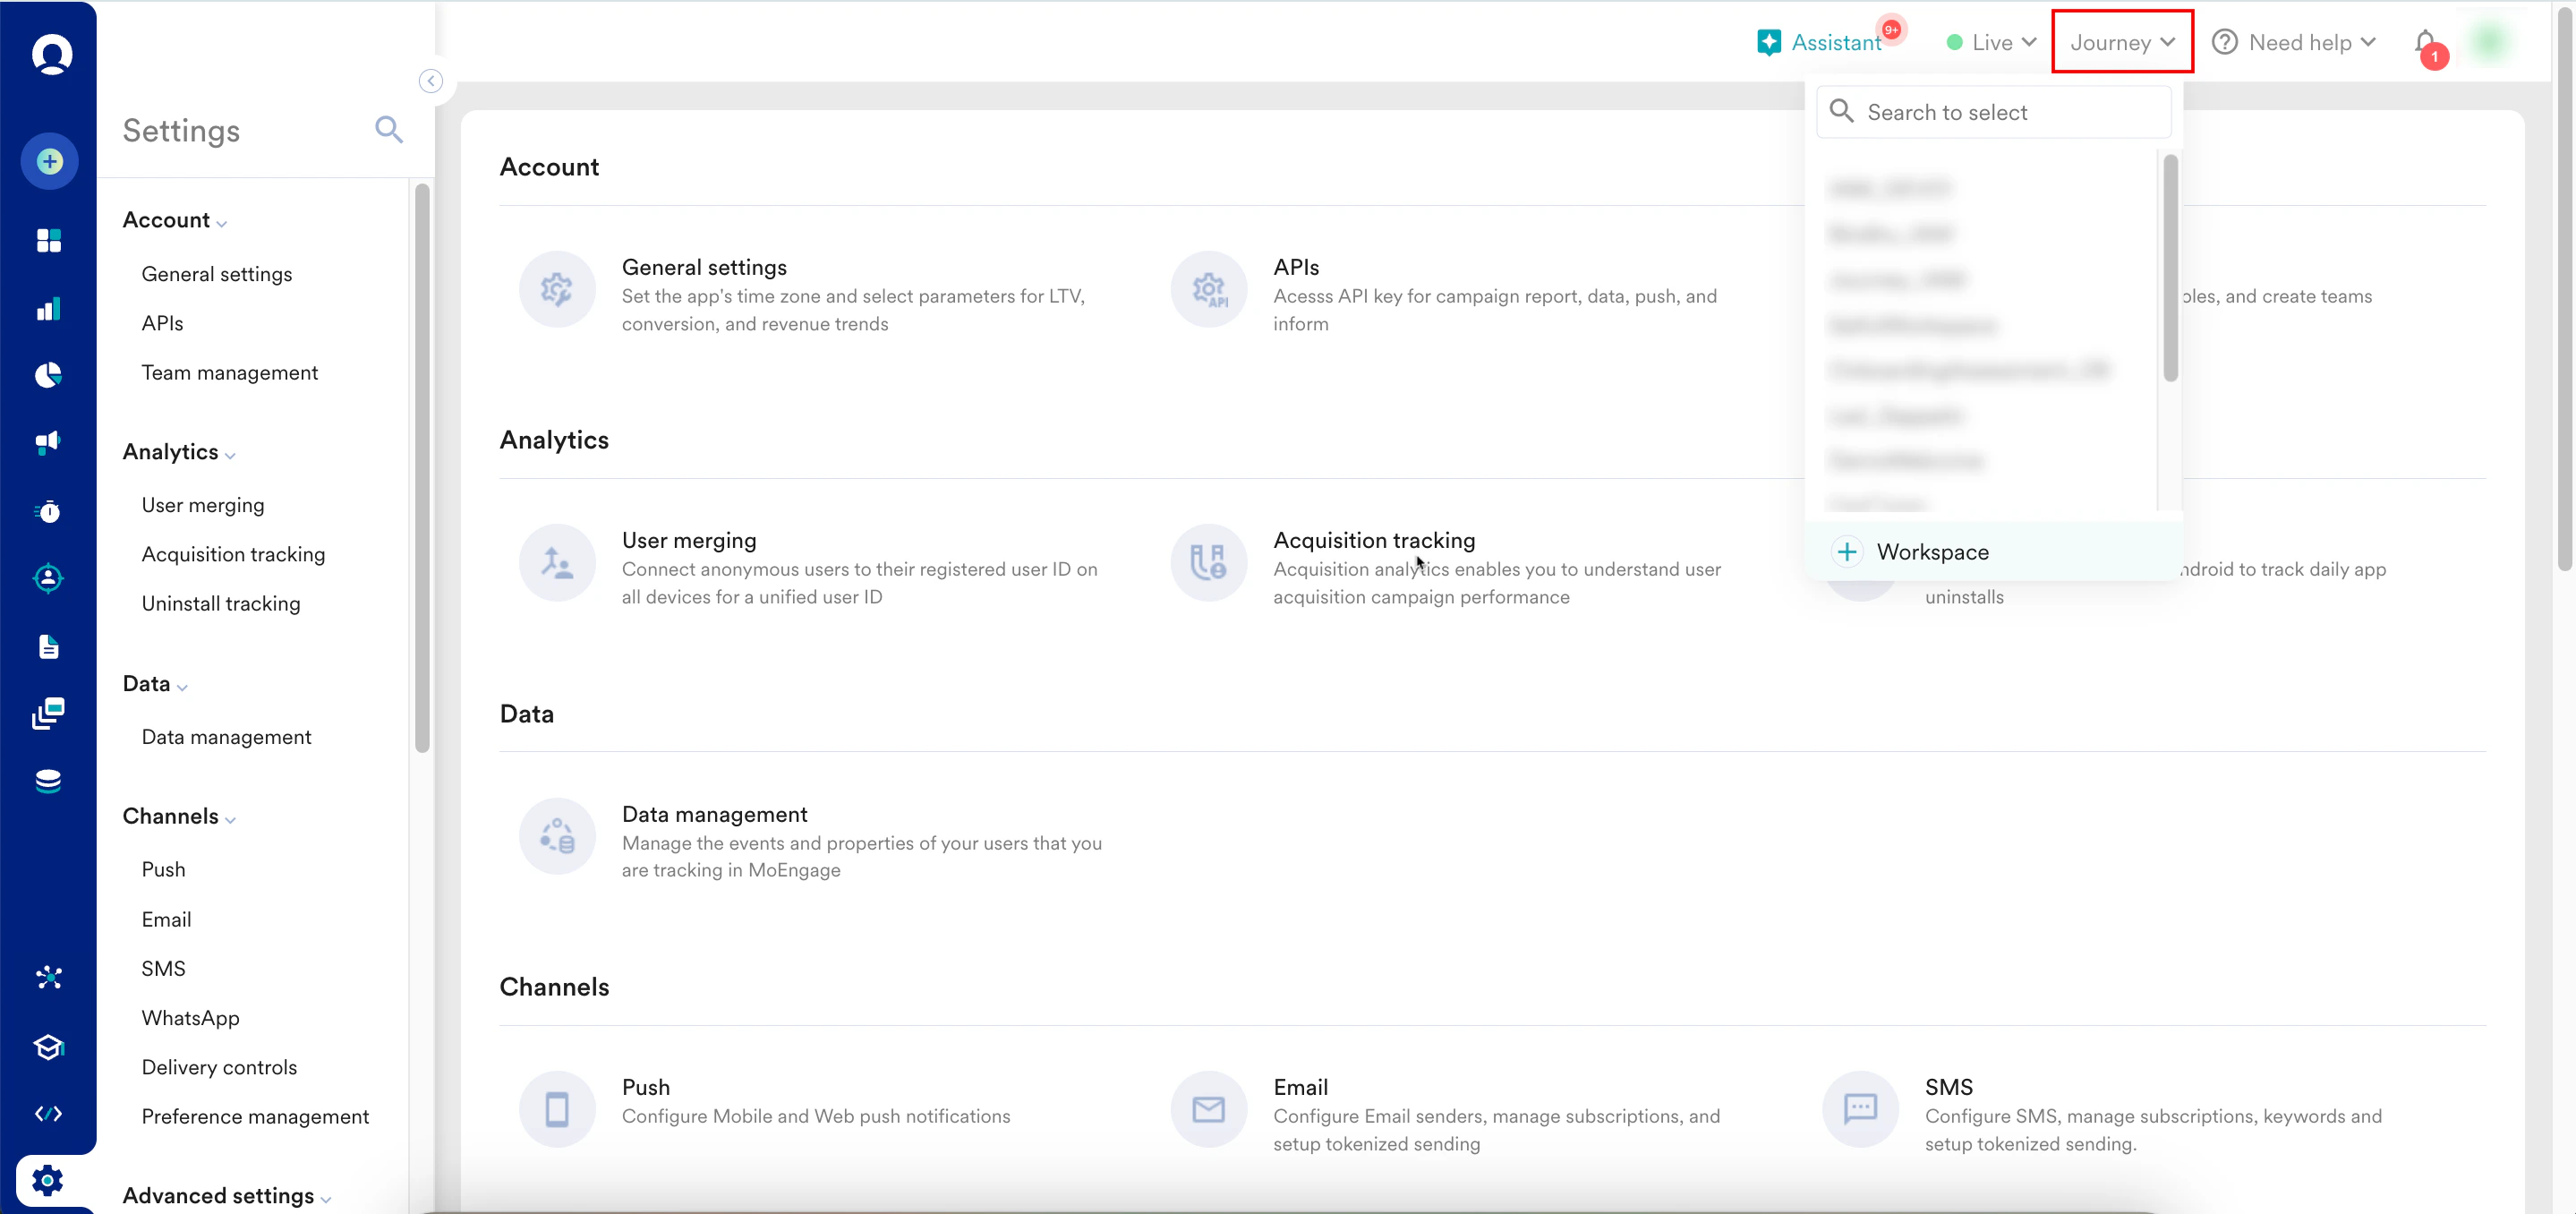 * You'll only see workspaces you've been invited to. If you're invited to only one workspace, the switcher won't appear.
* Switching workspaces may log you out if the two workspaces use different login methods or have different 2-step verification settings. For more information, refer to [Automatic Logout](/docs/user-guide/settings/account/security/automatic-logout).
## Add a New Workspace
1. Click the workspace arrow and then click **+ Workspace**.
2. Enter a workspace name and click **Add**.
Workspace names cannot be changed after creation. Workspaces cannot be deleted.
For workspace configuration — time zone, conversion goals, API keys, and more — refer to [Workspace Settings](/docs/user-guide/settings/account/general-settings/workspace-settings).
# Configure Workspace Language
The MoEngage workspace language is set to English by default, but you can change it to any language supported by MoEngage.
MoEngage currently supports Japanese and Brazilian Portuguese.
This is an Early Access feature. To enable it for your workspace, contact your CSM or [raise a support ticket](/docs/user-guide/contact-support/raise-a-support-ticket-through-moengage-dashboard).
Perform the following steps to configure the workspace language:
1. Navigate to **My profile** > **Preferences** > **Language preferences**.
* You'll only see workspaces you've been invited to. If you're invited to only one workspace, the switcher won't appear.
* Switching workspaces may log you out if the two workspaces use different login methods or have different 2-step verification settings. For more information, refer to [Automatic Logout](/docs/user-guide/settings/account/security/automatic-logout).
## Add a New Workspace
1. Click the workspace arrow and then click **+ Workspace**.
2. Enter a workspace name and click **Add**.
Workspace names cannot be changed after creation. Workspaces cannot be deleted.
For workspace configuration — time zone, conversion goals, API keys, and more — refer to [Workspace Settings](/docs/user-guide/settings/account/general-settings/workspace-settings).
# Configure Workspace Language
The MoEngage workspace language is set to English by default, but you can change it to any language supported by MoEngage.
MoEngage currently supports Japanese and Brazilian Portuguese.
This is an Early Access feature. To enable it for your workspace, contact your CSM or [raise a support ticket](/docs/user-guide/contact-support/raise-a-support-ticket-through-moengage-dashboard).
Perform the following steps to configure the workspace language:
1. Navigate to **My profile** > **Preferences** > **Language preferences**. 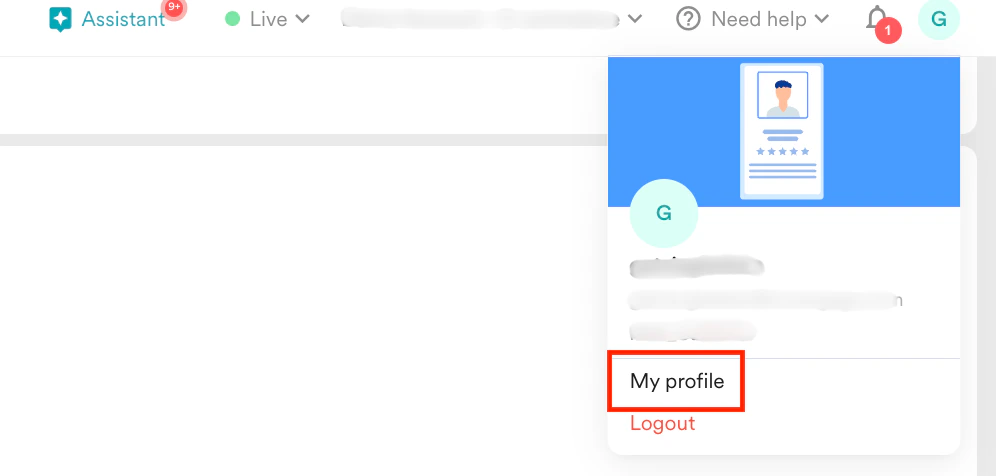 2. In the **Workspace language** list, select your preferred language.
 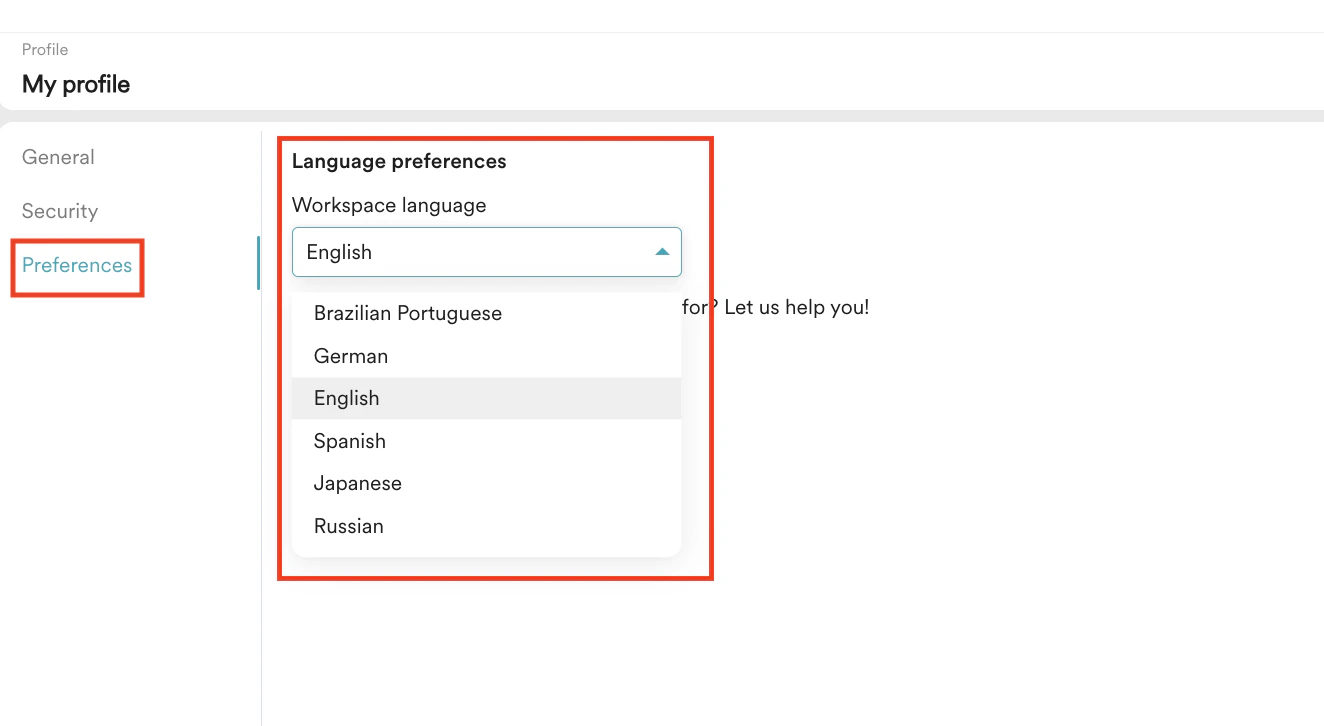 Your workspace switches to the selected language.
# Set Up the Dashboard
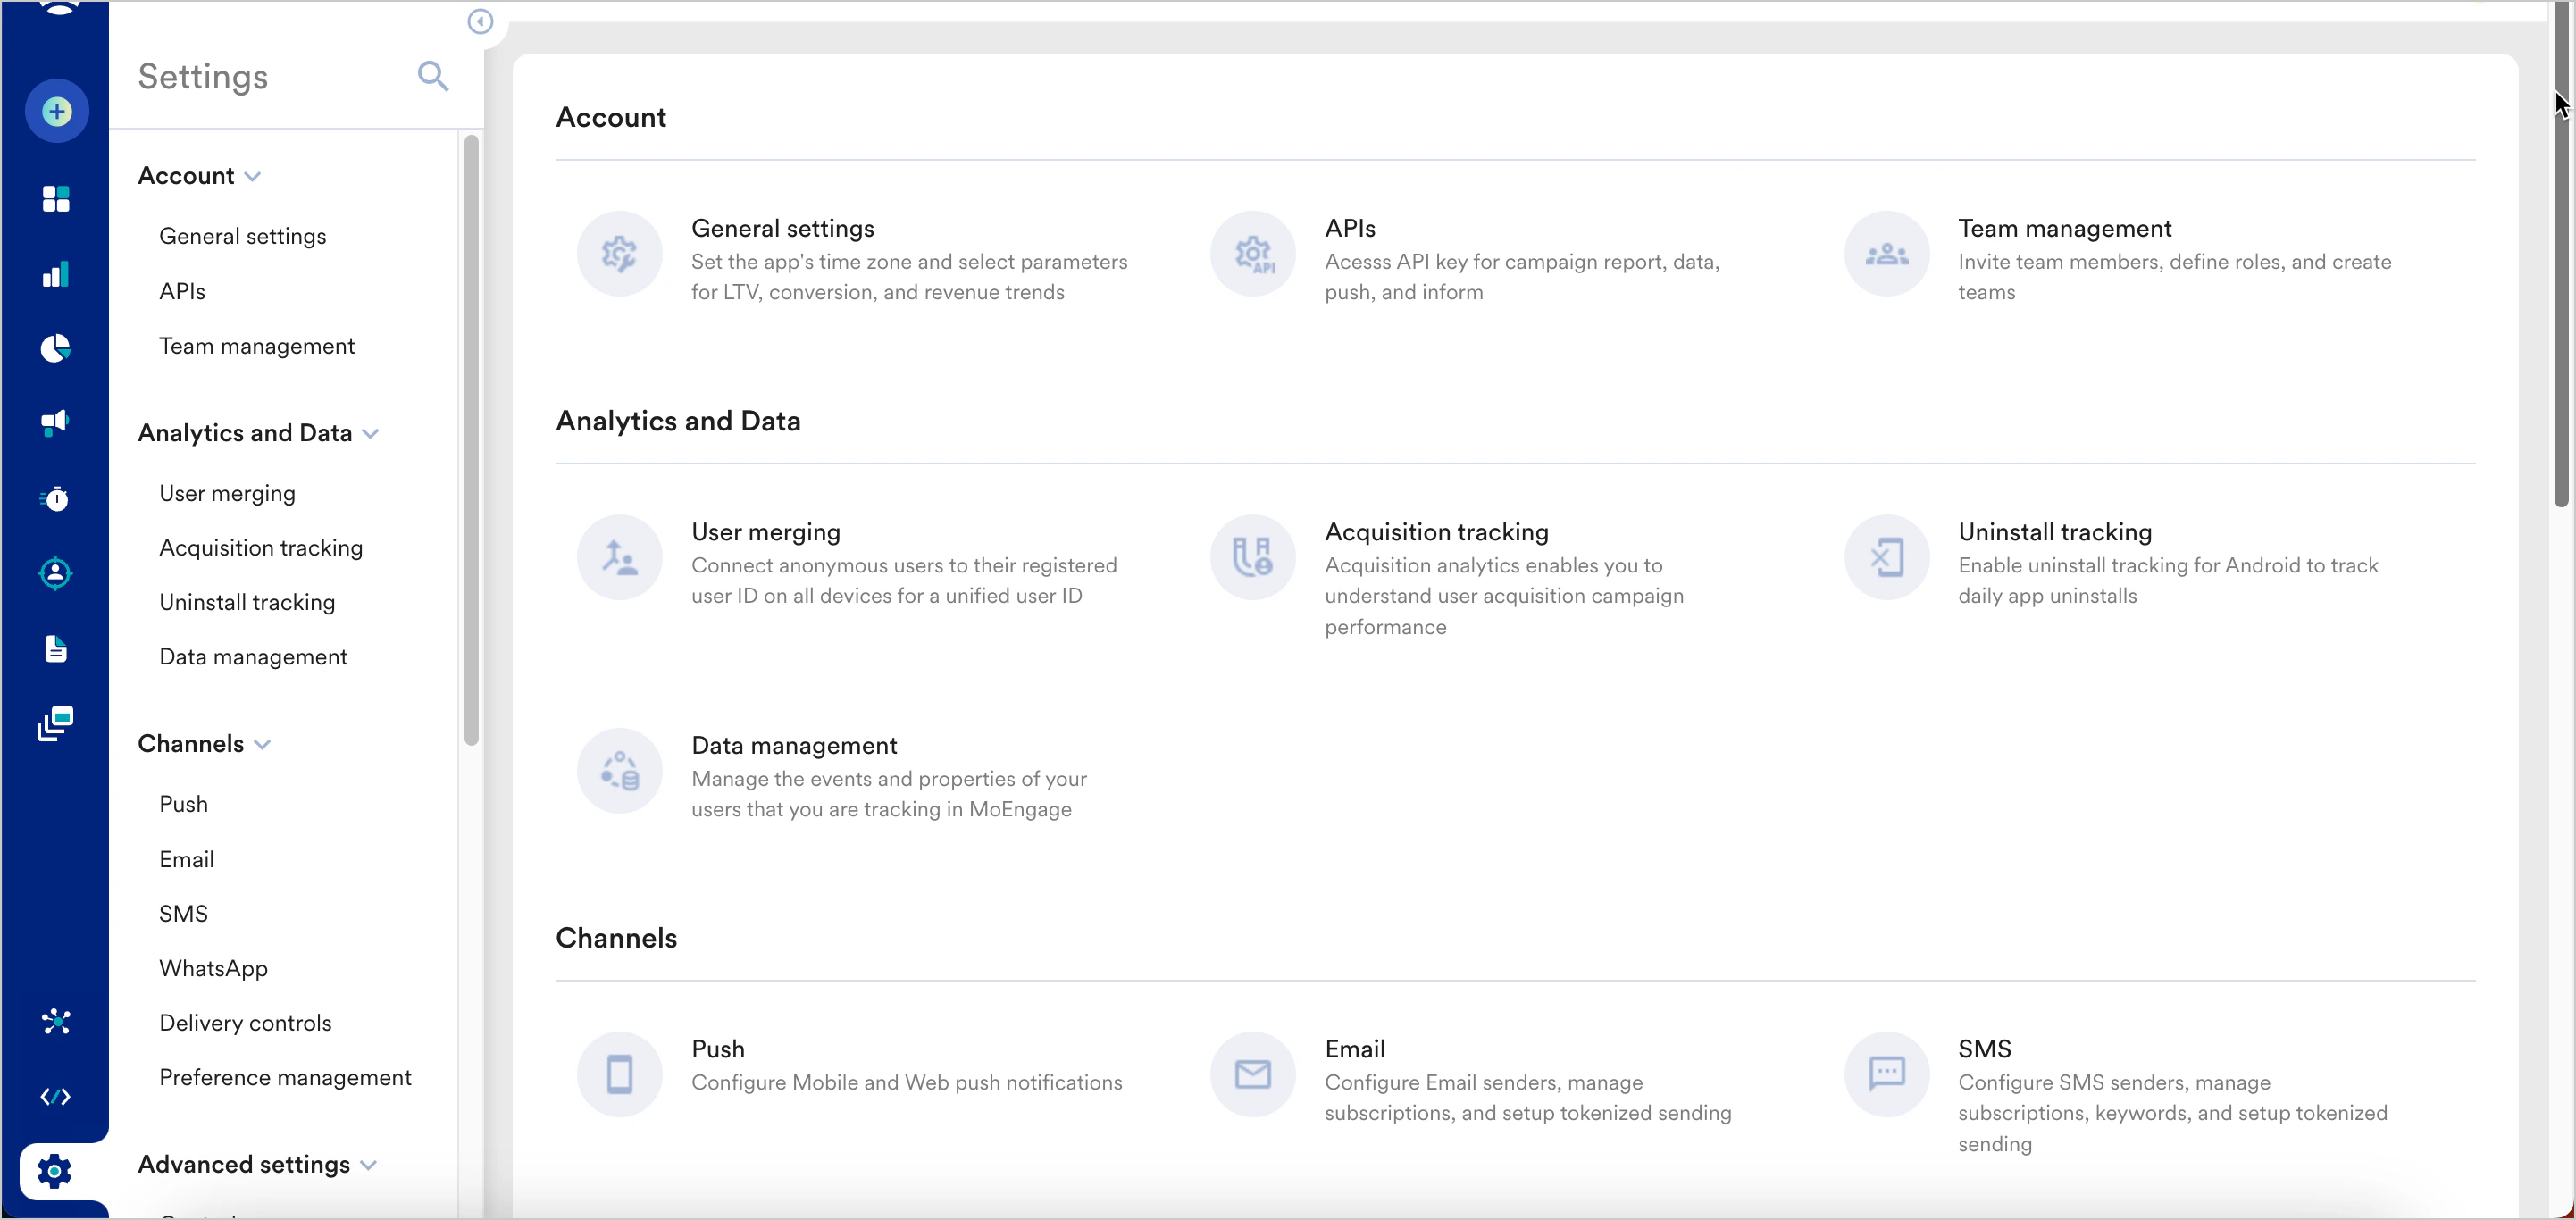
Configure your workspace by clicking **Settings** in the left navigation sidebar.
Your workspace switches to the selected language.
# Set Up the Dashboard
Configure your workspace by clicking **Settings** in the left navigation sidebar.
 ## Account
* [**General Settings**](/docs/user-guide/settings/account/general-settings/workspace-settings) — Configure workspace ID, time zone, conversion goals, locales, and workspace classification.
* [**API Keys**](/docs/user-guide/settings/account/api-and-api-keys/api-key-dashboard) — Manage Data API keys and other API credentials.
* [**Team Management**](/docs/user-guide/settings/account/team-management/manage-members) — Invite team members and manage access roles.
* [**Audit Logs**](/docs/user-guide/settings/account/audit-logs/audit-logs) — View a log of all actions taken in your workspace.
* [**Security**](/docs/user-guide/settings/account/security/overview) — Configure login methods, 2-step verification, SSO, and more.
* [**Billing**](/docs/user-guide/settings/account/billing/usage-details) — Add payment methods, access billing history, and view usage details across workspaces.
## Analytics
* [**User Merging**](/docs/user-guide/settings/analytics/enable-user-merging) — Consolidate anonymous and known user profiles into a single identity for accurate analytics.
* [**Acquisition Tracking**](/docs/user-guide/settings/analytics/acquisition-tracking) — Set up install attribution and measure campaign effectiveness.
* [**Uninstall Tracking**](/docs/user-guide/settings/analytics/uninstall-tracking) — Detect app uninstalls and gain insights into user churn.
## Data
* [**Data Management**](/docs/user-guide/settings/data-management/overview-data-management) — View tracked events and user attributes, monitor quotas, and manage auto-blocked data.
* [**Computed Traits**](/docs/user-guide/data/computed-traits/computed-traits-overview) — Create dynamic user attributes auto-calculated from event data.
## Channels
* [**Push**](/docs/user-guide/campaigns-and-channels/mobile-push/getting-started-with-mobile-push/configure-mobile-push) — Configure mobile push notification credentials and delivery settings.
* [**Email**](/docs/user-guide/campaigns-and-channels/email/getting-started-with-email/email-onboarding) — Configure email sender details, SMTP settings, and authentication.
* [**SMS**](/docs/user-guide/campaigns-and-channels/sms-mms-and-rcs/other-settings/configure-sms-mms-and-rcs-general-settings) — Configure SMS connectors and general delivery settings.
* [**WhatsApp**](/docs/user-guide/campaigns-and-channels/whatsapp/getting-started-with-whatsapp/configure-whatsapp) — Configure your WhatsApp business account and message templates.
* [**Delivery Controls**](/docs/user-guide/settings/channels/delivery-controls/frequency-capping) — Set frequency capping, DND, push throttling, and campaign audience limits across channels.
* [**Preference Management**](/docs/user-guide/campaigns-and-channels/mobile-push/getting-started-with-mobile-push/preference-management-for-push-notifications) — Manage channel-level opt-outs to prevent sending campaigns to unsubscribed users.
## Advanced Settings
* **Accessibility Controls** — Configure accessibility features for your MoEngage workspace.
* [**Control Groups**](/docs/user-guide/settings/advanced-settings/global-control-group) — Set up a global control group to measure the true impact of your campaigns.
* [**Tags**](/docs/user-guide/settings/advanced-settings/manage-tags) — Create and manage tags to organize campaigns and content.
* [**Locales**](/docs/user-guide/settings/advanced-settings/locales) — Configure language and regional settings for content personalization.
* [**Content API**](/docs/user-guide/settings/advanced-settings/add-a-content-api) — Connect external content APIs for dynamic, real-time personalization.
* [**Custom Domain**](/docs/user-guide/settings/advanced-settings/configure-custom-domain-link-branding) — Set a branded domain for campaign links and tracking URLs.
* [**Authorization Configuration**](/docs/user-guide/settings/advanced-settings/authorization-configuration-with-oauth-20) — Configure OAuth 2.0 access tokens for custom connectors and Content API integrations.
* [**UTM Tracking**](/docs/user-guide/settings/advanced-settings/configure-general-utm-parameters-at-account-level) — Set default UTM parameters to track campaign traffic in external analytics tools.
* [**Conversion And Attribution**](/docs/user-guide/settings/advanced-settings/campaign-attribution-settings) — Configure conversion windows and attribution rules for your campaigns.
## Reports and Alerts
* [**Alert Management**](/docs/user-guide/settings/reports-and-alerts/alert-management/getting-started/overview-alert-management) — Set up alerts for token expirations, campaign failures, and performance drops.
* [**Dashboard Subscriptions**](/docs/user-guide/settings/reports-and-alerts/dashboard-subscriptions) — Schedule and receive automated dashboard reports via email.
* [**Proactive Insights**](/docs/user-guide/settings/reports-and-alerts/proactive-assistant-settings) — Configure RFM insights, confidence intervals, and analysis preferences for the Proactive Assistant.
## Miscellaneous
* [**Inform**](/docs/user-guide/settings/miscellaneous/settings-inform) — Configure API credentials and user attribute preferences for MoEngage Inform.
* [**Push**](/docs/user-guide/campaigns-and-channels/mobile-push/getting-started-with-mobile-push/configure-mobile-push) — Configure mobile push notification credentials and delivery settings.
* [**Email**](/docs/user-guide/campaigns-and-channels/email/getting-started-with-email/email-onboarding) — Configure email sender details, SMTP settings, and authentication.
* [**SMS**](/docs/user-guide/campaigns-and-channels/sms-mms-and-rcs/other-settings/configure-sms-mms-and-rcs-general-settings) — Configure SMS connectors and general delivery settings.
* [**WhatsApp**](/docs/user-guide/campaigns-and-channels/whatsapp/getting-started-with-whatsapp/configure-whatsapp) — Configure your WhatsApp business account and message templates.
* [**Delivery Controls**](/docs/user-guide/settings/channels/delivery-controls/frequency-capping) — Set frequency capping, DND, push throttling, and campaign audience limits across channels.
* [**Preference Management**](/docs/user-guide/campaigns-and-channels/mobile-push/getting-started-with-mobile-push/preference-management-for-push-notifications) — Manage channel-level opt-outs to prevent sending campaigns to unsubscribed users.
## Offer Decisioning
* [**Offering Attributes**](/docs/user-guide/decisioning/offer-decisioning/create-offering-attribute) — Define and manage attributes used to personalize offers across campaigns.
# Next Steps
Your dashboard is now fully set up to start creating segments and launching targeted campaigns. For more information, refer to [creating user segments](/docs/user-guide/segment/segment-operations/rule-based-filter-segments) and [campaigns](/docs/user-guide/campaigns-and-channels/getting-started/introduction/moengage-channels).
## Account
* [**General Settings**](/docs/user-guide/settings/account/general-settings/workspace-settings) — Configure workspace ID, time zone, conversion goals, locales, and workspace classification.
* [**API Keys**](/docs/user-guide/settings/account/api-and-api-keys/api-key-dashboard) — Manage Data API keys and other API credentials.
* [**Team Management**](/docs/user-guide/settings/account/team-management/manage-members) — Invite team members and manage access roles.
* [**Audit Logs**](/docs/user-guide/settings/account/audit-logs/audit-logs) — View a log of all actions taken in your workspace.
* [**Security**](/docs/user-guide/settings/account/security/overview) — Configure login methods, 2-step verification, SSO, and more.
* [**Billing**](/docs/user-guide/settings/account/billing/usage-details) — Add payment methods, access billing history, and view usage details across workspaces.
## Analytics
* [**User Merging**](/docs/user-guide/settings/analytics/enable-user-merging) — Consolidate anonymous and known user profiles into a single identity for accurate analytics.
* [**Acquisition Tracking**](/docs/user-guide/settings/analytics/acquisition-tracking) — Set up install attribution and measure campaign effectiveness.
* [**Uninstall Tracking**](/docs/user-guide/settings/analytics/uninstall-tracking) — Detect app uninstalls and gain insights into user churn.
## Data
* [**Data Management**](/docs/user-guide/settings/data-management/overview-data-management) — View tracked events and user attributes, monitor quotas, and manage auto-blocked data.
* [**Computed Traits**](/docs/user-guide/data/computed-traits/computed-traits-overview) — Create dynamic user attributes auto-calculated from event data.
## Channels
* [**Push**](/docs/user-guide/campaigns-and-channels/mobile-push/getting-started-with-mobile-push/configure-mobile-push) — Configure mobile push notification credentials and delivery settings.
* [**Email**](/docs/user-guide/campaigns-and-channels/email/getting-started-with-email/email-onboarding) — Configure email sender details, SMTP settings, and authentication.
* [**SMS**](/docs/user-guide/campaigns-and-channels/sms-mms-and-rcs/other-settings/configure-sms-mms-and-rcs-general-settings) — Configure SMS connectors and general delivery settings.
* [**WhatsApp**](/docs/user-guide/campaigns-and-channels/whatsapp/getting-started-with-whatsapp/configure-whatsapp) — Configure your WhatsApp business account and message templates.
* [**Delivery Controls**](/docs/user-guide/settings/channels/delivery-controls/frequency-capping) — Set frequency capping, DND, push throttling, and campaign audience limits across channels.
* [**Preference Management**](/docs/user-guide/campaigns-and-channels/mobile-push/getting-started-with-mobile-push/preference-management-for-push-notifications) — Manage channel-level opt-outs to prevent sending campaigns to unsubscribed users.
## Advanced Settings
* **Accessibility Controls** — Configure accessibility features for your MoEngage workspace.
* [**Control Groups**](/docs/user-guide/settings/advanced-settings/global-control-group) — Set up a global control group to measure the true impact of your campaigns.
* [**Tags**](/docs/user-guide/settings/advanced-settings/manage-tags) — Create and manage tags to organize campaigns and content.
* [**Locales**](/docs/user-guide/settings/advanced-settings/locales) — Configure language and regional settings for content personalization.
* [**Content API**](/docs/user-guide/settings/advanced-settings/add-a-content-api) — Connect external content APIs for dynamic, real-time personalization.
* [**Custom Domain**](/docs/user-guide/settings/advanced-settings/configure-custom-domain-link-branding) — Set a branded domain for campaign links and tracking URLs.
* [**Authorization Configuration**](/docs/user-guide/settings/advanced-settings/authorization-configuration-with-oauth-20) — Configure OAuth 2.0 access tokens for custom connectors and Content API integrations.
* [**UTM Tracking**](/docs/user-guide/settings/advanced-settings/configure-general-utm-parameters-at-account-level) — Set default UTM parameters to track campaign traffic in external analytics tools.
* [**Conversion And Attribution**](/docs/user-guide/settings/advanced-settings/campaign-attribution-settings) — Configure conversion windows and attribution rules for your campaigns.
## Reports and Alerts
* [**Alert Management**](/docs/user-guide/settings/reports-and-alerts/alert-management/getting-started/overview-alert-management) — Set up alerts for token expirations, campaign failures, and performance drops.
* [**Dashboard Subscriptions**](/docs/user-guide/settings/reports-and-alerts/dashboard-subscriptions) — Schedule and receive automated dashboard reports via email.
* [**Proactive Insights**](/docs/user-guide/settings/reports-and-alerts/proactive-assistant-settings) — Configure RFM insights, confidence intervals, and analysis preferences for the Proactive Assistant.
## Miscellaneous
* [**Inform**](/docs/user-guide/settings/miscellaneous/settings-inform) — Configure API credentials and user attribute preferences for MoEngage Inform.
* [**Push**](/docs/user-guide/campaigns-and-channels/mobile-push/getting-started-with-mobile-push/configure-mobile-push) — Configure mobile push notification credentials and delivery settings.
* [**Email**](/docs/user-guide/campaigns-and-channels/email/getting-started-with-email/email-onboarding) — Configure email sender details, SMTP settings, and authentication.
* [**SMS**](/docs/user-guide/campaigns-and-channels/sms-mms-and-rcs/other-settings/configure-sms-mms-and-rcs-general-settings) — Configure SMS connectors and general delivery settings.
* [**WhatsApp**](/docs/user-guide/campaigns-and-channels/whatsapp/getting-started-with-whatsapp/configure-whatsapp) — Configure your WhatsApp business account and message templates.
* [**Delivery Controls**](/docs/user-guide/settings/channels/delivery-controls/frequency-capping) — Set frequency capping, DND, push throttling, and campaign audience limits across channels.
* [**Preference Management**](/docs/user-guide/campaigns-and-channels/mobile-push/getting-started-with-mobile-push/preference-management-for-push-notifications) — Manage channel-level opt-outs to prevent sending campaigns to unsubscribed users.
## Offer Decisioning
* [**Offering Attributes**](/docs/user-guide/decisioning/offer-decisioning/create-offering-attribute) — Define and manage attributes used to personalize offers across campaigns.
# Next Steps
Your dashboard is now fully set up to start creating segments and launching targeted campaigns. For more information, refer to [creating user segments](/docs/user-guide/segment/segment-operations/rule-based-filter-segments) and [campaigns](/docs/user-guide/campaigns-and-channels/getting-started/introduction/moengage-channels).