> ## Documentation Index
> Fetch the complete documentation index at: https://moengage.com/docs/llms.txt
> Use this file to discover all available pages before exploring further.
# Recommend a Premium Card
# Introduction
Promoting the benefits of new credit cards as a marketer brings several advantages. By emphasizing the financial flexibility, rewards, and incentives they offer, you nudge users to consider a new credit card for their purchases. By showcasing these benefits, you create a compelling reason for users to acquire a new credit card, providing them with enhanced financial options while benefiting your business through increased customer acquisition and engagement.
#### Advantages of recommending a premium card for a bank
* **Increased profitability**: Premium cards typically come with higher annual fees, generating a steady stream of revenue. Affluent customers tend to spend more, leading to increased transaction fees for the bank.
* **Attracting and retaining customers**: Premium cards serve as a powerful tool for attracting and retaining affluent clients, a highly desirable customer segment. These customers often hold multiple accounts and utilize various banking services, increasing overall profitability.
* **Enhanced brand image**: Offering premium cards elevates the bank's brand image, positioning it as a provider of exclusive and high-quality financial services.
* **Increased customer loyalty and engagement**: Premium cardholders often develop a strong relationship with the bank due to the exclusive perks and personalized service. This fosters customer loyalty and reduces churn.
* **Cross-selling opportunities**: Premium cardholders are more likely to utilize other banking services, such as wealth management, investment products. This creates opportunities for cross-selling and increases the bank's share of wallet.
* **Increased card usage**: Due to the rewards that are offered on the card, the card is often used very frequently by the customer, increasing the transactions that the bank processes.
We can achieve this use case using the following steps:
1. [Create RFM segments](/use-cases/push/recommend-a-premium-card#step-1-create-rfm-segments)
2. [Create a Push campaign](/use-cases/push/recommend-a-premium-card#step-2-create-a-push-campaign)
# Expected Result
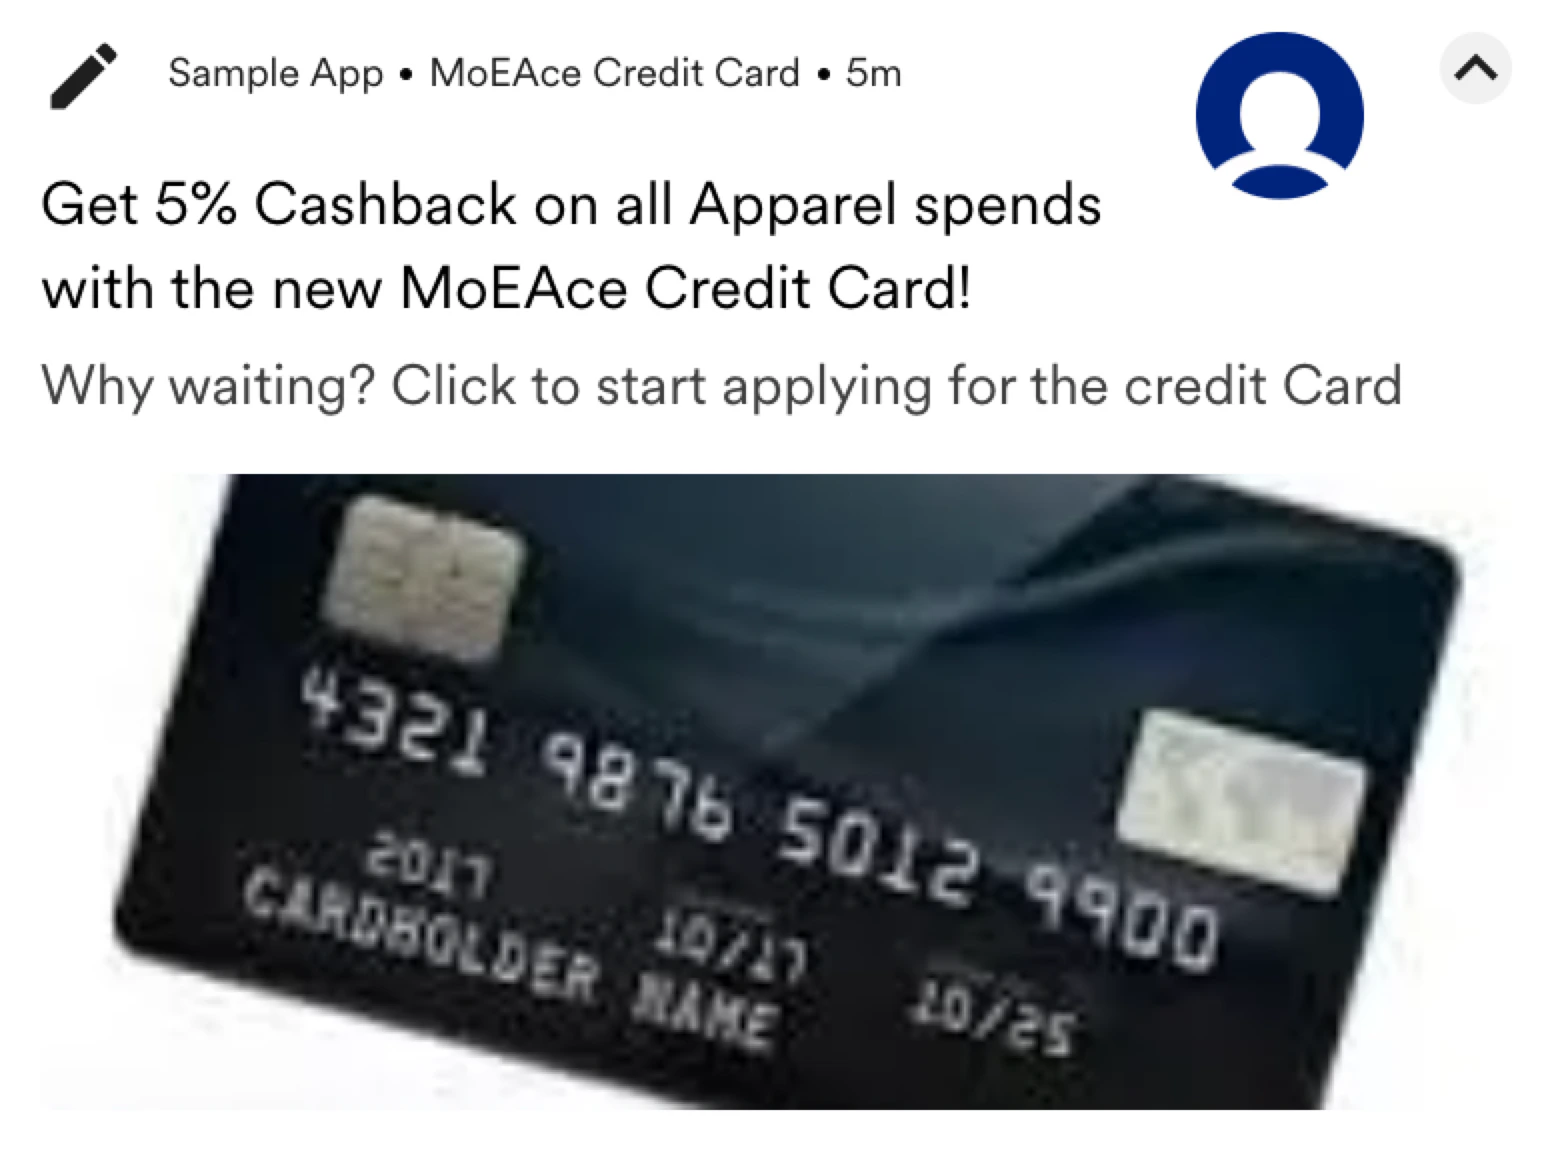
Users receive a Push Notification on their phone to apply for a new credit card:
 * Events must be available in MoEngage to track the action of a user spending on a credit card and related information such as the platform, bill amount, and card type. In this example, we will use the event *Credit Card used*. To understand how to track events, refer to the [Developer Guide](/developer-guide/introduction).
* An event must be available in MoEngage to track the action of a user opening the app. In this example, we will use the event *App/Site Opened*.
* The Push channel must be configured. For more information, refer to [Configure App Push](/user-guide/campaigns-and-channels/mobile-push/getting-started-with-mobile-push/configure-mobile-push).
* User properties must be available in MoEngage to track the most common expense category (this is optional but can be used to personalize messages). In this example, we will use the property **CommonExpense**.
# Step 1: Create RFM Segments
Before creating our campaign, let's understand RFM segments and the process for creating them. We will use these to define our target audience.
The RFM (Recency, Frequency, and Monetary) model provides auto-segmentation and buckets users into categories such as *Loyal*, *Promising*, and *At Risk* based on their behavior. You can use these auto segments in different ways such as user analysis, churn analysis, and to target users effectively. To learn more about RFM Segments, refer to [RFM Segments](/user-guide/segment/segment-operations/rfm-segments).
For our use case, let us use this model to find the *Champion* *users* who spend the most and recommend the premium card with the benefits to them, as they are our high-value customers who use our card the most.
1. On the left navigation menu in the MoEngage dashboard, click **Segment** > **RFM** **segments**.
* Events must be available in MoEngage to track the action of a user spending on a credit card and related information such as the platform, bill amount, and card type. In this example, we will use the event *Credit Card used*. To understand how to track events, refer to the [Developer Guide](/developer-guide/introduction).
* An event must be available in MoEngage to track the action of a user opening the app. In this example, we will use the event *App/Site Opened*.
* The Push channel must be configured. For more information, refer to [Configure App Push](/user-guide/campaigns-and-channels/mobile-push/getting-started-with-mobile-push/configure-mobile-push).
* User properties must be available in MoEngage to track the most common expense category (this is optional but can be used to personalize messages). In this example, we will use the property **CommonExpense**.
# Step 1: Create RFM Segments
Before creating our campaign, let's understand RFM segments and the process for creating them. We will use these to define our target audience.
The RFM (Recency, Frequency, and Monetary) model provides auto-segmentation and buckets users into categories such as *Loyal*, *Promising*, and *At Risk* based on their behavior. You can use these auto segments in different ways such as user analysis, churn analysis, and to target users effectively. To learn more about RFM Segments, refer to [RFM Segments](/user-guide/segment/segment-operations/rfm-segments).
For our use case, let us use this model to find the *Champion* *users* who spend the most and recommend the premium card with the benefits to them, as they are our high-value customers who use our card the most.
1. On the left navigation menu in the MoEngage dashboard, click **Segment** > **RFM** **segments**. 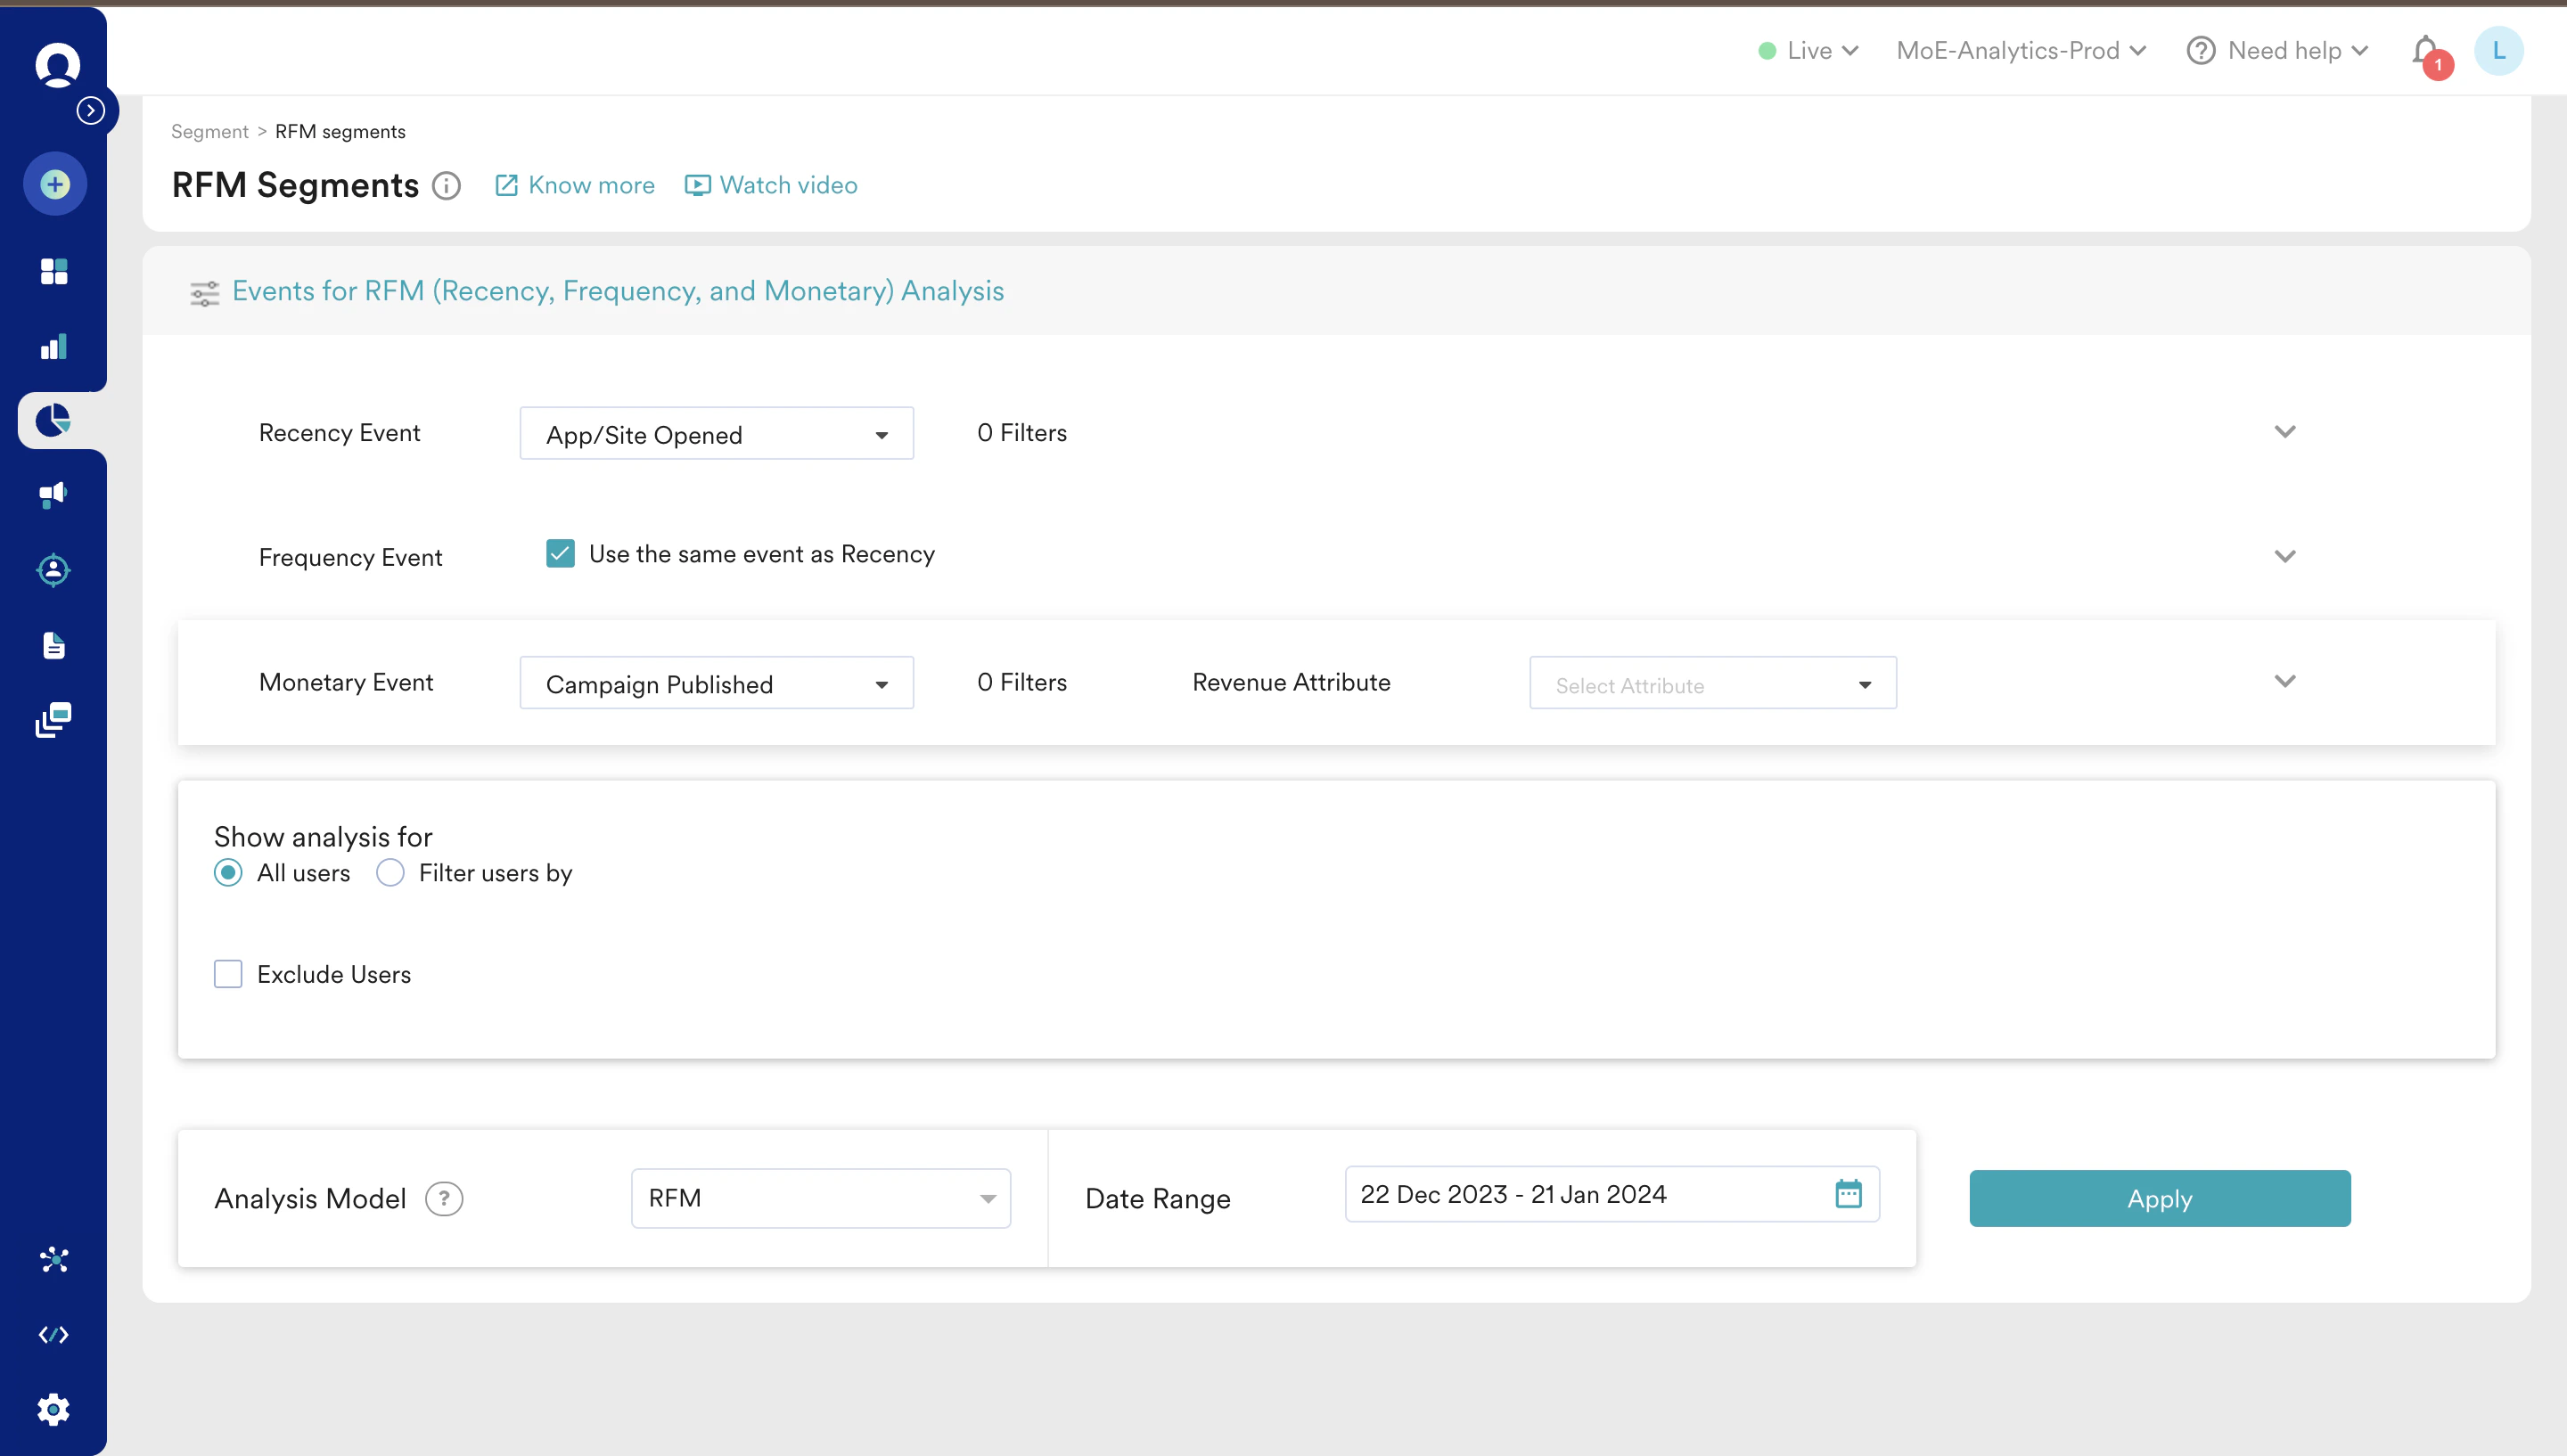 2. In the **Recency Event** list, select *App/Site Opened*, the event based on which the recency score should be allotted.
3. Use the same *App/Site Opened* event for **Frequency Event** as well.
4. In the **Monetary Even**t list, select *Credit Card used* and select **Revenue Attribute** as *Amount*.
2. In the **Recency Event** list, select *App/Site Opened*, the event based on which the recency score should be allotted.
3. Use the same *App/Site Opened* event for **Frequency Event** as well.
4. In the **Monetary Even**t list, select *Credit Card used* and select **Revenue Attribute** as *Amount*. 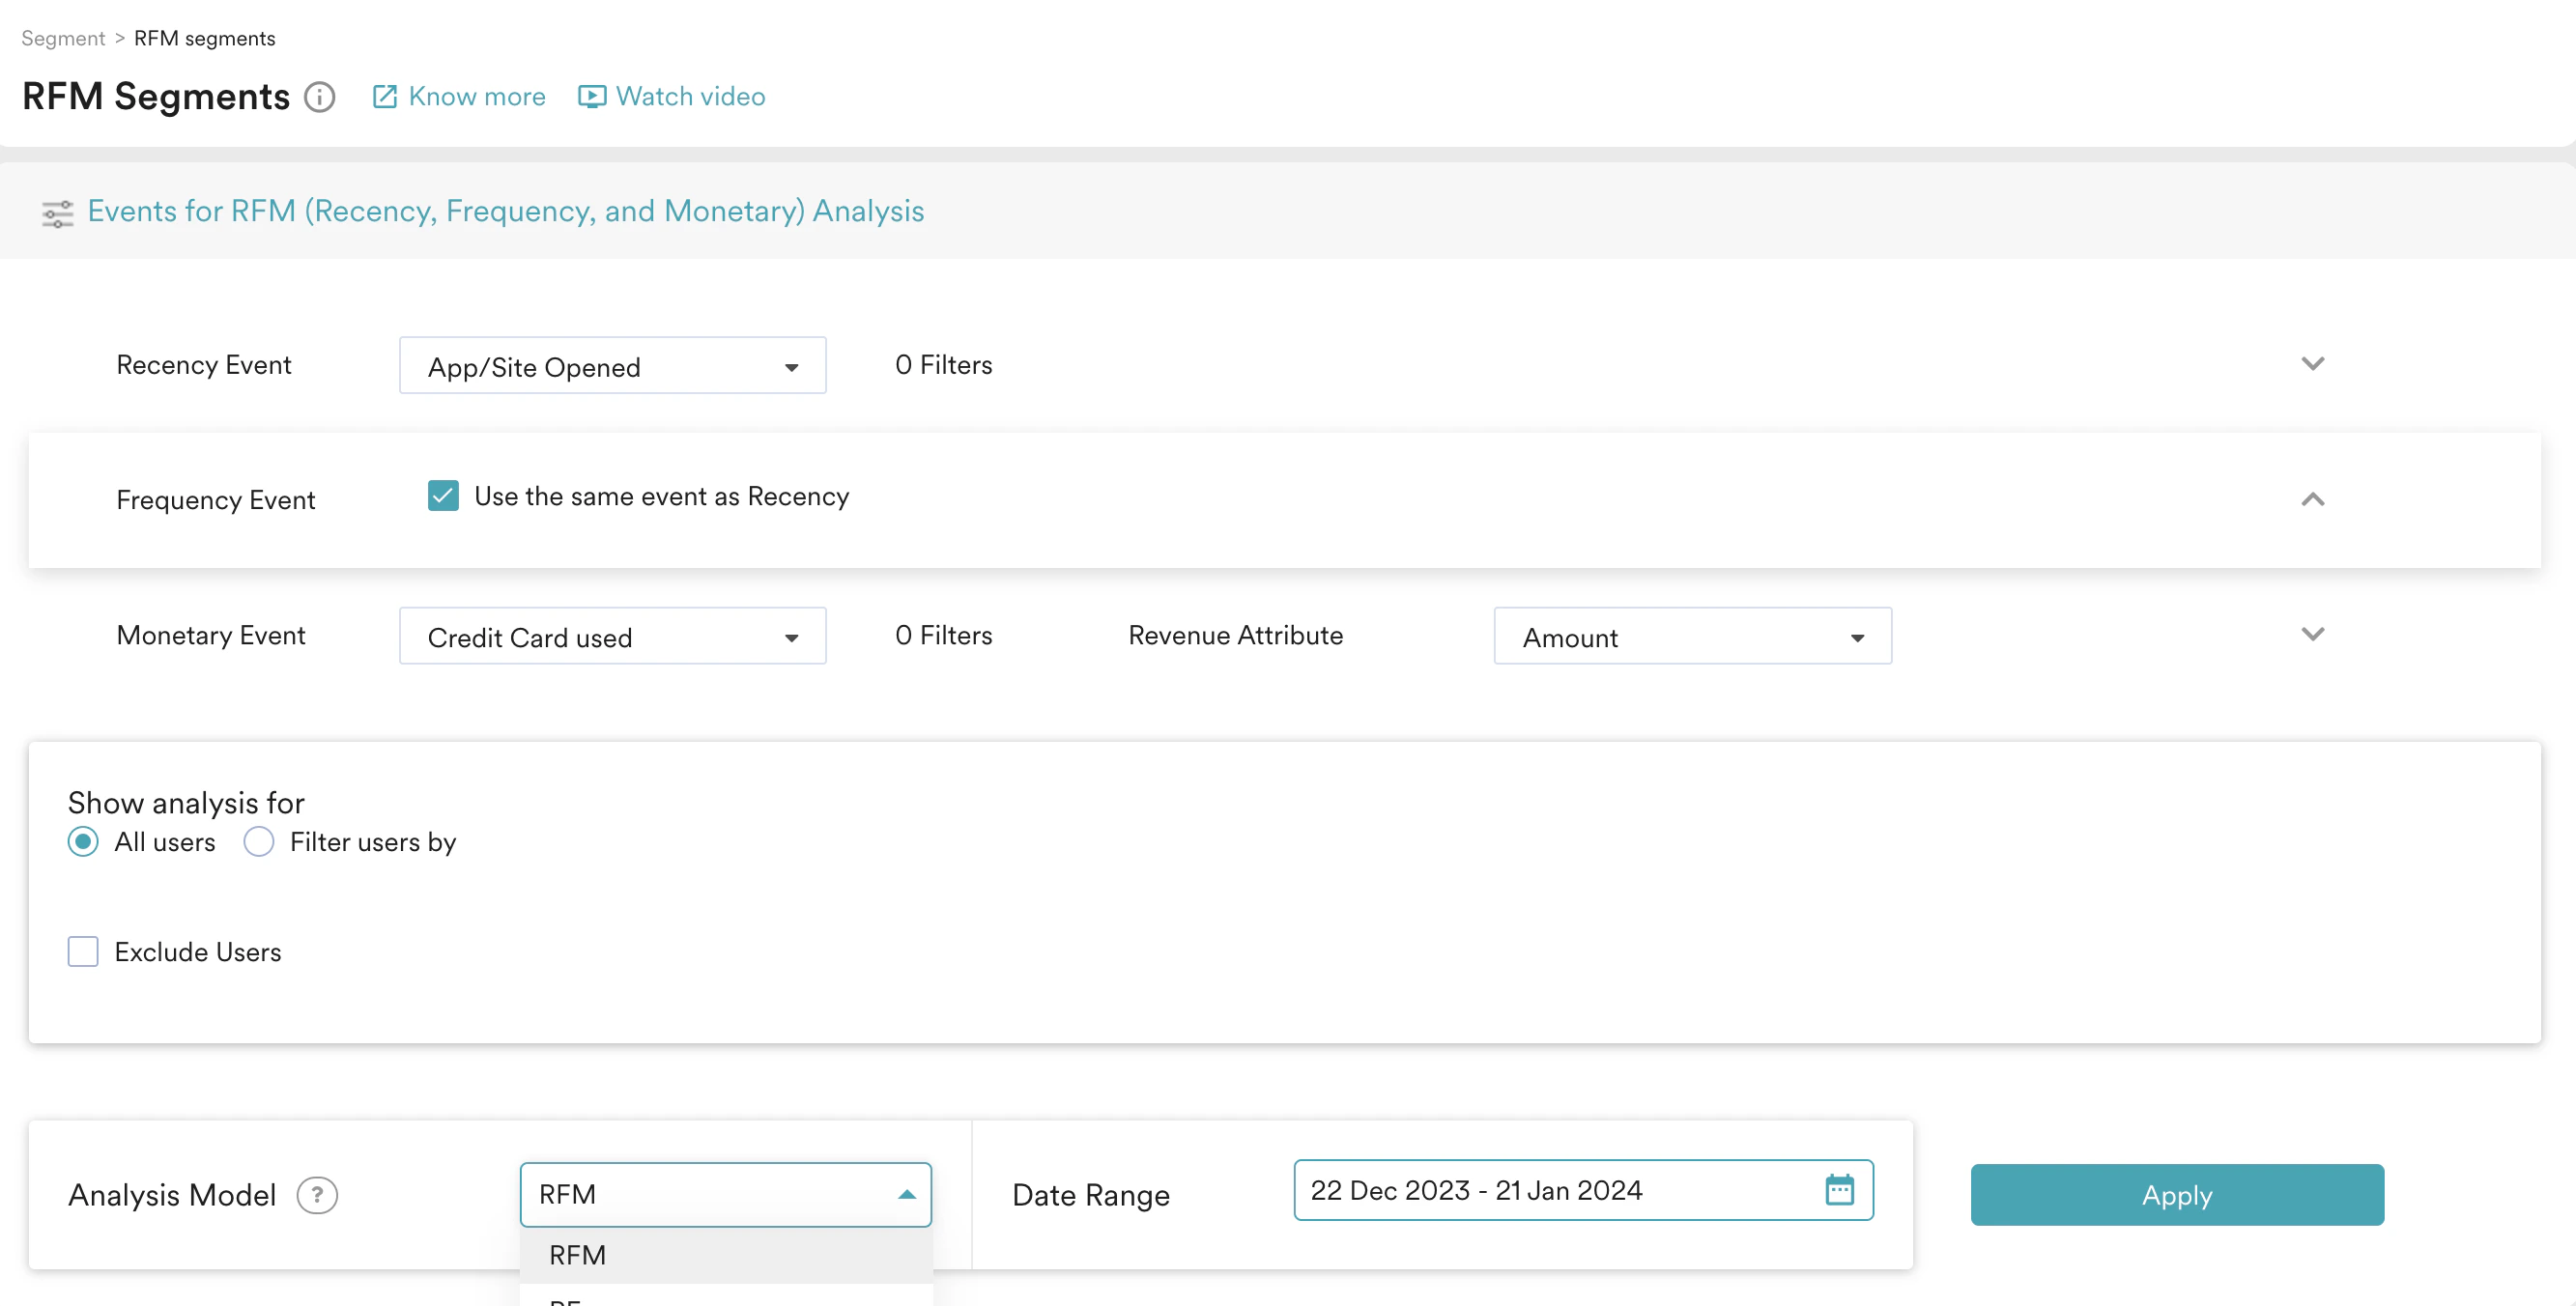 5. Under **Show analysis for**, select **All users** to make the analysis run for all users.
6. In the **Analysis Model** list, select **RFM**.
7. Click **Apply**. This will generate a chart like the one below. You can click any chart to save it as a custom segment or create a campaign using the segment as the target audience directly.
5. Under **Show analysis for**, select **All users** to make the analysis run for all users.
6. In the **Analysis Model** list, select **RFM**.
7. Click **Apply**. This will generate a chart like the one below. You can click any chart to save it as a custom segment or create a campaign using the segment as the target audience directly. 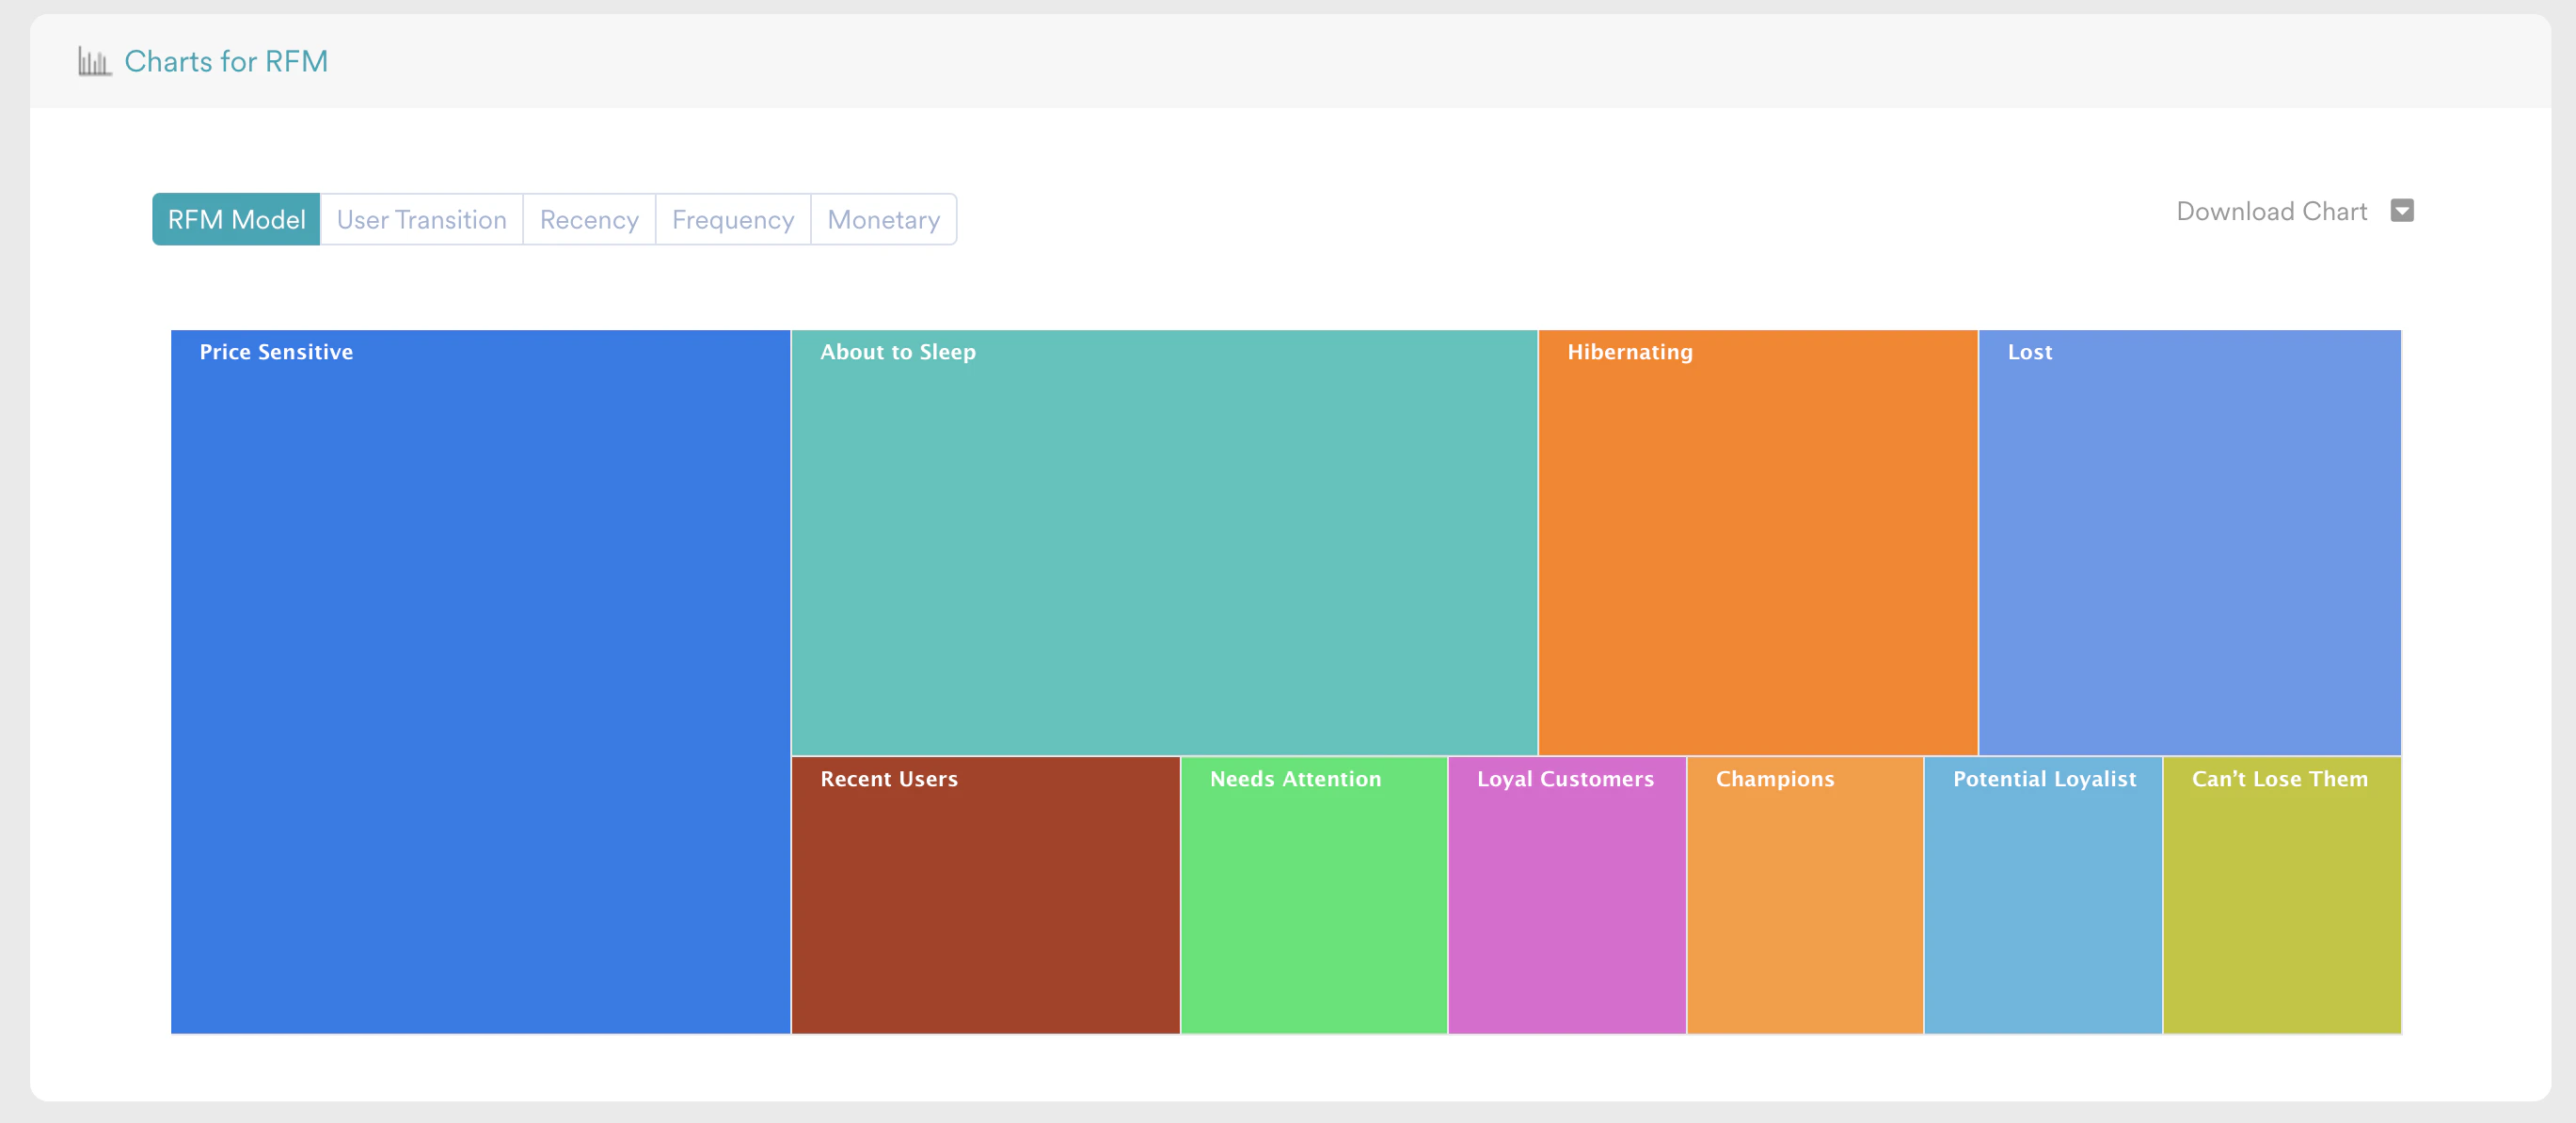 8. For our example, click the **Champions** box.
9. On the Engage Users dialog box, select **Custom Segment**.
8. For our example, click the **Champions** box.
9. On the Engage Users dialog box, select **Custom Segment**. 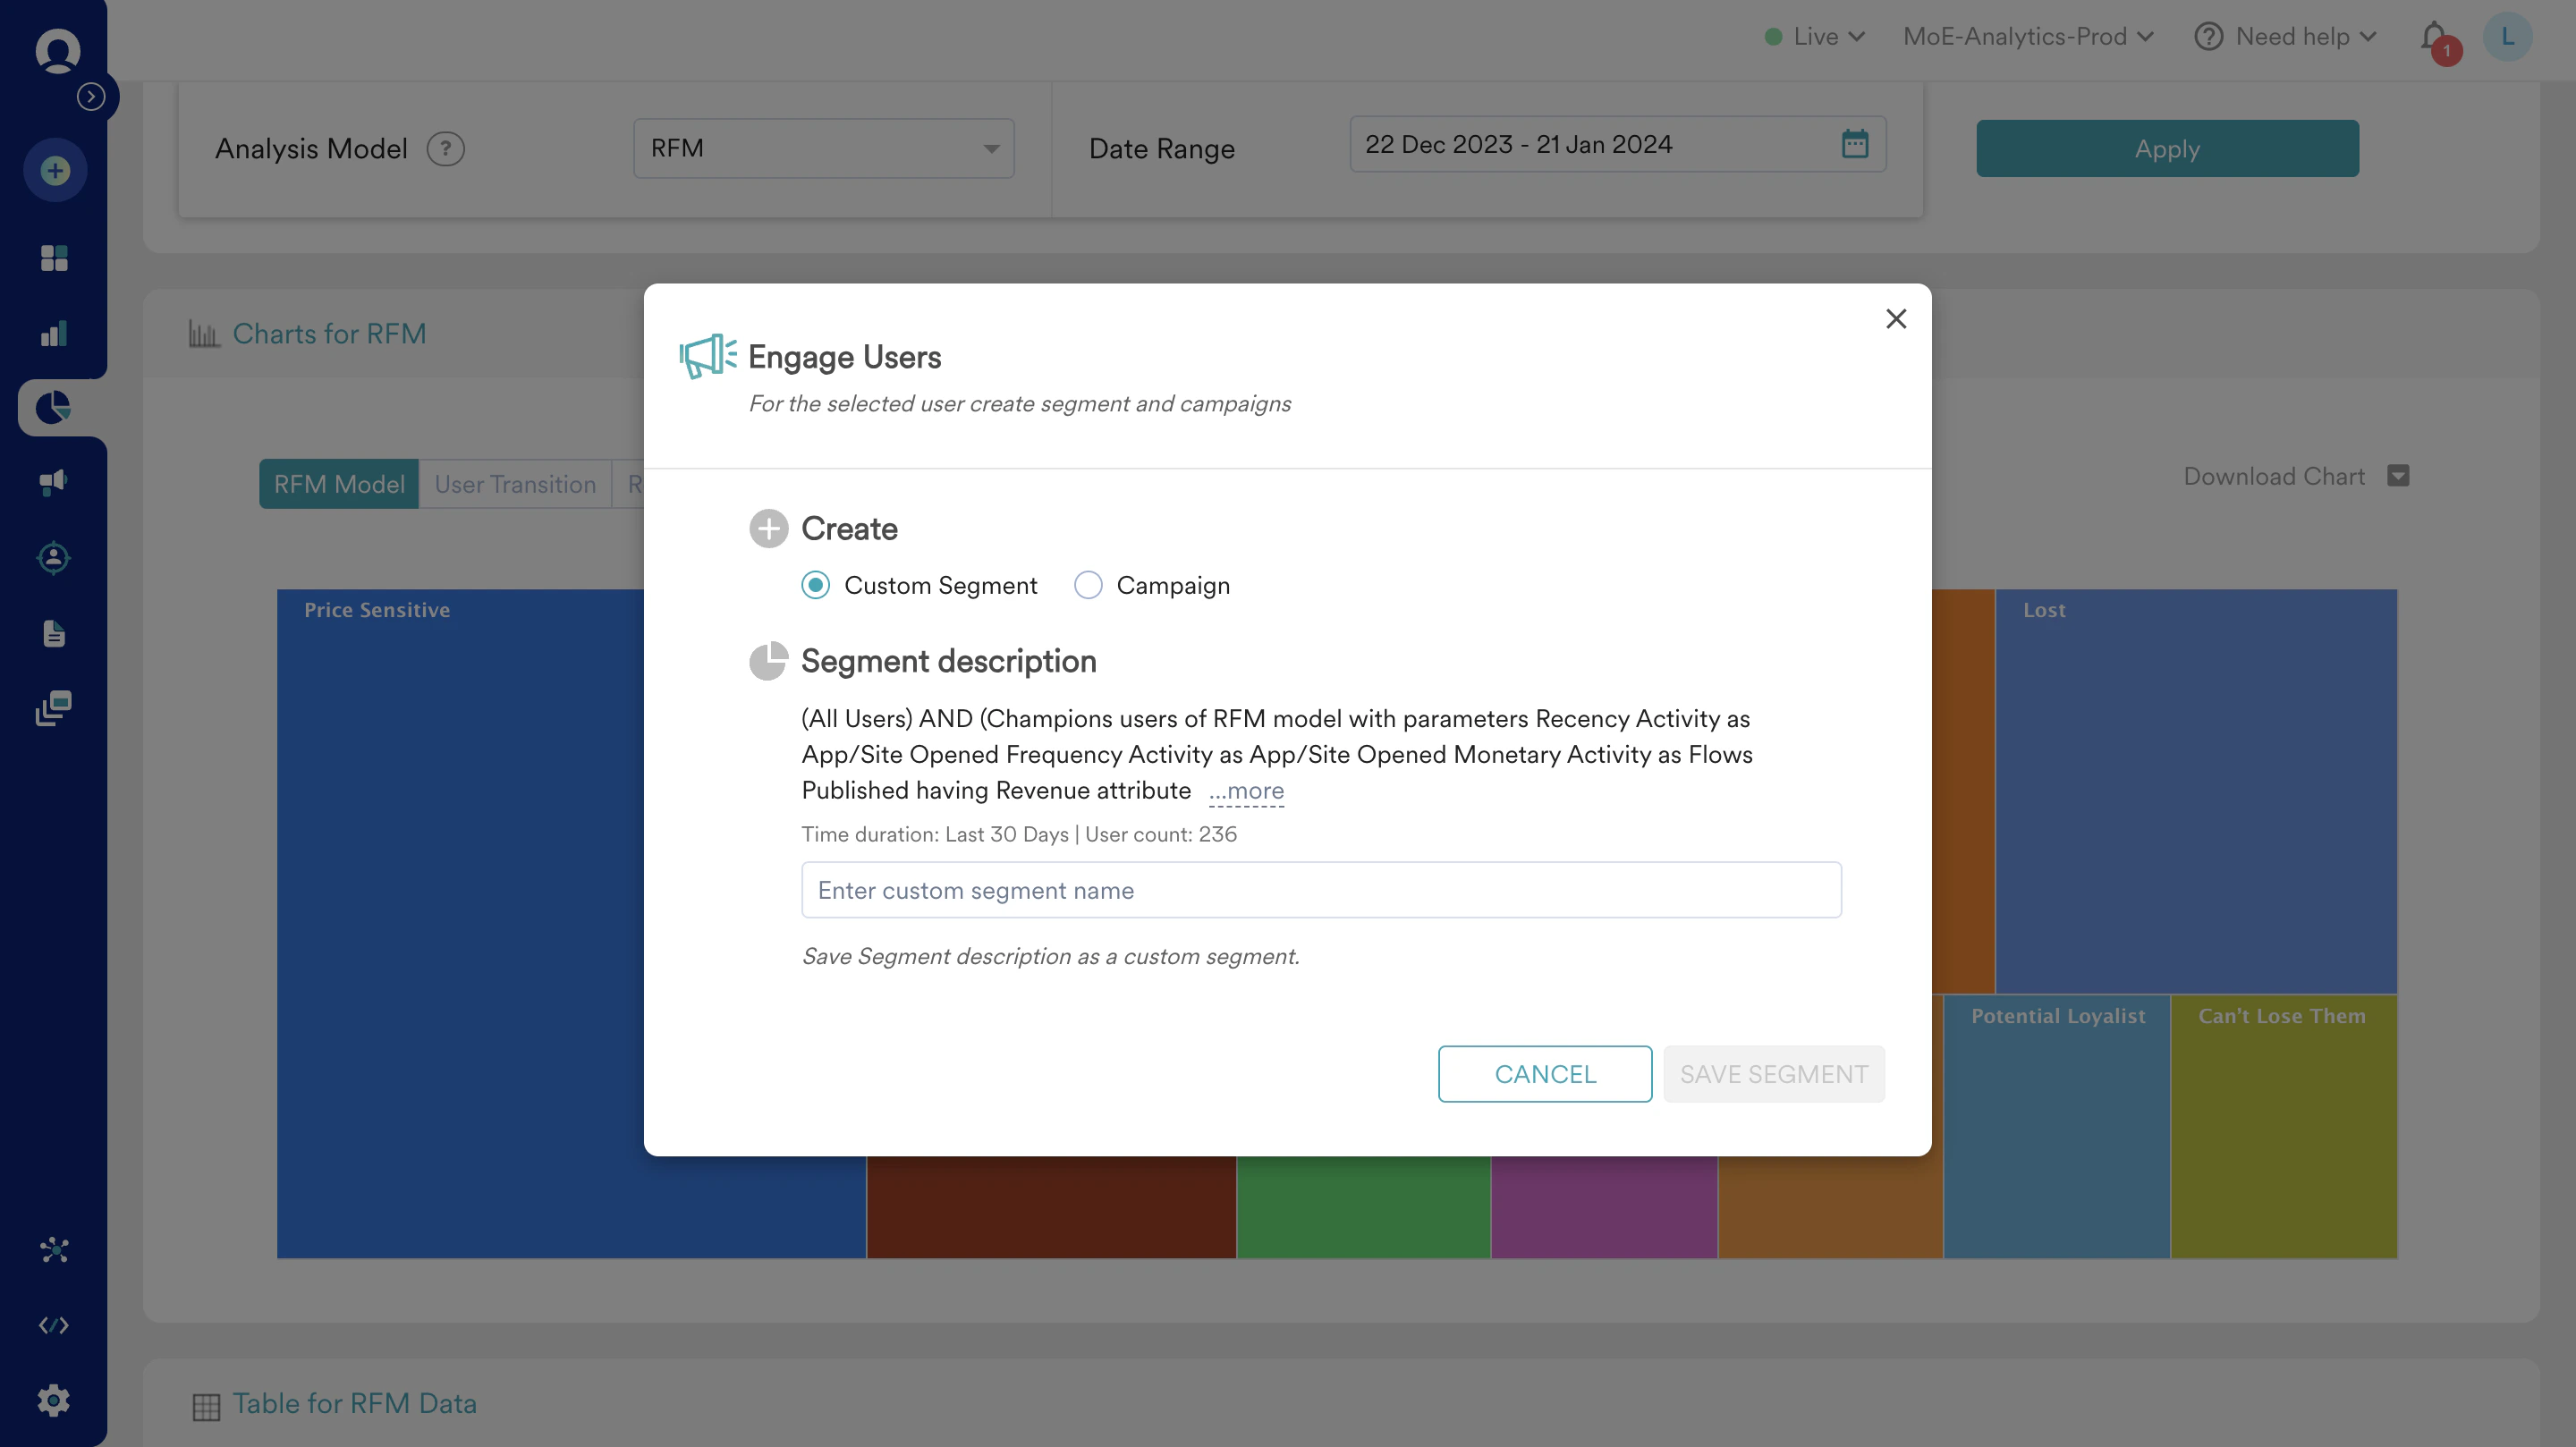 10. Enter a name for the segment and click **SAVE SEGMENT**.
 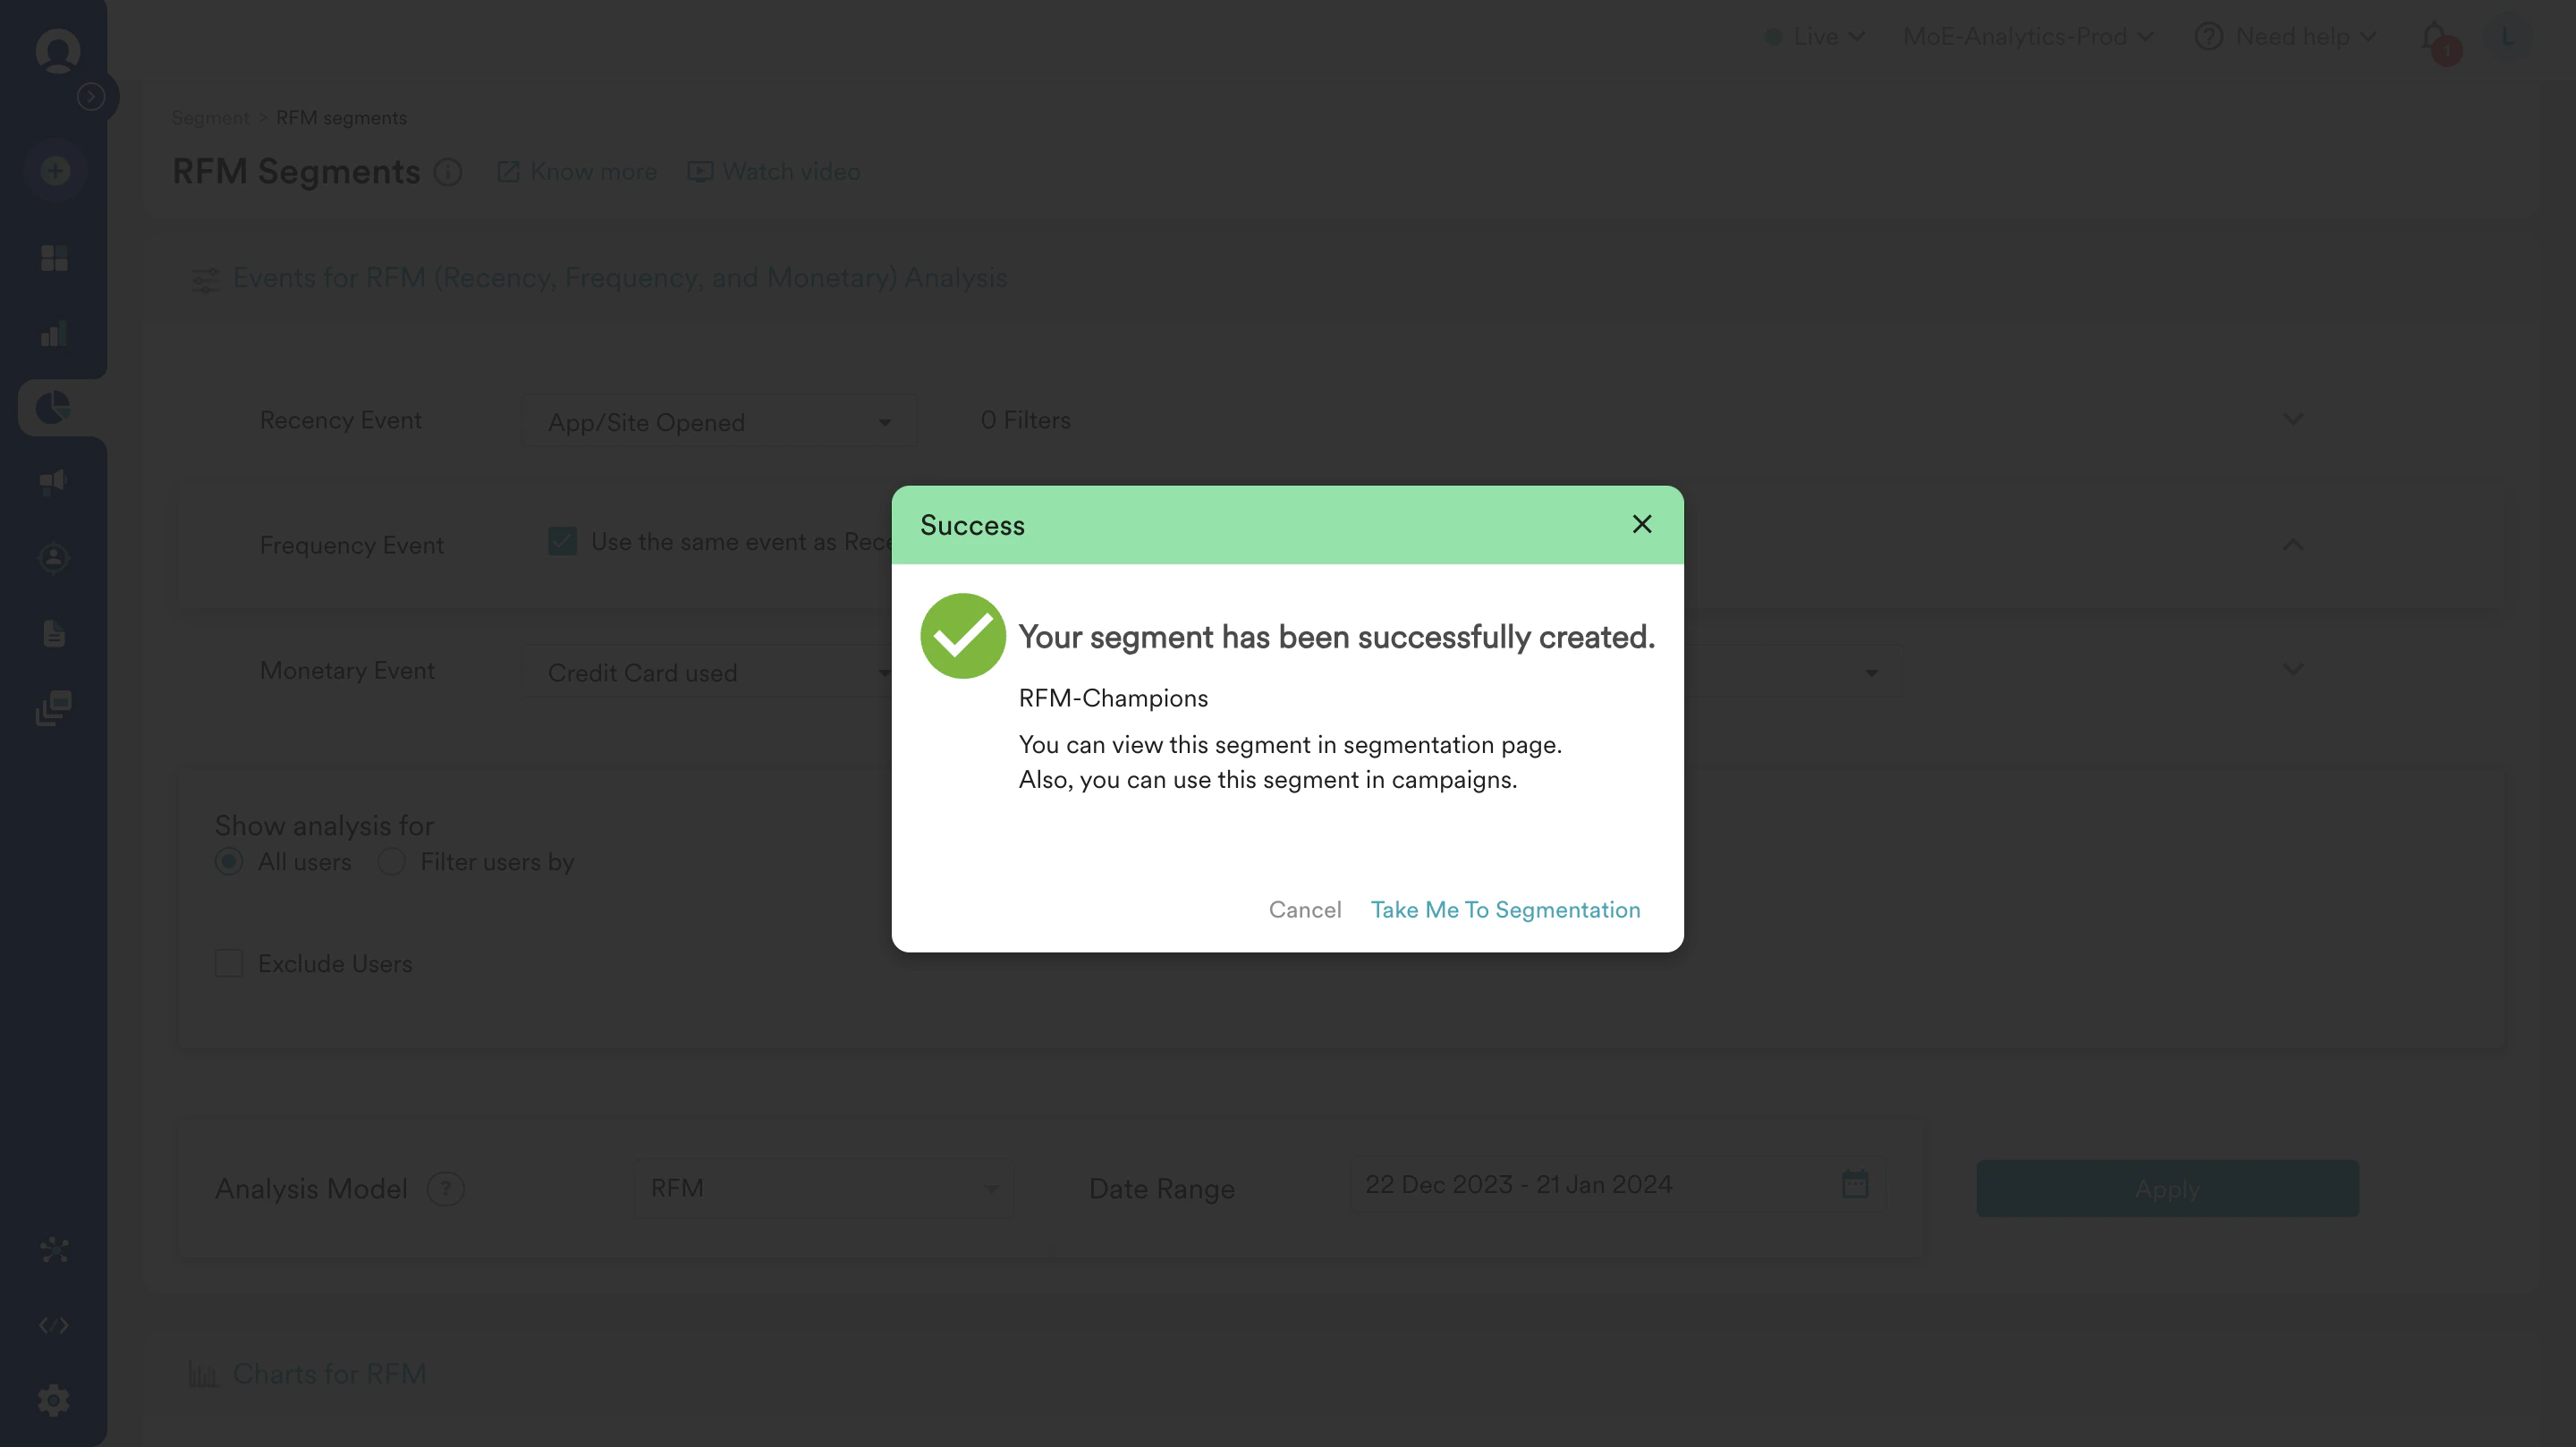 Now that the segment to target is created, we can start creating our campaign to nudge people about the premium card.
# Step 2: Create a Push Campaign
In this section, let us create a Push Notification campaign that triggers Push messages about the premium card:
## Step 2.1: Target Users
1. On the left navigation menu in the MoEngage dashboard, click **Engage**, and then click **Campaigns**.
2. On the **All campaigns** page, click **+ Create campaign**.
3. Under **Outbound**, select **Push** > **Periodic**.
Now that the segment to target is created, we can start creating our campaign to nudge people about the premium card.
# Step 2: Create a Push Campaign
In this section, let us create a Push Notification campaign that triggers Push messages about the premium card:
## Step 2.1: Target Users
1. On the left navigation menu in the MoEngage dashboard, click **Engage**, and then click **Campaigns**.
2. On the **All campaigns** page, click **+ Create campaign**.
3. Under **Outbound**, select **Push** > **Periodic**. 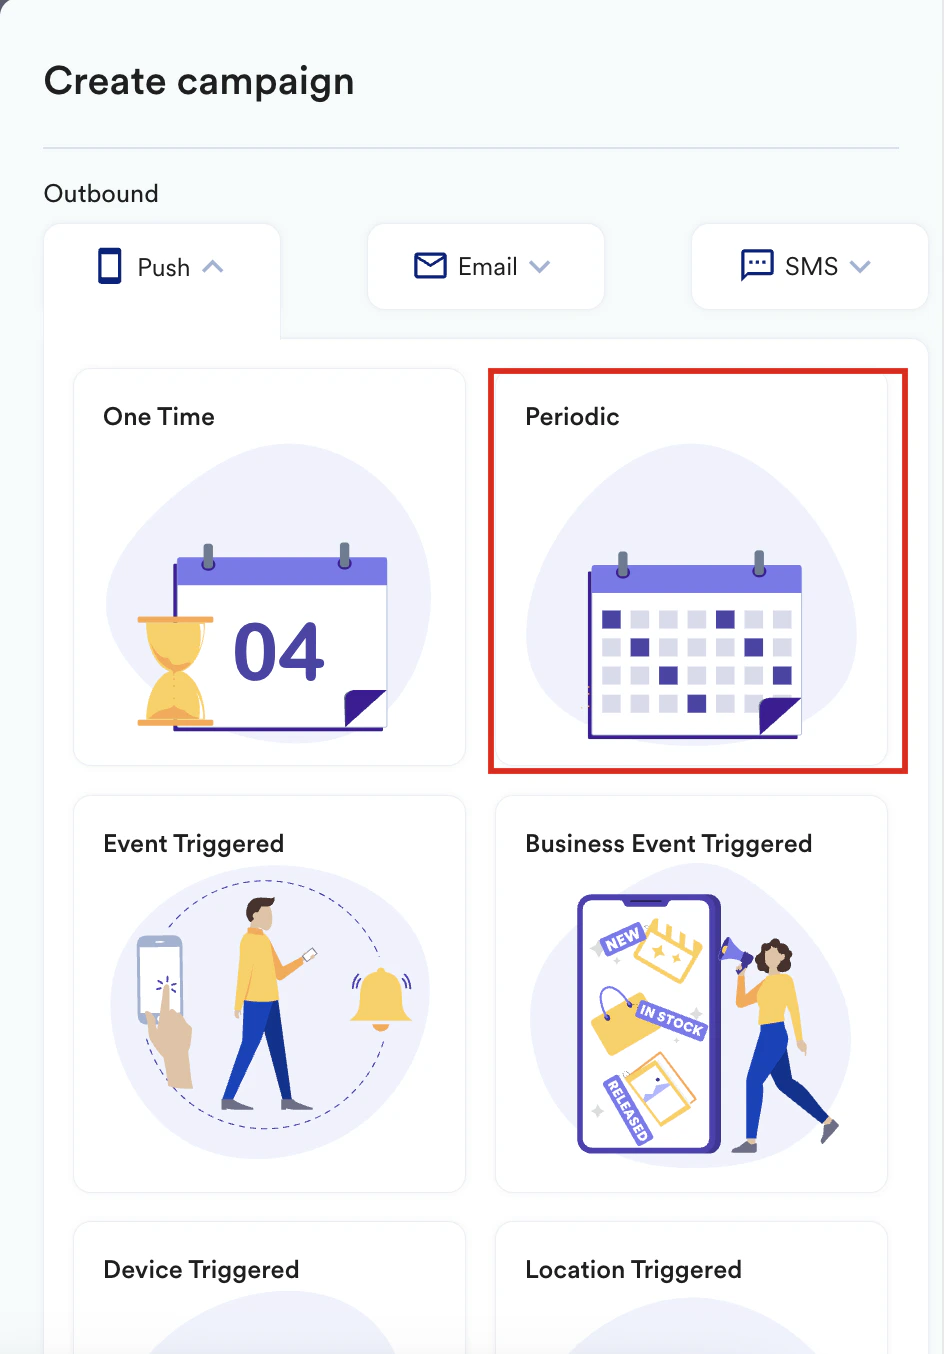 You are taken to the first step, **Target users**, of defining your campaign.
4. Enter the following details:
* **Team**: Select a team if your organization has teams enabled for your account. For more information, refer to [Teams in MoEngage](/user-guide/settings/account/team-management/teams-in-moengage). For example, *Demo Account - E-commerce*.
* **Campaign name**: Enter a name for the campaign. For example, *Premium Credit Card*.
* **Campaign tags**: Select the required campaign tags.
You are taken to the first step, **Target users**, of defining your campaign.
4. Enter the following details:
* **Team**: Select a team if your organization has teams enabled for your account. For more information, refer to [Teams in MoEngage](/user-guide/settings/account/team-management/teams-in-moengage). For example, *Demo Account - E-commerce*.
* **Campaign name**: Enter a name for the campaign. For example, *Premium Credit Card*.
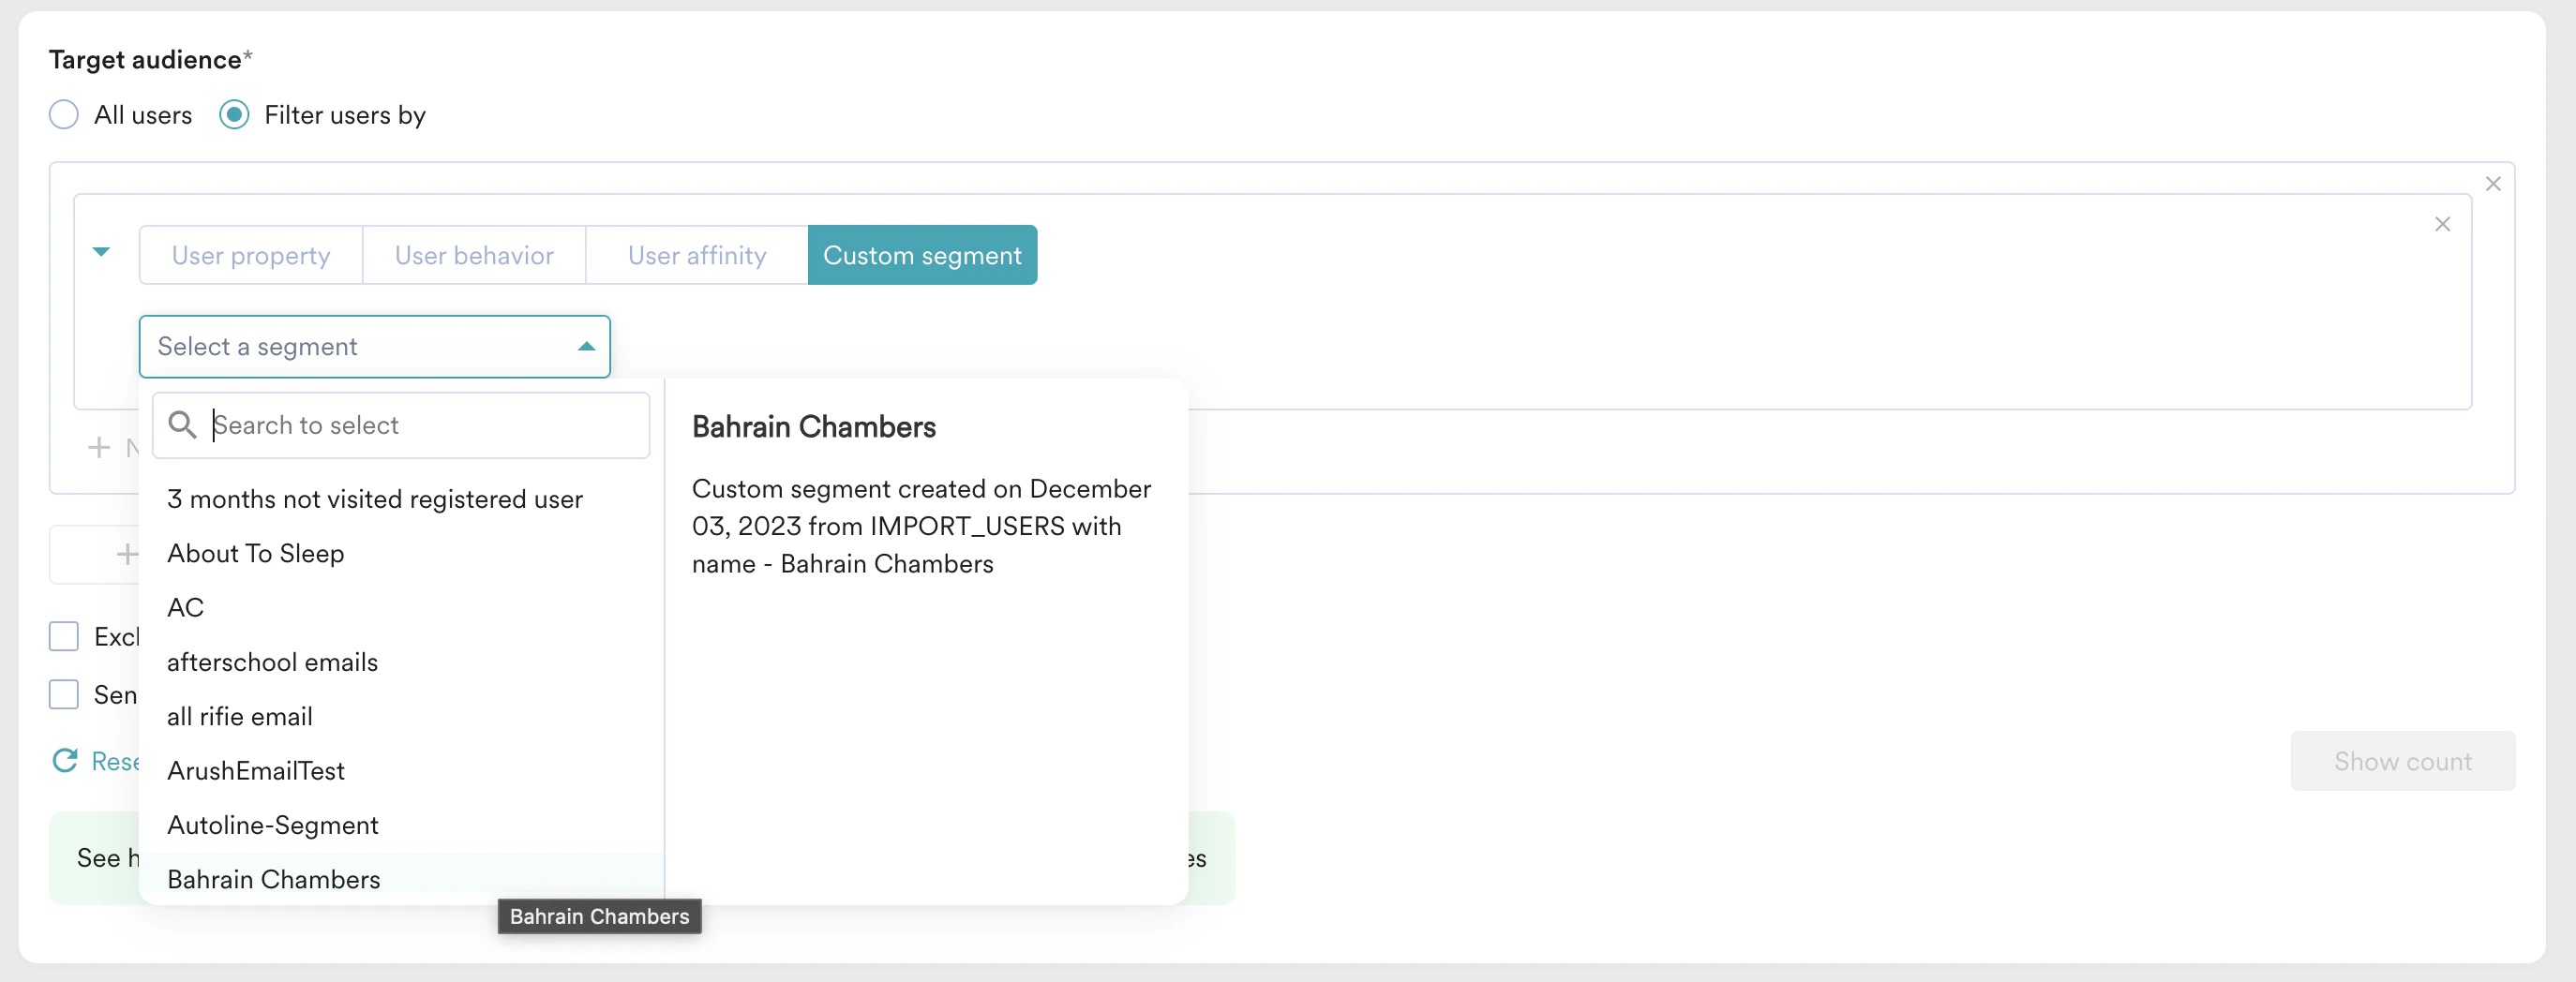
* **Campaign tags**: Select the required campaign tags. 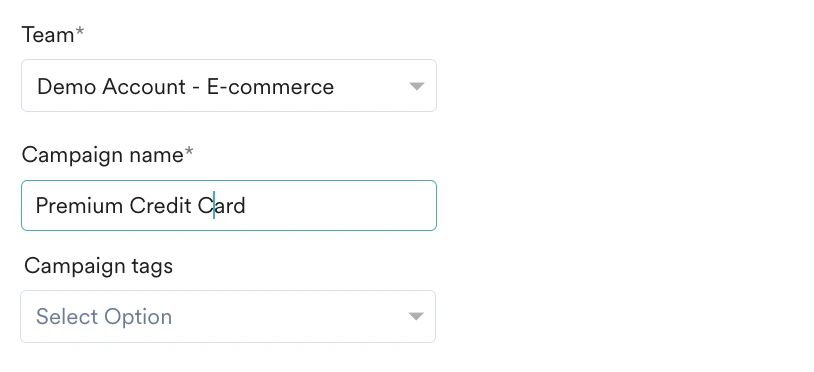 5. Under **Target audience**, select our saved custom segment [created above](/use-cases/push/recommend-a-premium-card#step-1-create-rfm-segments) by searching for the same.
  6. Under **Target Platforms**, select **Android**.
  7. Click **Next** to move to the second step, **Content**, where you can define the content for your Push campaign.
## Step 2.2: Content
1. Select the template that you would like to use. For our example, select **Basic notification**.
7. Click **Next** to move to the second step, **Content**, where you can define the content for your Push campaign.
## Step 2.2: Content
1. Select the template that you would like to use. For our example, select **Basic notification**. 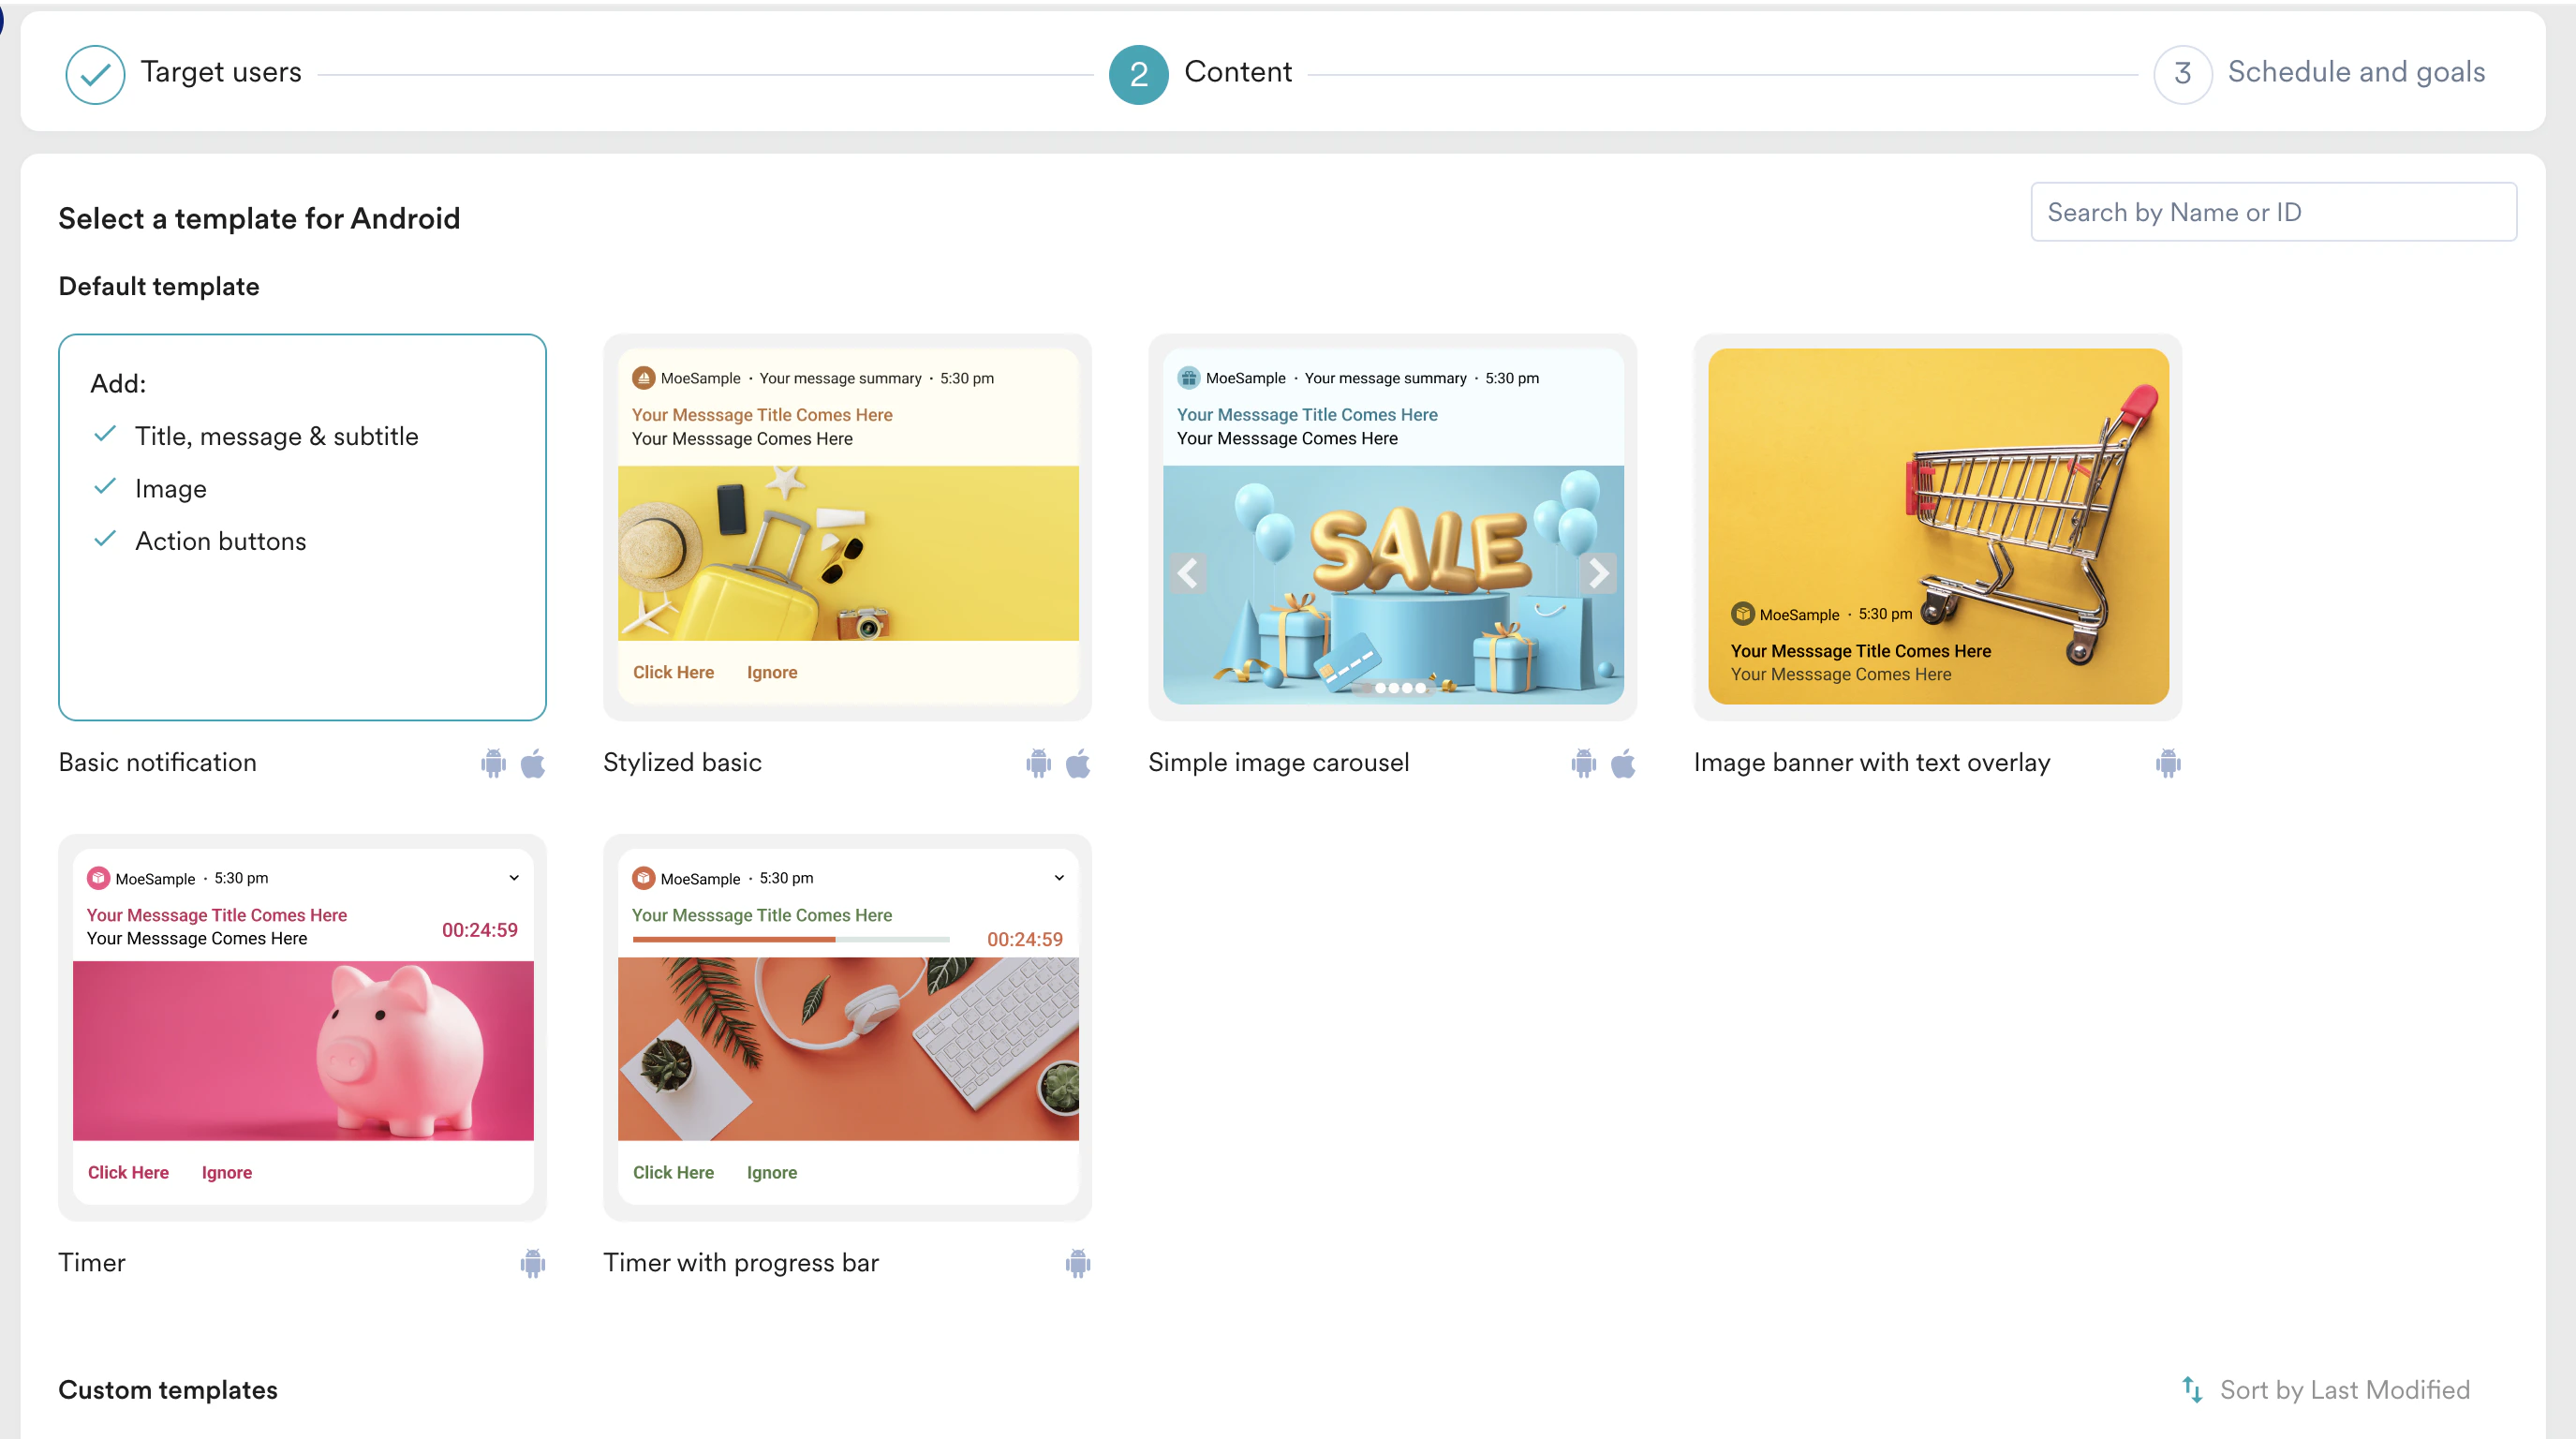 2. Enter the required content for the campaign. We can enter the content manually or generate it using Merlin AI. For more information, refer to [Generate Push Messages with Merlin AI](/user-guide/ai-and-intelligence/merlin-ai/merlin-ai-copywriter/generate-push-messages-with-merlin-ai).
 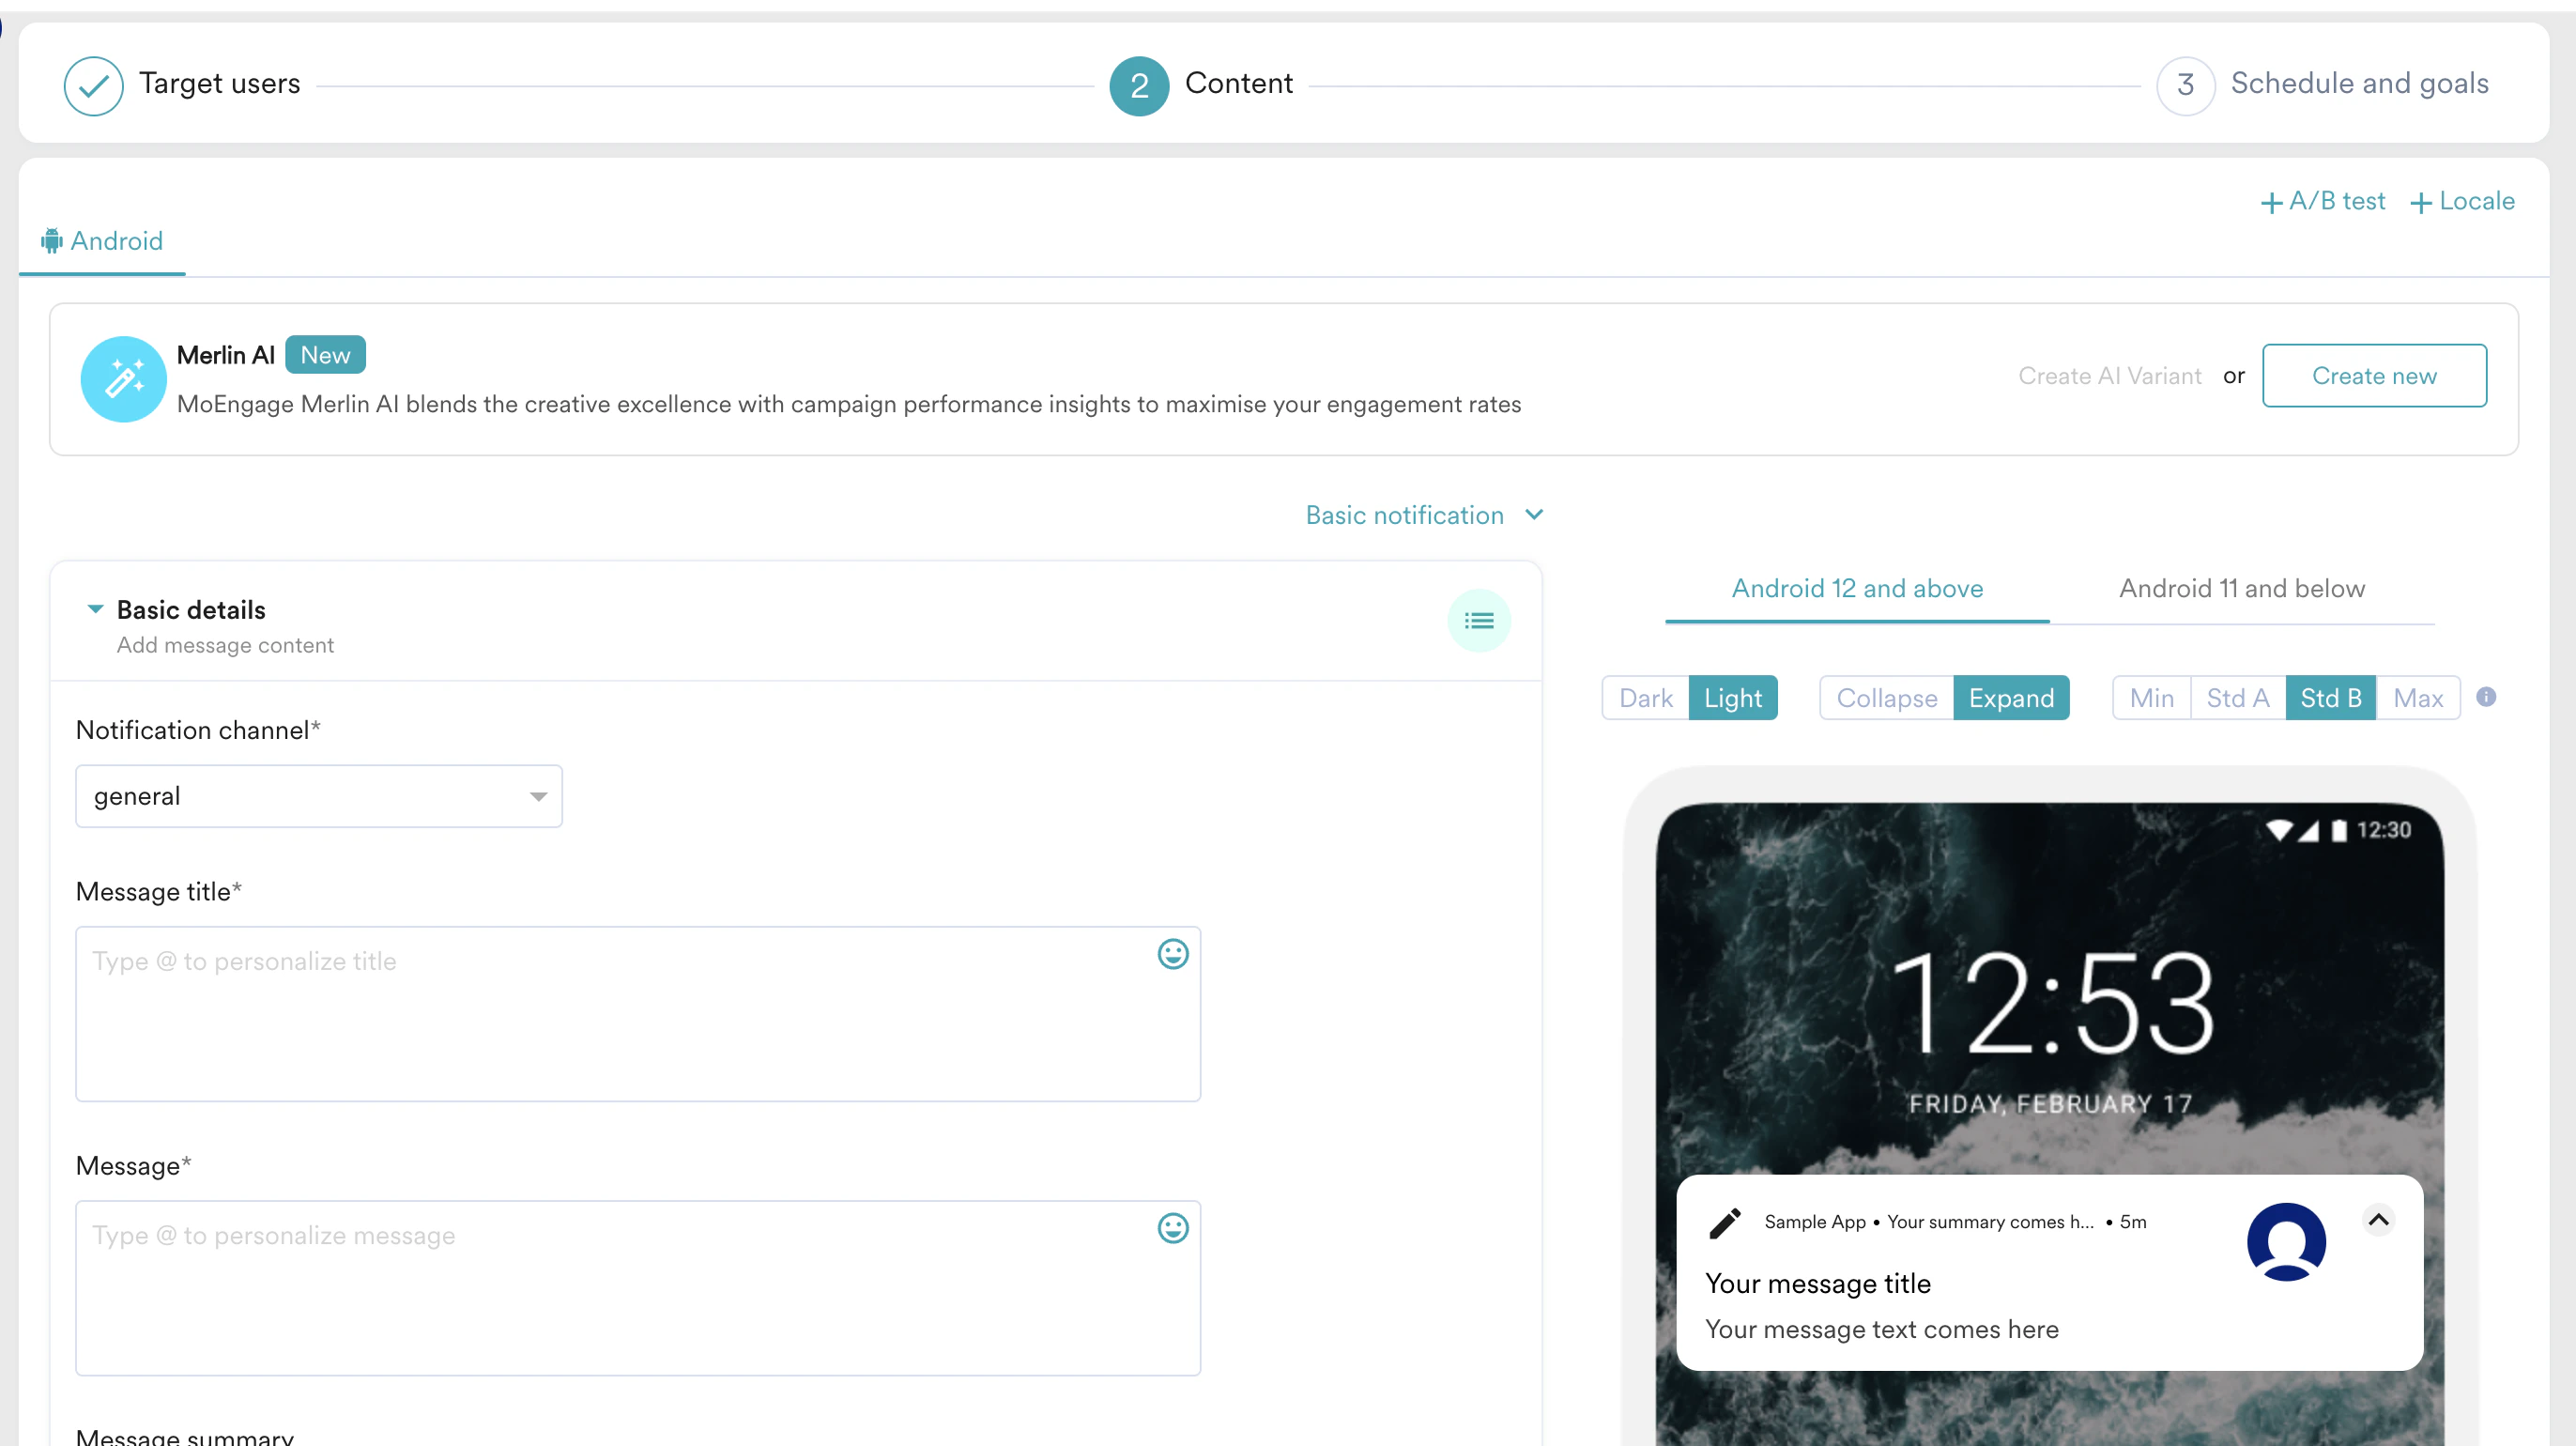 3. You can also use locales to convey different benefits of the card that the users would like to know about. For example, using the user property **CommonExpense** which has the most common expenditure category, you can send different message to each category that the card has benefits on.\
Essentially, you can define a message through this to convey to your users, who mostly spend on apparel, that the credit card has 5% cashback on Apparel expenses.
4. To do the same, click **+Locale** and then click **+New Locale**.
3. You can also use locales to convey different benefits of the card that the users would like to know about. For example, using the user property **CommonExpense** which has the most common expenditure category, you can send different message to each category that the card has benefits on.\
Essentially, you can define a message through this to convey to your users, who mostly spend on apparel, that the credit card has 5% cashback on Apparel expenses.
4. To do the same, click **+Locale** and then click **+New Locale**. 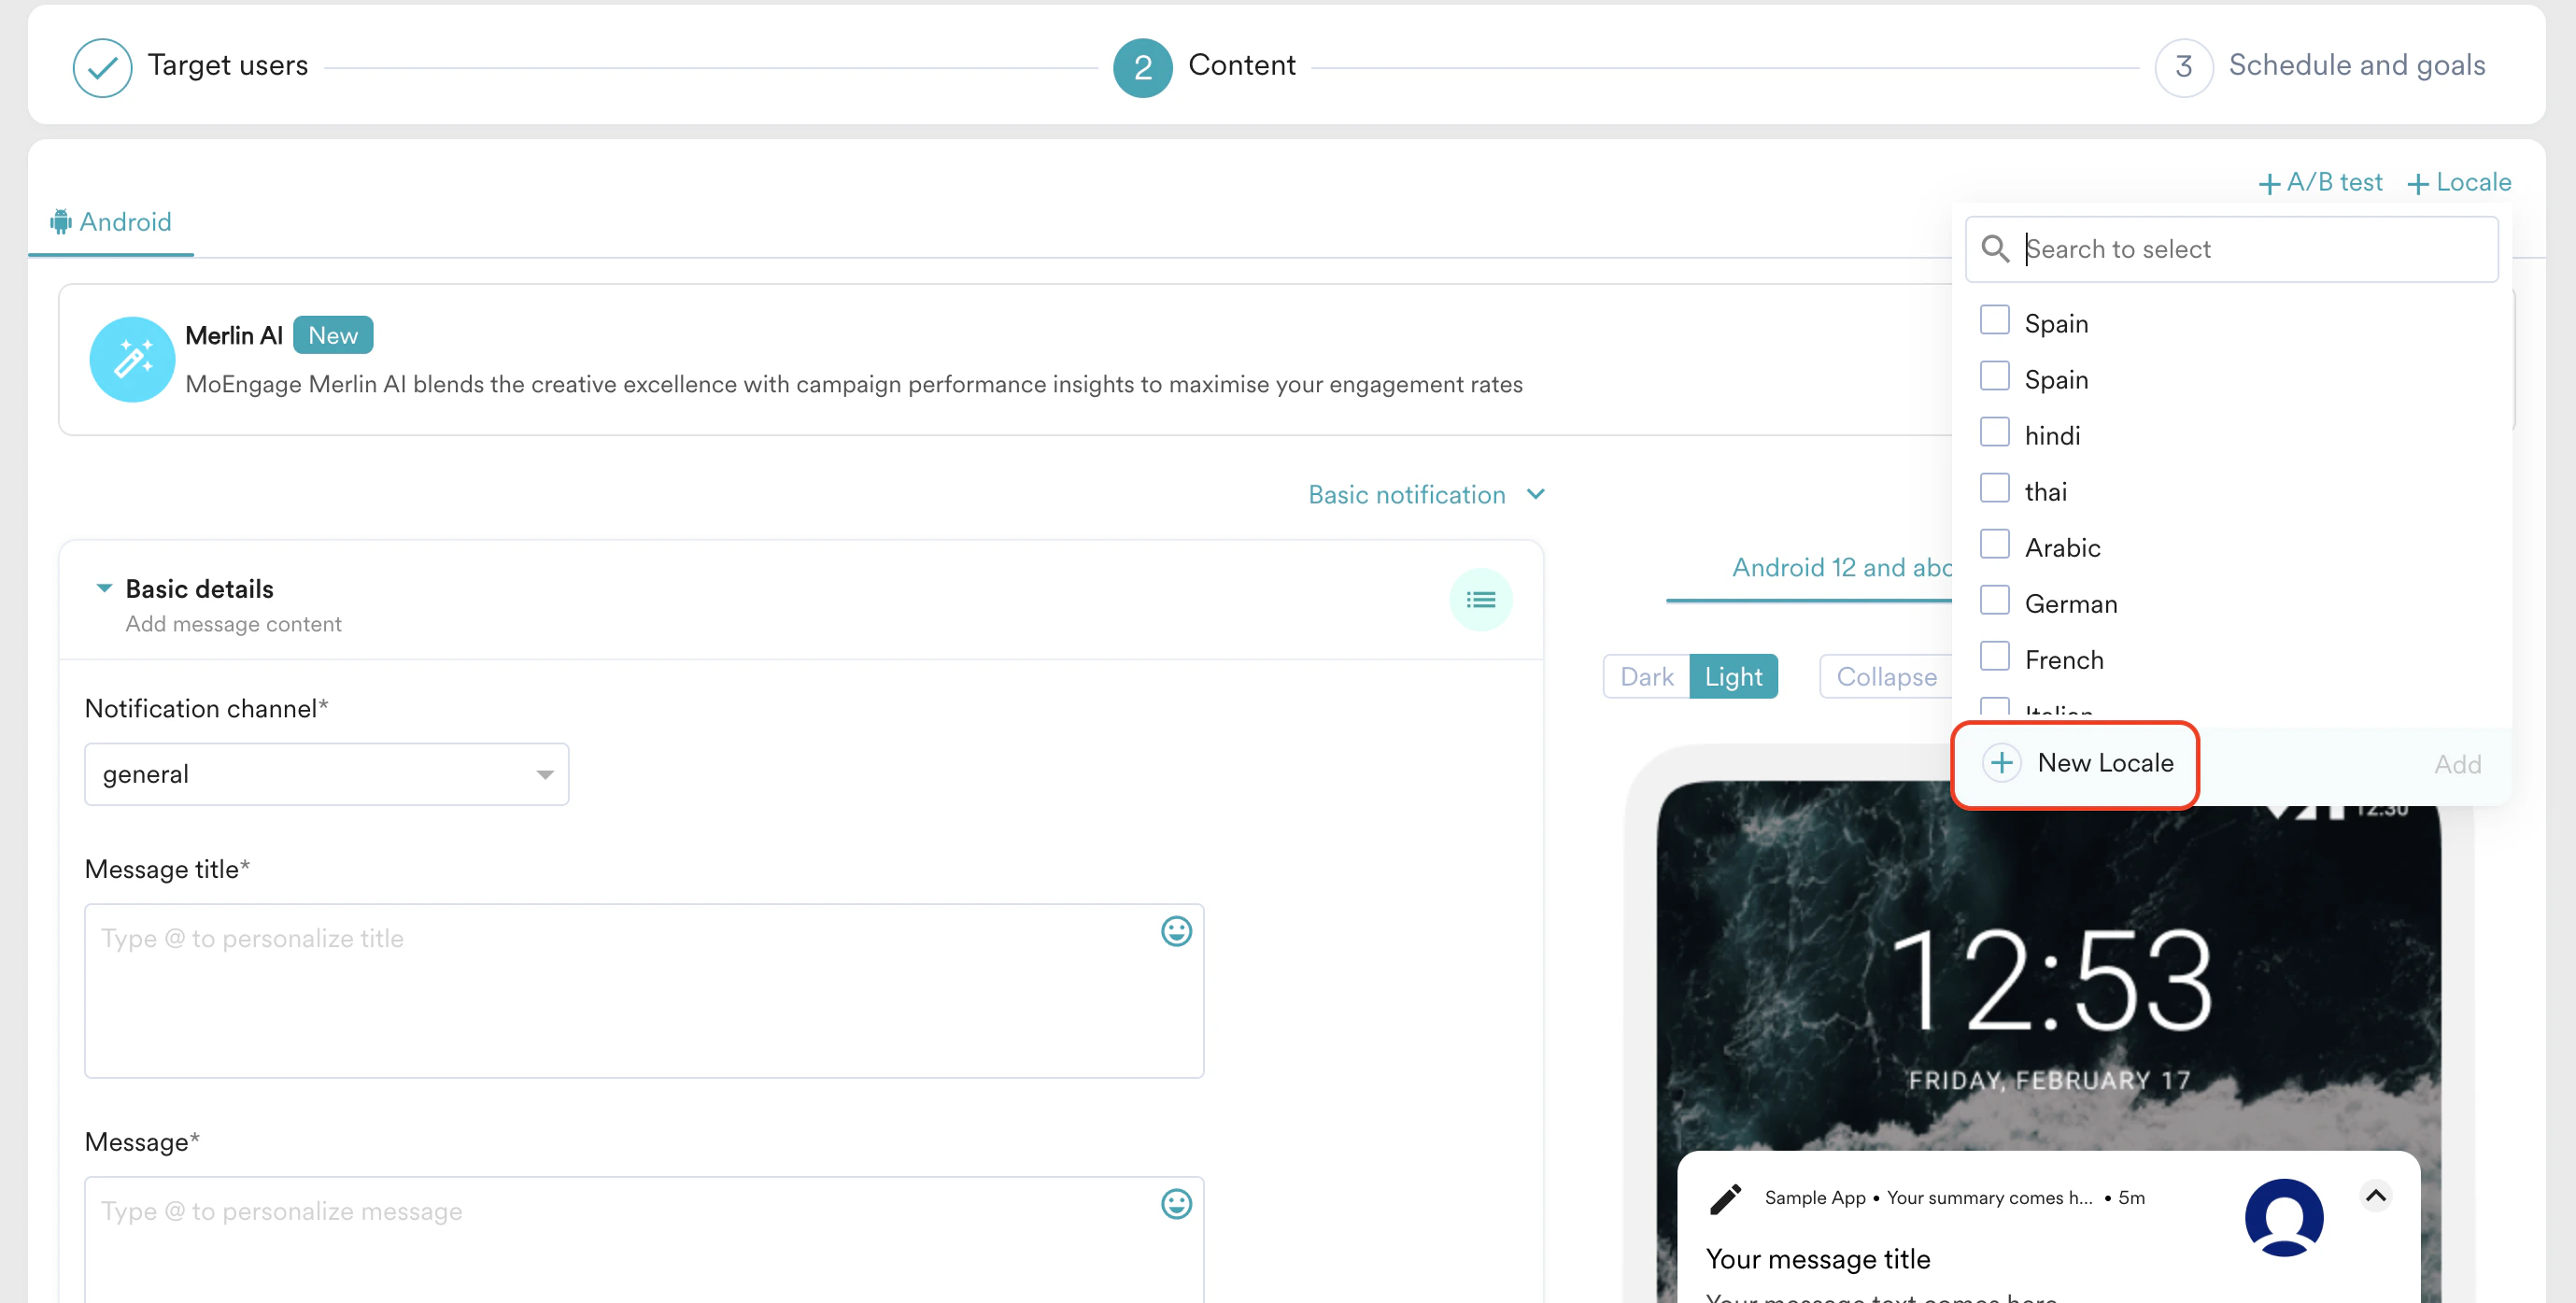 5. On the **Add new locale** dialog box, enter a name to the locale and select the attribute that has this information from the drop-down list. In this example, select *CommonExpense*.
 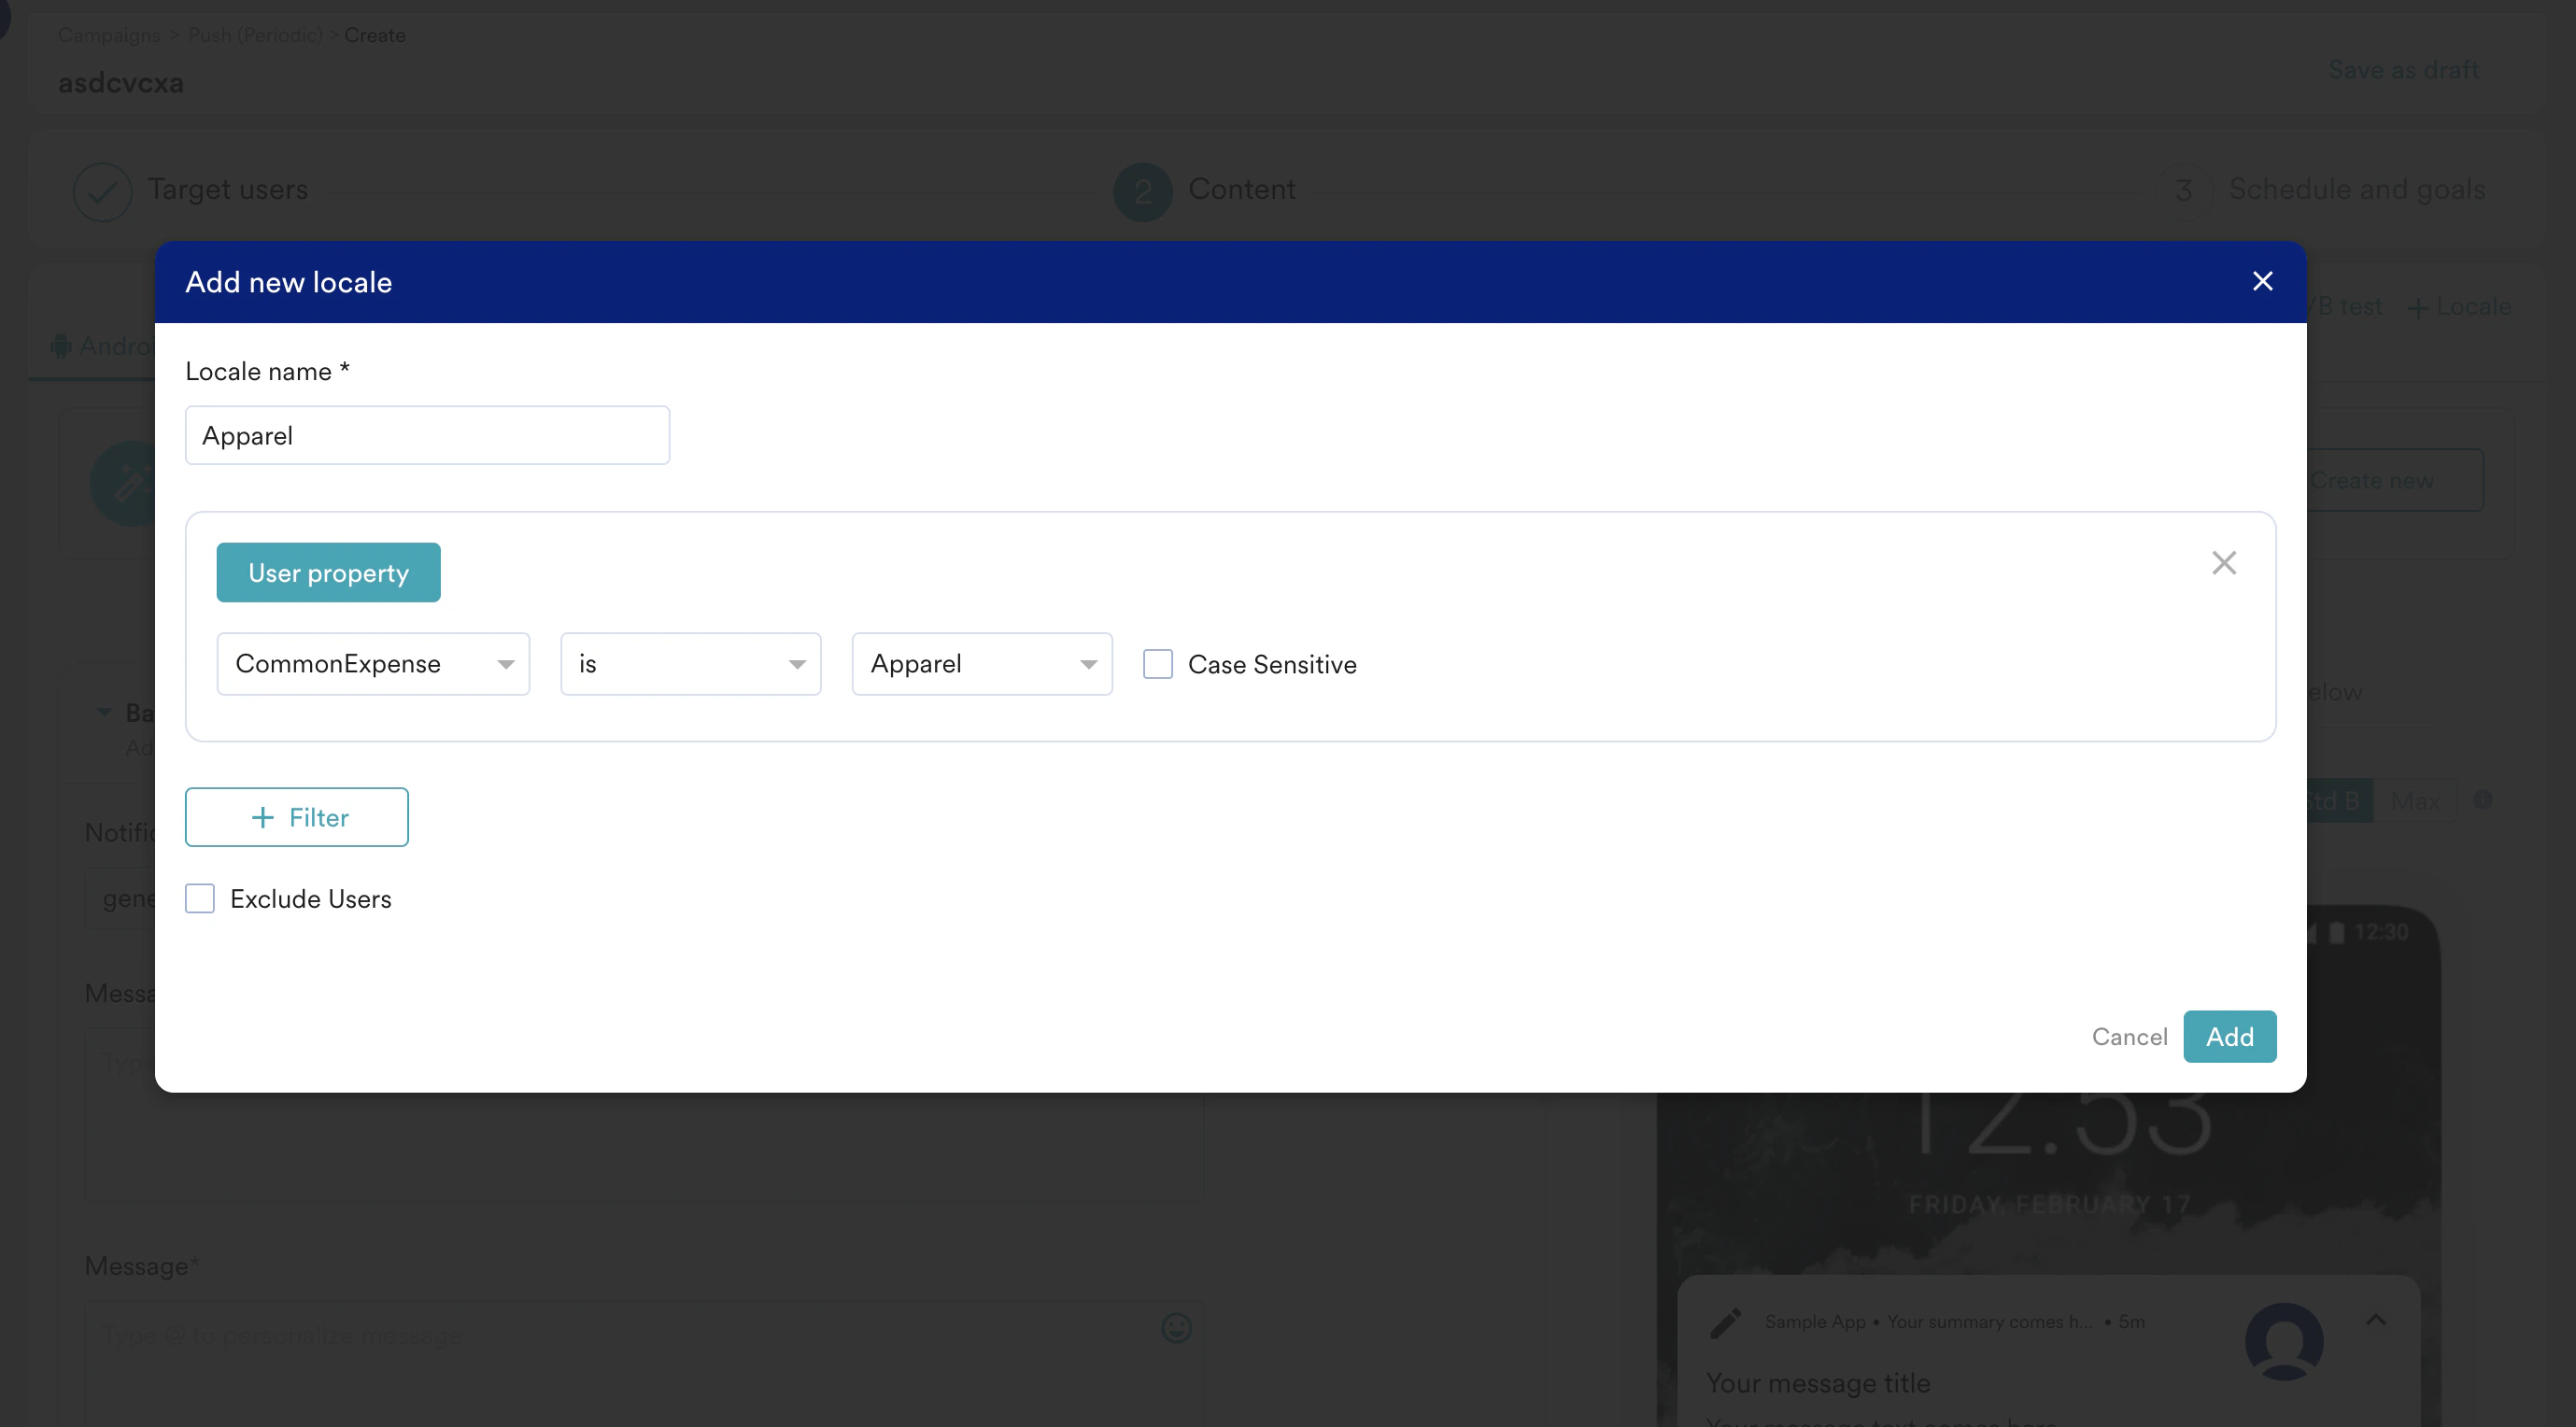 6. Click **Add** to create the locale. Now search for the same again by clicking **+ Locale**.
7. Select **Apparel** and then click **Add**.
6. Click **Add** to create the locale. Now search for the same again by clicking **+ Locale**.
7. Select **Apparel** and then click **Add**. 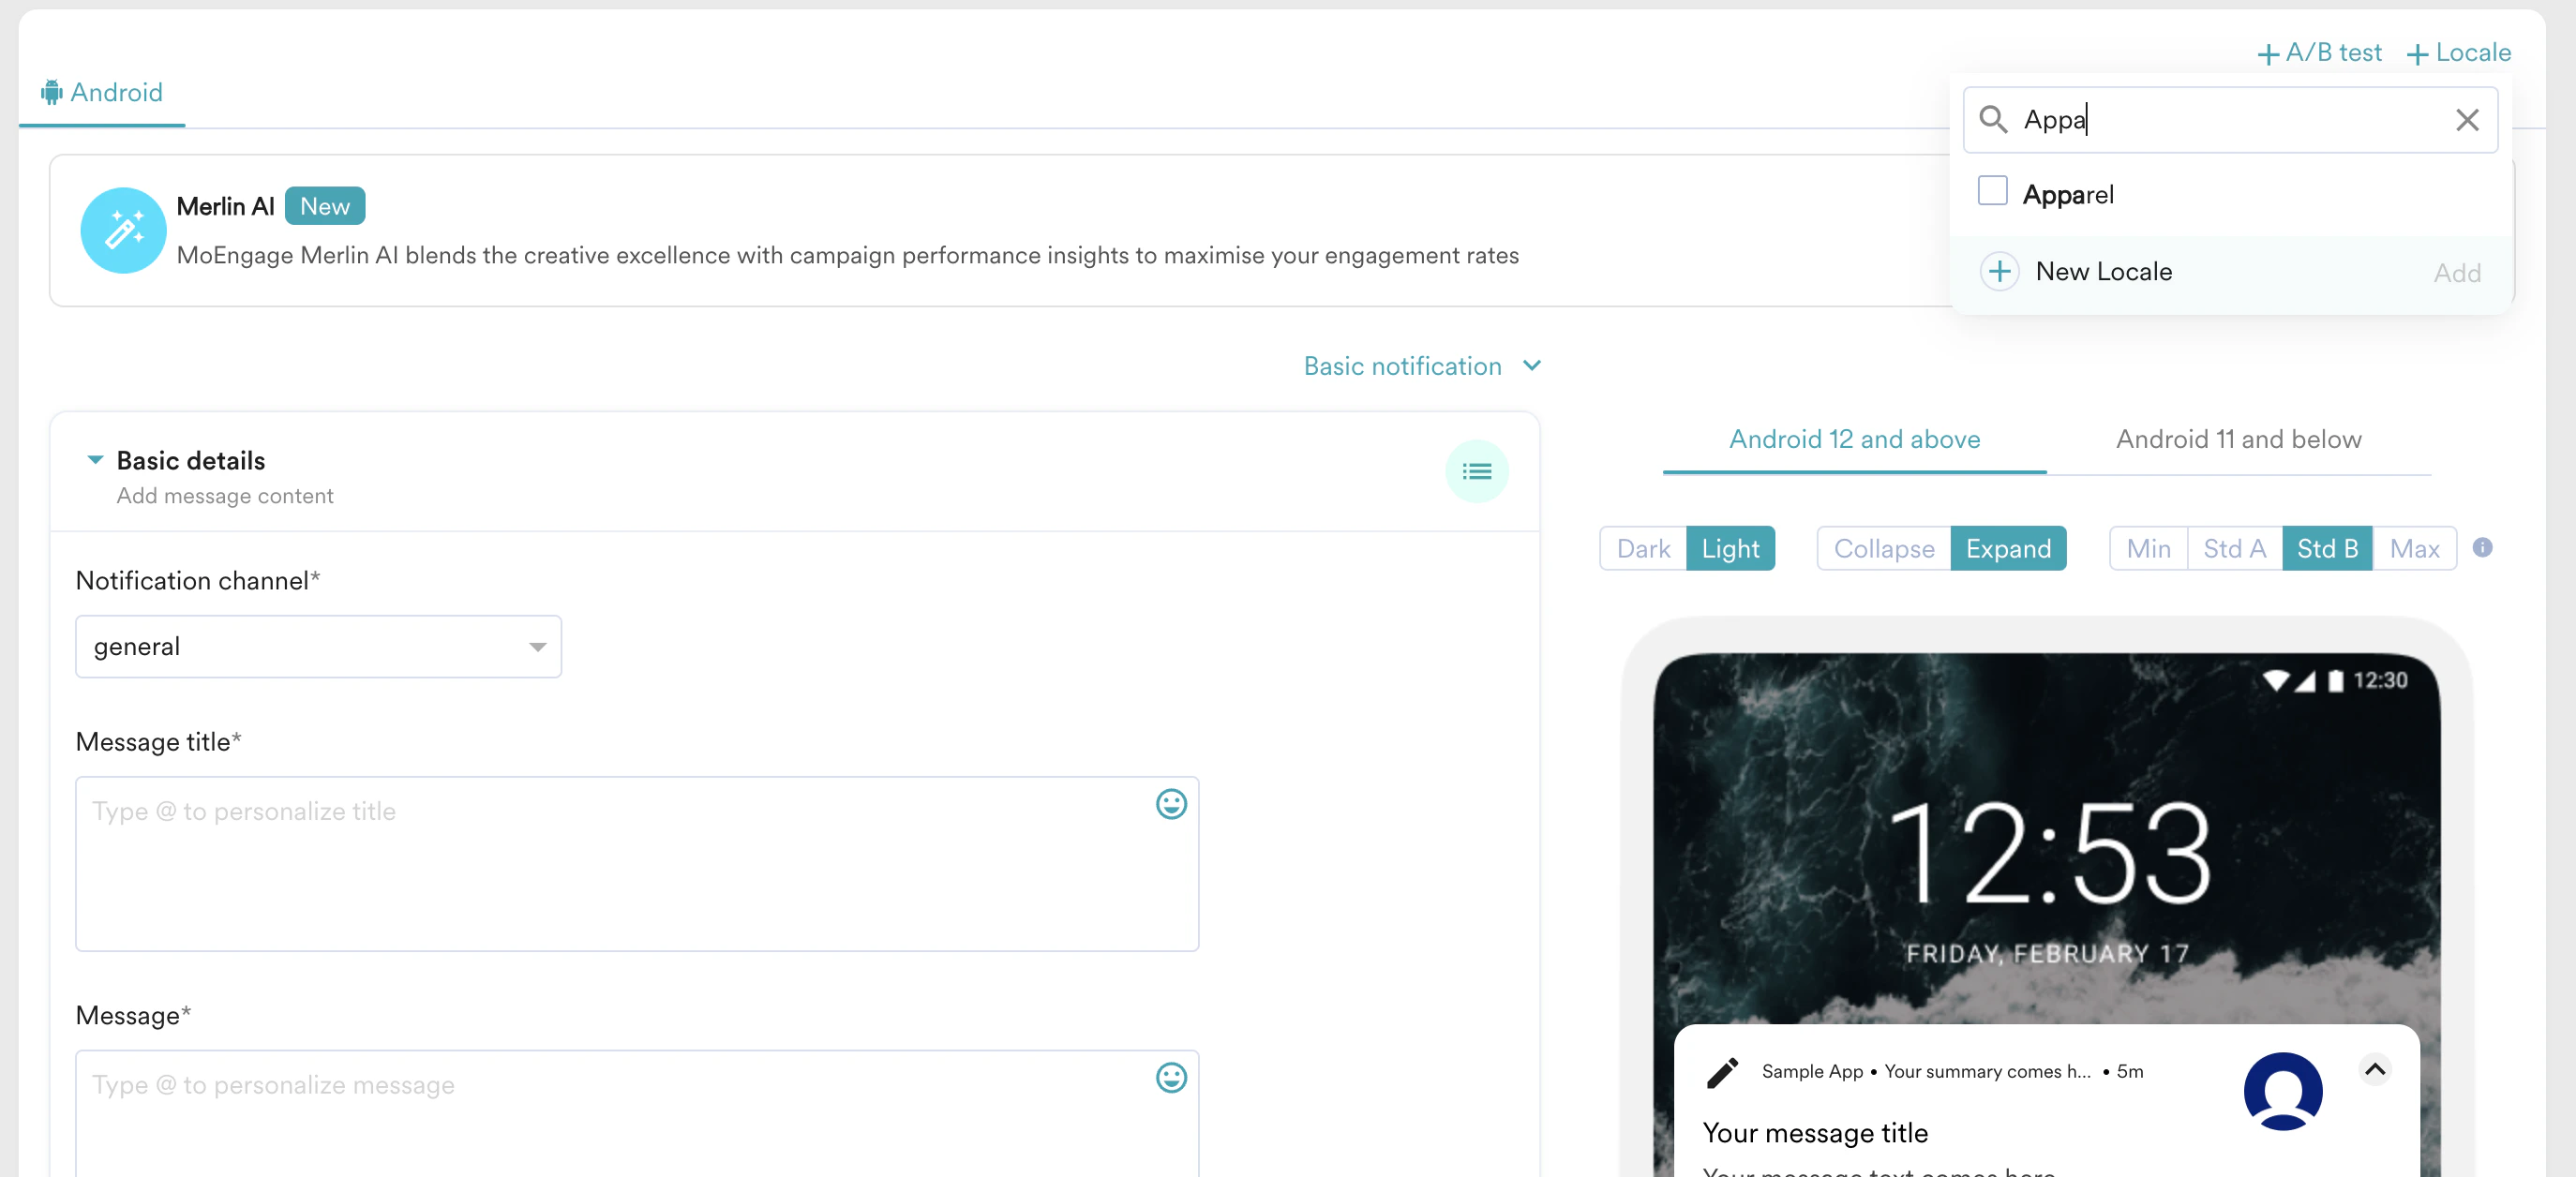 8. On the Choose content for new added locales pop-up window, decide whether to copy the content from the previously defined locale or from scratch.
 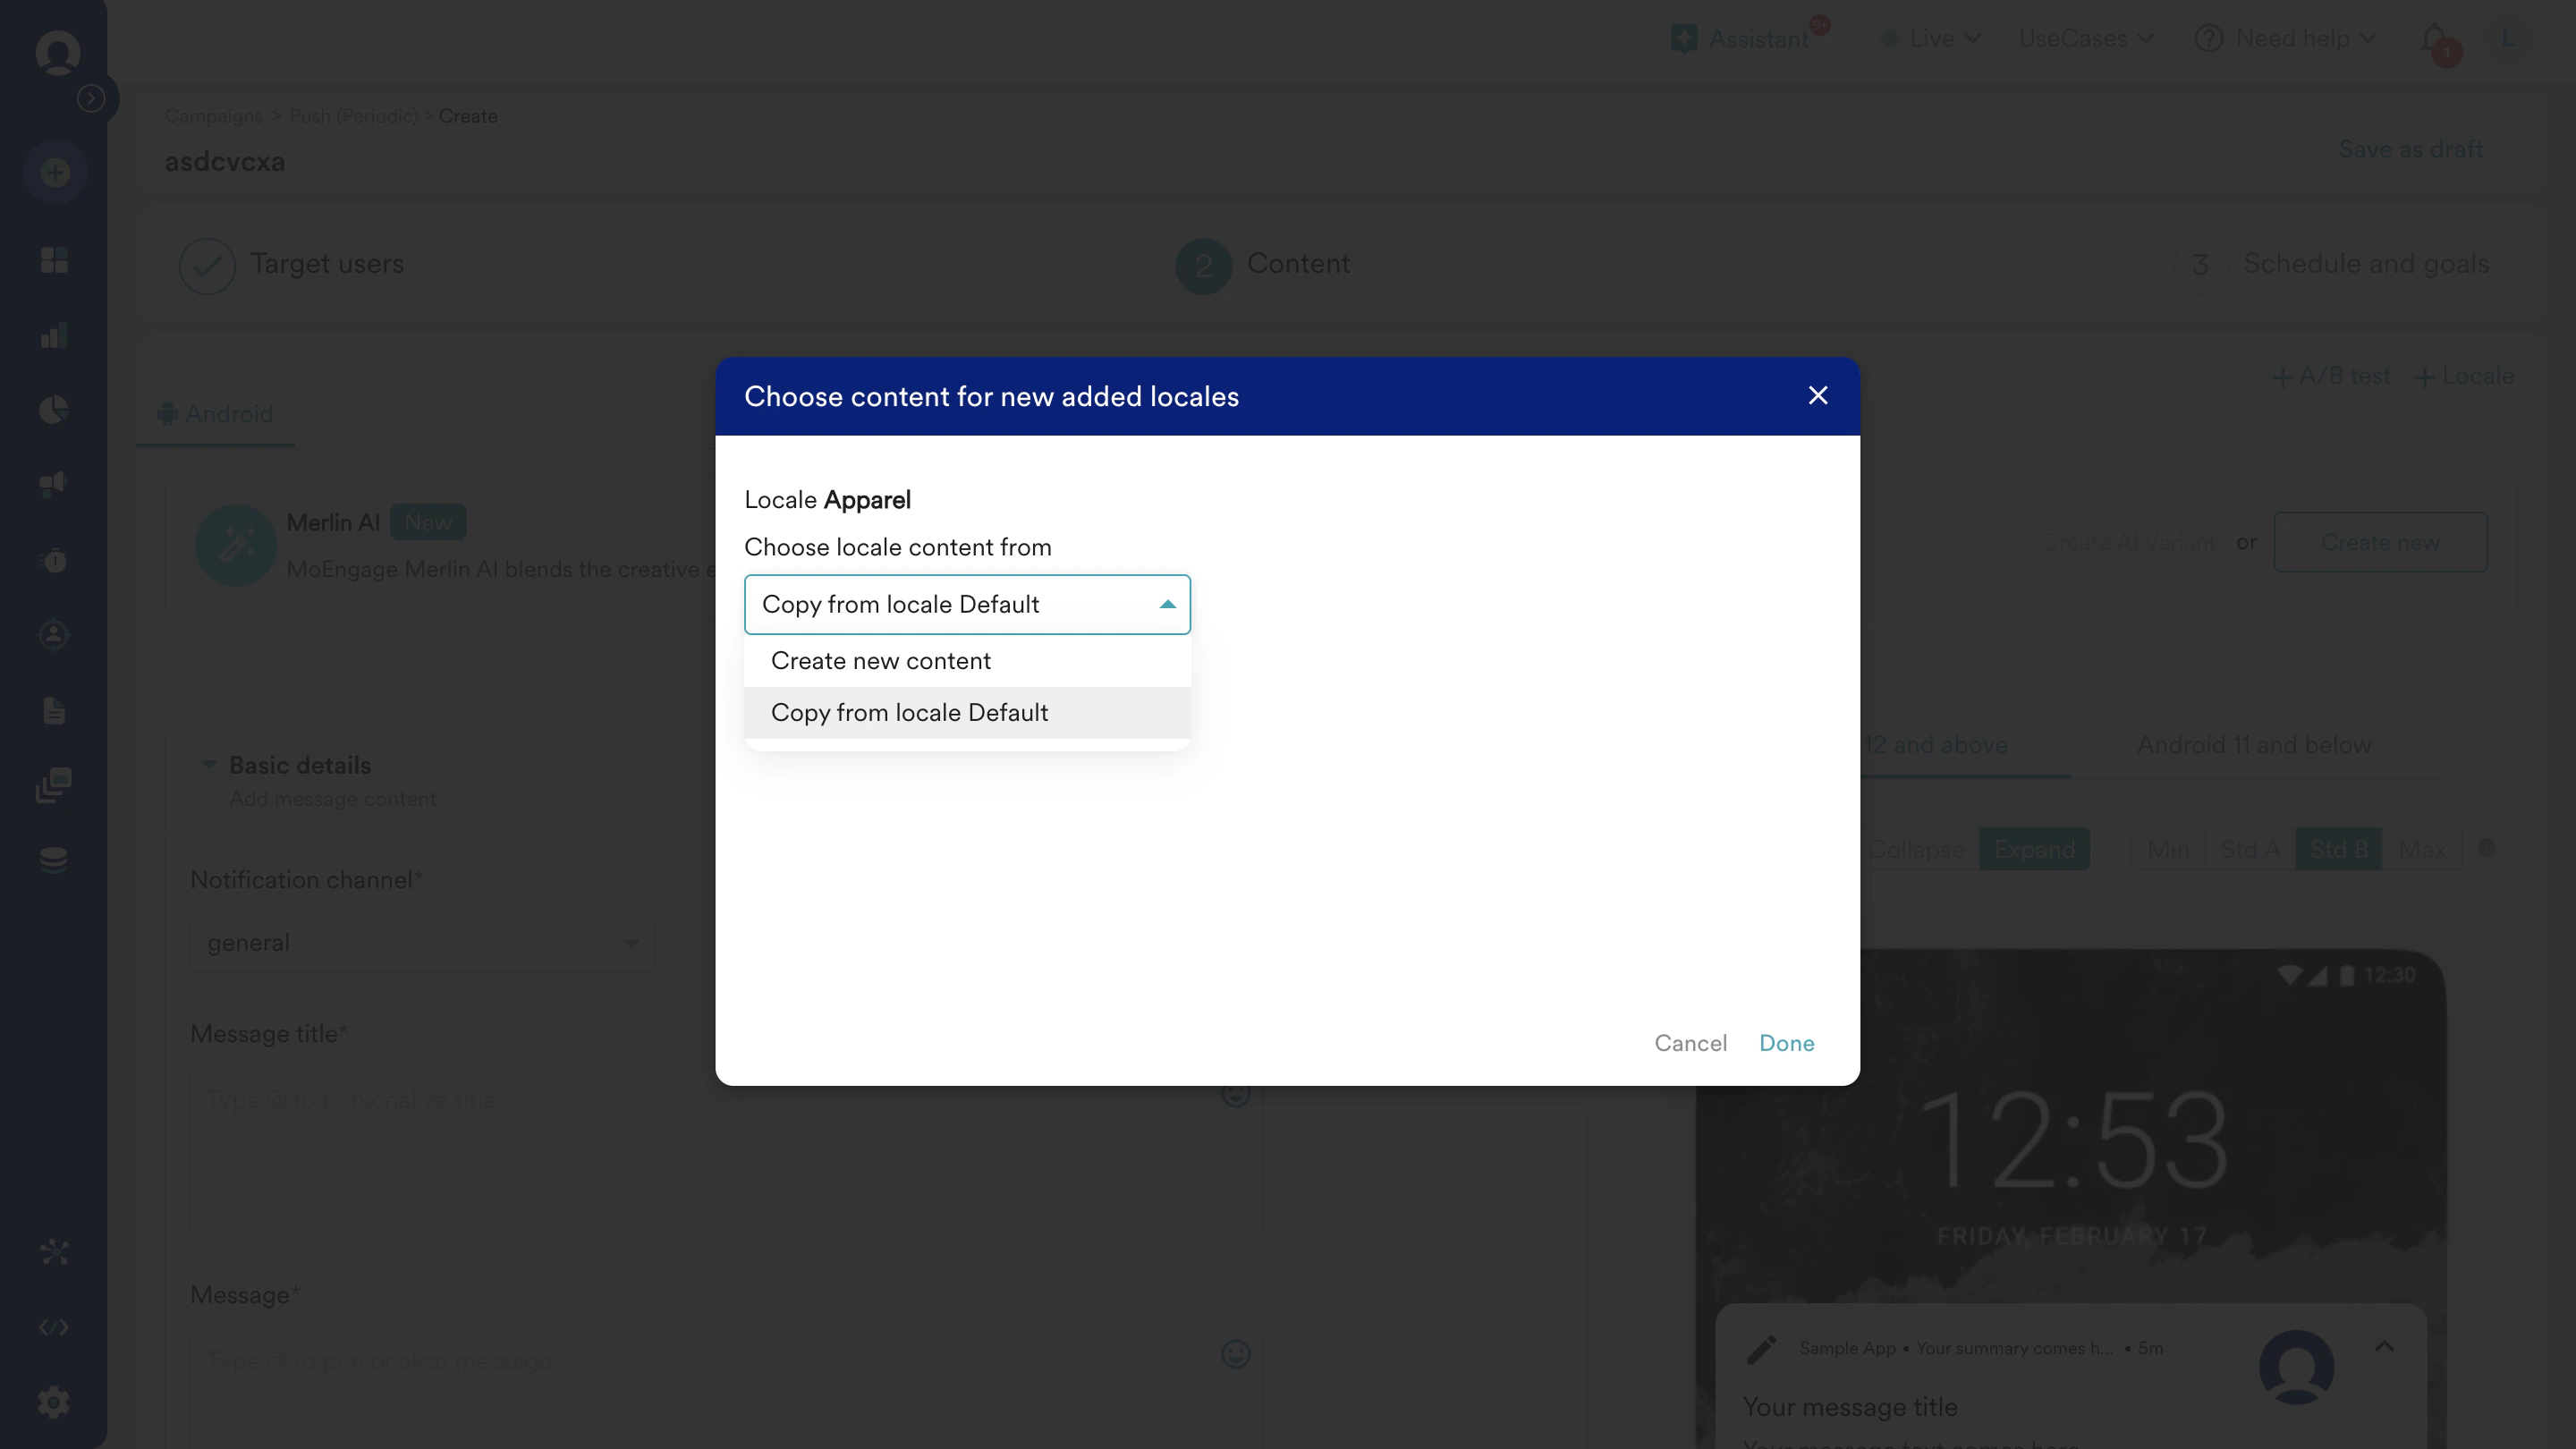 9. Similarly, you can create multiple locales for each category the card has benefits on, and one default generic locale for users.\
The following is an example of how the content section might look after defining multiple locales based on your needs:
9. Similarly, you can create multiple locales for each category the card has benefits on, and one default generic locale for users.\
The following is an example of how the content section might look after defining multiple locales based on your needs: 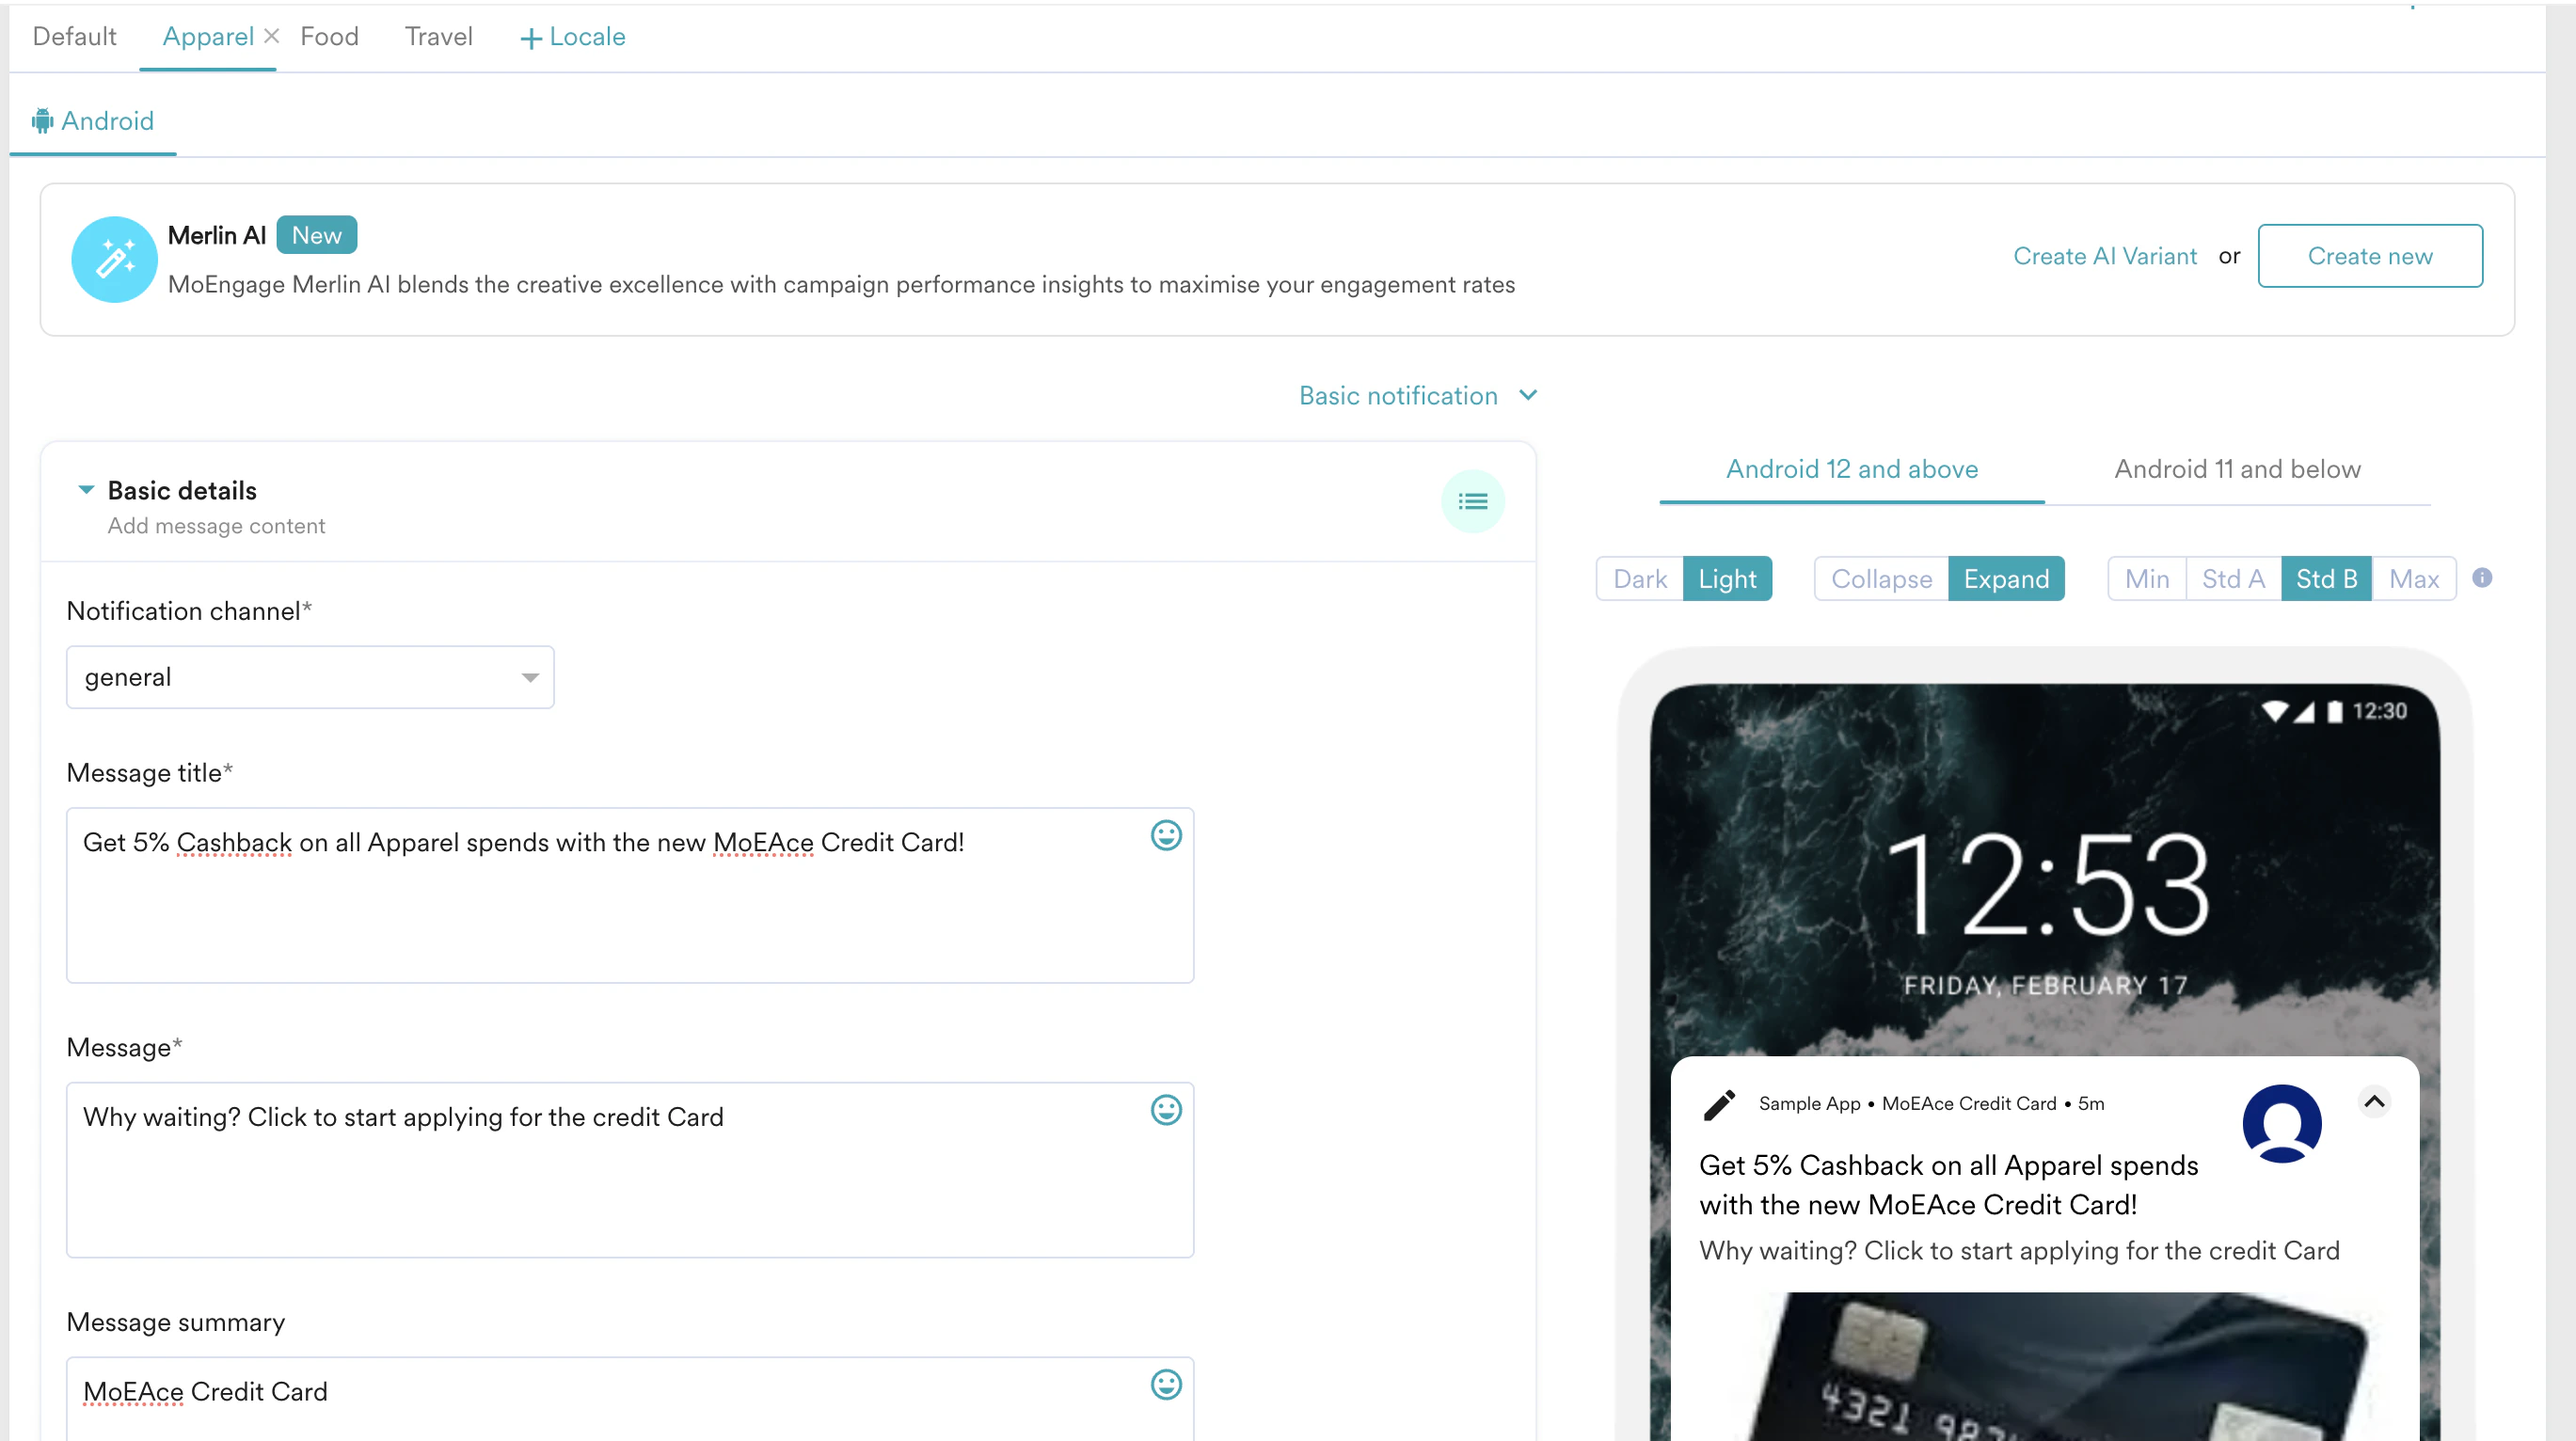 10. Use the Deeplink section to take the user directly to the page from where they can apply for the new card to avoid drop-offs.
1. From the **Default click action** drop-down list, select *Deeplinking*.
2. In the **URL** field, enter the specific URL.
11. Click **Next** to move to the third step, **Schedule and goals**, where you can define the schedule and goal of your campaign.
## Step 2.3: Schedule and Goals
1. In the **Send campaign** section, define when you want to start and end your Push campaign.
10. Use the Deeplink section to take the user directly to the page from where they can apply for the new card to avoid drop-offs.
1. From the **Default click action** drop-down list, select *Deeplinking*.
2. In the **URL** field, enter the specific URL.
11. Click **Next** to move to the third step, **Schedule and goals**, where you can define the schedule and goal of your campaign.
## Step 2.3: Schedule and Goals
1. In the **Send campaign** section, define when you want to start and end your Push campaign. 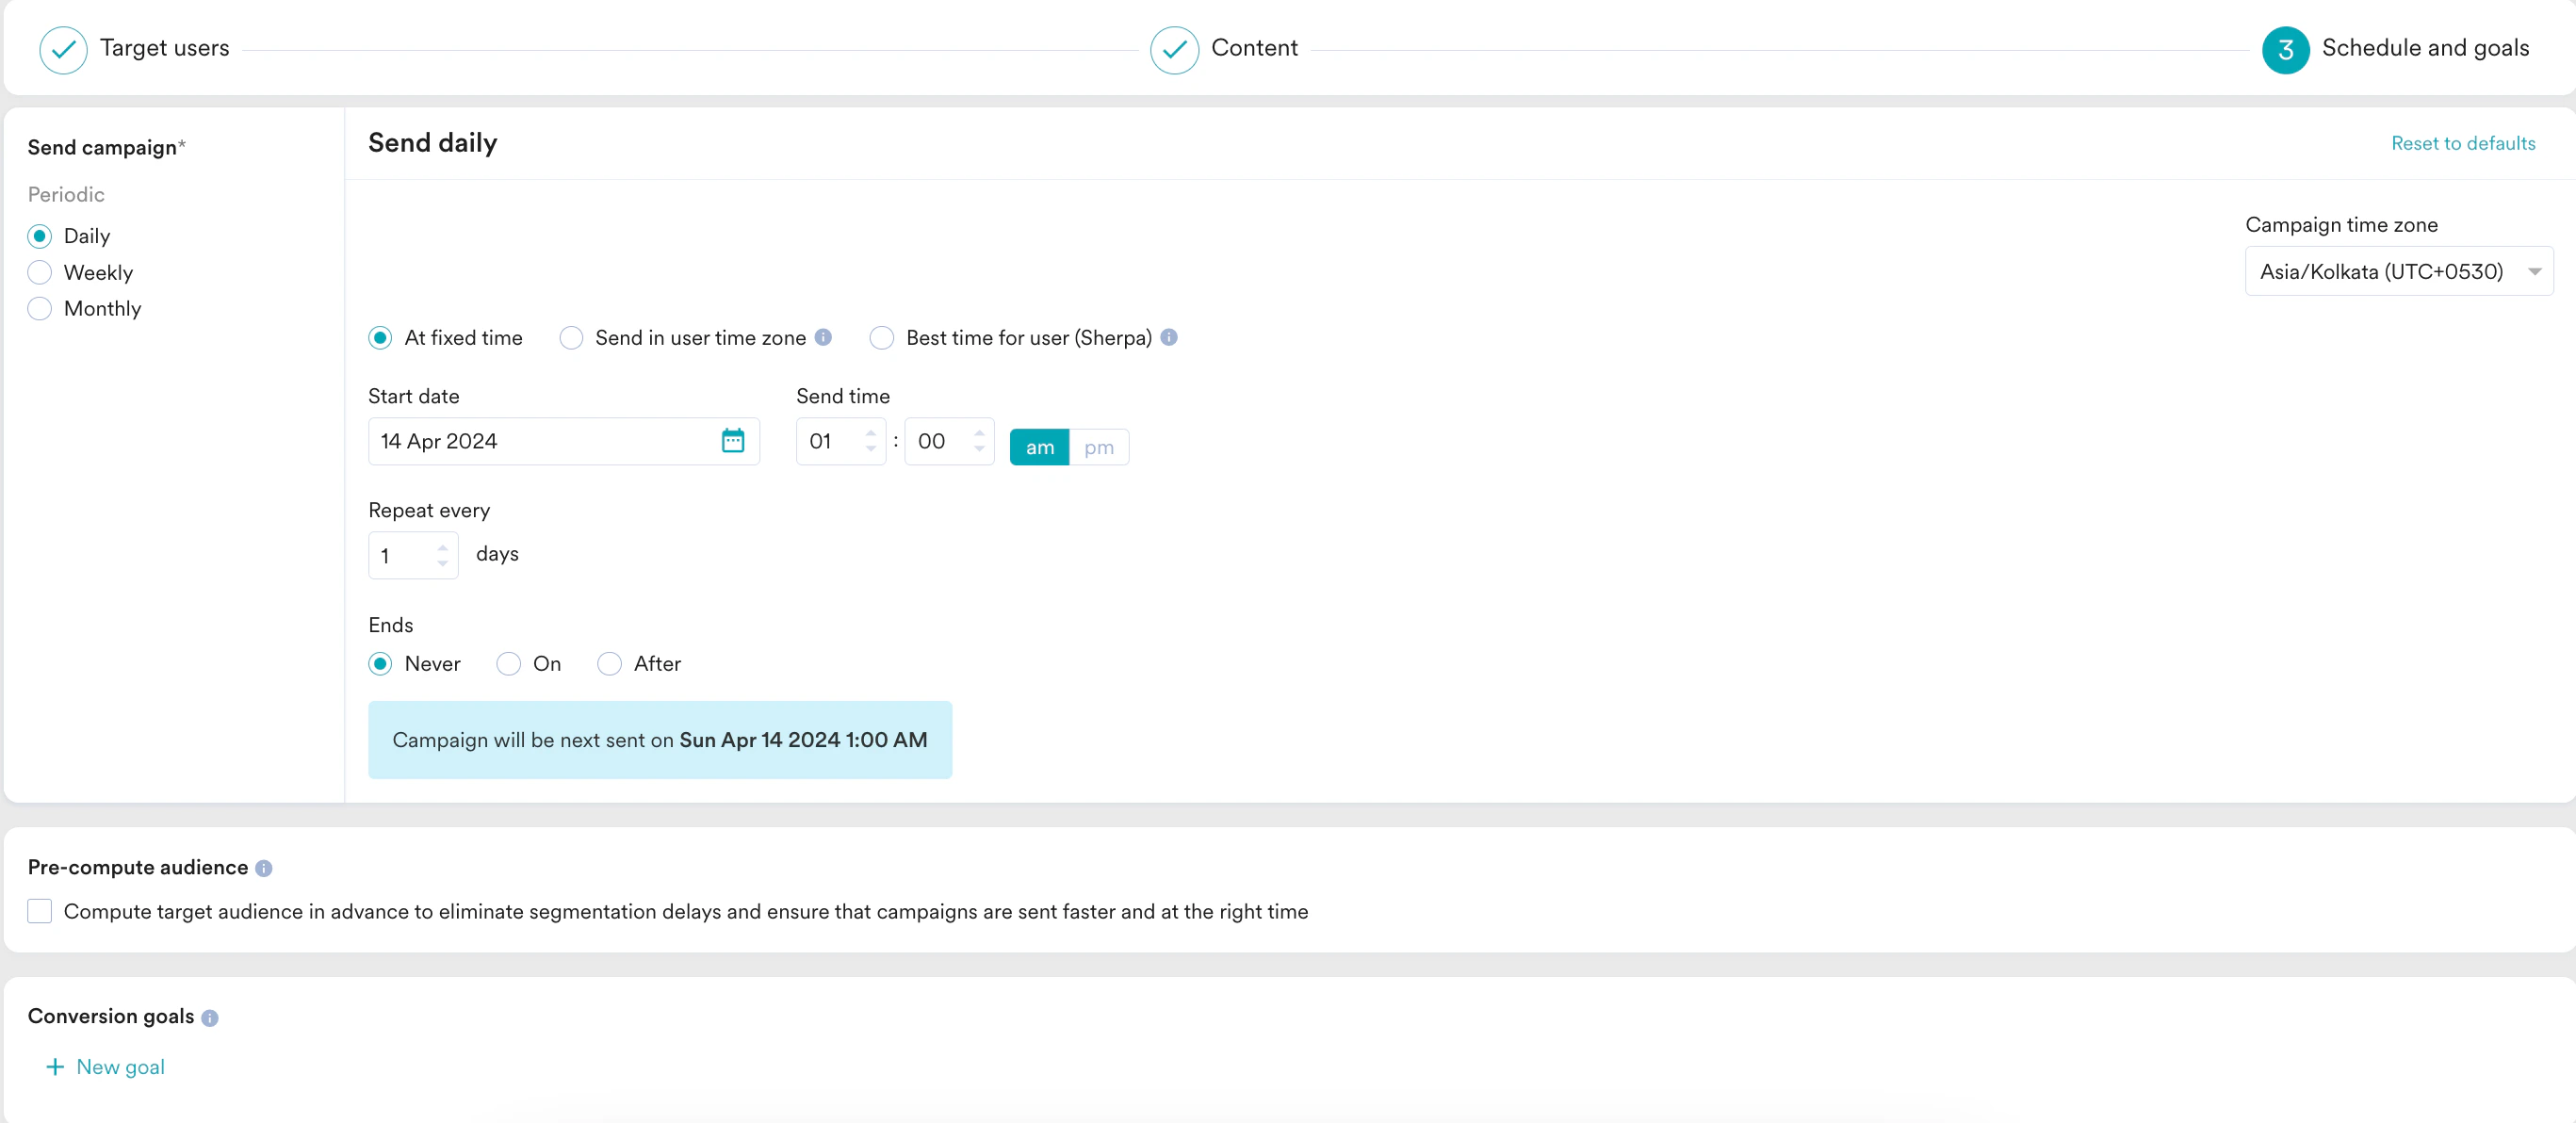 2. In the **Conversion goals** section, add conversion goals that you would like to track.
3. Define **Delivery controls** and **Advanced** settings based on your requirements. For more information, refer to [Create Push Campaigns](/user-guide/campaigns-and-channels/mobile-push/create/create-push-campaigns).
2. In the **Conversion goals** section, add conversion goals that you would like to track.
3. Define **Delivery controls** and **Advanced** settings based on your requirements. For more information, refer to [Create Push Campaigns](/user-guide/campaigns-and-channels/mobile-push/create/create-push-campaigns). 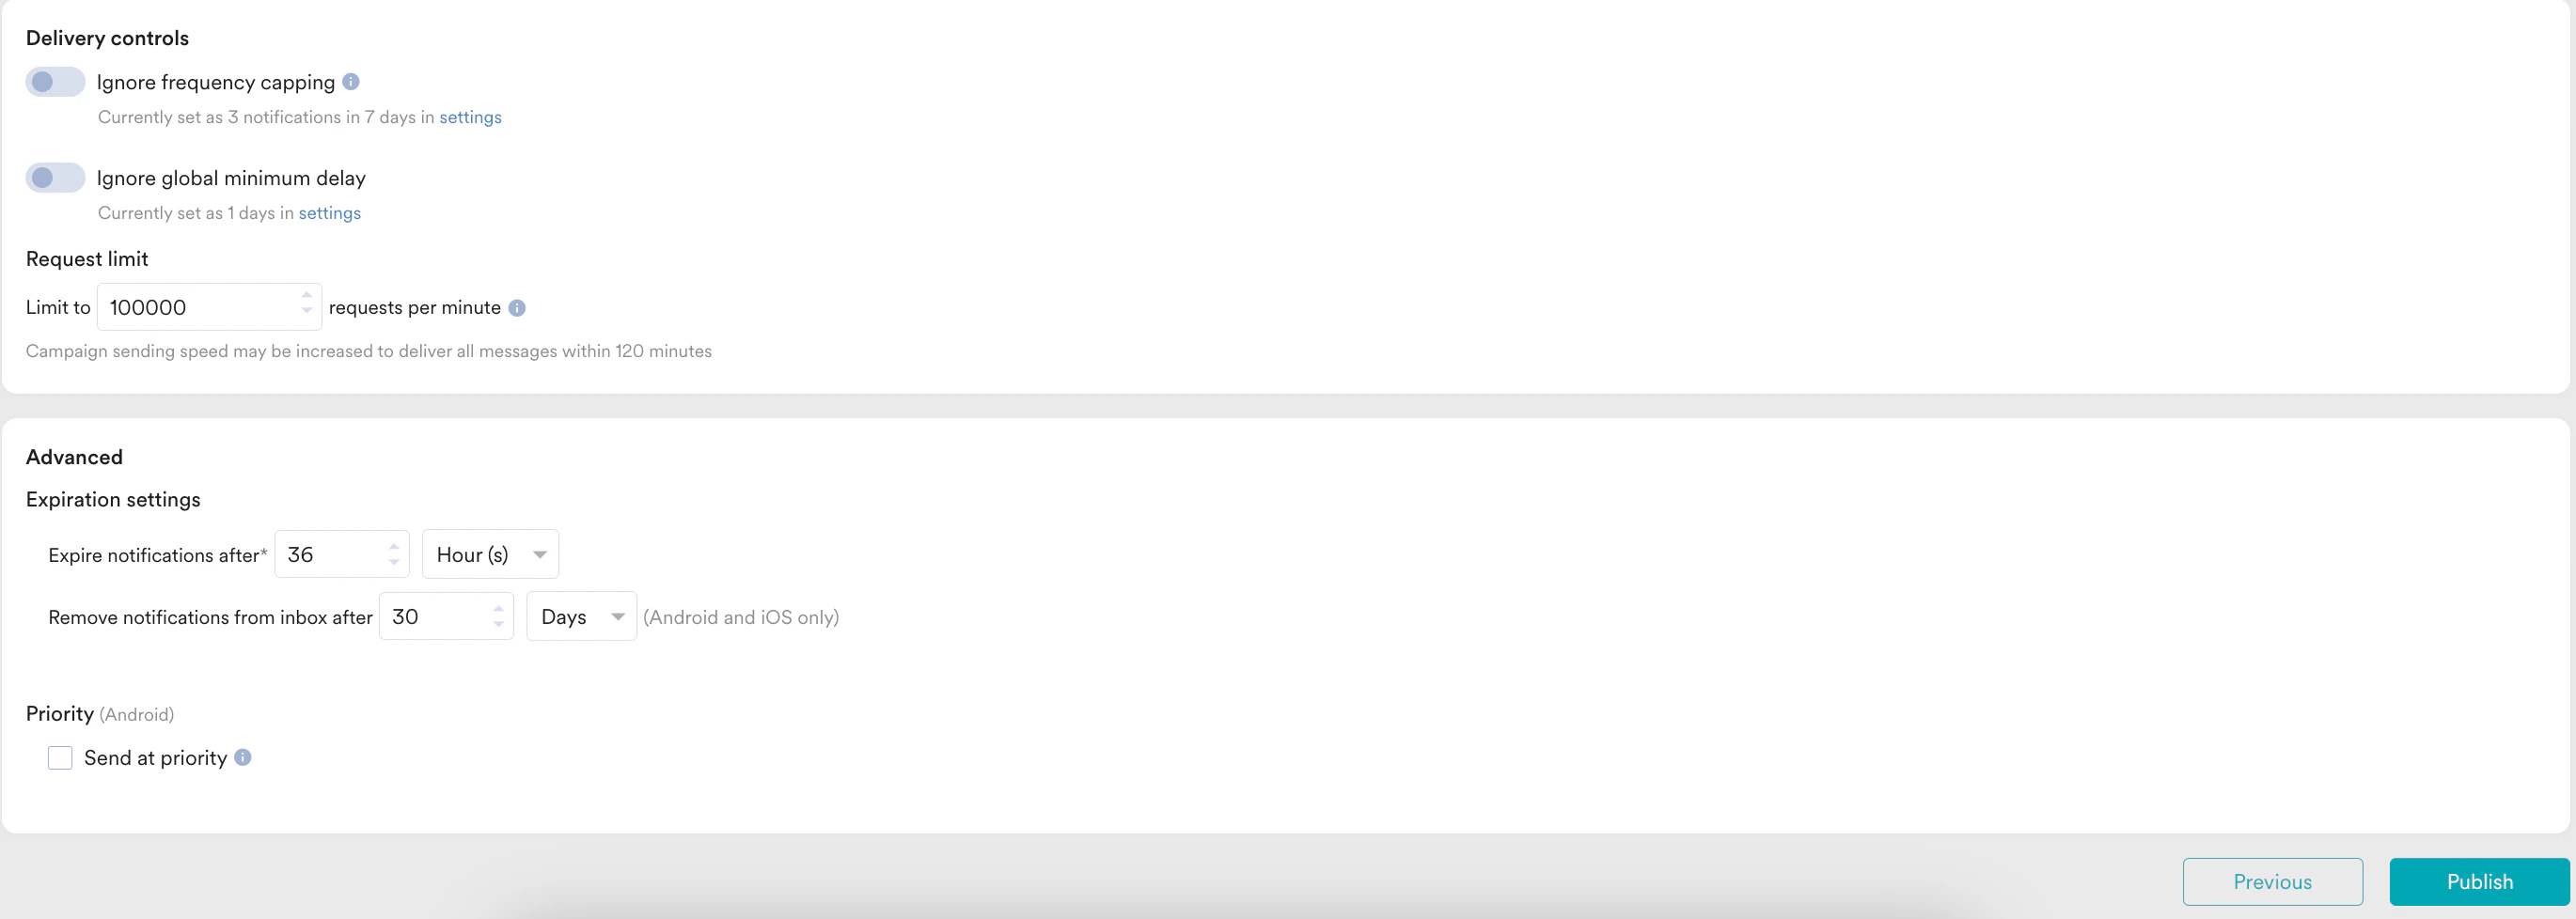 4. Click **Publish**.
# Conclusion
In this use case, we used RFM segments, locales, and Push Notification campaigns to recommend premium credit cards to high-value customers.
4. Click **Publish**.
# Conclusion
In this use case, we used RFM segments, locales, and Push Notification campaigns to recommend premium credit cards to high-value customers.