> ## Documentation Index
> Fetch the complete documentation index at: https://moengage.com/docs/llms.txt
> Use this file to discover all available pages before exploring further.
# Highlight an EMI Option
# Introduction
For a marketer, promoting the Equated Monthly Installment (EMI) option for credit card spending offers numerous benefits. By highlighting this option, you increase customers' purchasing power and affordability because it allows for larger purchases and manageable monthly installments. Furthermore, it helps build trust, loyalty, and long-term customer relationships. However, transparent communication of associated terms and conditions is essential to ensure customer understanding and satisfaction.
#### Advantages of highlighting an EMI option
* **Increased affordability**: EMI options make expensive items more accessible to a broader customer base by allowing them to pay for purchases in smaller, manageable installments over time.
* **Higher transaction value**: Customers are more likely to opt for higher-value products when EMI is available, leading to increased average transaction values.
* **Enhanced convenience and flexibility**: EMI allows customers to make purchases without paying the full amount upfront, enhancing their shopping experience and satisfaction.
* **Upselling and cross-selling opportunities**: EMI can facilitate upselling and cross-selling opportunities, as customers may be more inclined to consider additional products or services when they are already in a purchase mindset.
* **Penetration of new customer segments**: EMI can unlock new customers who might not have been able to afford a particular product or service without the installment option.
* **Faster inventory turnover**: EMI can lead to quicker inventory turnover as customers can purchase items sooner and pay for them over time rather than waiting to save up for the full amount.
We will achieve this use case in two steps:
1. [Create an RFM segment](/use-cases/push/highlight-an-emi-option#step-1-create-an-rfm-segment)
2. [Create a Push Campaign](/use-cases/push/highlight-an-emi-option#step-2-create-a-push-campaign)
# Expected Result
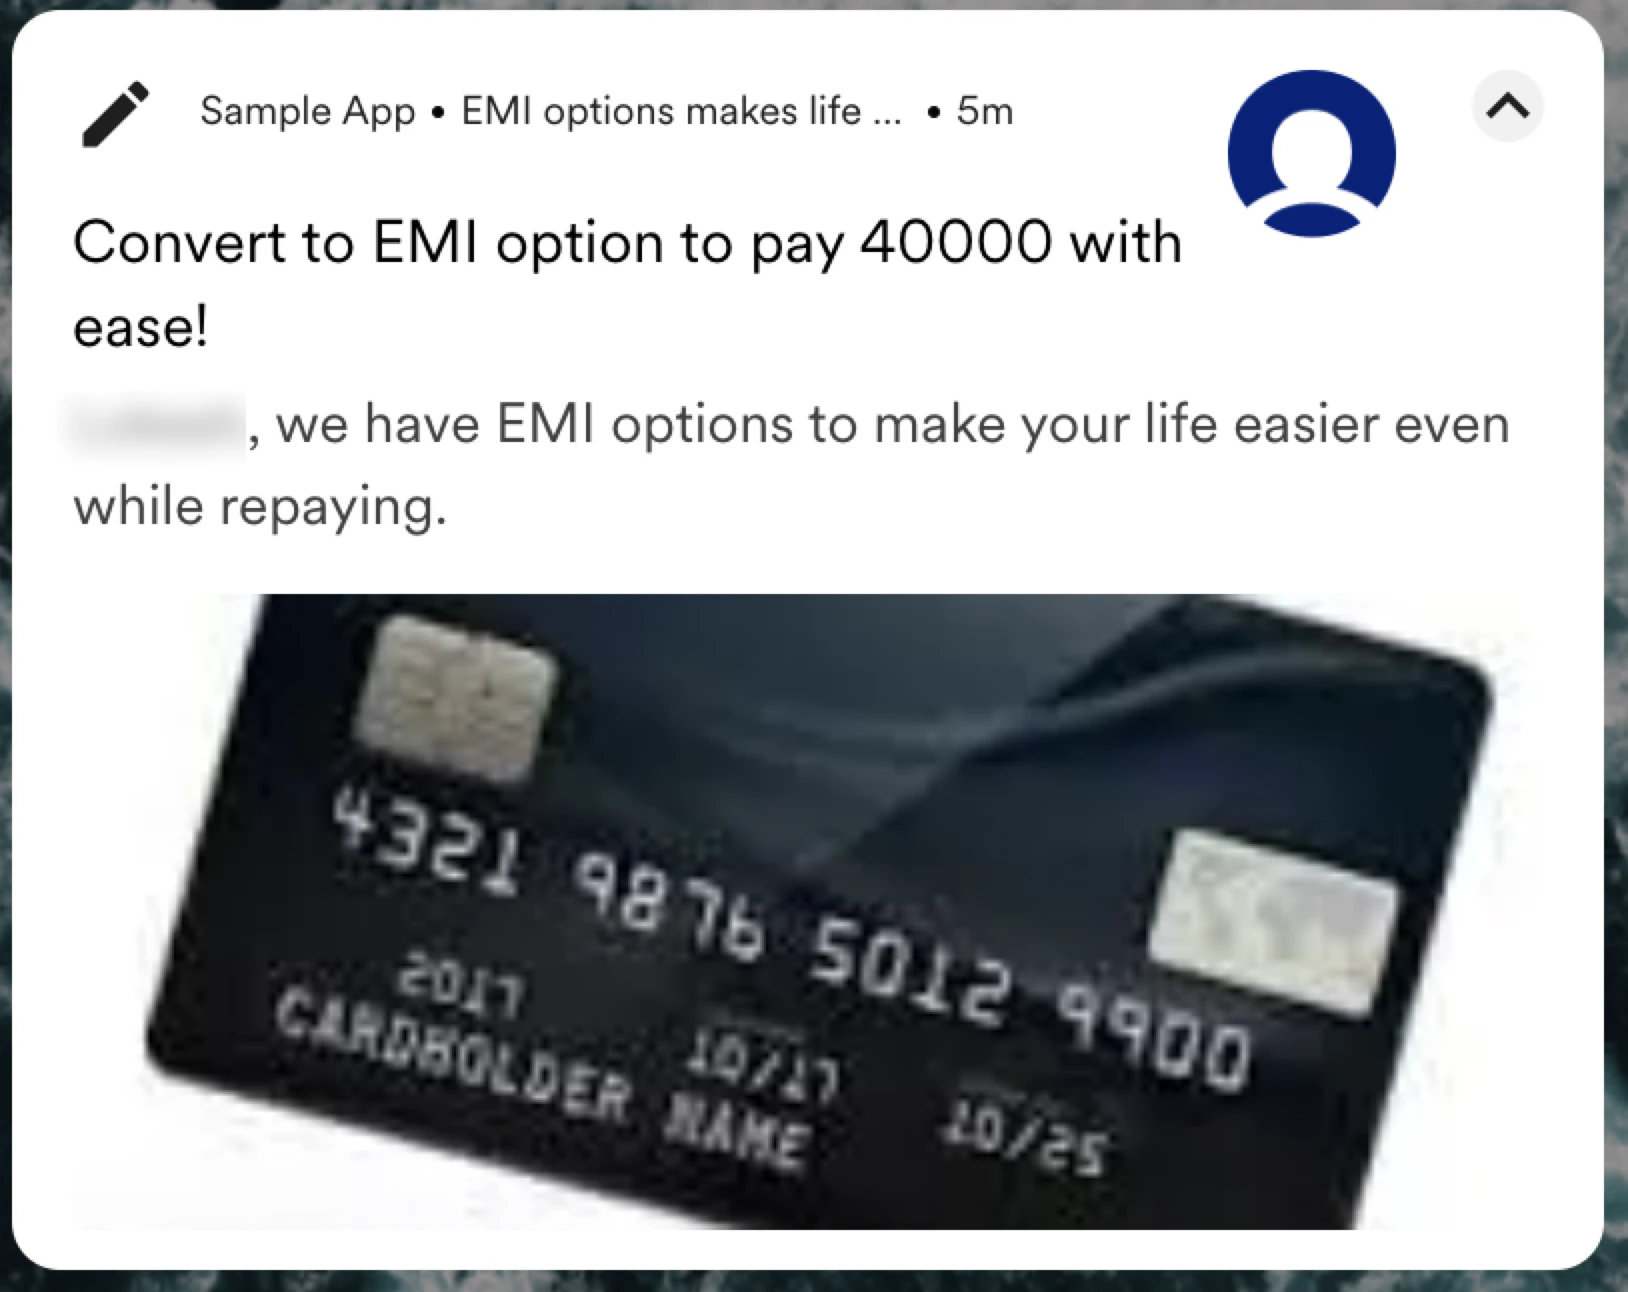
Users receive a push notification on their phone to convert a purchase to an EMI option:
 * Events must be available in MoEngage to track the action of a user spending on a credit card and related information such as accrued bill amount, and card type. To understand how to track events, refer to the [Developer Guide](/developer-guide/introduction). In this example, we will use the following events:
* *Credit Card used*
* *App/Site Opened*
* The [Push channel](/user-guide/campaigns-and-channels/mobile-push/getting-started-with-mobile-push) must be configured.
# Step 1: Create an RFM Segment
Before creating our campaign, let's understand RFM segments and the process of creating them. We will use these RFM segments to define our target audience.
The RFM (Recency, Frequency, and Monetary) model provides auto-segmentation and buckets users into categories such as *Loyal*, *Promising*, and *At Risk* based on their behavior. You can use these auto segments in different ways, such as user analysis, churn analysis, and to target users effectively. For more information, refer to [RFM Segments](/user-guide/segment/segment-operations/rfm-segments).
In this section, we will create an RFM segment to find the *Champion Users* who spend the most and introduce them to EMI or installment options.
1. On the left navigation menu in the MoEngage dashboard, click **Segment**, and then click **RFM** **segments**.
2. On the RFM segments page, in the **Recency Event** list, select *App/Site Opened*, the event based on which recency score should be allotted.
3. Select the **Use the same event as Recency**check box.
4. In the **Monetary Event** list, select *Credit Card used,* and in the **Revenue Attribute** list, select *Amount*.
5. Under **Show analysis for**, select **All users**.
* Events must be available in MoEngage to track the action of a user spending on a credit card and related information such as accrued bill amount, and card type. To understand how to track events, refer to the [Developer Guide](/developer-guide/introduction). In this example, we will use the following events:
* *Credit Card used*
* *App/Site Opened*
* The [Push channel](/user-guide/campaigns-and-channels/mobile-push/getting-started-with-mobile-push) must be configured.
# Step 1: Create an RFM Segment
Before creating our campaign, let's understand RFM segments and the process of creating them. We will use these RFM segments to define our target audience.
The RFM (Recency, Frequency, and Monetary) model provides auto-segmentation and buckets users into categories such as *Loyal*, *Promising*, and *At Risk* based on their behavior. You can use these auto segments in different ways, such as user analysis, churn analysis, and to target users effectively. For more information, refer to [RFM Segments](/user-guide/segment/segment-operations/rfm-segments).
In this section, we will create an RFM segment to find the *Champion Users* who spend the most and introduce them to EMI or installment options.
1. On the left navigation menu in the MoEngage dashboard, click **Segment**, and then click **RFM** **segments**.
2. On the RFM segments page, in the **Recency Event** list, select *App/Site Opened*, the event based on which recency score should be allotted.
3. Select the **Use the same event as Recency**check box.
4. In the **Monetary Event** list, select *Credit Card used,* and in the **Revenue Attribute** list, select *Amount*.
5. Under **Show analysis for**, select **All users**. 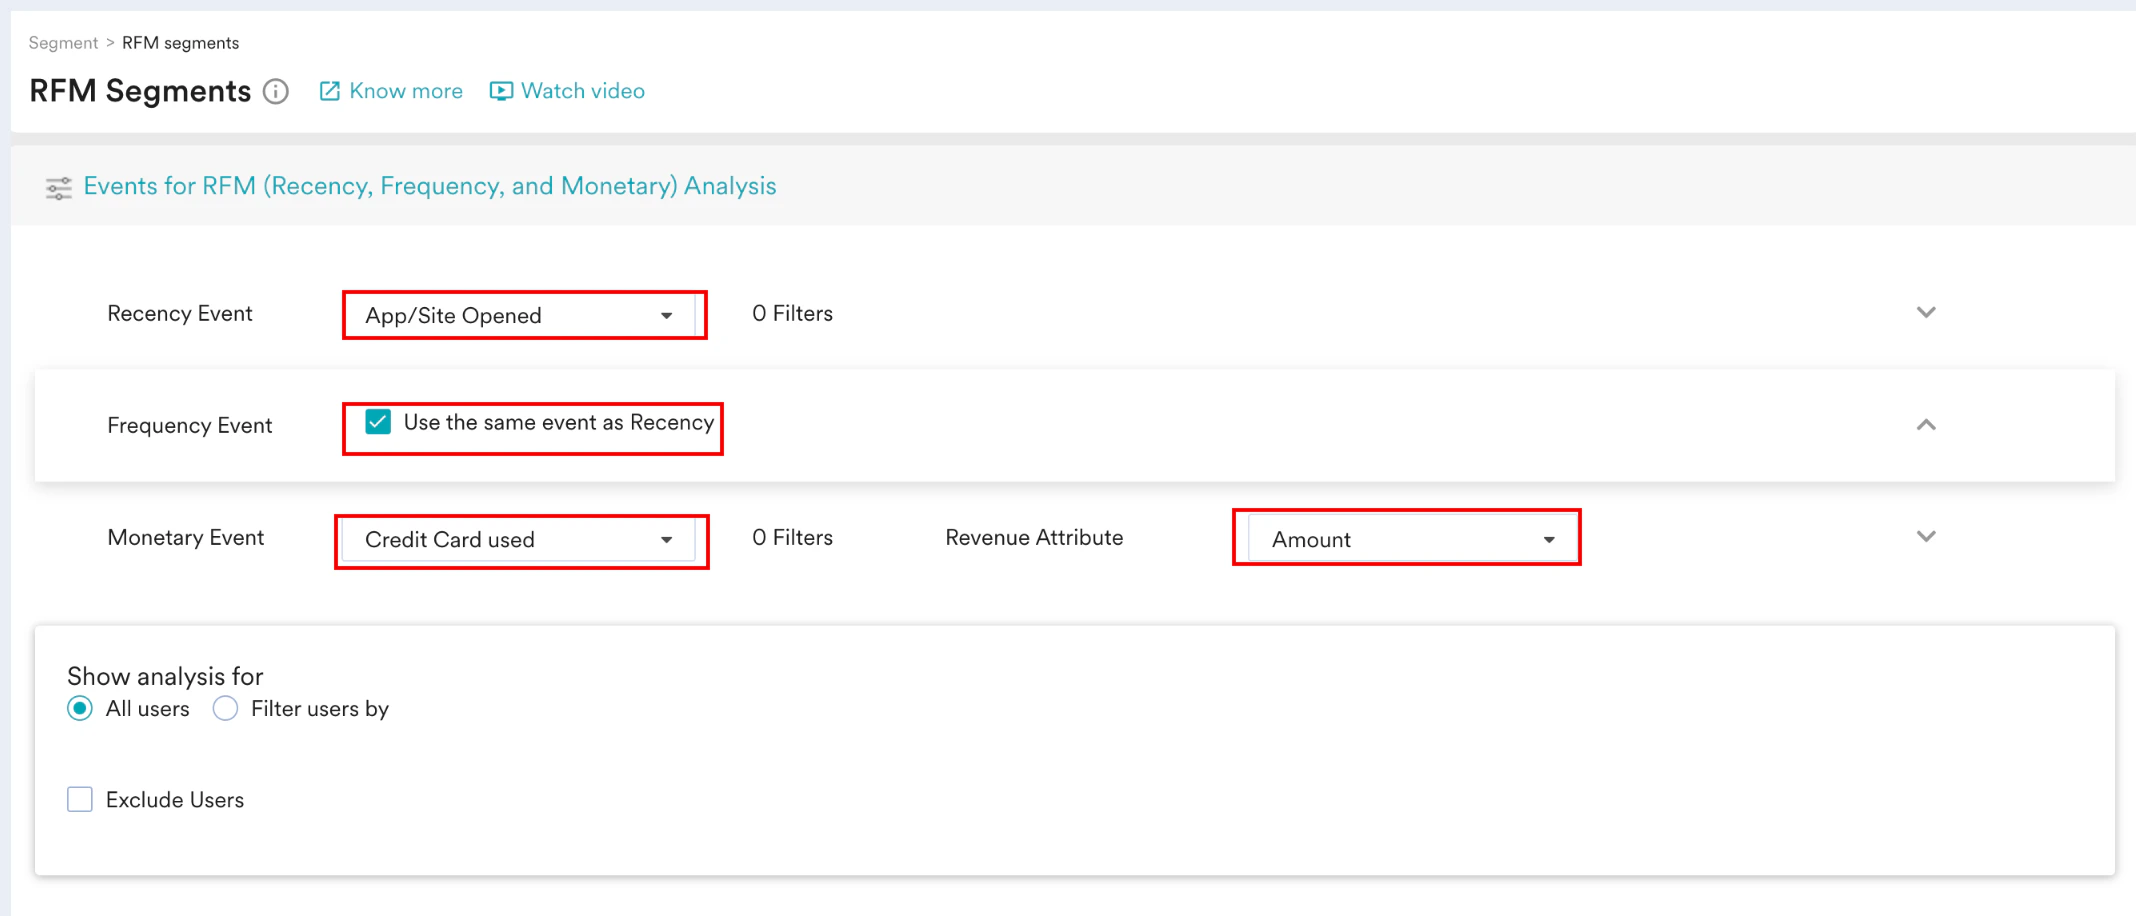 6. Under **Show analysis for**, select **All users** to make the analysis run for all users.
7. From the **Analysis Model**, select \_RFM\_and define the **Date Range**\*.\*
8. Click **Apply**.
6. Under **Show analysis for**, select **All users** to make the analysis run for all users.
7. From the **Analysis Model**, select \_RFM\_and define the **Date Range**\*.\*
8. Click **Apply**.  MoEngage generates a chart like the one shown below:
 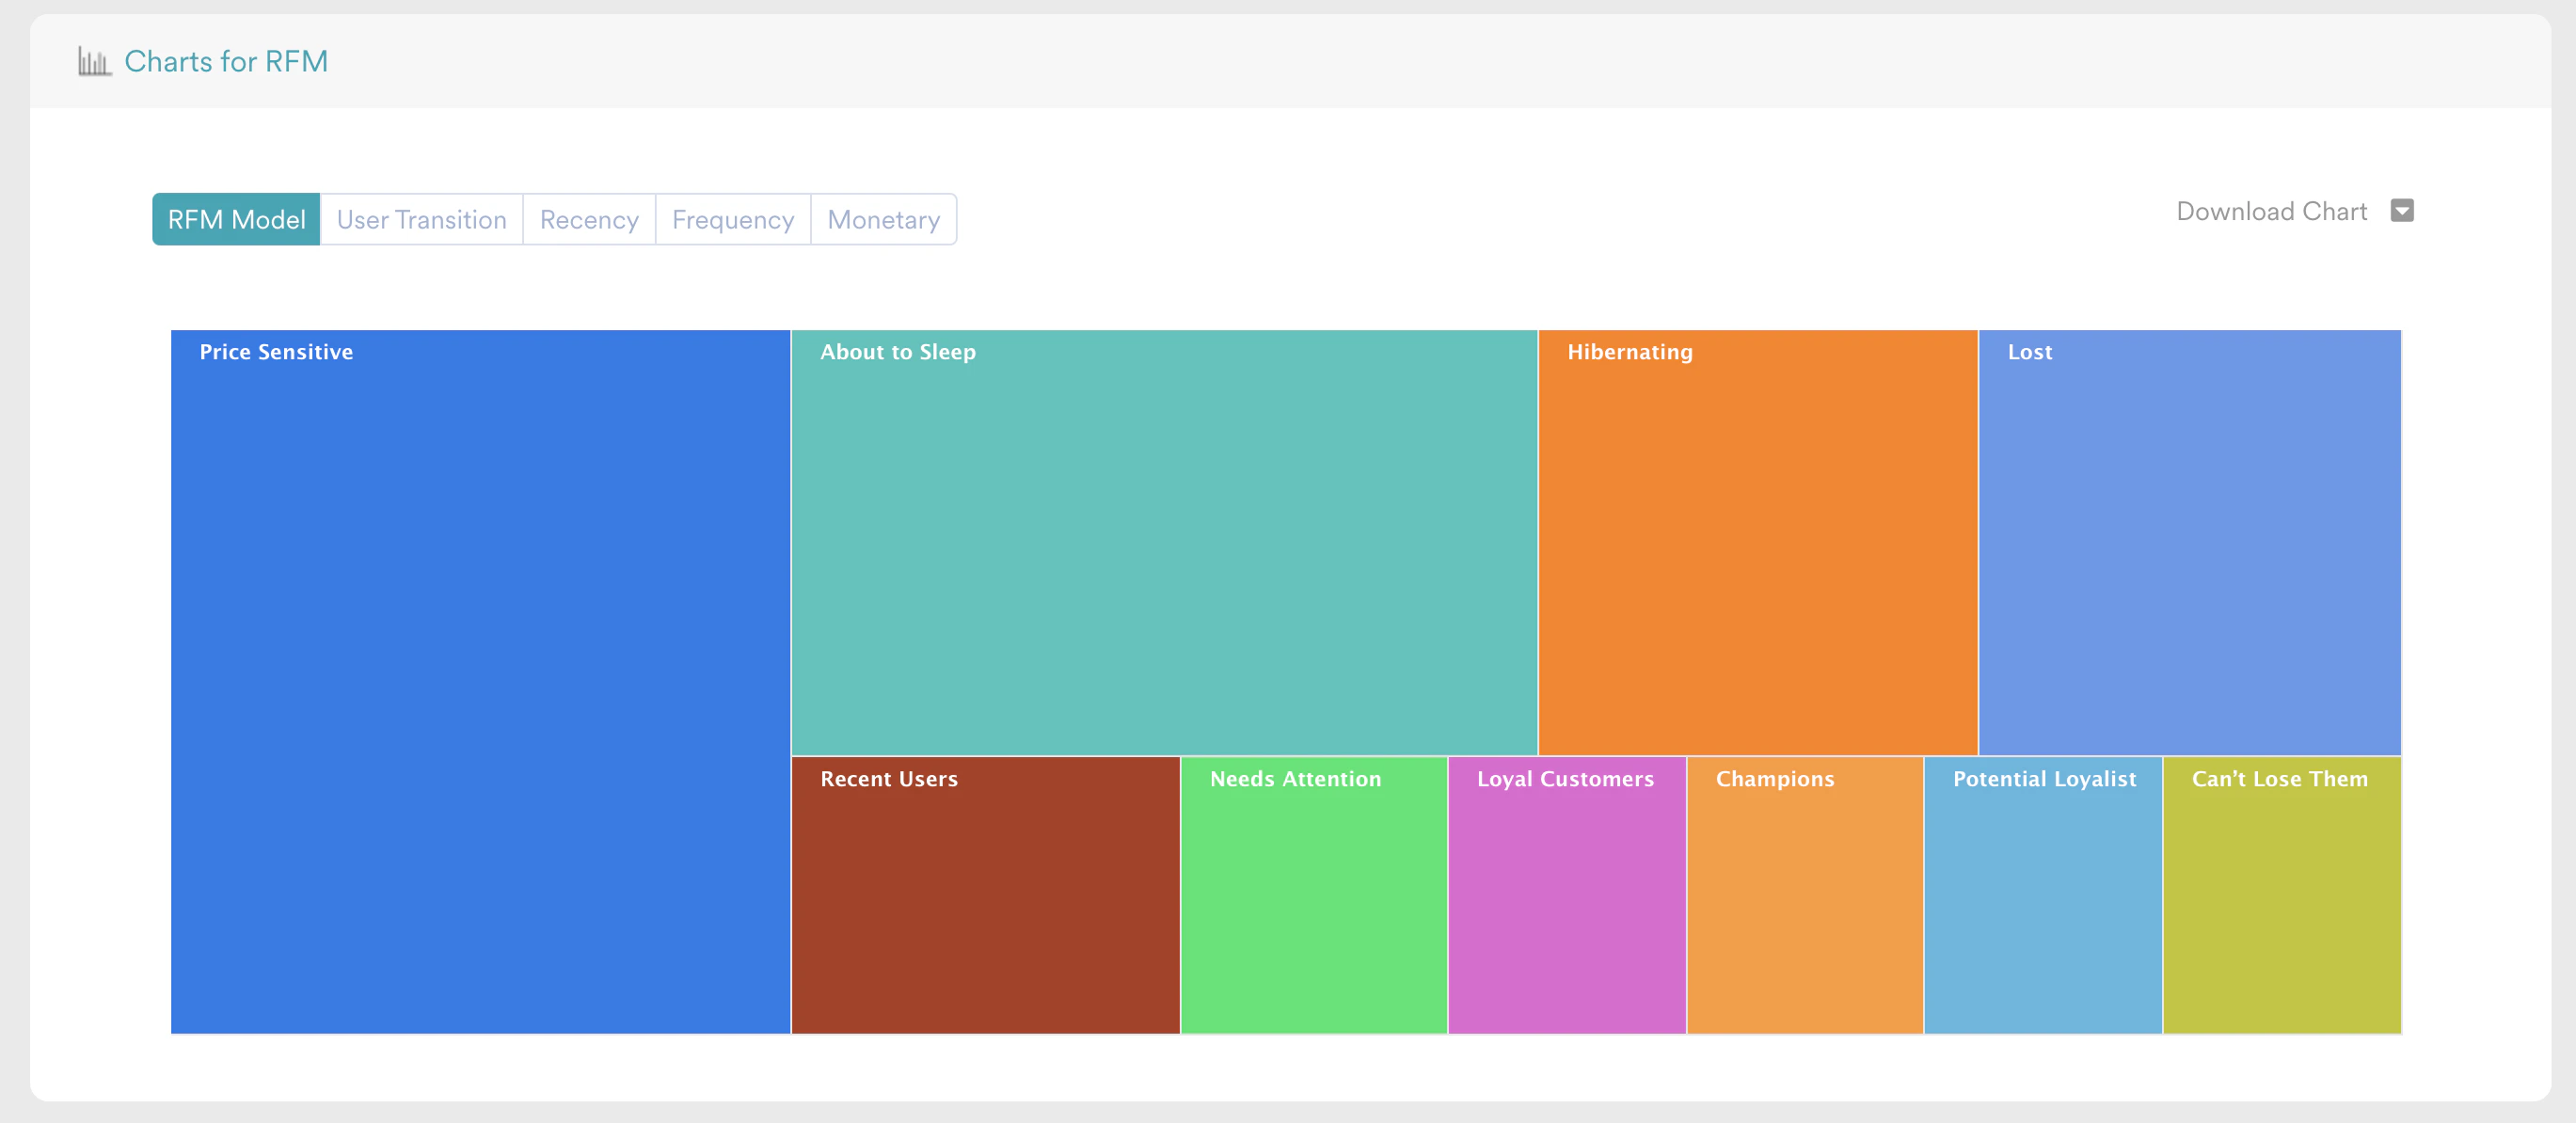 \
You can select any chart to save it as a custom segment or create a campaign using the segment as the target audience directly.
9. For our example, click the **Champions** box.
10. On the **Engage Users** dialog box, select **Custom Segment** and enter the custom segment name as *RFM-segment*.
11. Click **SAVE SEGMENT**.
\
You can select any chart to save it as a custom segment or create a campaign using the segment as the target audience directly.
9. For our example, click the **Champions** box.
10. On the **Engage Users** dialog box, select **Custom Segment** and enter the custom segment name as *RFM-segment*.
11. Click **SAVE SEGMENT**. 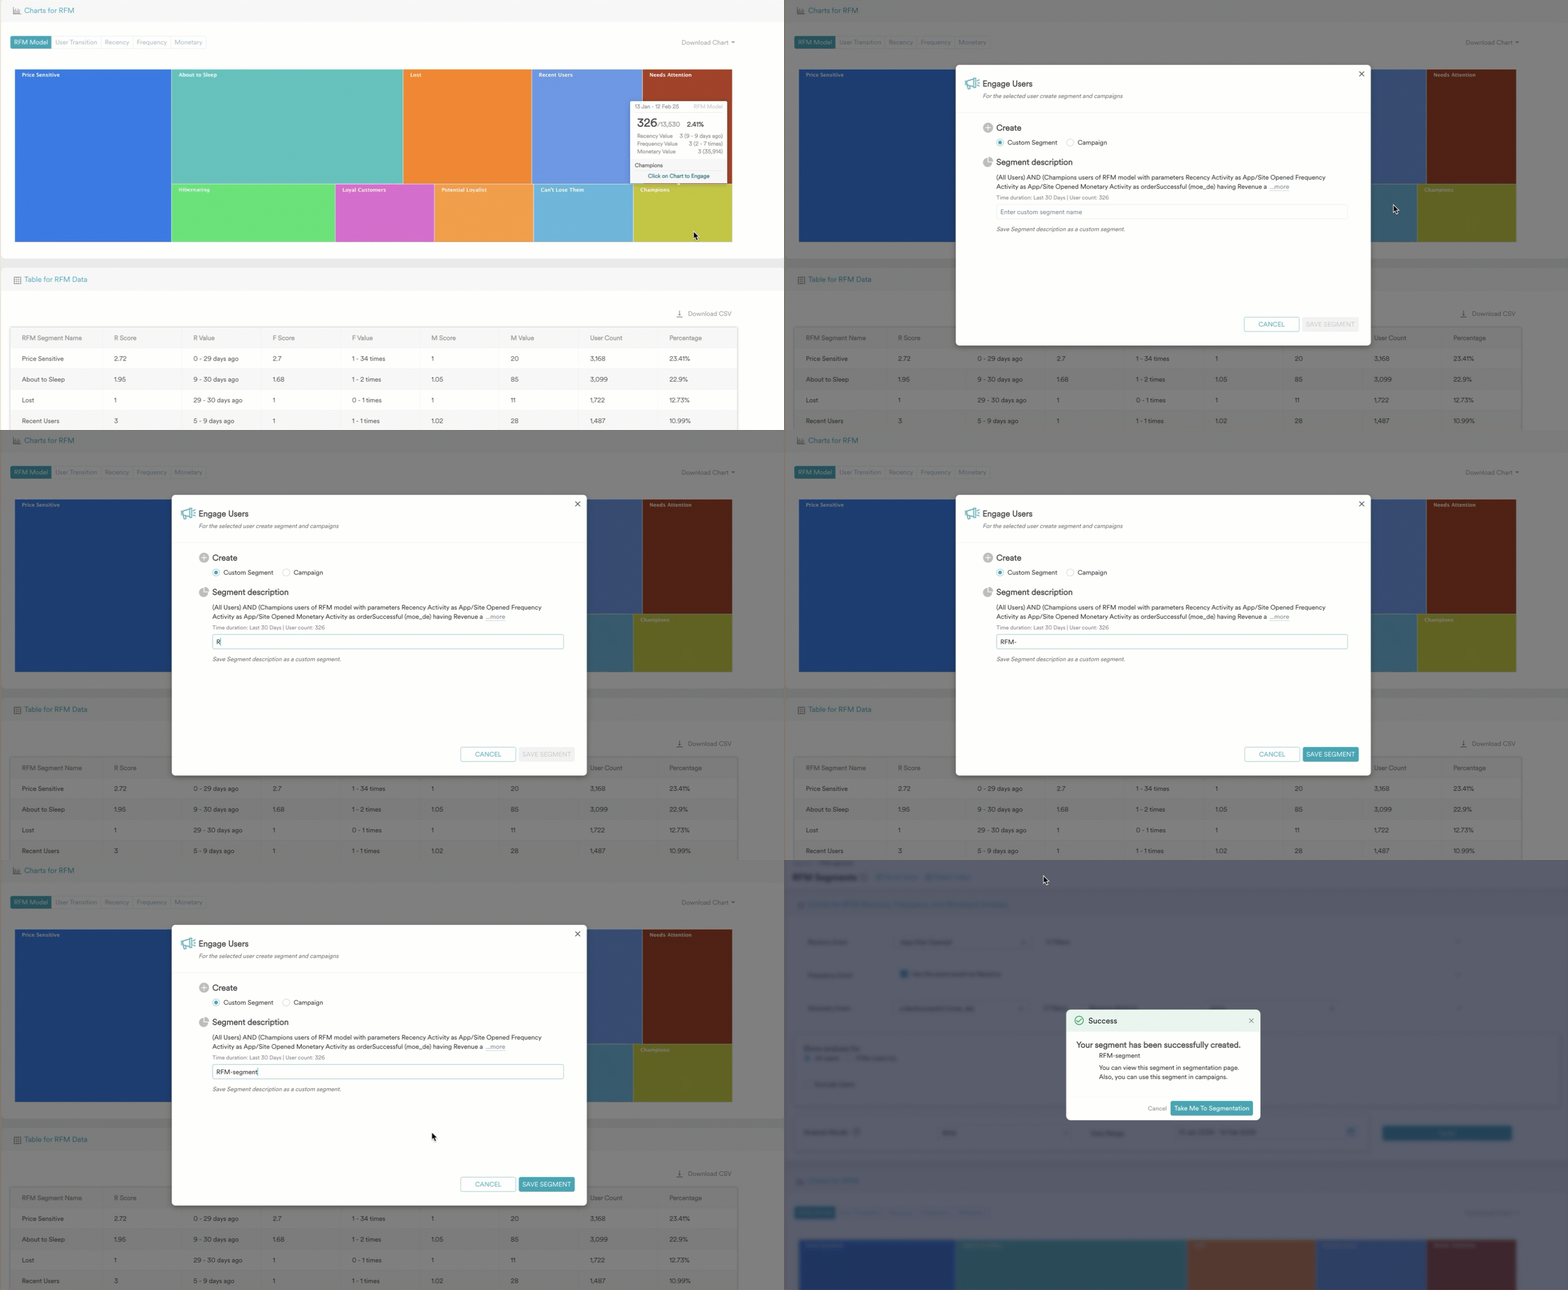 Now that the segment to target is created, we can start creating our Campaign to nudge people toward the possibility of an EMI option.
# Step 2: Create a Push Campaign
In this section, we will create a Push campaign that triggers push notifications about the possibility of having an EMI option. They will nudge users to convert their credit card spending to easy EMI options.
## Step 2.1: Target Users
1. On the left navigation menu in the MoEngage dashboard, click **Engage**, and then click **Campaigns**.
2. On the All campaigns page, click **+ Create campaign**.
3. Under **Outbound**, click **Push**> **Event Triggered**.
Now that the segment to target is created, we can start creating our Campaign to nudge people toward the possibility of an EMI option.
# Step 2: Create a Push Campaign
In this section, we will create a Push campaign that triggers push notifications about the possibility of having an EMI option. They will nudge users to convert their credit card spending to easy EMI options.
## Step 2.1: Target Users
1. On the left navigation menu in the MoEngage dashboard, click **Engage**, and then click **Campaigns**.
2. On the All campaigns page, click **+ Create campaign**.
3. Under **Outbound**, click **Push**> **Event Triggered**. 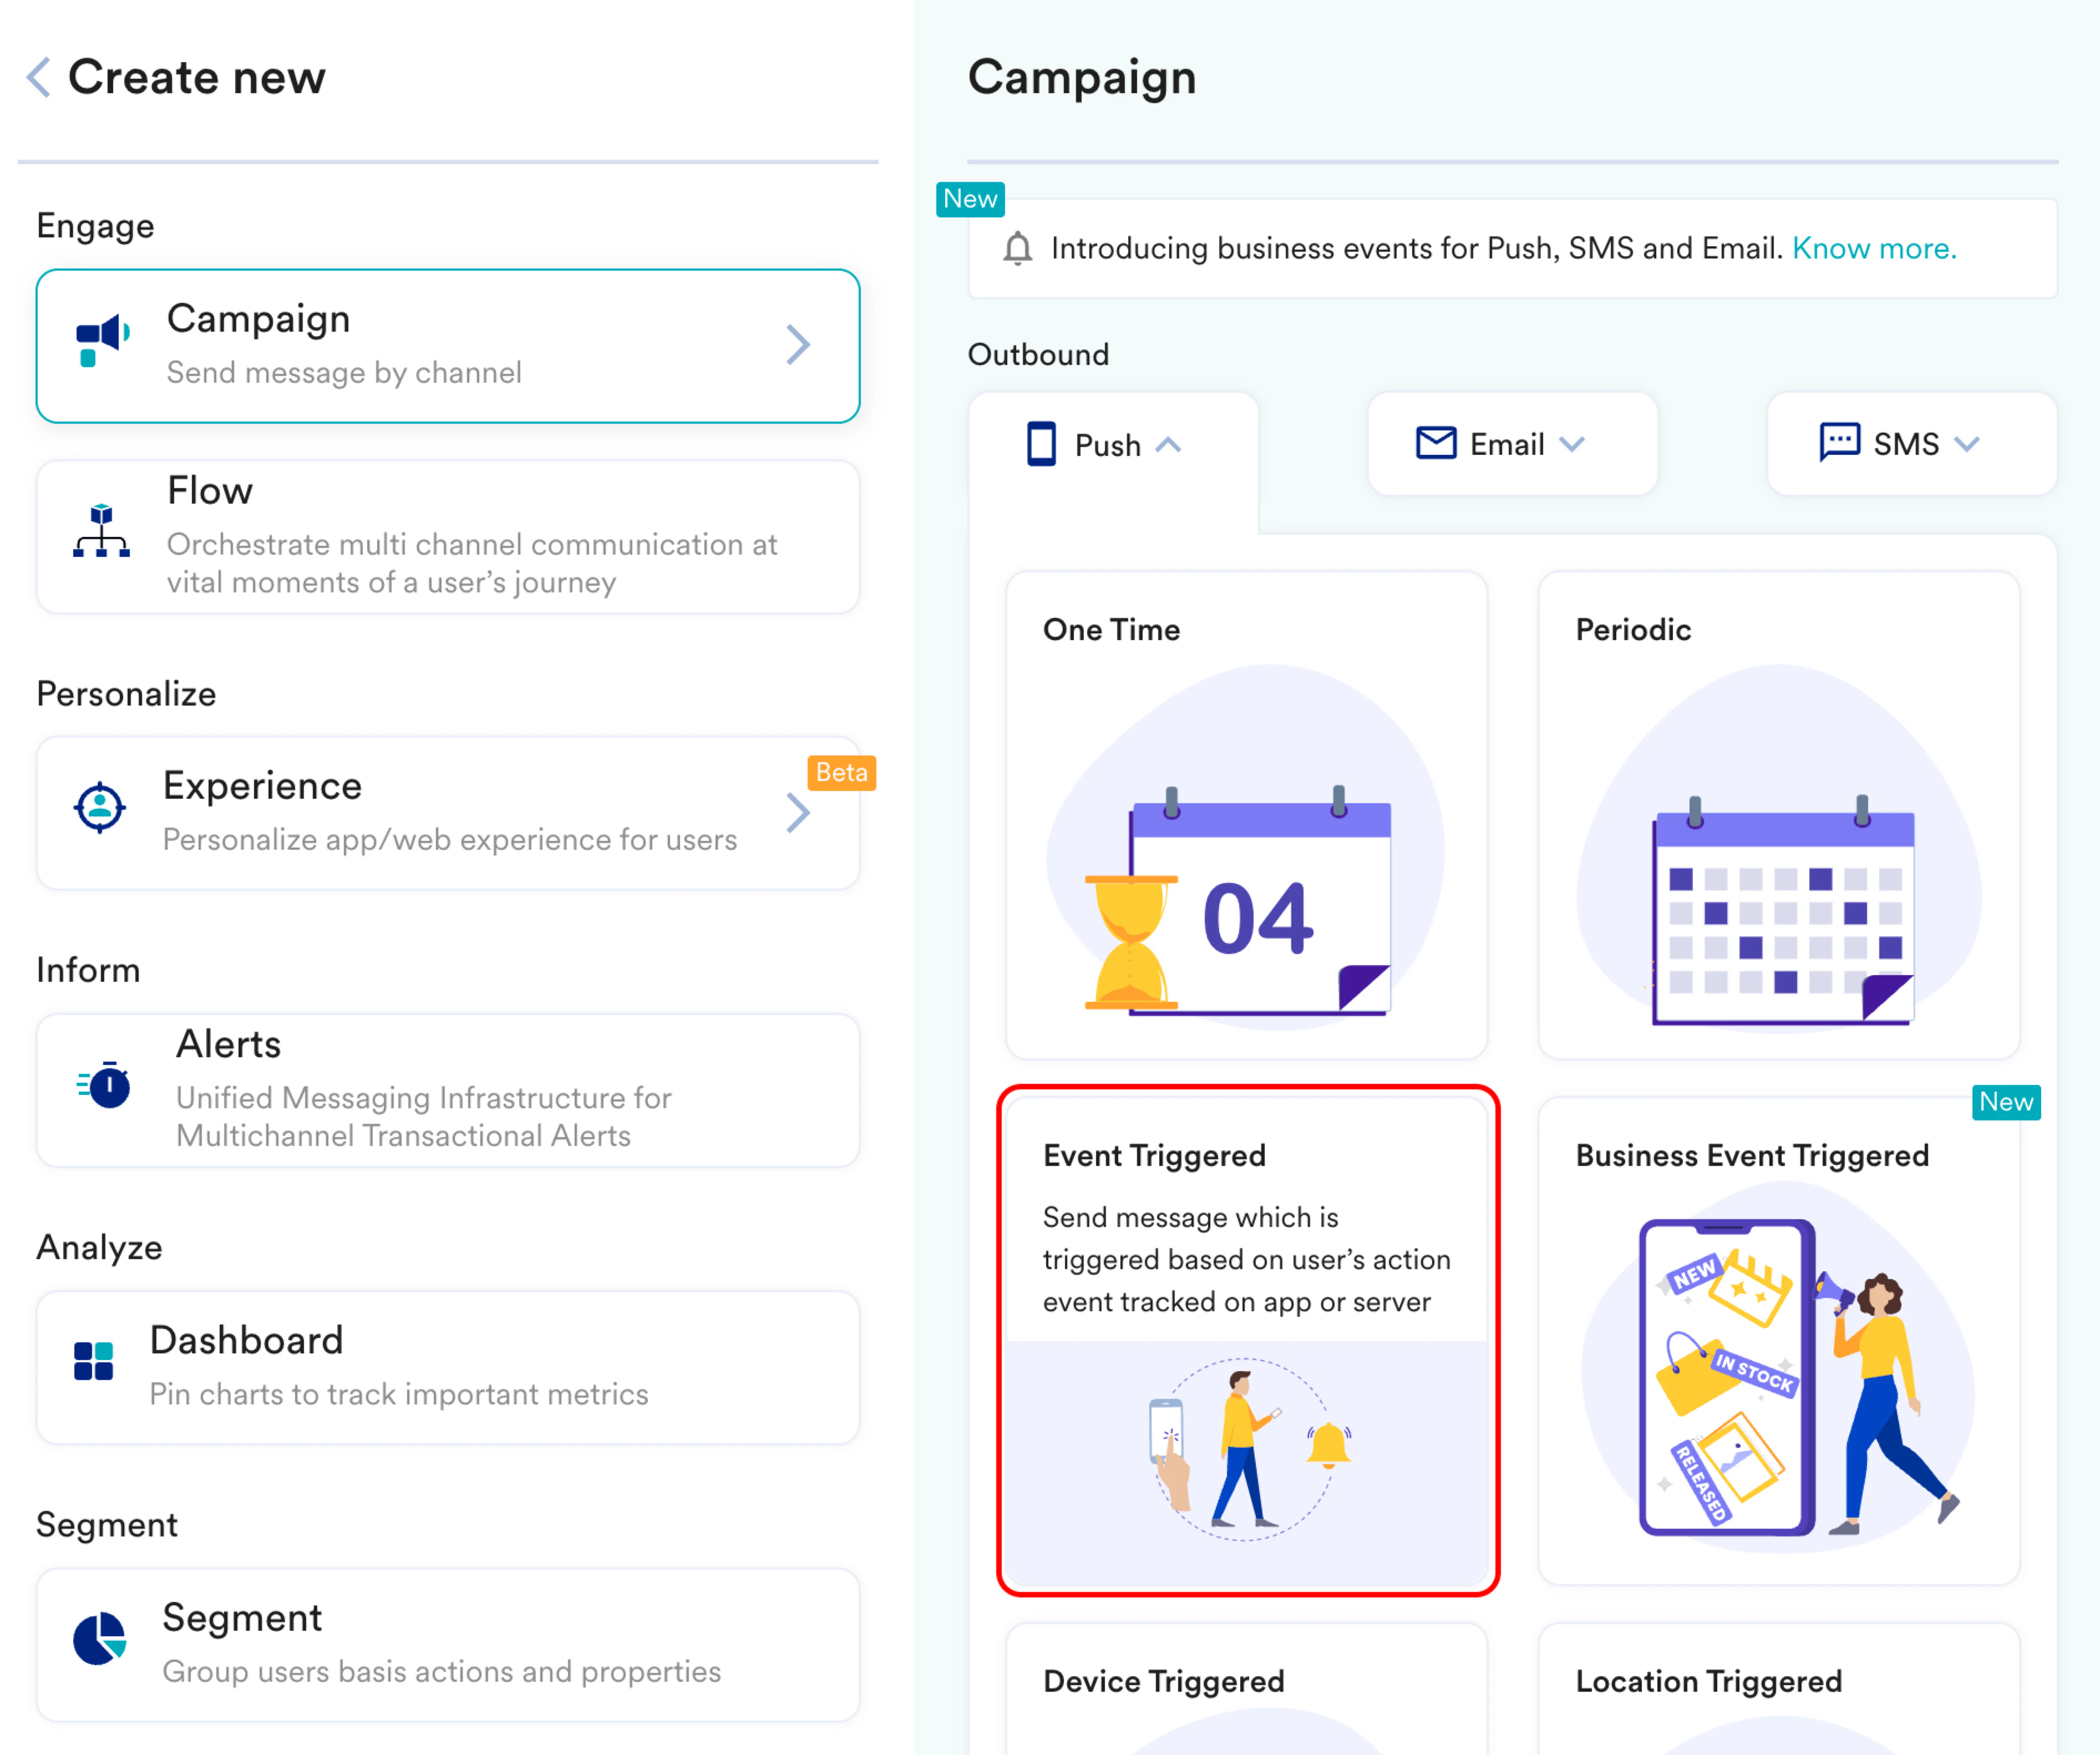 You are taken to the first step, **Target users**, of defining your campaign.
4. Define your campaign with a name and tags. Enter the following details:
1. **Team**: Select a team if your organization has teams enabled for your account. For more information, refer to [Teams in MoEngage](/user-guide/settings/account/team-management/teams-in-moengage).
2. **Campaign name**: Enter a name for the campaign. For example, *EMI Option*.
3. **Campaign tags**: Select the required campaign tags.
You are taken to the first step, **Target users**, of defining your campaign.
4. Define your campaign with a name and tags. Enter the following details:
1. **Team**: Select a team if your organization has teams enabled for your account. For more information, refer to [Teams in MoEngage](/user-guide/settings/account/team-management/teams-in-moengage).
2. **Campaign name**: Enter a name for the campaign. For example, *EMI Option*.
3. **Campaign tags**: Select the required campaign tags. 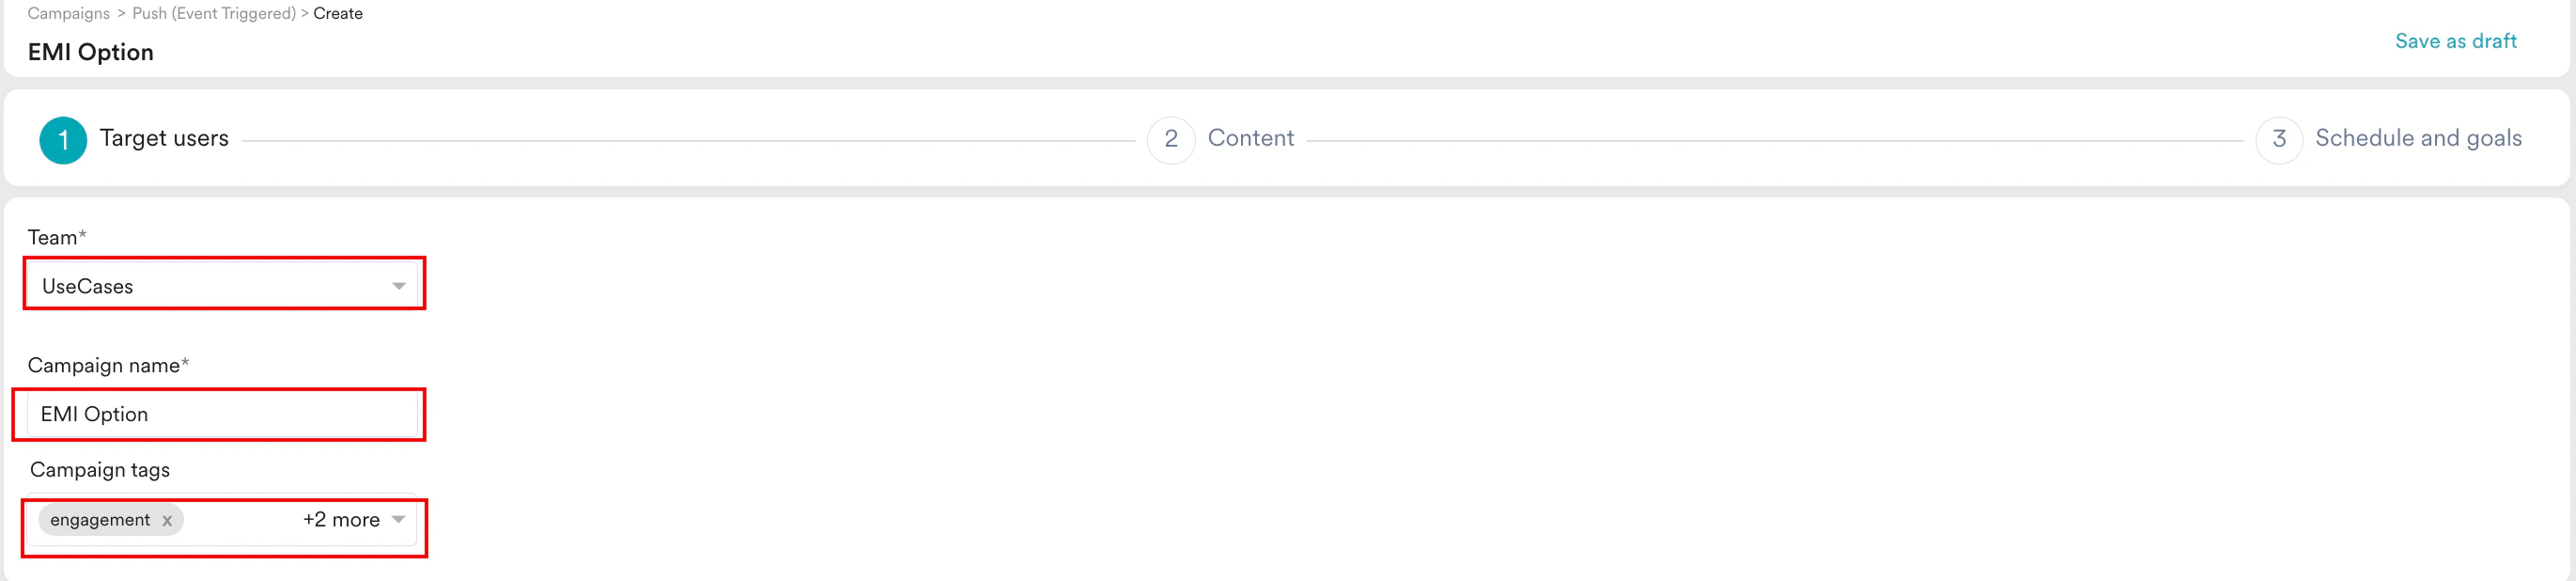 5. In the **Trigger Criteria** section, define the logic for identifying all customers who have used credit cards with an amount greater than 5000.
6. To define the above-mentioned dynamics, perform the following steps:
1. In the **IF user** section, select the event *Credit Card used*.
2. Click **+ Attribute** to apply an additional filter to check if the *Amount* spent is greater than 5000.
3. In the **THEN trigger the message** section, select **Immediately**. Given the announcement is about EMI, suggesting the same for lesser amounts will not be meaningful. So, for this example, the target audience can be as shown below:
5. In the **Trigger Criteria** section, define the logic for identifying all customers who have used credit cards with an amount greater than 5000.
6. To define the above-mentioned dynamics, perform the following steps:
1. In the **IF user** section, select the event *Credit Card used*.
2. Click **+ Attribute** to apply an additional filter to check if the *Amount* spent is greater than 5000.
3. In the **THEN trigger the message** section, select **Immediately**. Given the announcement is about EMI, suggesting the same for lesser amounts will not be meaningful. So, for this example, the target audience can be as shown below: 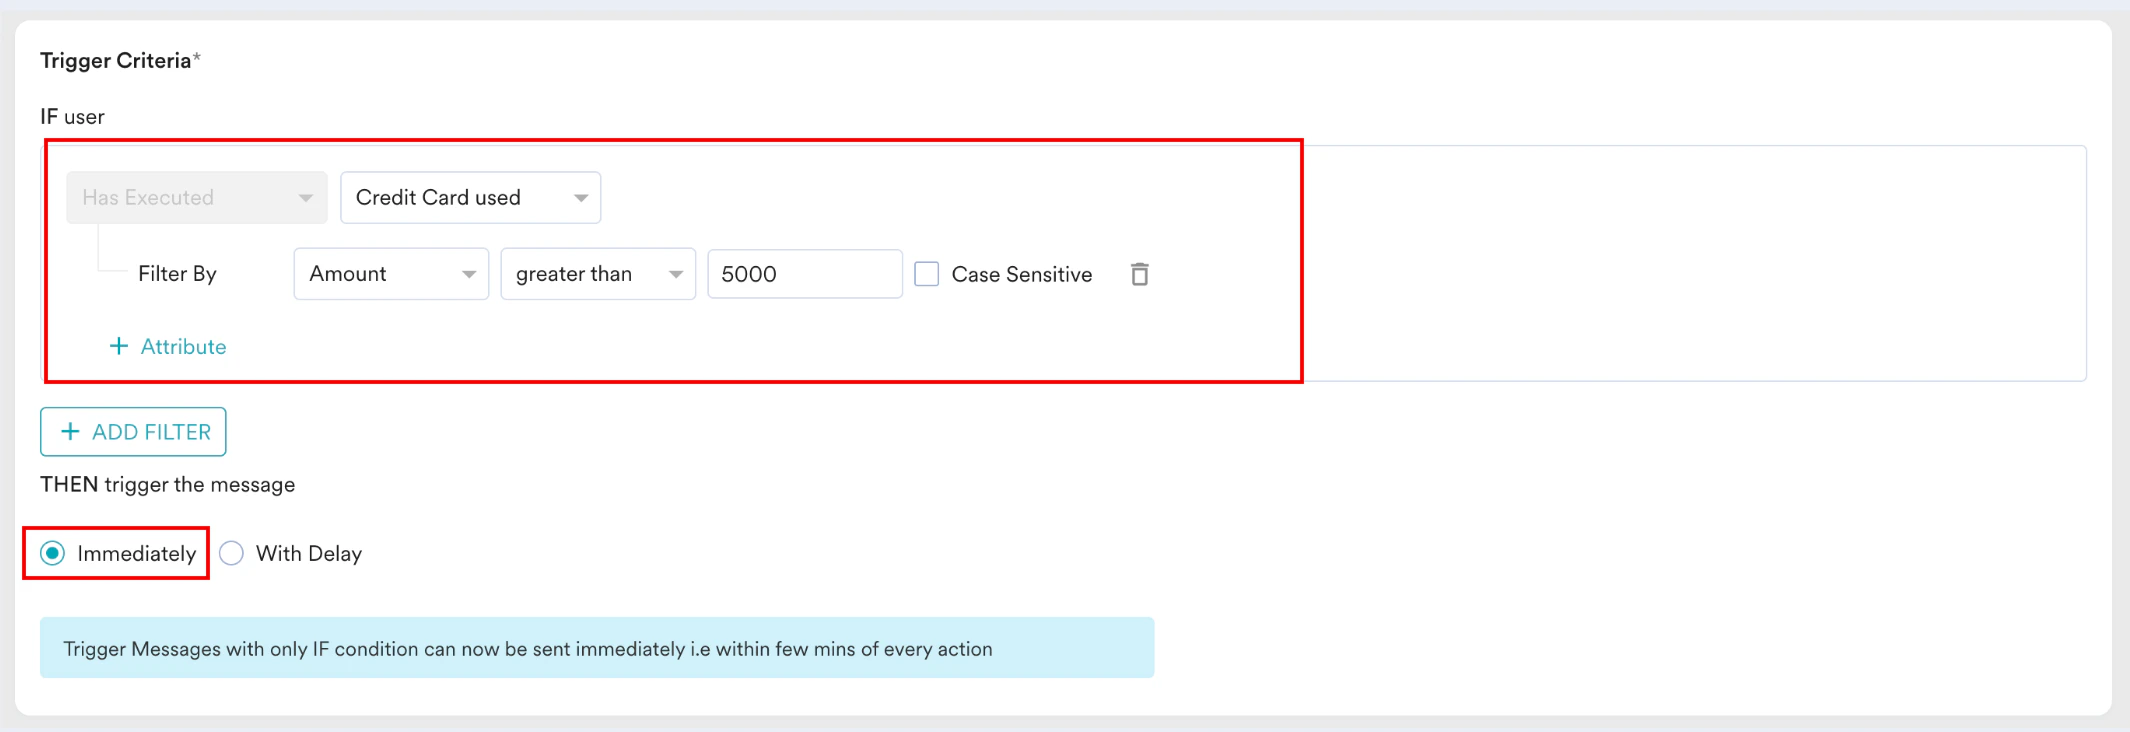 7. In the **Target audience** section, select our saved custom segment, *RFM-segment* that we created in the [Step 1: Create an RFM segment](/use-cases/push/highlight-an-emi-option#step-1-create-an-rfm-segment) by searching for the same.
 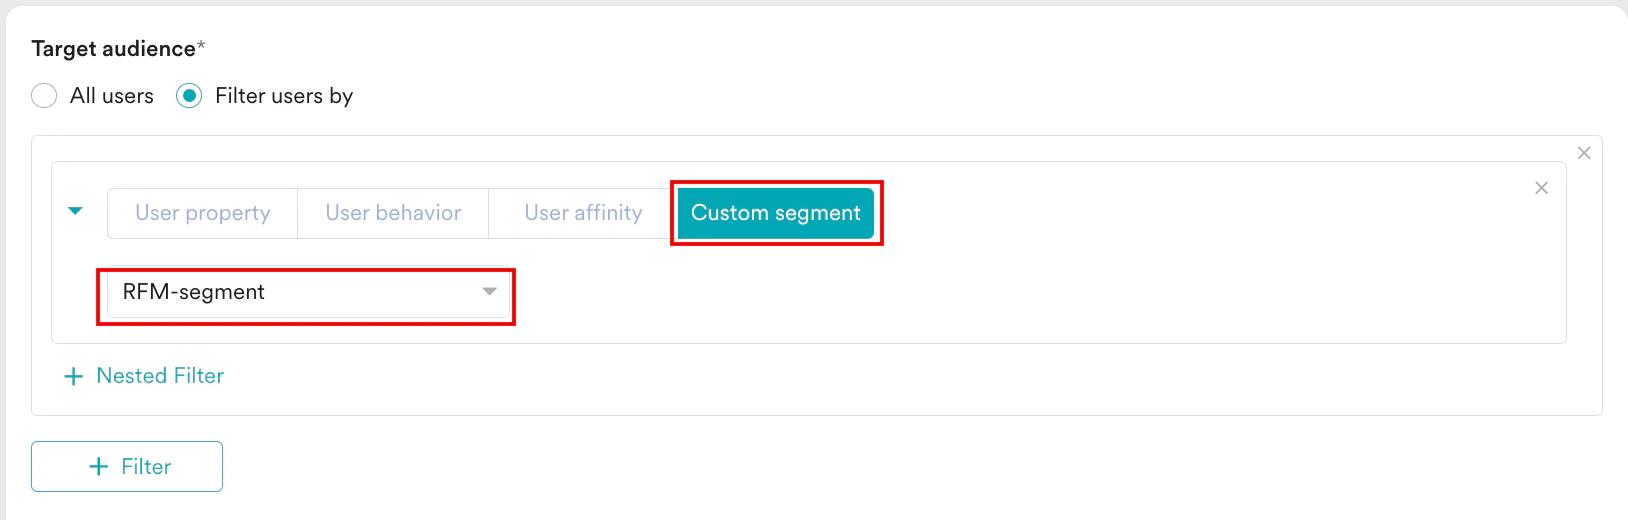 8. In the **Target Platforms**section, select **Android**.
 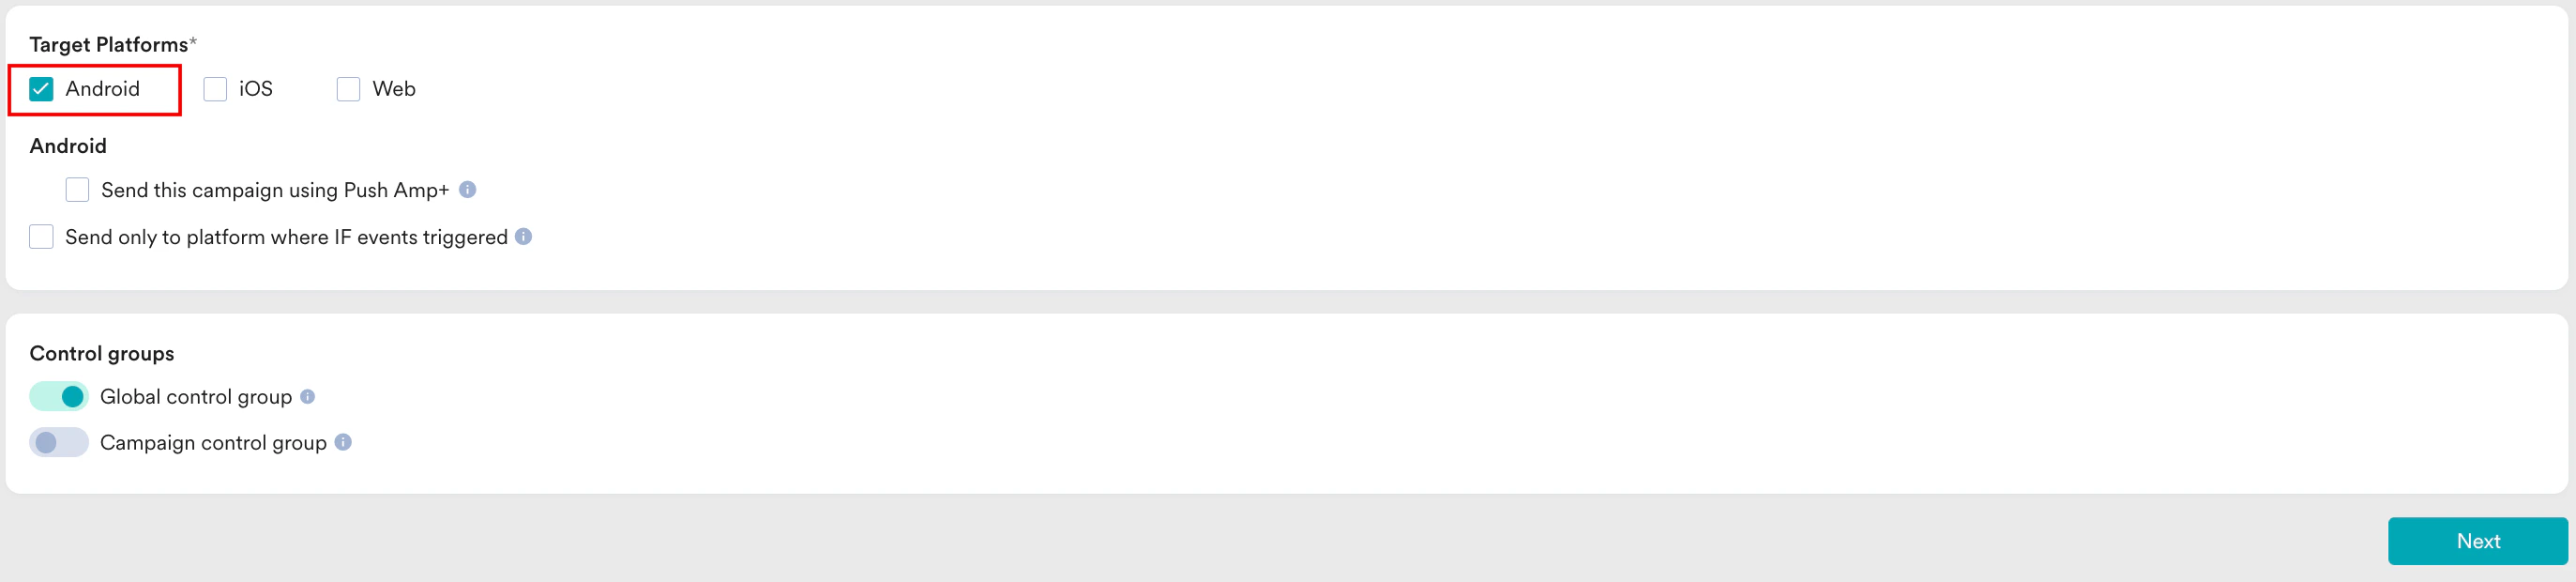 9. Click **Next** to move to the second step, **Content**, where you can define the content for your Push campaign.
## Step 2.2: Content
1. Select the template that you would like to use. For example, select **Basic notification**.
9. Click **Next** to move to the second step, **Content**, where you can define the content for your Push campaign.
## Step 2.2: Content
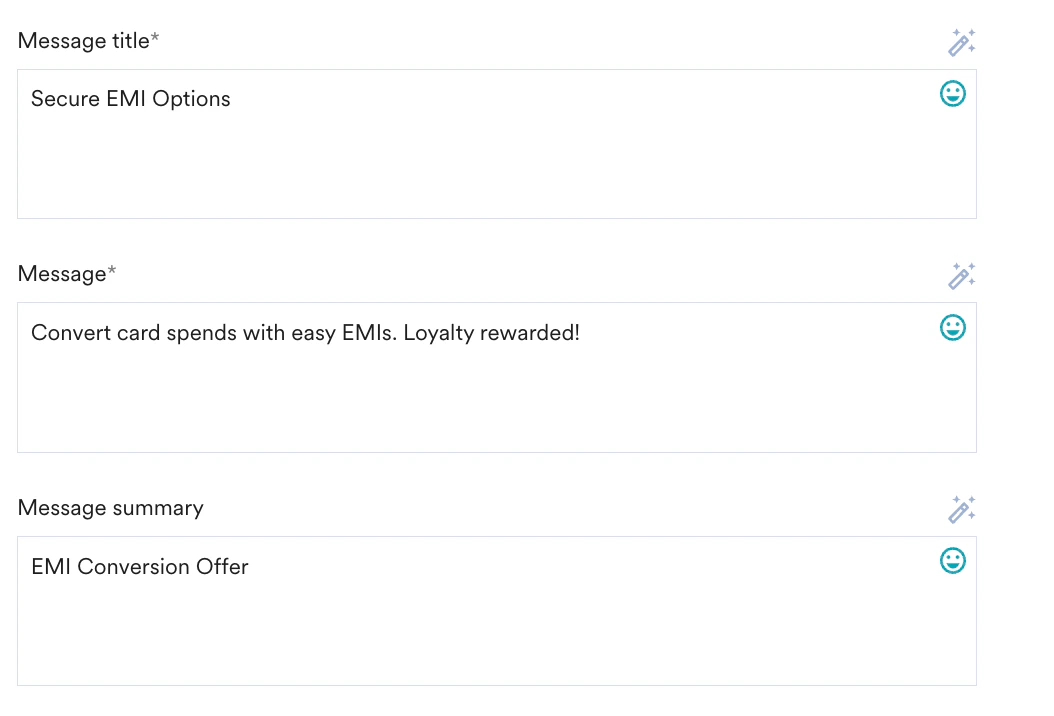
1. Select the template that you would like to use. For example, select **Basic notification**. 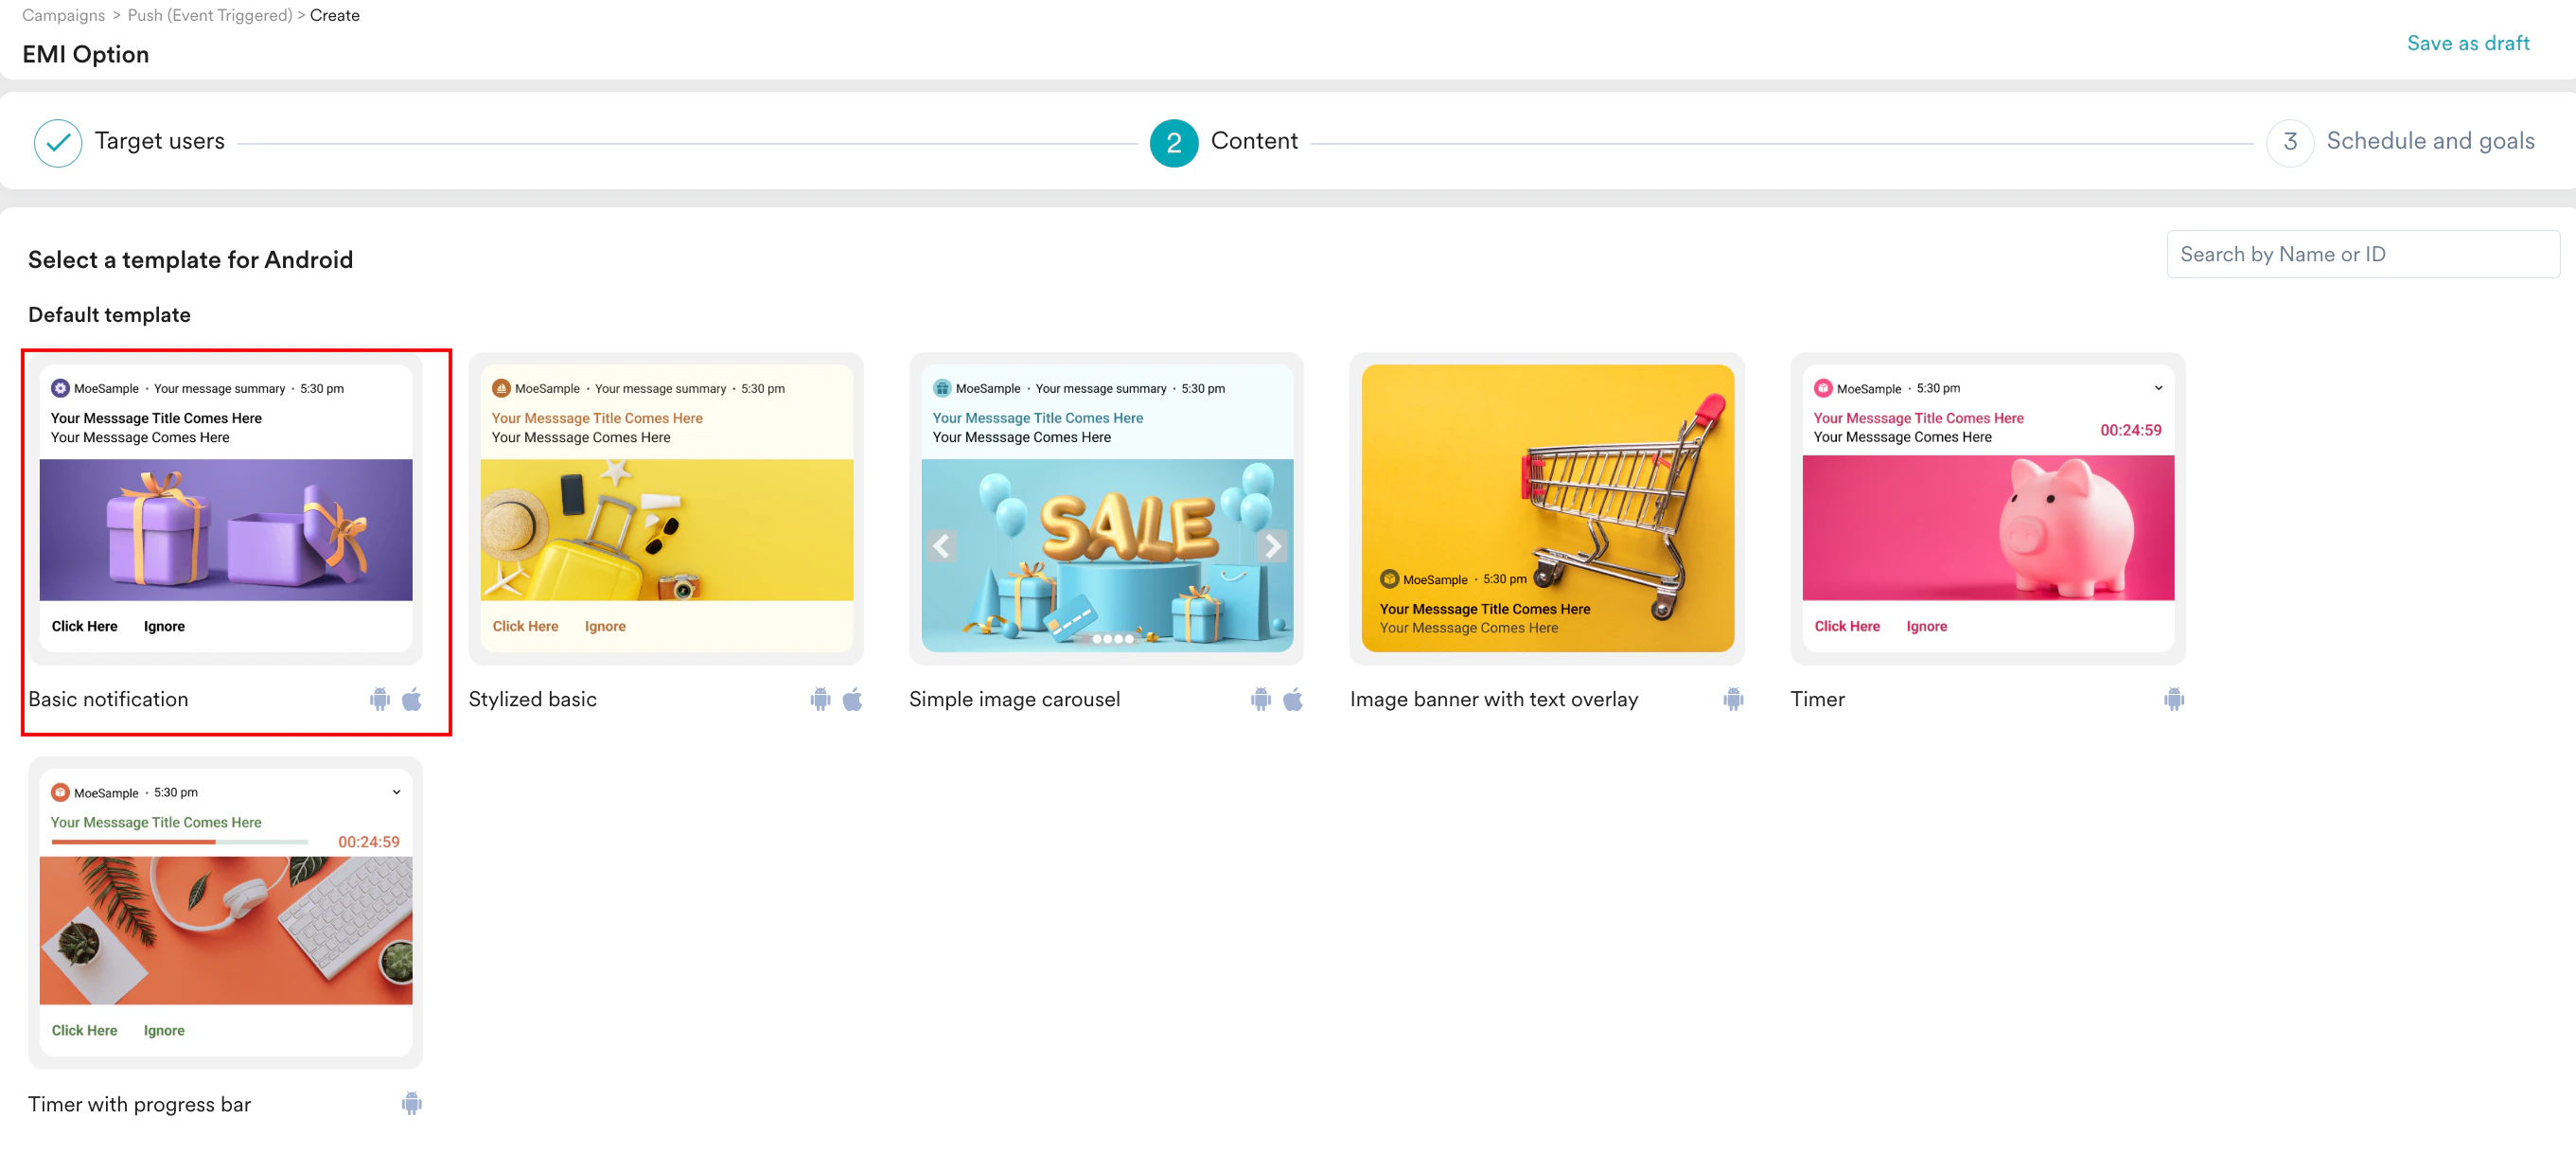 2. Enter the required content for the campaign. We can manually enter a title, message, and summary, or generate them using Merlin AI. For more information, refer to [Generate Push Messages with Merlin AI](/user-guide/ai-and-intelligence/merlin-ai/merlin-ai-copywriter/generate-push-messages-with-merlin-ai).
  \
The content for such communications would need to have the values picked from the business event’s attributes, which can be done similarly to any other personalization.
3. Add personalization to the message using information such as the user's name. Such personalization makes the message more contextual and makes the users feel connected. To do the same:
1. Type *@*.
2. On the **Push Personalization** dialog box, find relevant attributes from a user's business event or user property. For example, here we have selected *Credit Card Transaction Amount*.
\
The content for such communications would need to have the values picked from the business event’s attributes, which can be done similarly to any other personalization.
3. Add personalization to the message using information such as the user's name. Such personalization makes the message more contextual and makes the users feel connected. To do the same:
1. Type *@*.
2. On the **Push Personalization** dialog box, find relevant attributes from a user's business event or user property. For example, here we have selected *Credit Card Transaction Amount*. 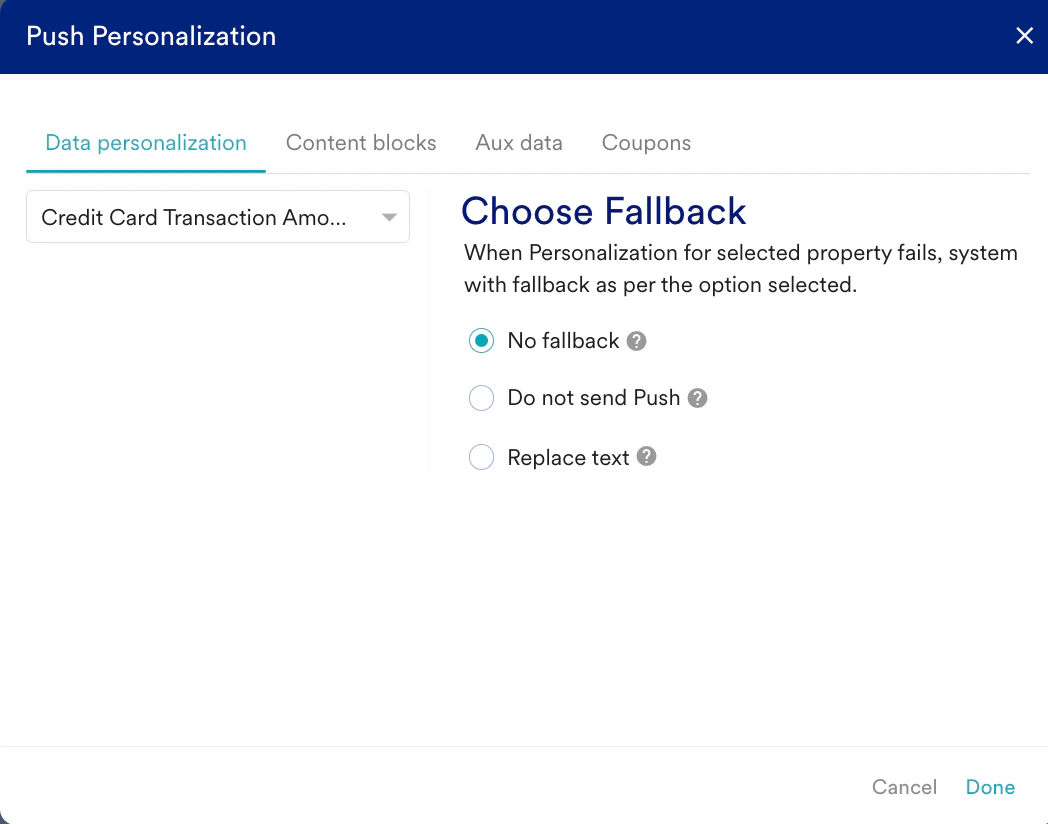 \
The following is an example of the personalized content screen:
\
The following is an example of the personalized content screen: 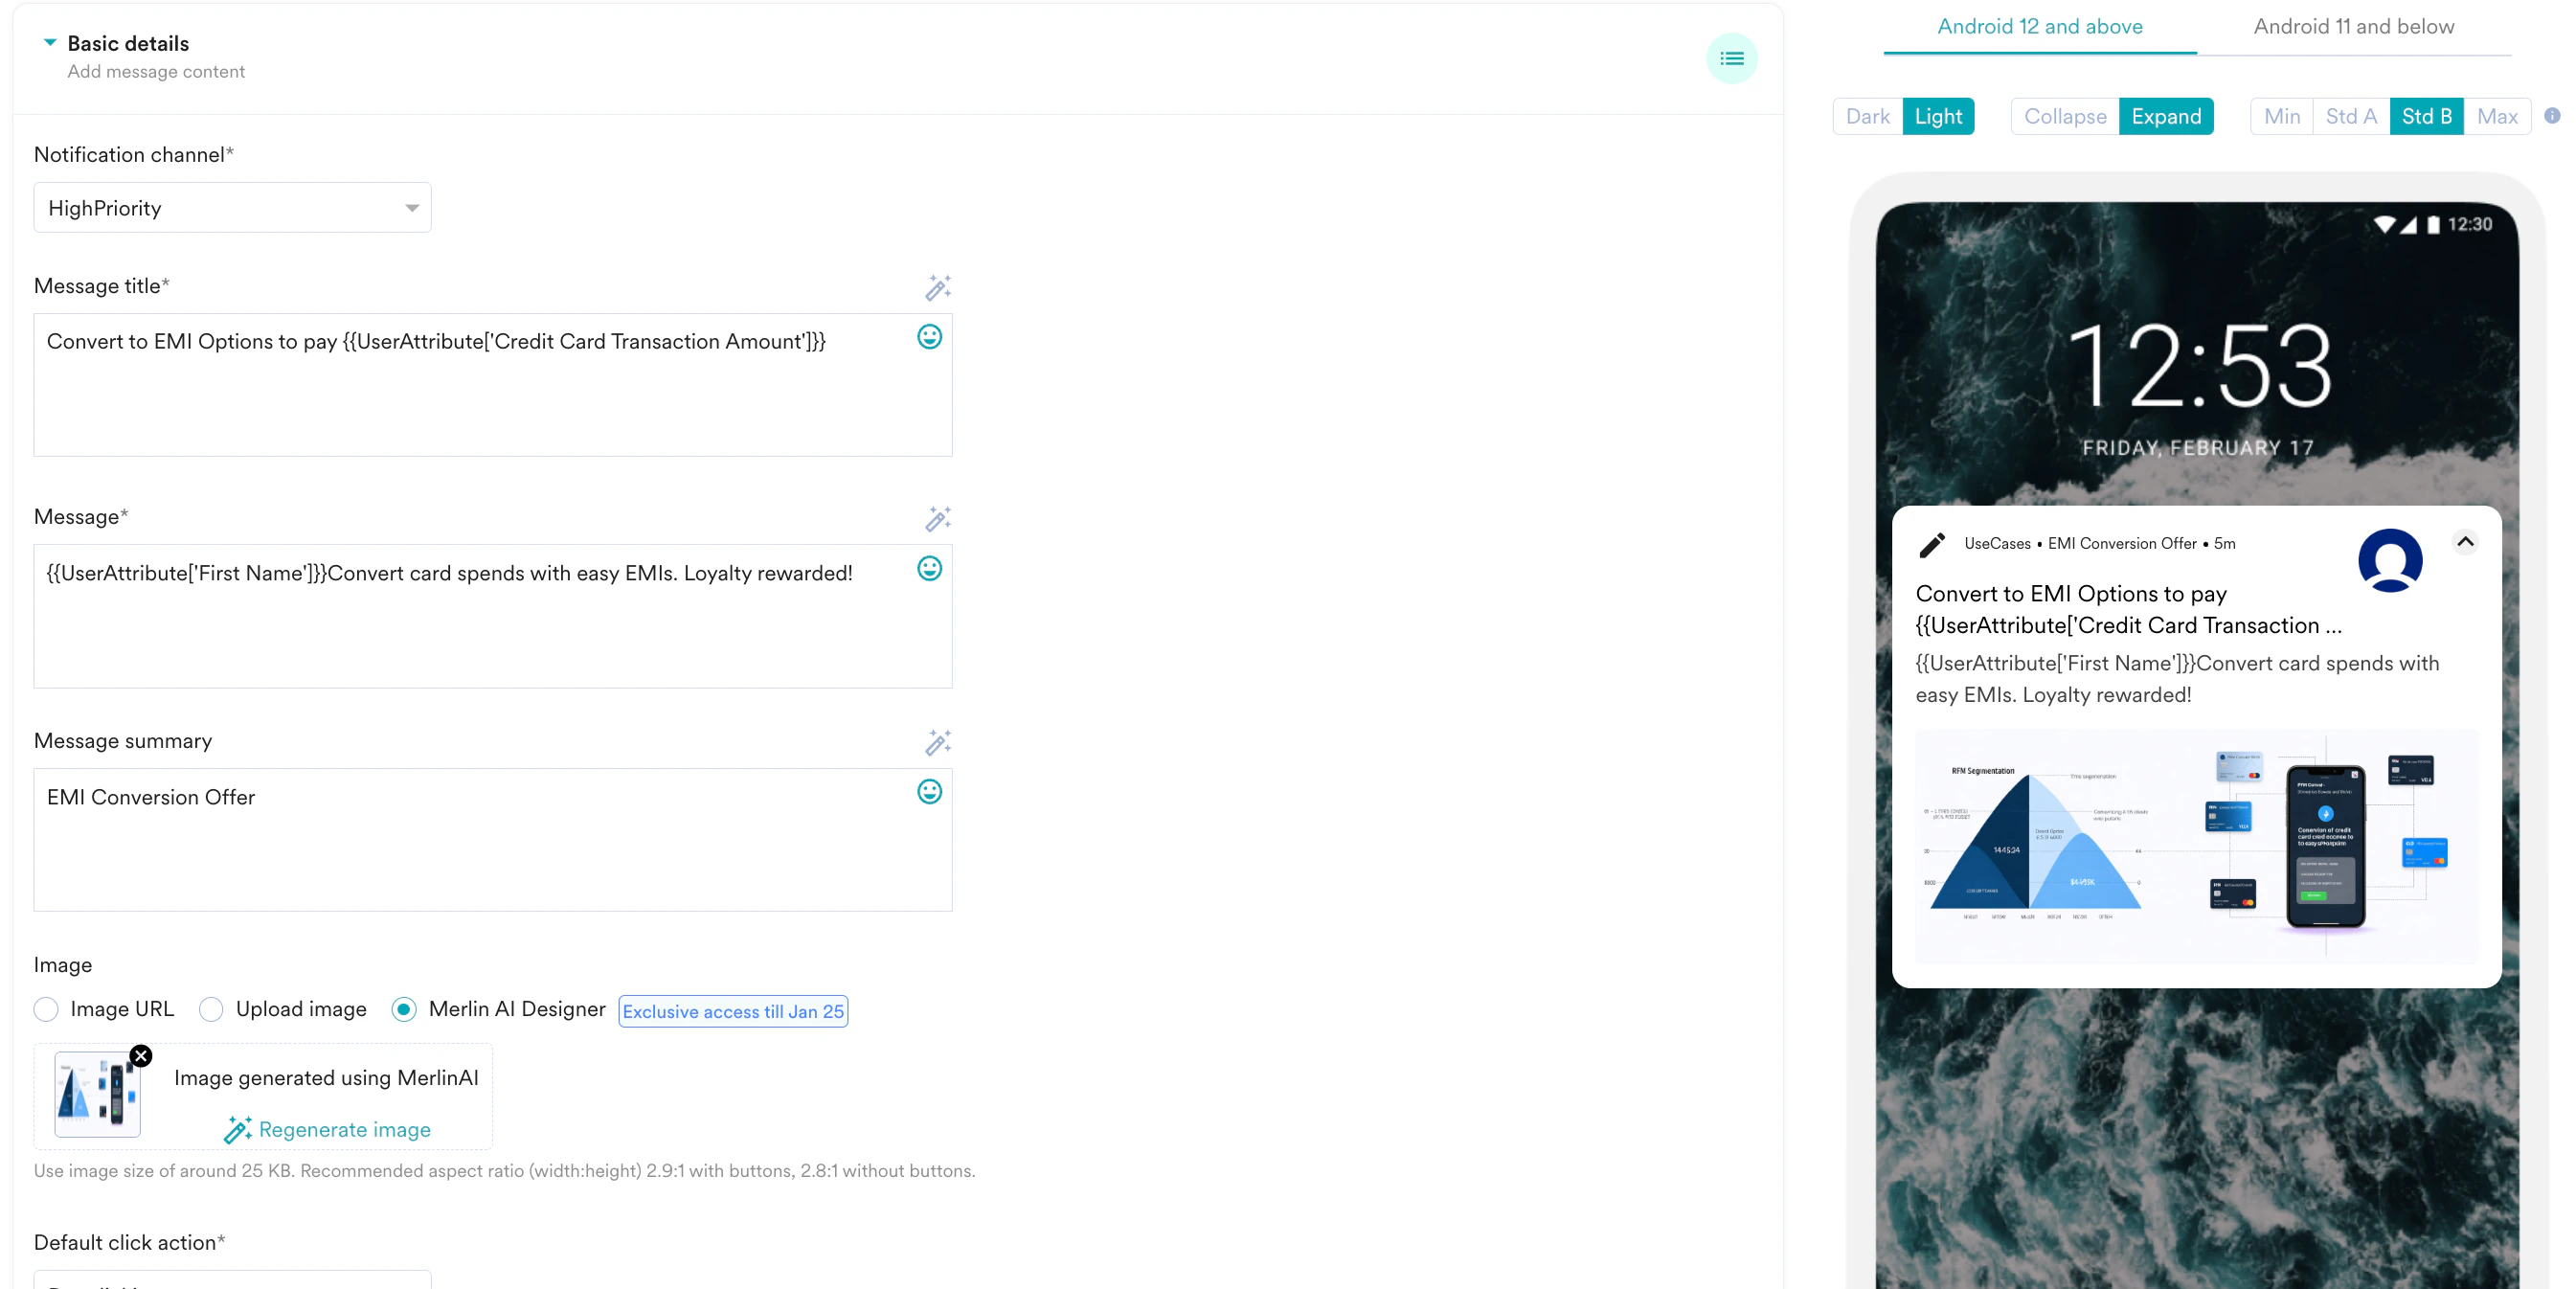 4. Use the deep link option to direct users to a page in your app or website where they can check their ticket details.
1. In the **Default click action** list, select *Deeplinking*.
2. In the **URL** field, mention the relevant URL.
5. Click **Next** to move to the third step, **Schedule and goals**, where you can define your campaign's schedule and goals.
## Step 2.3: Schedule and Goals
1. Define when to start and end this campaign and the conversion goal based on your requirements.
2. Change the deliverability settings based on your requirements. For more information, refer to [Create Push Campaigns](/user-guide/campaigns-and-channels/mobile-push/create/create-push-campaigns).
4. Use the deep link option to direct users to a page in your app or website where they can check their ticket details.
1. In the **Default click action** list, select *Deeplinking*.
2. In the **URL** field, mention the relevant URL.
5. Click **Next** to move to the third step, **Schedule and goals**, where you can define your campaign's schedule and goals.
## Step 2.3: Schedule and Goals
1. Define when to start and end this campaign and the conversion goal based on your requirements.
2. Change the deliverability settings based on your requirements. For more information, refer to [Create Push Campaigns](/user-guide/campaigns-and-channels/mobile-push/create/create-push-campaigns). 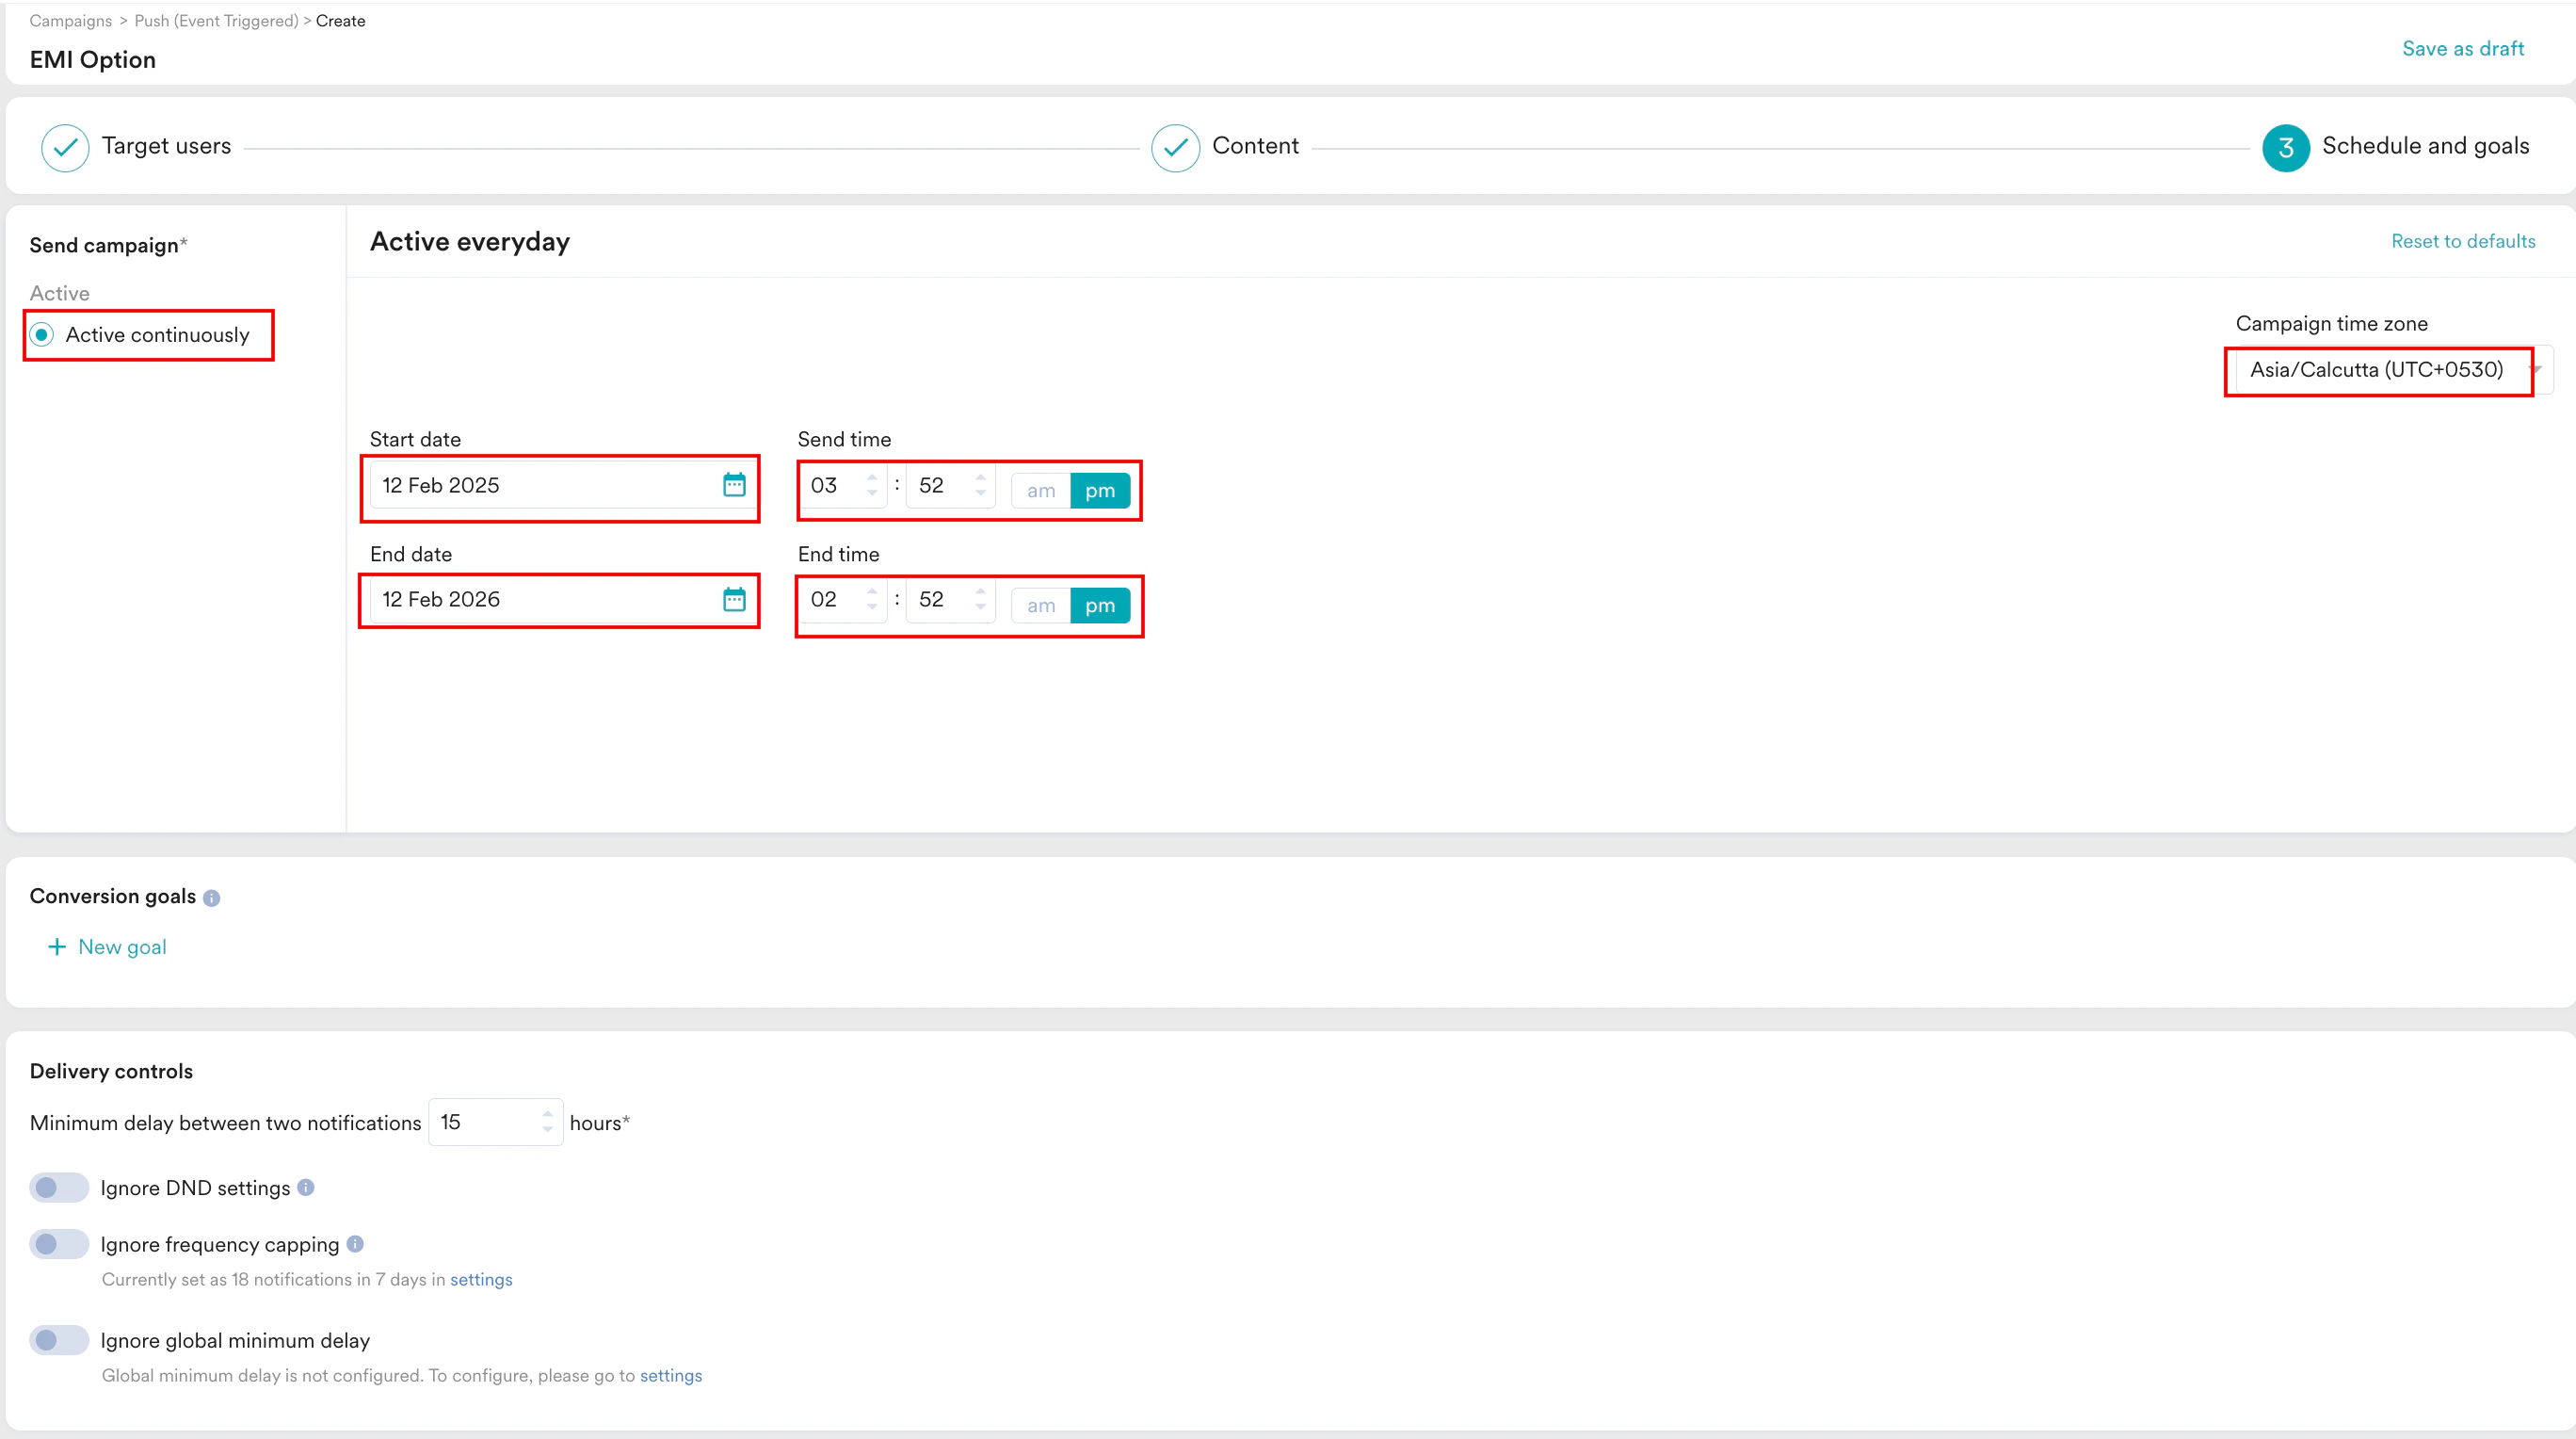 3. Click **Publish**.
# Conclusion
In this article, we used an RFM segmentation and a Push campaign to nudge users to convert their credit card spending to easy EMI options.
3. Click **Publish**.
# Conclusion
In this article, we used an RFM segmentation and a Push campaign to nudge users to convert their credit card spending to easy EMI options.