> ## Documentation Index
> Fetch the complete documentation index at: https://moengage.com/docs/llms.txt
> Use this file to discover all available pages before exploring further.
# Intercom
> Sync users, leads, and support events from Intercom to MoEngage using Workflows or Series webhooks to trigger contextual engagement campaigns.
Intercom is a user messaging platform that helps businesses build better user relationships through personalized, messenger-based experiences. It combines live chat, marketing automation, user support, and user engagement tools in one platform to help companies connect with their users at every stage of the user lifecycle.
## MoEngage × Intercom
The integration of MoEngage and Intercom empowers businesses to enhance their user engagement and support initiatives through seamless data synchronization. With this integration, you can:
* Synchronize leads, users, and associated company data from Intercom to MoEngage.
* Import support activities, like ticket state updates and conversation attributes, as behavioral events in MoEngage.
* Capture custom attributes and tags for comprehensive user profiling.
* Trigger campaigns based on support interactions and user lifecycle events.
## Use Cases
Integrating Intercom with MoEngage helps you solve the following use case:
* **Sync leads and user data**: Automatically sync newly created leads and users from Intercom to MoEngage for targeted marketing campaigns.
* **Trigger support-driven engagement**: Push lead or user data to MoEngage to trigger contextual follow-up campaigns the moment a ticket is created in Intercom.
* **Automate ticket state-based campaigns**: Send timely satisfaction surveys, upsell offers, or re-engagement messages by pushing data to MoEngage whenever a ticket's state is updated (for example, resolved, closed, escalated).
### Sync Modules
The following table outlines the default sync type for each module:
| Module | MoEngage Sync Type |
| ------------------------- | ----------------------------------- |
| Users | Users |
| Leads | Users |
| Ticket Attributes | Events |
| Companies | Users (Synced with Users and Leads) |
| Custom Tracked Attributes | Custom Event Properties |
Company Information - The Companies module is also supported. To ensure your data is always current, the associated company information is synced with your Users and Leads records, respectively.
# Integration
Before you begin, ensure you have the following requirements:
* For workflow integration methods: You must have an Intercom Advanced plan or higher.
* For Series method: The Series (paid add-on on Intercom) must be enabled.
# Method 1: Use Intercom Workflows
Workflows are ideal for syncing data in real-time based on triggers like **Conversation Created** or **Ticket Resolved**. You can choose between a simple approach for basic data sync or an advanced approach for data enrichment, as outlined below:
* Approach A: [Simple Workflows (Basic Sync)](#approach-a-simple-workflows-basic-sync)
* Approach B: [Advanced Workflows (Enhanced Sync)](#approach-b-advanced-workflows-enhanced-sync)
## Approach A: Simple Workflows (Basic Sync)
Use this for a simple, direct sync of standard data. To set up this simple Workflow, perform the following steps :
* Step 1: [Create the MoEngage Webhook Data Connector](#step-1-create-the-moengage-webhook-data-connector)
* Step 2: [Request Body Structure](#step-2-request-body-structure)
* Step 3: [Create a Workflow to Trigger the Data Connector](#step-3-create-a-workflow-to-trigger-the-data-connector)
### Step 1: Create the MoEngage Webhook Data Connector
To create the MoEngage Webhook data connector, perform the following steps:
1. In the left navigation bar of your Intercom dashboard, click the **Settings** icon  in the the lower-left navigation bar.
2. In the **Settings** menu, click**Integrations** to expand the section, and then click **Data connectors**.
3. On the **Data connectors** page, click **+ New data connector** in the upper-right corner to begin the setup process.\
in the the lower-left navigation bar.
2. In the **Settings** menu, click**Integrations** to expand the section, and then click **Data connectors**.
3. On the **Data connectors** page, click **+ New data connector** in the upper-right corner to begin the setup process.\
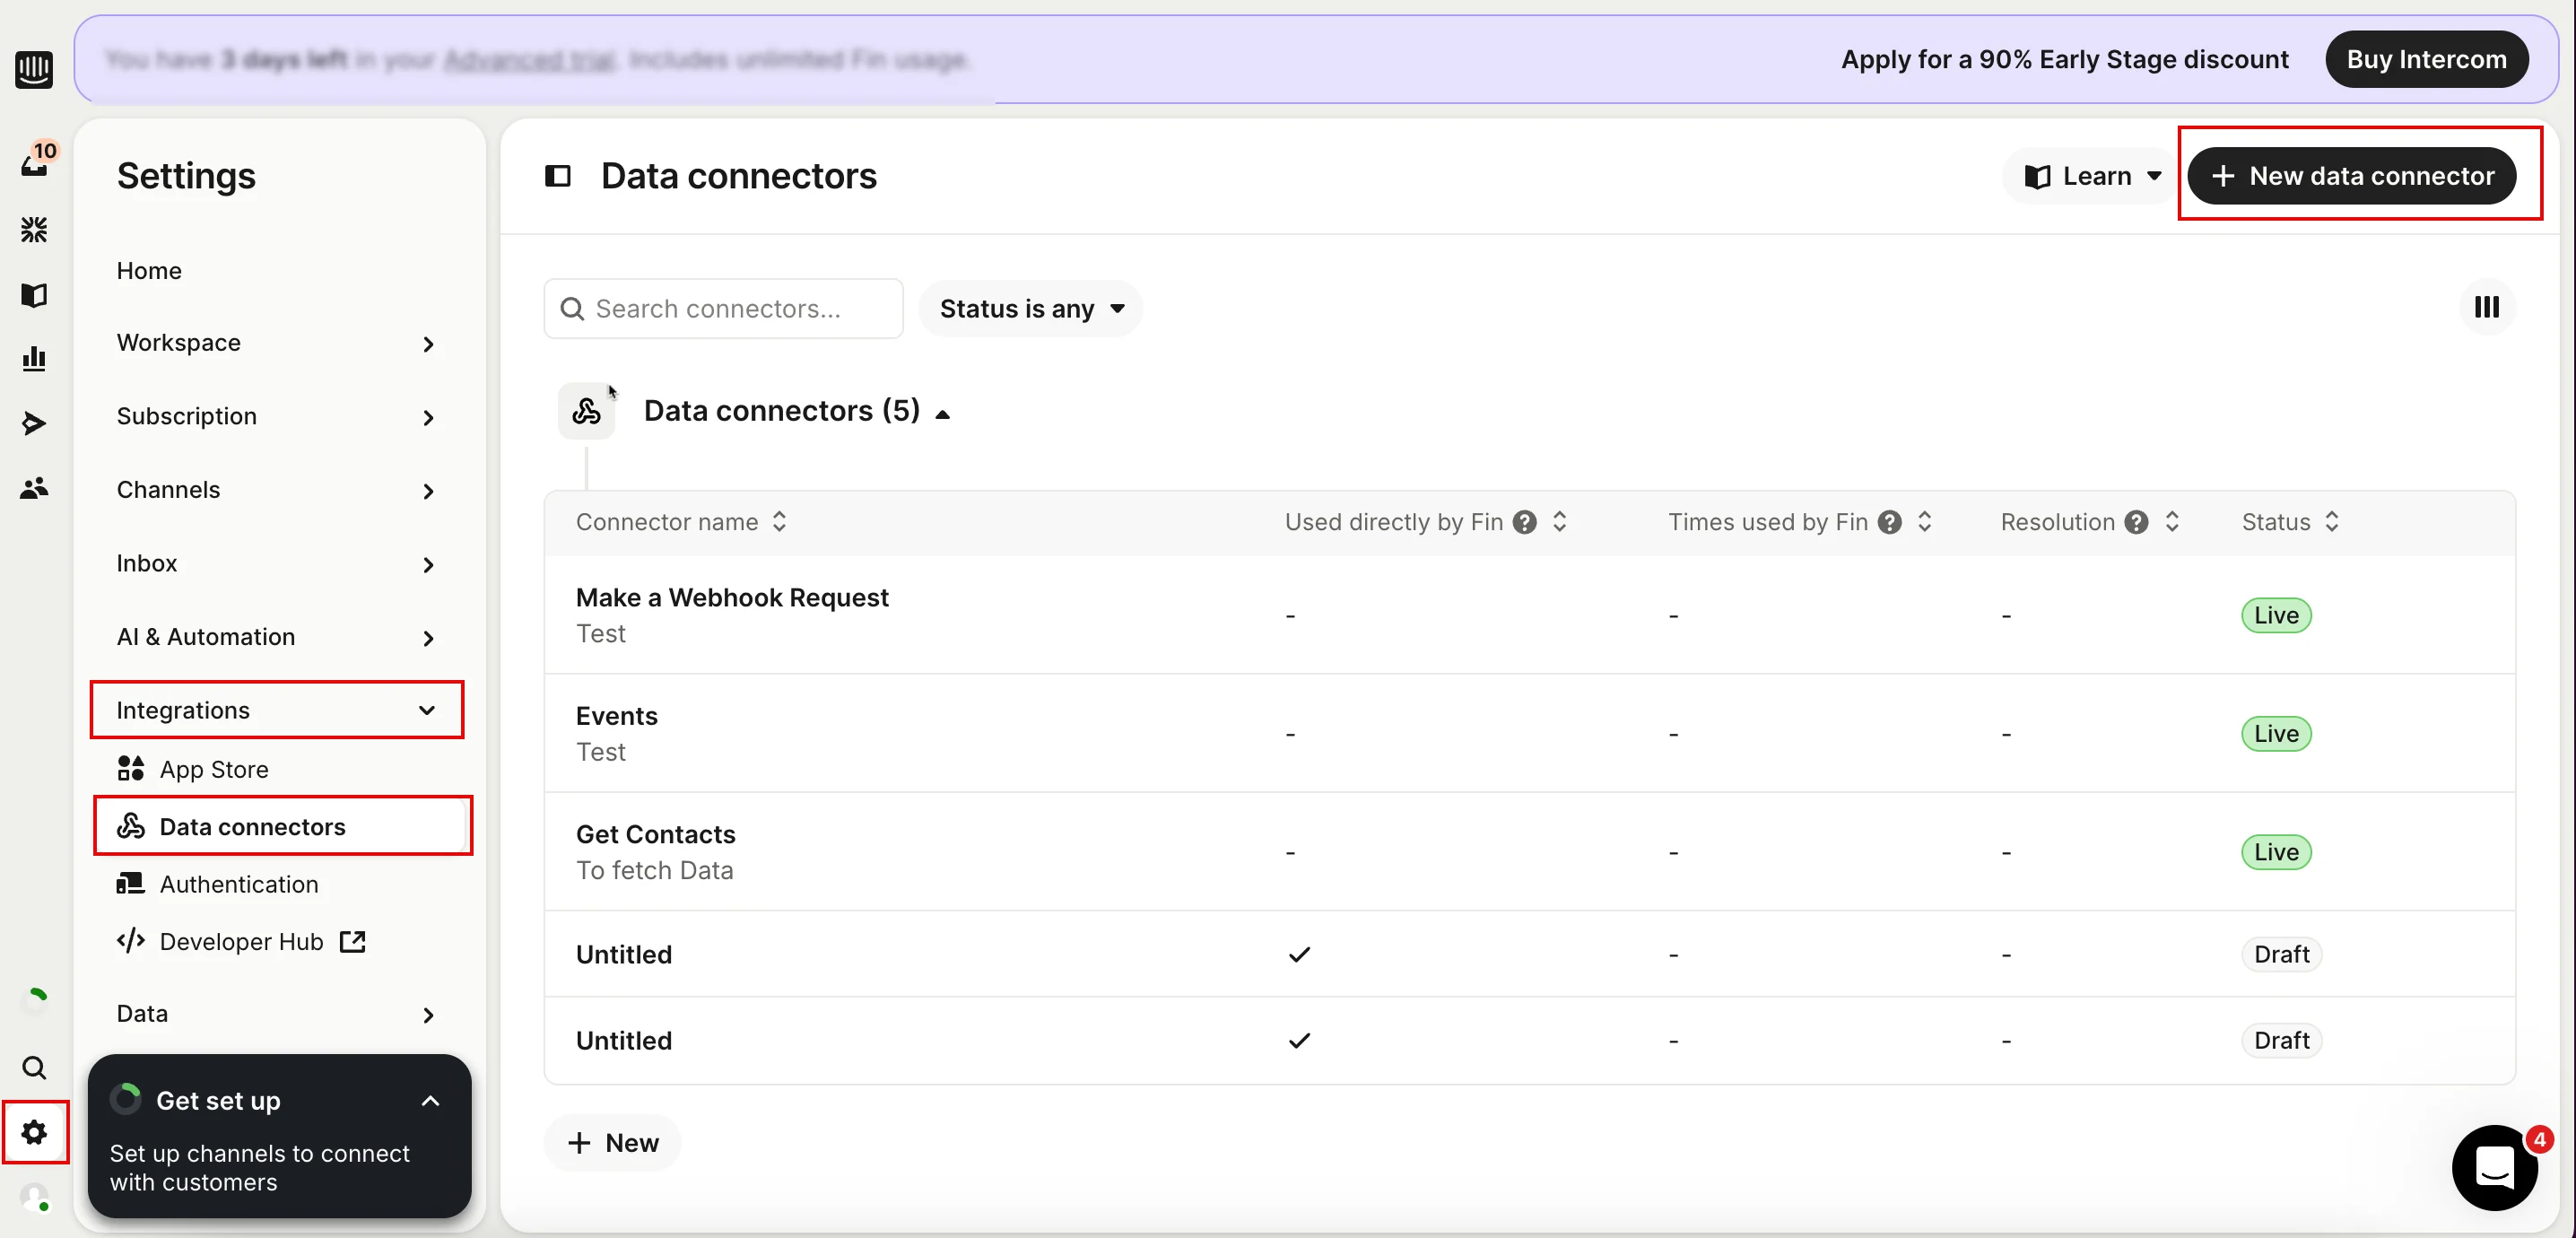 \
The **Data connectors** page appears.
4. On the **About** tab, provide the following details for your connector:
1. In the **Name** box, type the name for your connector.
2. In the **Description** box (optional), add a description to explain the connector's purpose.
3. By default, the **Enable Fin to use this connector directly** check box is selected (optional).
5. Click **Next step** to proceed.
\
The **Data connectors** page appears.
4. On the **About** tab, provide the following details for your connector:
1. In the **Name** box, type the name for your connector.
2. In the **Description** box (optional), add a description to explain the connector's purpose.
3. By default, the **Enable Fin to use this connector directly** check box is selected (optional).
5. Click **Next step** to proceed. 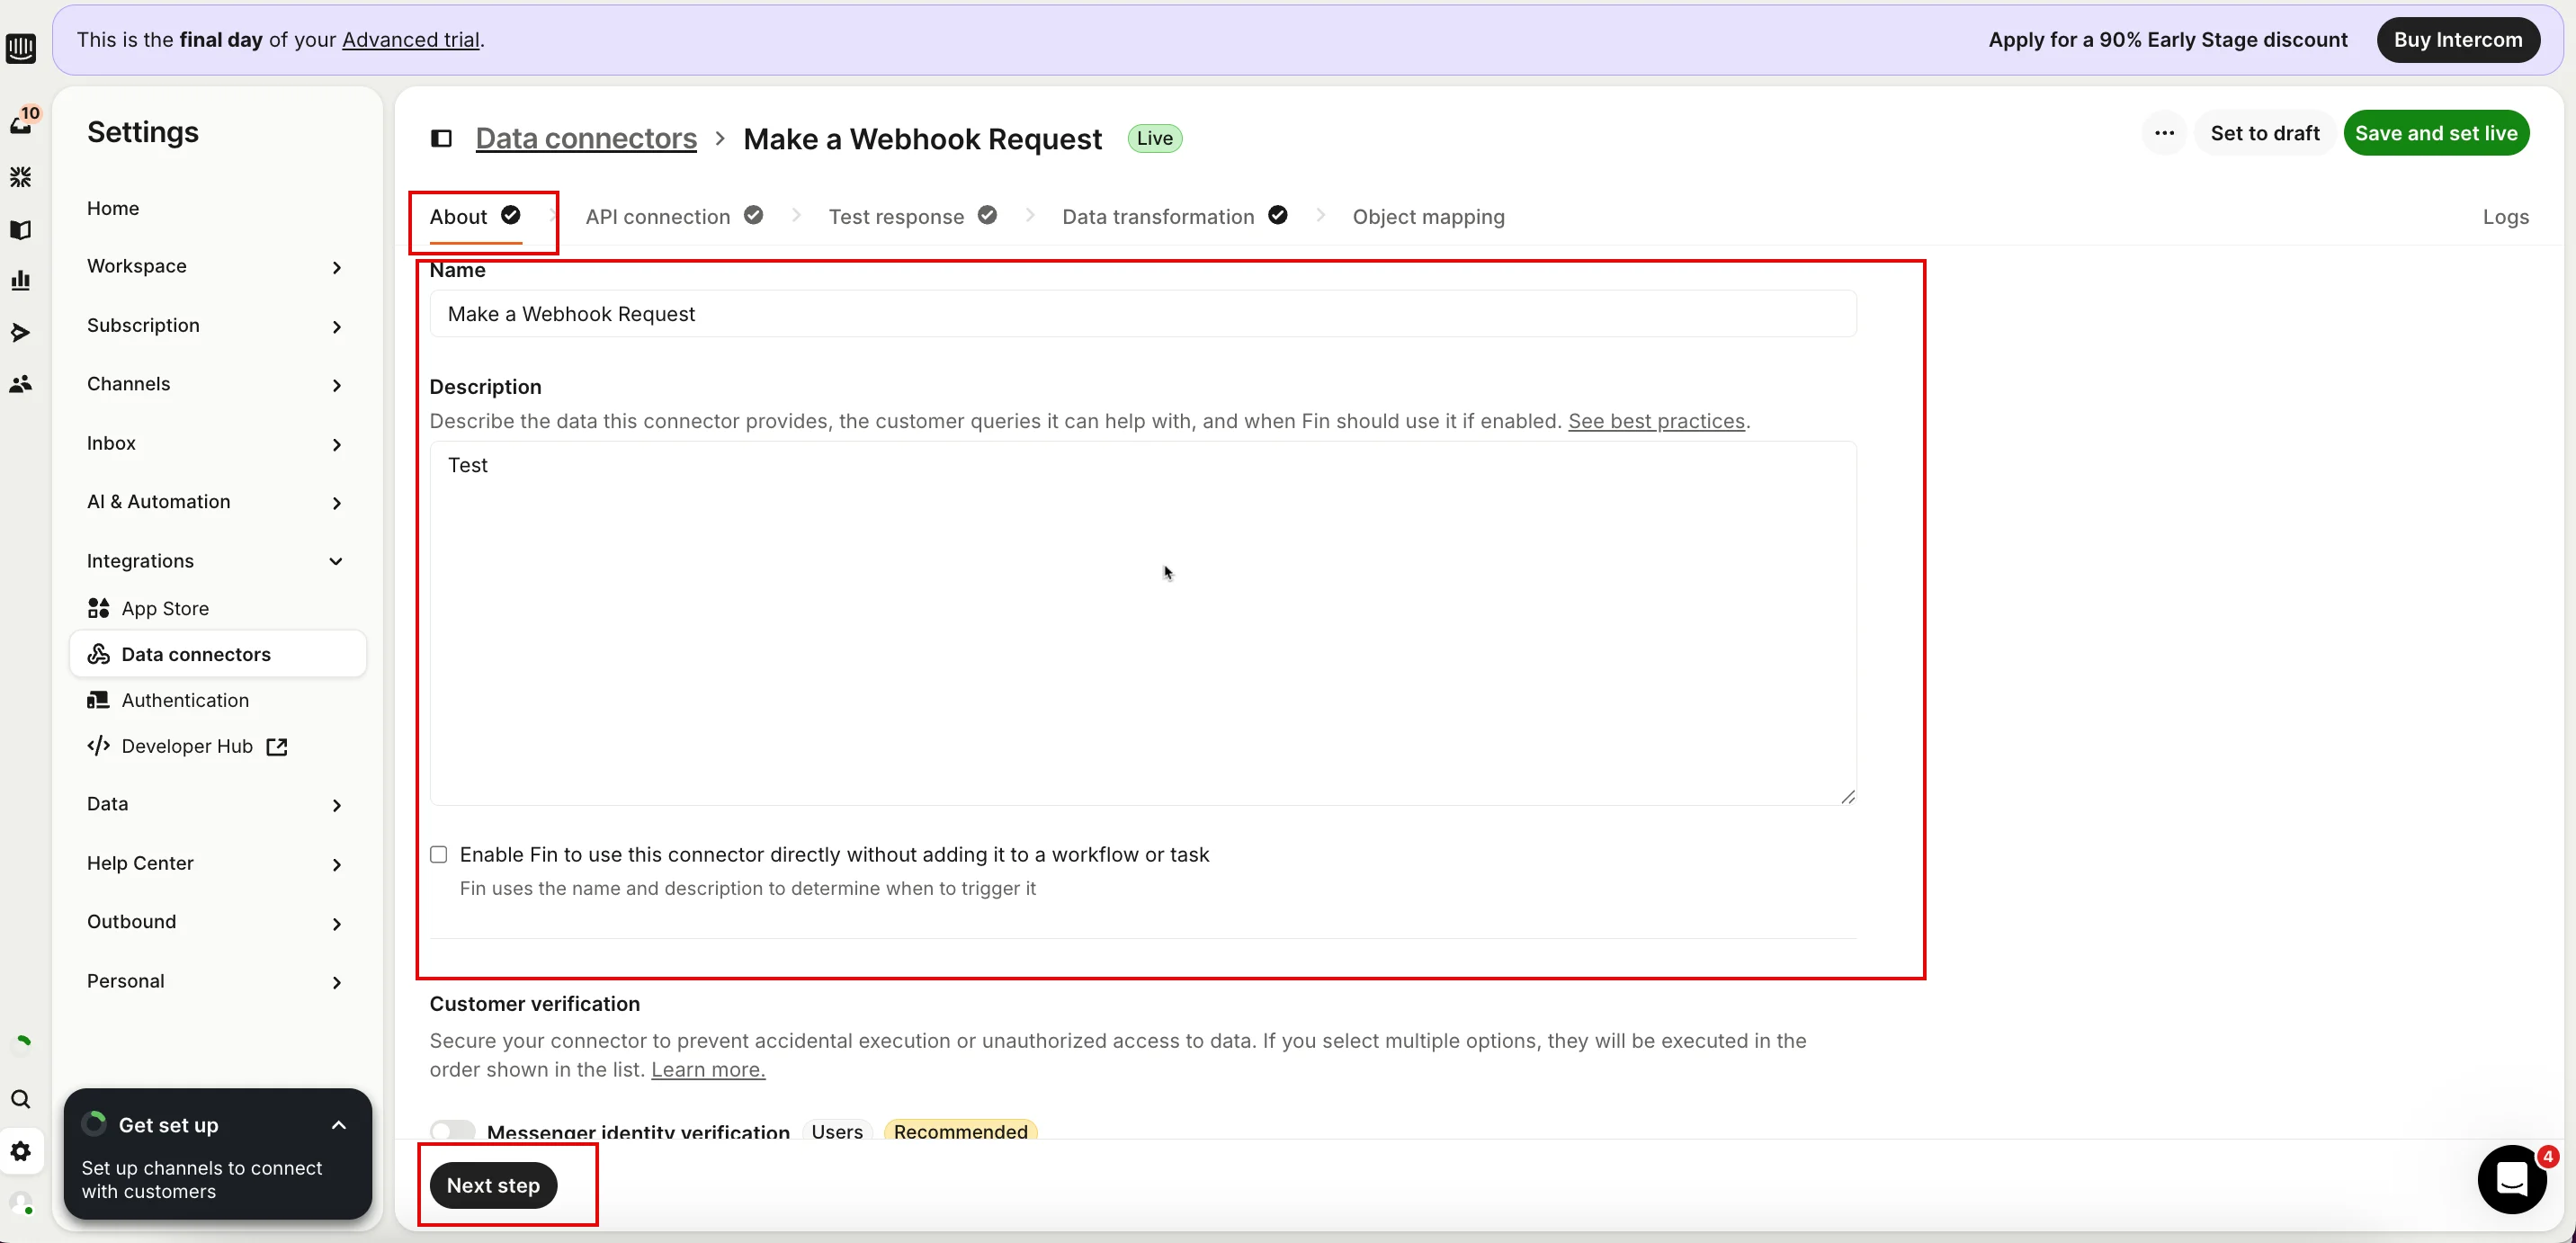 6. On the **API connection** tab, provide the following details:
| Intercom Section | Description |
| ------------------ | ------------------------------------------------------------------------------------------------------------------------------------------------------------------------------------------------------------------------------------------------------------------------------------------------------------------------------------------------------------------------------------------------------------------------------------------------------------------------------------------------------------------------------------------------------------------------------------------------------------------------------------------------------------------------------------------------------------------------------------------------------------------------------------------------------------------------------------------------------------------------------------- |
| **Method** | **POST** |
| **URL** | Enter the dedicated URL provided by MoEngage in the following format: `https://api-0X.moengage.com/v1/partner/intercom/{events/user}/?configName={config_name}` |
| **Custom Headers** | Content-Type: application/json
6. On the **API connection** tab, provide the following details:
| Intercom Section | Description |
| ------------------ | ------------------------------------------------------------------------------------------------------------------------------------------------------------------------------------------------------------------------------------------------------------------------------------------------------------------------------------------------------------------------------------------------------------------------------------------------------------------------------------------------------------------------------------------------------------------------------------------------------------------------------------------------------------------------------------------------------------------------------------------------------------------------------------------------------------------------------------------------------------------------------------- |
| **Method** | **POST** |
| **URL** | Enter the dedicated URL provided by MoEngage in the following format: `https://api-0X.moengage.com/v1/partner/intercom/{events/user}/?configName={config_name}` |
| **Custom Headers** | Content-Type: application/json
Authorization: Generate a Basic Authentication Token using an online [Basic Auth Header Generator tool](https://www.debugbear.com/basic-auth-header-generator). You must enter your **Workspace ID** as username and **Data API Key** as password. To find your credentials, perform the following steps: - On the MoEngage UI, navigate to **Settings** > **Account** > **APIs**.
- Copy the ID under **Workspace ID** (**earlier app id**).
- Copy the **Data** under **API keys**.
Your Basic Authentication Token is a combination of **Workspace ID** and **Data**. For example, paste the following value as your Basic Authentication Token:`Basic Qk5CR1NNNUR4eHh4eHhWQ1hSRFJEWTdSOlFsWHVoTHVaeHh4eHh4QWQrQnBYUEotNw==`
**Note**: Ensure the token is copied completely without extra space.
|
7. Click **Next step** to proceed to the **Test response** tab to test the connection by providing sample values for your payload. 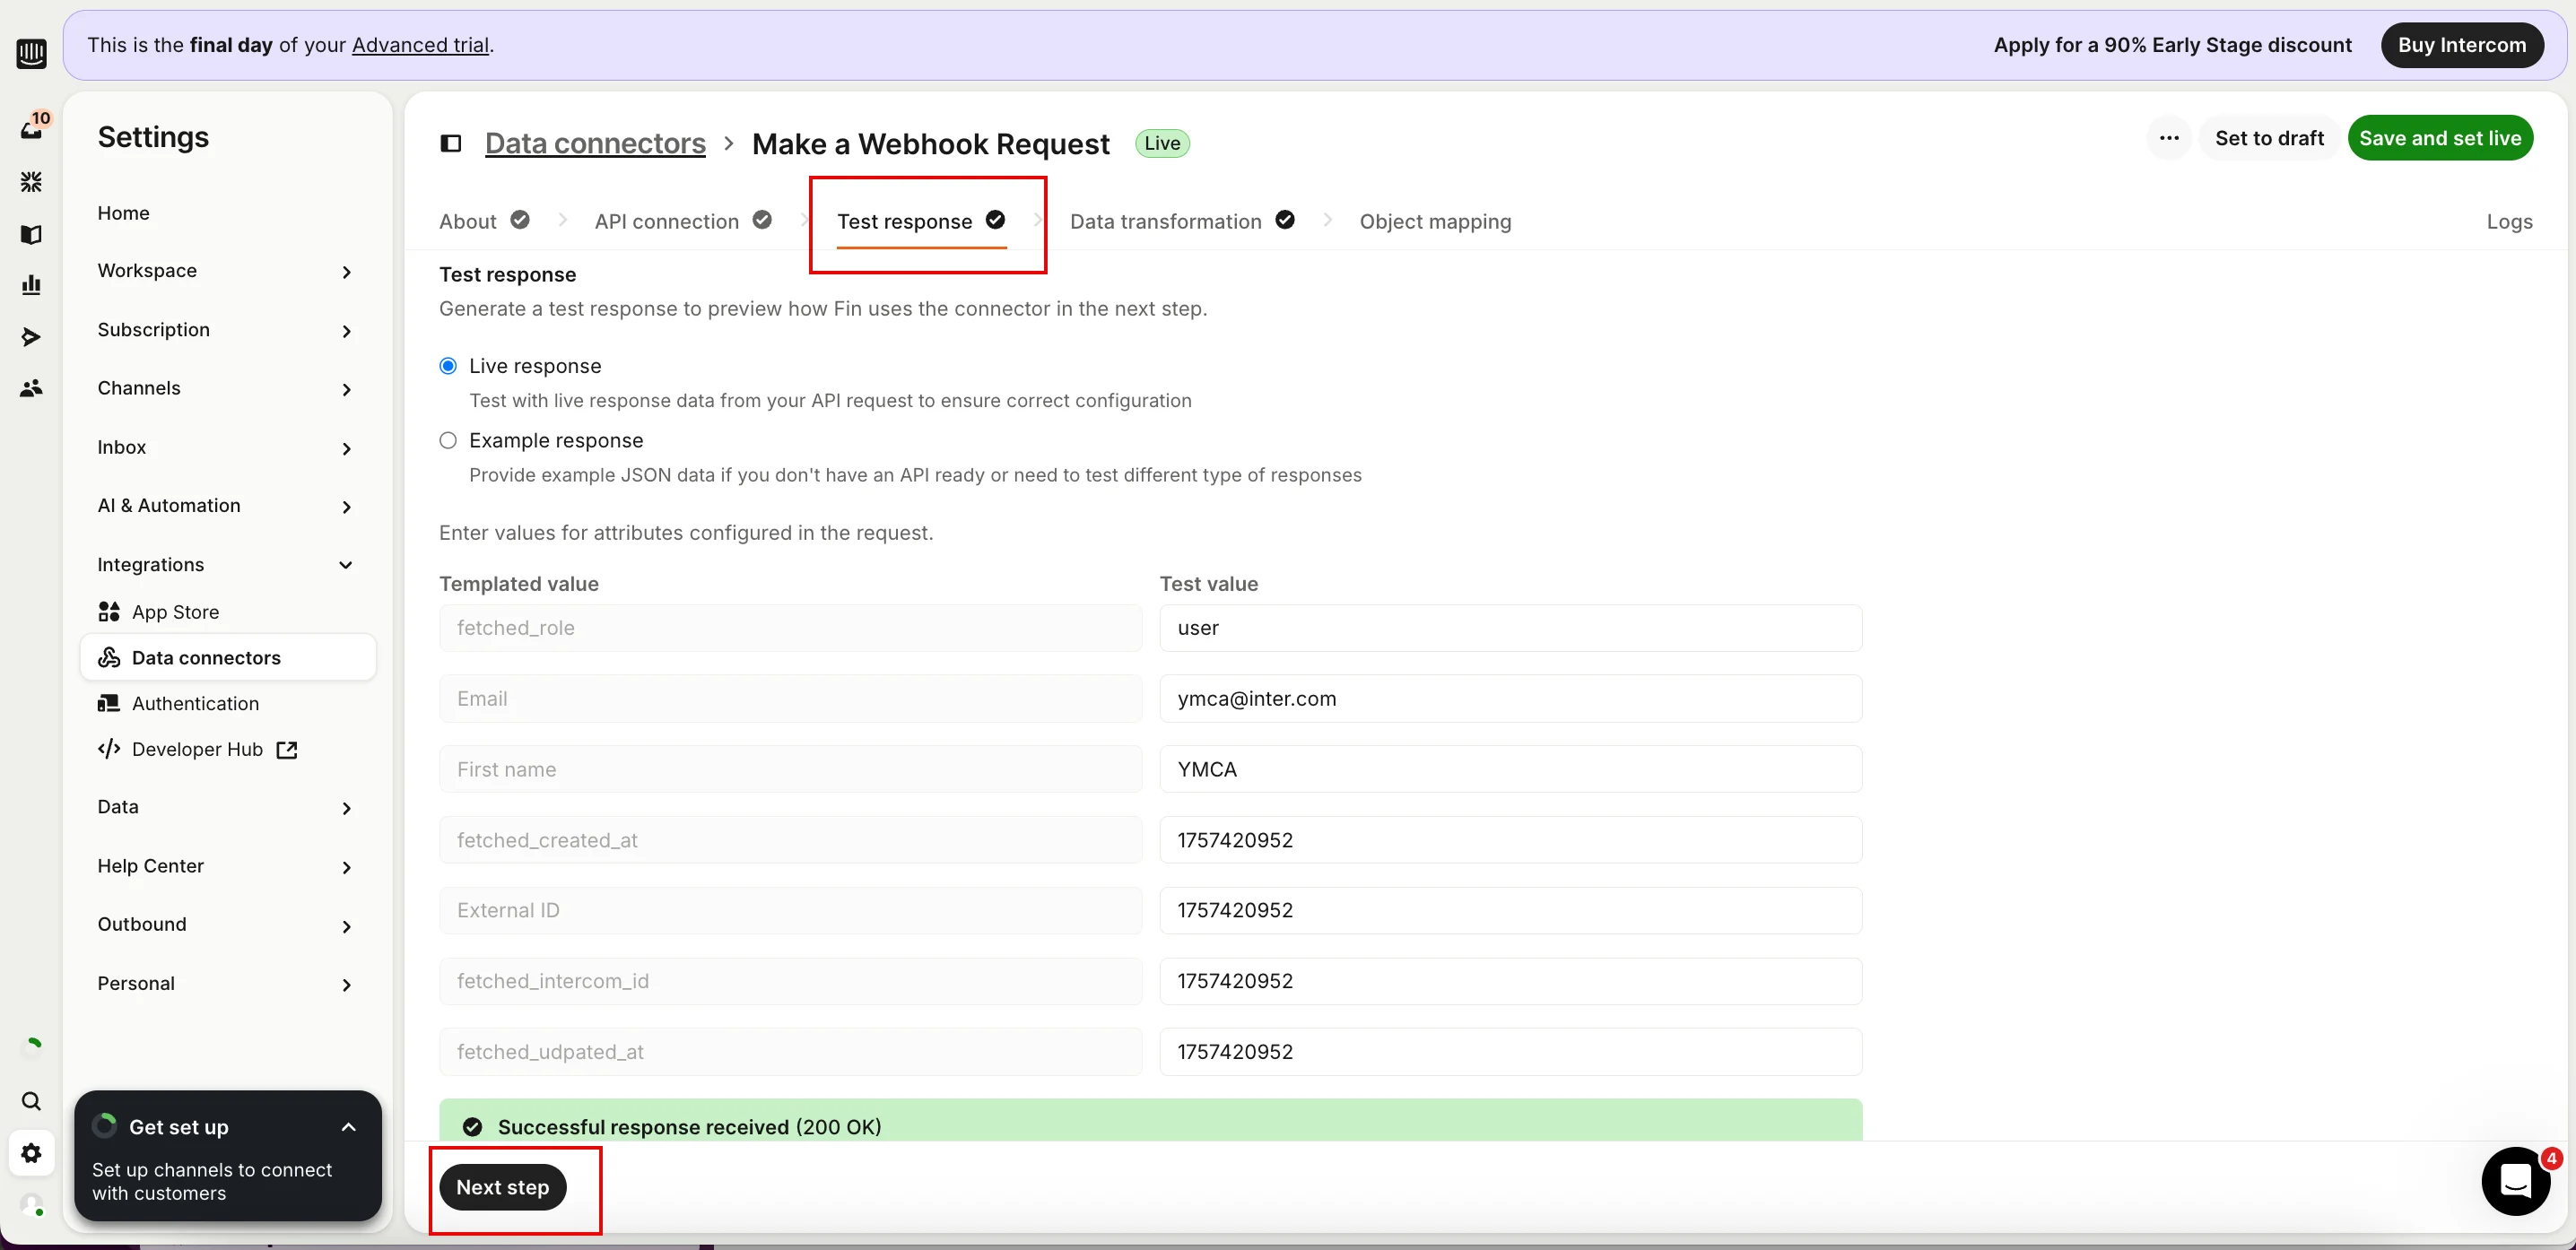 **Note**: Ensure Intercom is successfully connected to MoEngage before you use the connector in a live workflow.
### Step 2: Request Body Structure
Intercom Series relies on built-in attribute inserters. To prevent integration errors, it is recommended to share your specific setup and requirements with your MoEngage customer success manager (CSM).
To configure the request body section, you must use Intercom's attribute inserter to map the following values dynamically and you can add your desired key-values as needed.
| Key | Description |
| ------------- | ------------------------------------------------------------------------------------------------------------------------- |
| `type` | This identifies the type of record being sent, for example, user. |
| `u_fn` | This is the user's first name. |
| `u_ln` | This is the user's last name. |
| `u_mb` | This is the user's mobile number. |
| `customer_id` | This is the unique identifier for the user. |
| `intercom_id` | This is the user's unique ID from Intercom. |
| `createdate` | The timestamp for when the user record was originally created. This value does not change. |
| `modified_at` | The timestamp for when the user record was last modified or updated. This value changes every time the record is updated. |
### Step 3: Create a Workflow to Trigger the Data Connector
To create a workflow to trigger the data connection, perform the following steps:
1. In the left navigation bar of your Intercom dashboard, click **Fin AI Agent**.
2. On the **Fin AI Agent** menu, click **Workflows**.
3. On the **Workflows** page, click **+ New workflow** in the upper-right corner.
4. In the **+ New workflow** list, click **Create from scratch**.
**Note**: Ensure Intercom is successfully connected to MoEngage before you use the connector in a live workflow.
### Step 2: Request Body Structure
Intercom Series relies on built-in attribute inserters. To prevent integration errors, it is recommended to share your specific setup and requirements with your MoEngage customer success manager (CSM).
To configure the request body section, you must use Intercom's attribute inserter to map the following values dynamically and you can add your desired key-values as needed.
| Key | Description |
| ------------- | ------------------------------------------------------------------------------------------------------------------------- |
| `type` | This identifies the type of record being sent, for example, user. |
| `u_fn` | This is the user's first name. |
| `u_ln` | This is the user's last name. |
| `u_mb` | This is the user's mobile number. |
| `customer_id` | This is the unique identifier for the user. |
| `intercom_id` | This is the user's unique ID from Intercom. |
| `createdate` | The timestamp for when the user record was originally created. This value does not change. |
| `modified_at` | The timestamp for when the user record was last modified or updated. This value changes every time the record is updated. |
### Step 3: Create a Workflow to Trigger the Data Connector
To create a workflow to trigger the data connection, perform the following steps:
1. In the left navigation bar of your Intercom dashboard, click **Fin AI Agent**.
2. On the **Fin AI Agent** menu, click **Workflows**.
3. On the **Workflows** page, click **+ New workflow** in the upper-right corner.
4. In the **+ New workflow** list, click **Create from scratch**.  The **Create from scratch using the following triggers** dialog box appears.
5. Now, select your desired workflow trigger (for example, click **Ticket-only** category on the left, and then click **When a ticket is created trigger**).
The **Create from scratch using the following triggers** dialog box appears.
5. Now, select your desired workflow trigger (for example, click **Ticket-only** category on the left, and then click **When a ticket is created trigger**).  Now, you must configure the trigger.
6. In the **When a ticket is created** panel on the workflow canvas, set the following:
* **Channels**: Specify which channels the trigger will apply to (for example, Web, iOS and so on).
* **Filters**: Select the workflow to run for **Users** , **Leads** , or both.
7. Click **+ Add step** to add the data connector action.
8. From the **Choose what's next** menu, search or select **Data connector**.
Now, you must configure the trigger.
6. In the **When a ticket is created** panel on the workflow canvas, set the following:
* **Channels**: Specify which channels the trigger will apply to (for example, Web, iOS and so on).
* **Filters**: Select the workflow to run for **Users** , **Leads** , or both.
7. Click **+ Add step** to add the data connector action.
8. From the **Choose what's next** menu, search or select **Data connector**.  9. Select the specific connector you created earlier.
  10. Click **Set live** in the upper-right corner to save and enable your workflow.
**Information**
* You can only use simple attributes available in the attribute inserter (for example, a user's name, email, or subscription plan).
* The workflow sends the data without providing any options for transformation.
## Approach B: Advanced Workflows (Enhanced Sync)
Use this when you want to enrich or transform data before sending it to MoEngage. To set up this advanced workflow, perform the following steps:
* Step 1: [Create Custom Conversation Objects](#step-1-create-custom-conversation-objects)
* Step 2: [Get Your Intercom API Token](#step-2-get-your-intercom-api-token)
* Step 3: [Create the Intercom API Data Enrichment Connector](#step-3-create-the-intercom-api-data-enrichment-connector)
* Step 4: [Create the MoEngage Webhook Data Connector](#step-4-create-the-moengage-webhook-data-connector)
* Step 5: [Request Body Structure](#step-5-request-body-structure)
* Step 6: [Create a Workflow to Trigger the Data Connector](#step-6-create-a-workflow-to-trigger-the-data-connector)
### Step 1: Create Custom Conversation Objects
To create custom conversation objects, perform the following steps:
1. In the left navigation bar of your Intercom dashboard, click the **Settings** icon in the lower-left navigation bar.
2. On the **Settings** menu, click **Data** to expand the section, and then click **Conversations**.
3. On the **Conversations** page, click **+ Create attribute** in the upper-right corner to begin the setup process.
10. Click **Set live** in the upper-right corner to save and enable your workflow.
**Information**
* You can only use simple attributes available in the attribute inserter (for example, a user's name, email, or subscription plan).
* The workflow sends the data without providing any options for transformation.
## Approach B: Advanced Workflows (Enhanced Sync)
Use this when you want to enrich or transform data before sending it to MoEngage. To set up this advanced workflow, perform the following steps:
* Step 1: [Create Custom Conversation Objects](#step-1-create-custom-conversation-objects)
* Step 2: [Get Your Intercom API Token](#step-2-get-your-intercom-api-token)
* Step 3: [Create the Intercom API Data Enrichment Connector](#step-3-create-the-intercom-api-data-enrichment-connector)
* Step 4: [Create the MoEngage Webhook Data Connector](#step-4-create-the-moengage-webhook-data-connector)
* Step 5: [Request Body Structure](#step-5-request-body-structure)
* Step 6: [Create a Workflow to Trigger the Data Connector](#step-6-create-a-workflow-to-trigger-the-data-connector)
### Step 1: Create Custom Conversation Objects
To create custom conversation objects, perform the following steps:
1. In the left navigation bar of your Intercom dashboard, click the **Settings** icon in the lower-left navigation bar.
2. On the **Settings** menu, click **Data** to expand the section, and then click **Conversations**.
3. On the **Conversations** page, click **+ Create attribute** in the upper-right corner to begin the setup process.  The **Create a new attribute** dialog box appears.
4. On the **General** tab, provide the following details:
1. In the **Format** list, select the data type for your attribute (for example, **Text** , **Number** and so on).
2. In the **Name** box, type the name for the attribute (for example, session\_count).
3. In the **Description** box (optional), add a description to explain what the attribute is for (for example, User session count).
4. Configure the optional visibility and requirement settings as needed.
5. Click **Save**.
The **Create a new attribute** dialog box appears.
4. On the **General** tab, provide the following details:
1. In the **Format** list, select the data type for your attribute (for example, **Text** , **Number** and so on).
2. In the **Name** box, type the name for the attribute (for example, session\_count).
3. In the **Description** box (optional), add a description to explain what the attribute is for (for example, User session count).
4. Configure the optional visibility and requirement settings as needed.
5. Click **Save**. 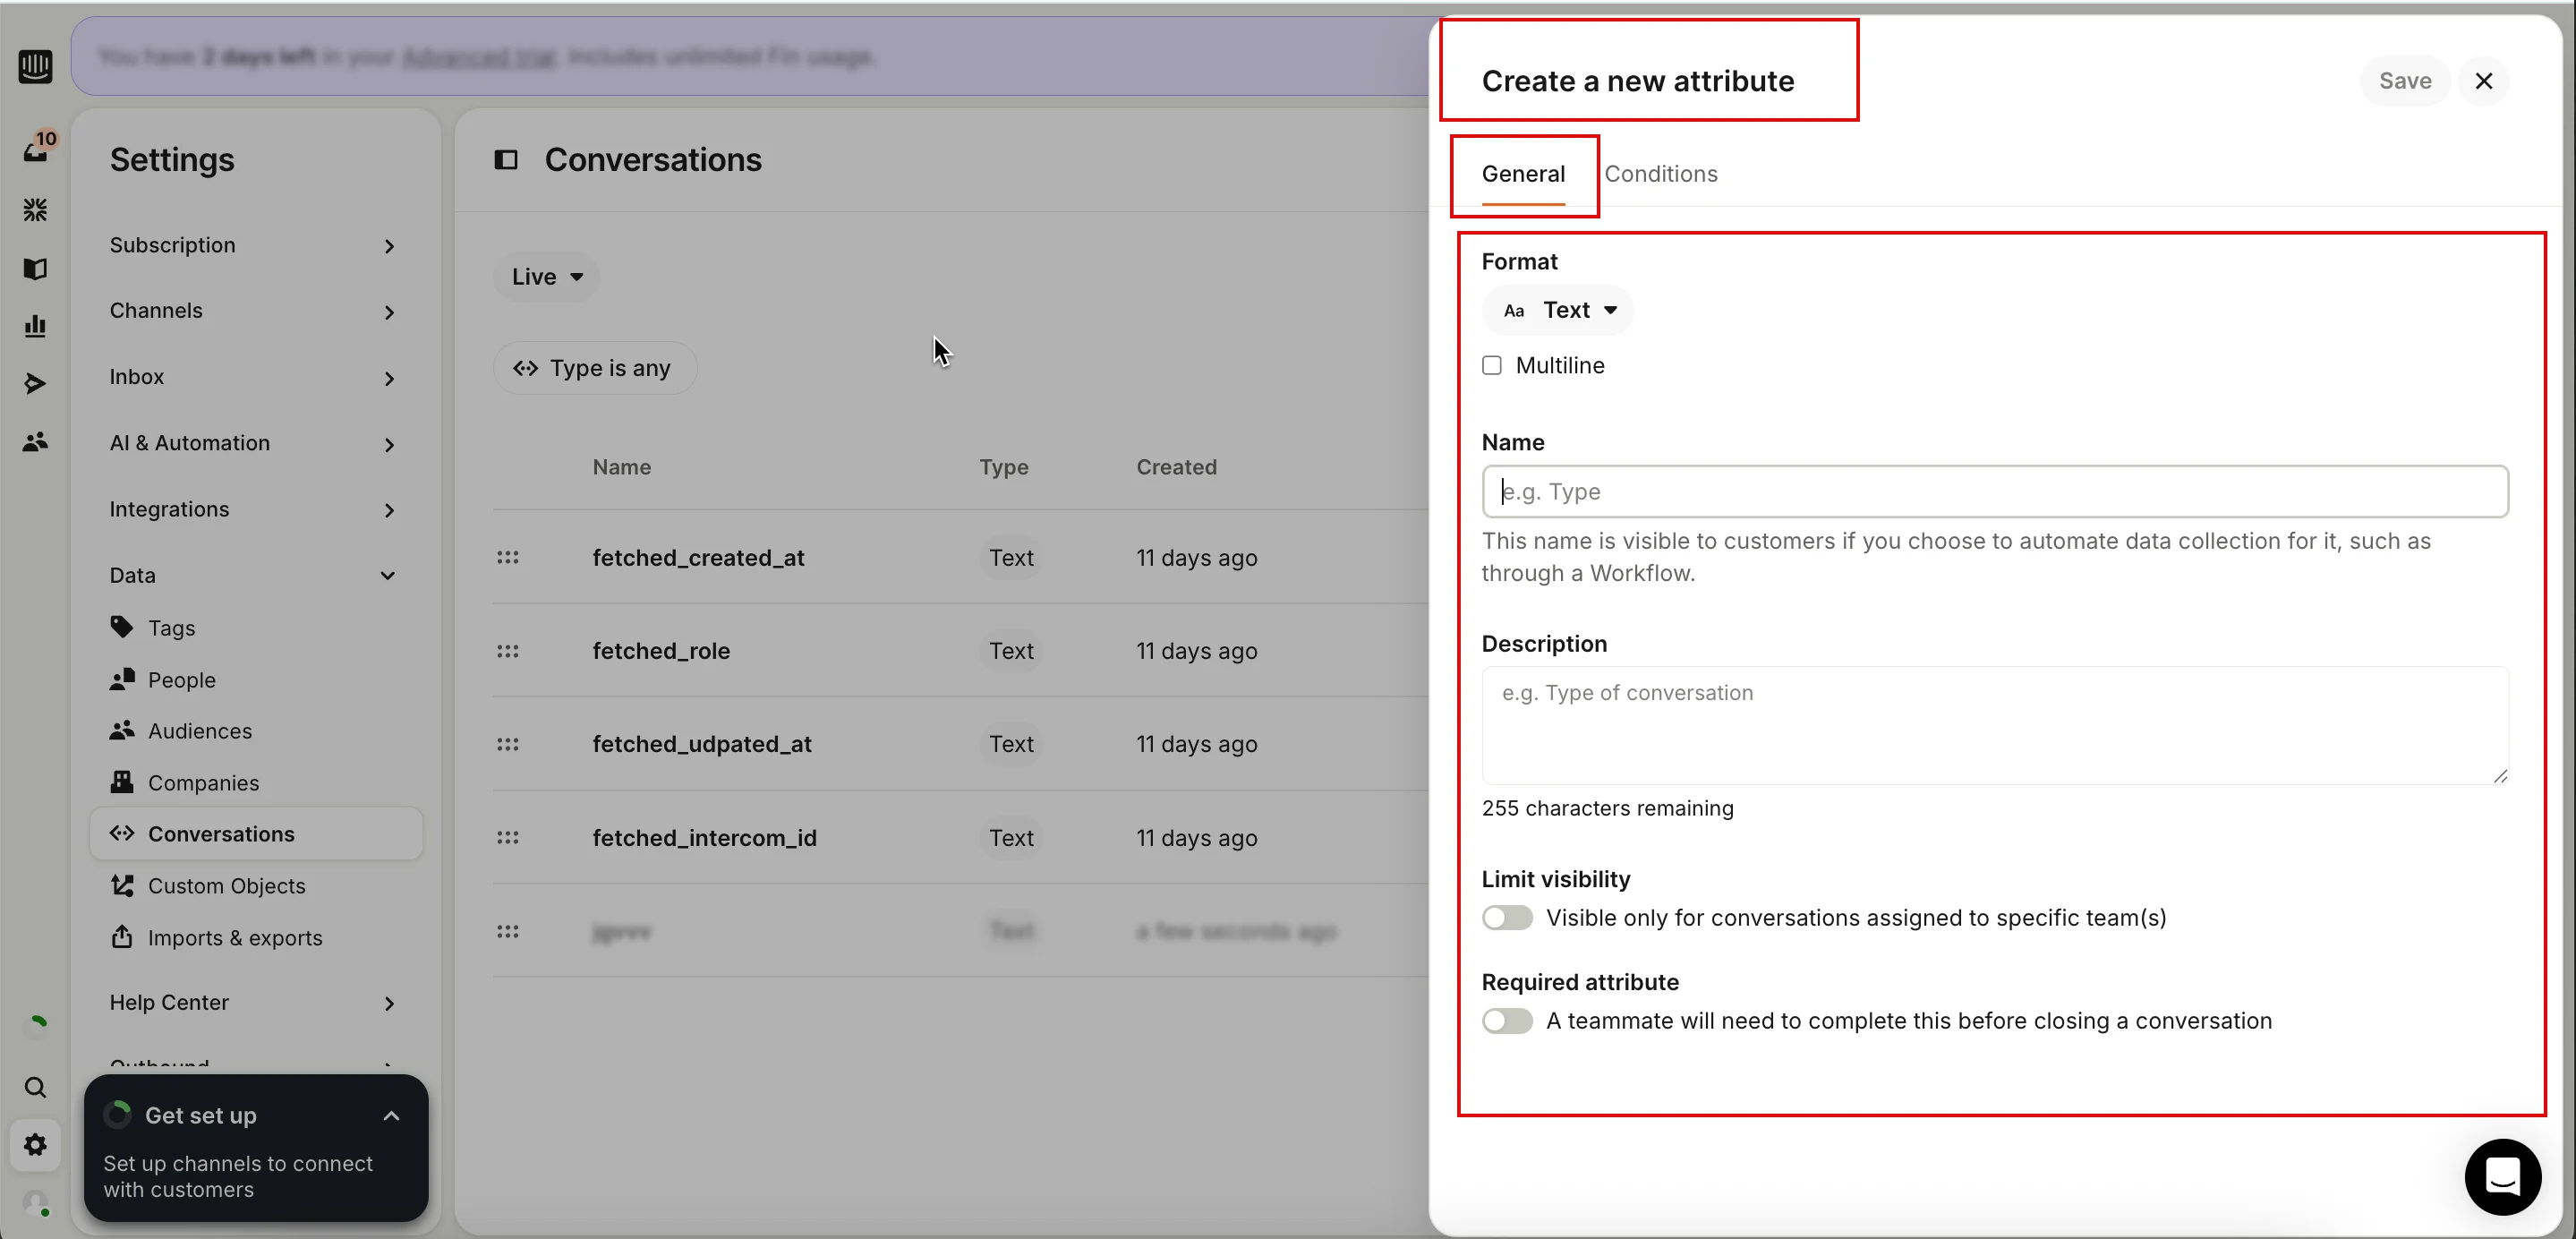 ### Step 2: Get Your Intercom API Token
To get your Intercom API token, perform the following steps:
1. In the left navigation bar of your Intercom dashboard, click the **Settings** icon in the lower-left navigation bar.
2. On the **Home** page, under the **Integrations** section, click **Developer Hub**.
### Step 2: Get Your Intercom API Token
To get your Intercom API token, perform the following steps:
1. In the left navigation bar of your Intercom dashboard, click the **Settings** icon in the lower-left navigation bar.
2. On the **Home** page, under the **Integrations** section, click **Developer Hub**.  The INTERCOM | Developer Hub
  window appears. Now, you must decide whether to create a new app or use an existing one.
3. To create a new app:
1. On the **Your apps** page, click **New app.** The **New app** dialog box appears.
2. In the **App name** box, type a name for your app.
3. In the **Workspace list**, select the workspace for your app.
4. Click **Create app.**
4. To use an existing app:
1. Find and select your app from the list.
2. Click **Edit** in the upper- right corner.
5. In the left navigation menu for your app, select **Authentication**.
6. On the **Authentication** page, in the **Access token** section, copy the token. This will be used as your Bearer Token.
7. Scroll to the **Permissions** section and ensure the permissions are enabled for your app.
window appears. Now, you must decide whether to create a new app or use an existing one.
3. To create a new app:
1. On the **Your apps** page, click **New app.** The **New app** dialog box appears.
2. In the **App name** box, type a name for your app.
3. In the **Workspace list**, select the workspace for your app.
4. Click **Create app.**
4. To use an existing app:
1. Find and select your app from the list.
2. Click **Edit** in the upper- right corner.
5. In the left navigation menu for your app, select **Authentication**.
6. On the **Authentication** page, in the **Access token** section, copy the token. This will be used as your Bearer Token.
7. Scroll to the **Permissions** section and ensure the permissions are enabled for your app. 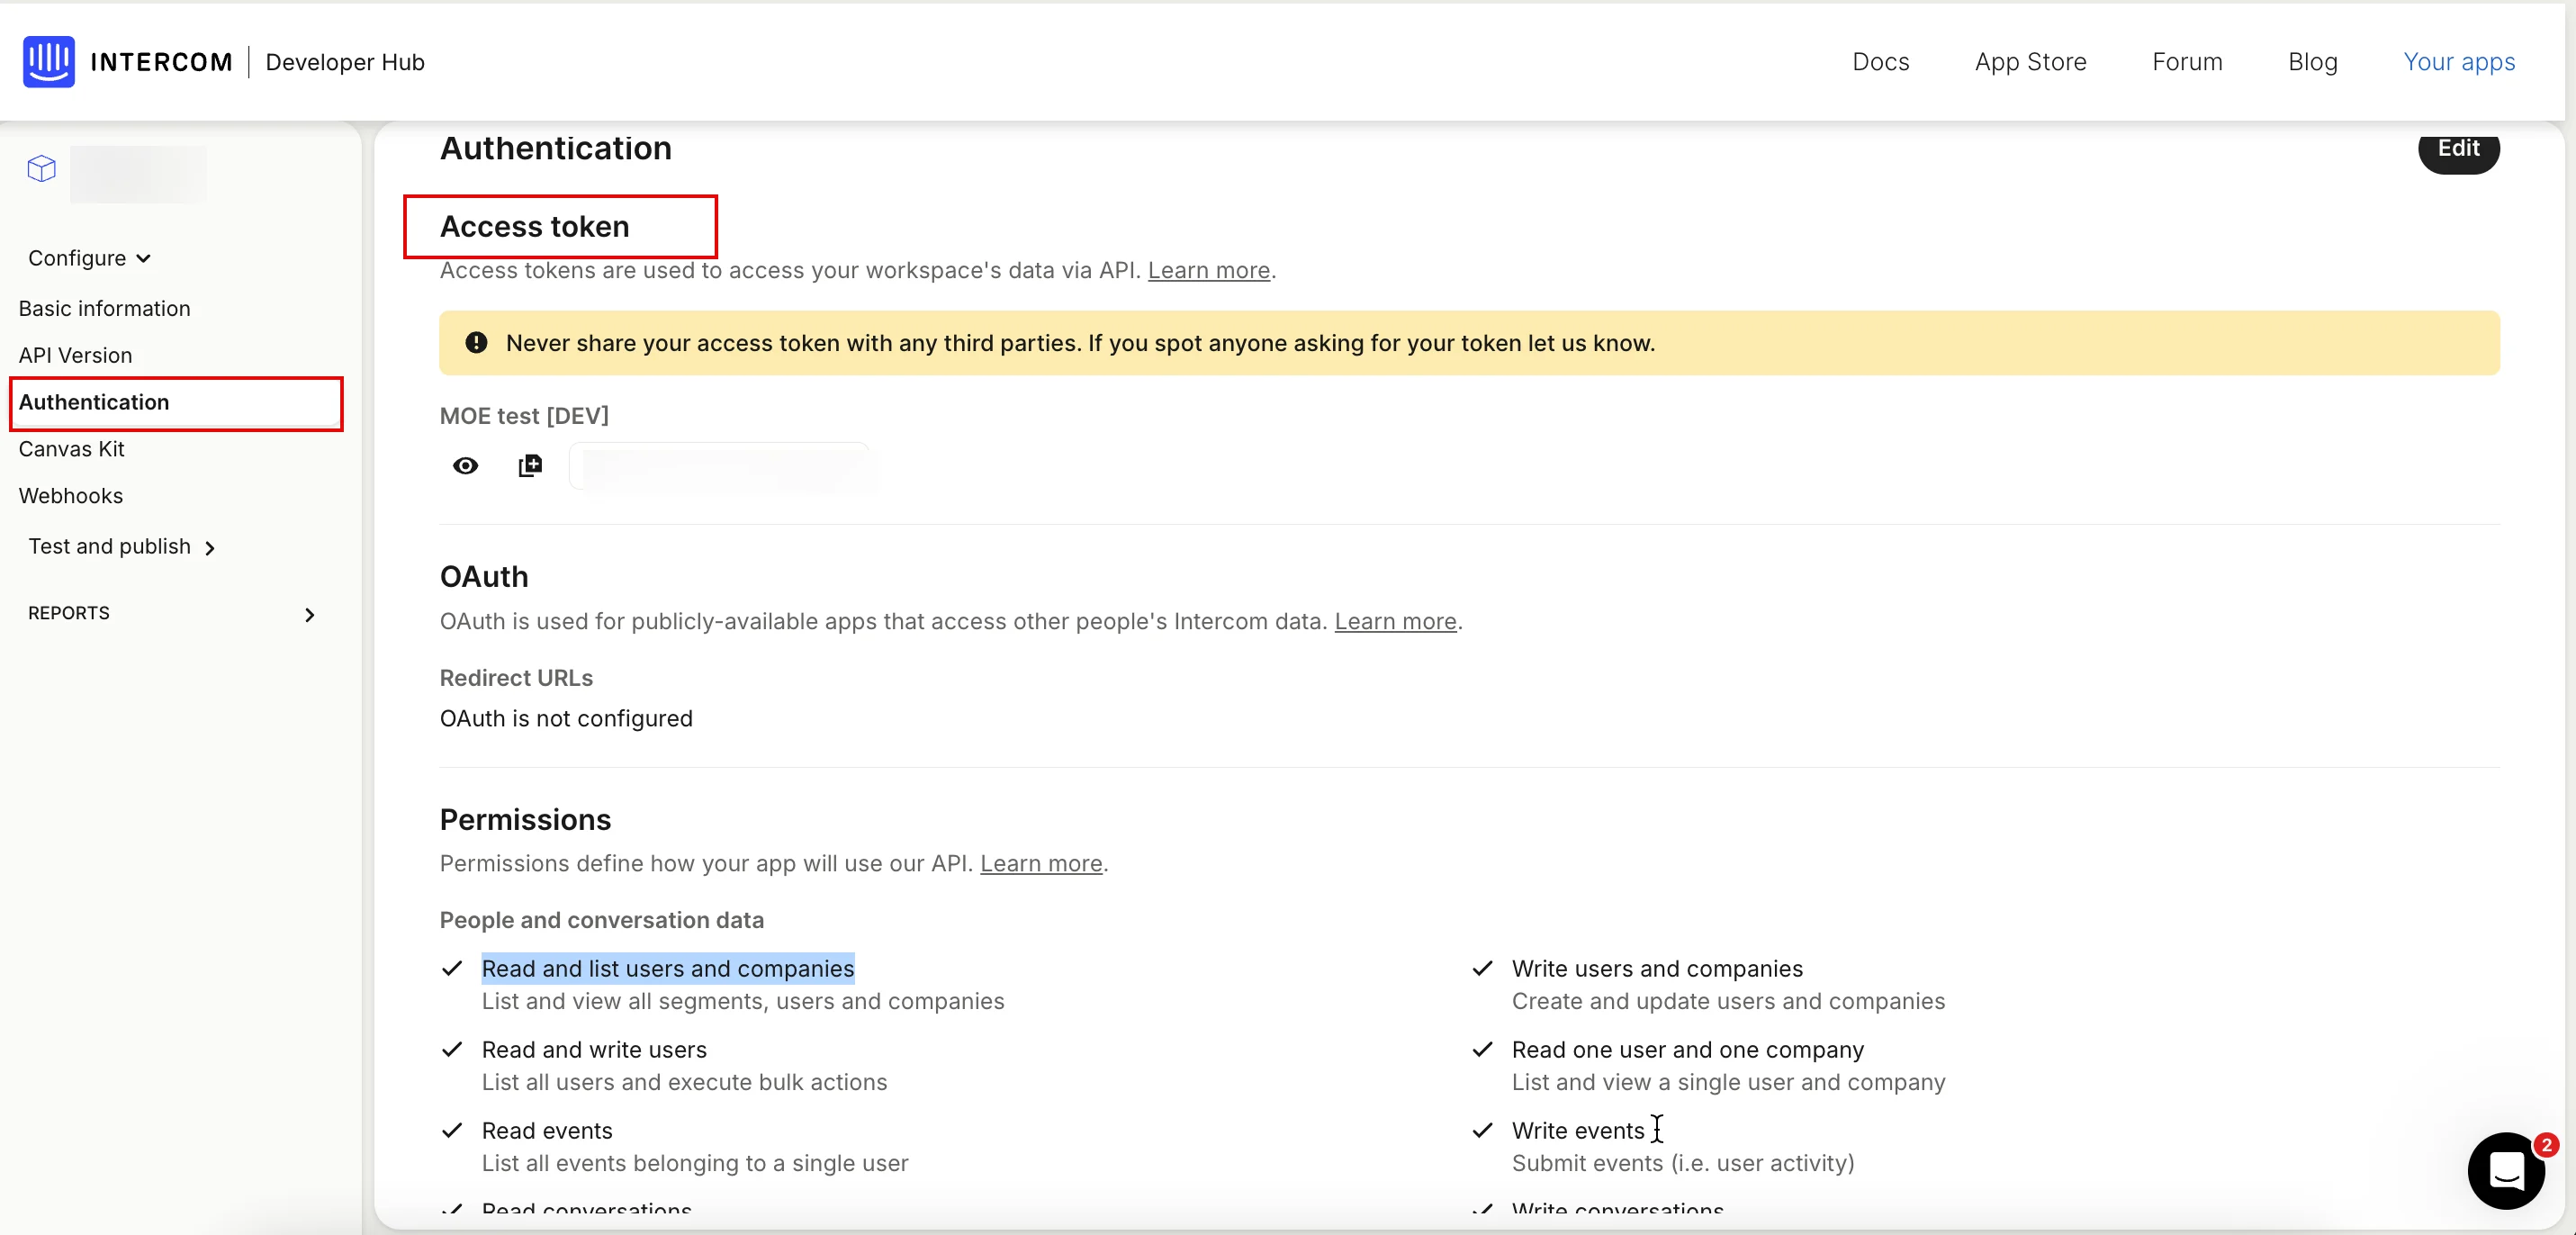 ### Step 3: Create the Intercom API Data Enrichment Connector
**Information**
Use the Intercom Contact Search API to get additional data, as shown in the following steps. For other tasks, you can use any of the APIs listed in the [Intercom API reference](https://developers.intercom.com/docs/references/rest-api/api.intercom.io/contacts/searchforcontacts).
To create the Intercom Contact Search API, perform the following steps:
1. Create the MoEngage Webhook Data Connector. To do this, follow the steps through point 6 as detailed in the section [Step 1: Create the MoEngage Webhook Data Connector](#step-1-create-the-moengage-webhook-data-connector).
2. In the **Request Body** section, paste the following JSON. This will search for a contact using their email or external ID.
```json JSON theme={null}
{
"query": {
"operator": "OR",
"value": [
{
"field": "email",
"operator": "=",
"value": "{{ insert email id }}"
},
{
"field": "external_id",
"operator": "=",
"value": "{{ insert external_id }}"
}
]
}
}
```
3. Click **Next step** to proceed to the **Test response** tab to test the connection by providing sample values for your payload.
### Step 3: Create the Intercom API Data Enrichment Connector
**Information**
Use the Intercom Contact Search API to get additional data, as shown in the following steps. For other tasks, you can use any of the APIs listed in the [Intercom API reference](https://developers.intercom.com/docs/references/rest-api/api.intercom.io/contacts/searchforcontacts).
To create the Intercom Contact Search API, perform the following steps:
1. Create the MoEngage Webhook Data Connector. To do this, follow the steps through point 6 as detailed in the section [Step 1: Create the MoEngage Webhook Data Connector](#step-1-create-the-moengage-webhook-data-connector).
2. In the **Request Body** section, paste the following JSON. This will search for a contact using their email or external ID.
```json JSON theme={null}
{
"query": {
"operator": "OR",
"value": [
{
"field": "email",
"operator": "=",
"value": "{{ insert email id }}"
},
{
"field": "external_id",
"operator": "=",
"value": "{{ insert external_id }}"
}
]
}
}
```
3. Click **Next step** to proceed to the **Test response** tab to test the connection by providing sample values for your payload.  **Note**: Ensure Intercom is successfully connected to MoEngage before you use the connector in a live workflow.
4. Click **Next step** to proceed to the **Data transformation** tab.
5. Paste the following code into the code editor to extract the first contact from the API response.
```python Python wrap theme={null}
def transform(api_response):
"""Extract first contact from search results array
Args:
api_response: The raw response data from the API call
Returns:
dict: First contact data or empty dict if no contacts found
"""
# Extract first contact from the data array
if isinstance(api_response, dict) and 'data' in api_response and api_response['data']:
return api_response['data'][0]
else:
return {}
return transform(inputs['data'])
```
6. Click **Next step** to proceed to the **Object mapping** tab.
7. Configure the mappings for each attribute you need to sync.
8. Click **Save and set live**.
**Note**: Ensure Intercom is successfully connected to MoEngage before you use the connector in a live workflow.
4. Click **Next step** to proceed to the **Data transformation** tab.
5. Paste the following code into the code editor to extract the first contact from the API response.
```python Python wrap theme={null}
def transform(api_response):
"""Extract first contact from search results array
Args:
api_response: The raw response data from the API call
Returns:
dict: First contact data or empty dict if no contacts found
"""
# Extract first contact from the data array
if isinstance(api_response, dict) and 'data' in api_response and api_response['data']:
return api_response['data'][0]
else:
return {}
return transform(inputs['data'])
```
6. Click **Next step** to proceed to the **Object mapping** tab.
7. Configure the mappings for each attribute you need to sync.
8. Click **Save and set live**. 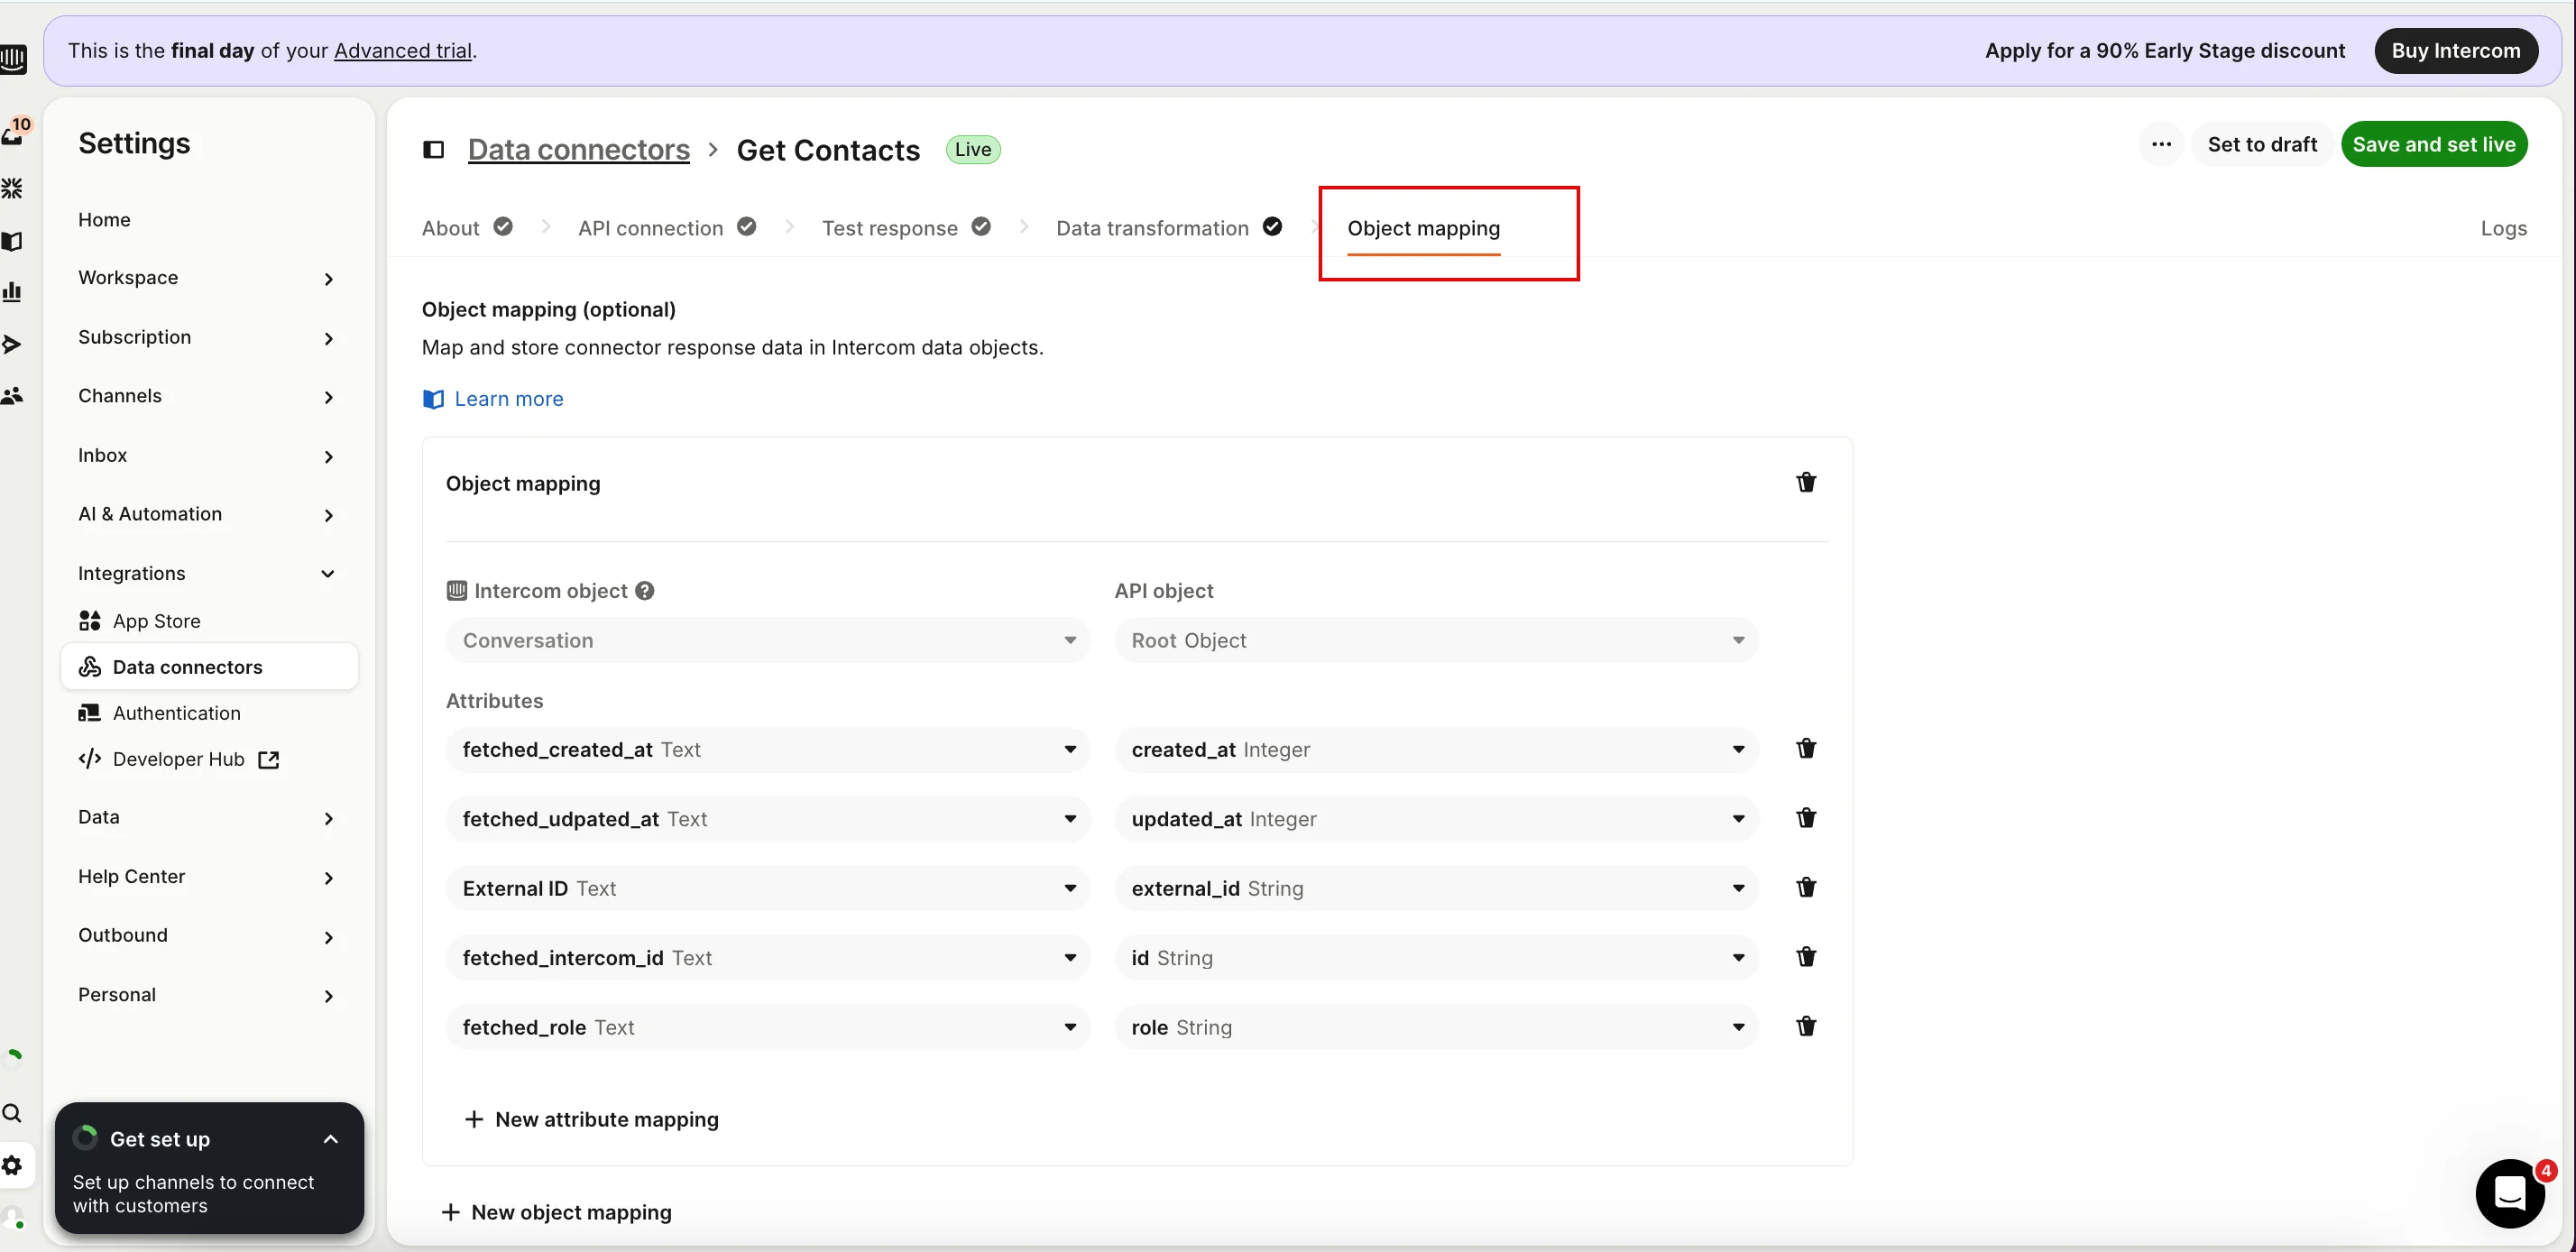 ### Step 4: Create the MoEngage Webhook Data Connector
First, create the MoEngage Webhook Data Connector. To do this, follow the steps through point 6 as detailed in the section [Step 1: Create the MoEngage Webhook Data Connector](#step-1-create-the-moengage-webhook-data-connector) and test the response to verify the connection.
### Step 5: Request Body Structure
Build the payload by following the instructions in the section, [Step 2: Request Body Structure](#step-2-request-body-structure) and add the custom objects you created to include the additional enriched data in the payload.
### Step 6: Create a Workflow to Trigger the Data Connector
To create a workflow to trigger the data connection, perform the following steps:
1. Create the MoEngage Webhook Data Connector. To do this, follow the steps through point 7 as detailed in the section, [Step 3: Create a Workflow to Trigger the Data Connector](#step-3-create-a-workflow-to-trigger-the-data-connector).
2. Select the custom Data Connector that you created to fetch the additional data.
3. Add the Webhook Data Connector that you created to push the enriched data.
4. Activate the Workflow.
5. Click the **Save and Set**.
### Step 4: Create the MoEngage Webhook Data Connector
First, create the MoEngage Webhook Data Connector. To do this, follow the steps through point 6 as detailed in the section [Step 1: Create the MoEngage Webhook Data Connector](#step-1-create-the-moengage-webhook-data-connector) and test the response to verify the connection.
### Step 5: Request Body Structure
Build the payload by following the instructions in the section, [Step 2: Request Body Structure](#step-2-request-body-structure) and add the custom objects you created to include the additional enriched data in the payload.
### Step 6: Create a Workflow to Trigger the Data Connector
To create a workflow to trigger the data connection, perform the following steps:
1. Create the MoEngage Webhook Data Connector. To do this, follow the steps through point 7 as detailed in the section, [Step 3: Create a Workflow to Trigger the Data Connector](#step-3-create-a-workflow-to-trigger-the-data-connector).
2. Select the custom Data Connector that you created to fetch the additional data.
3. Add the Webhook Data Connector that you created to push the enriched data.
4. Activate the Workflow.
5. Click the **Save and Set**. 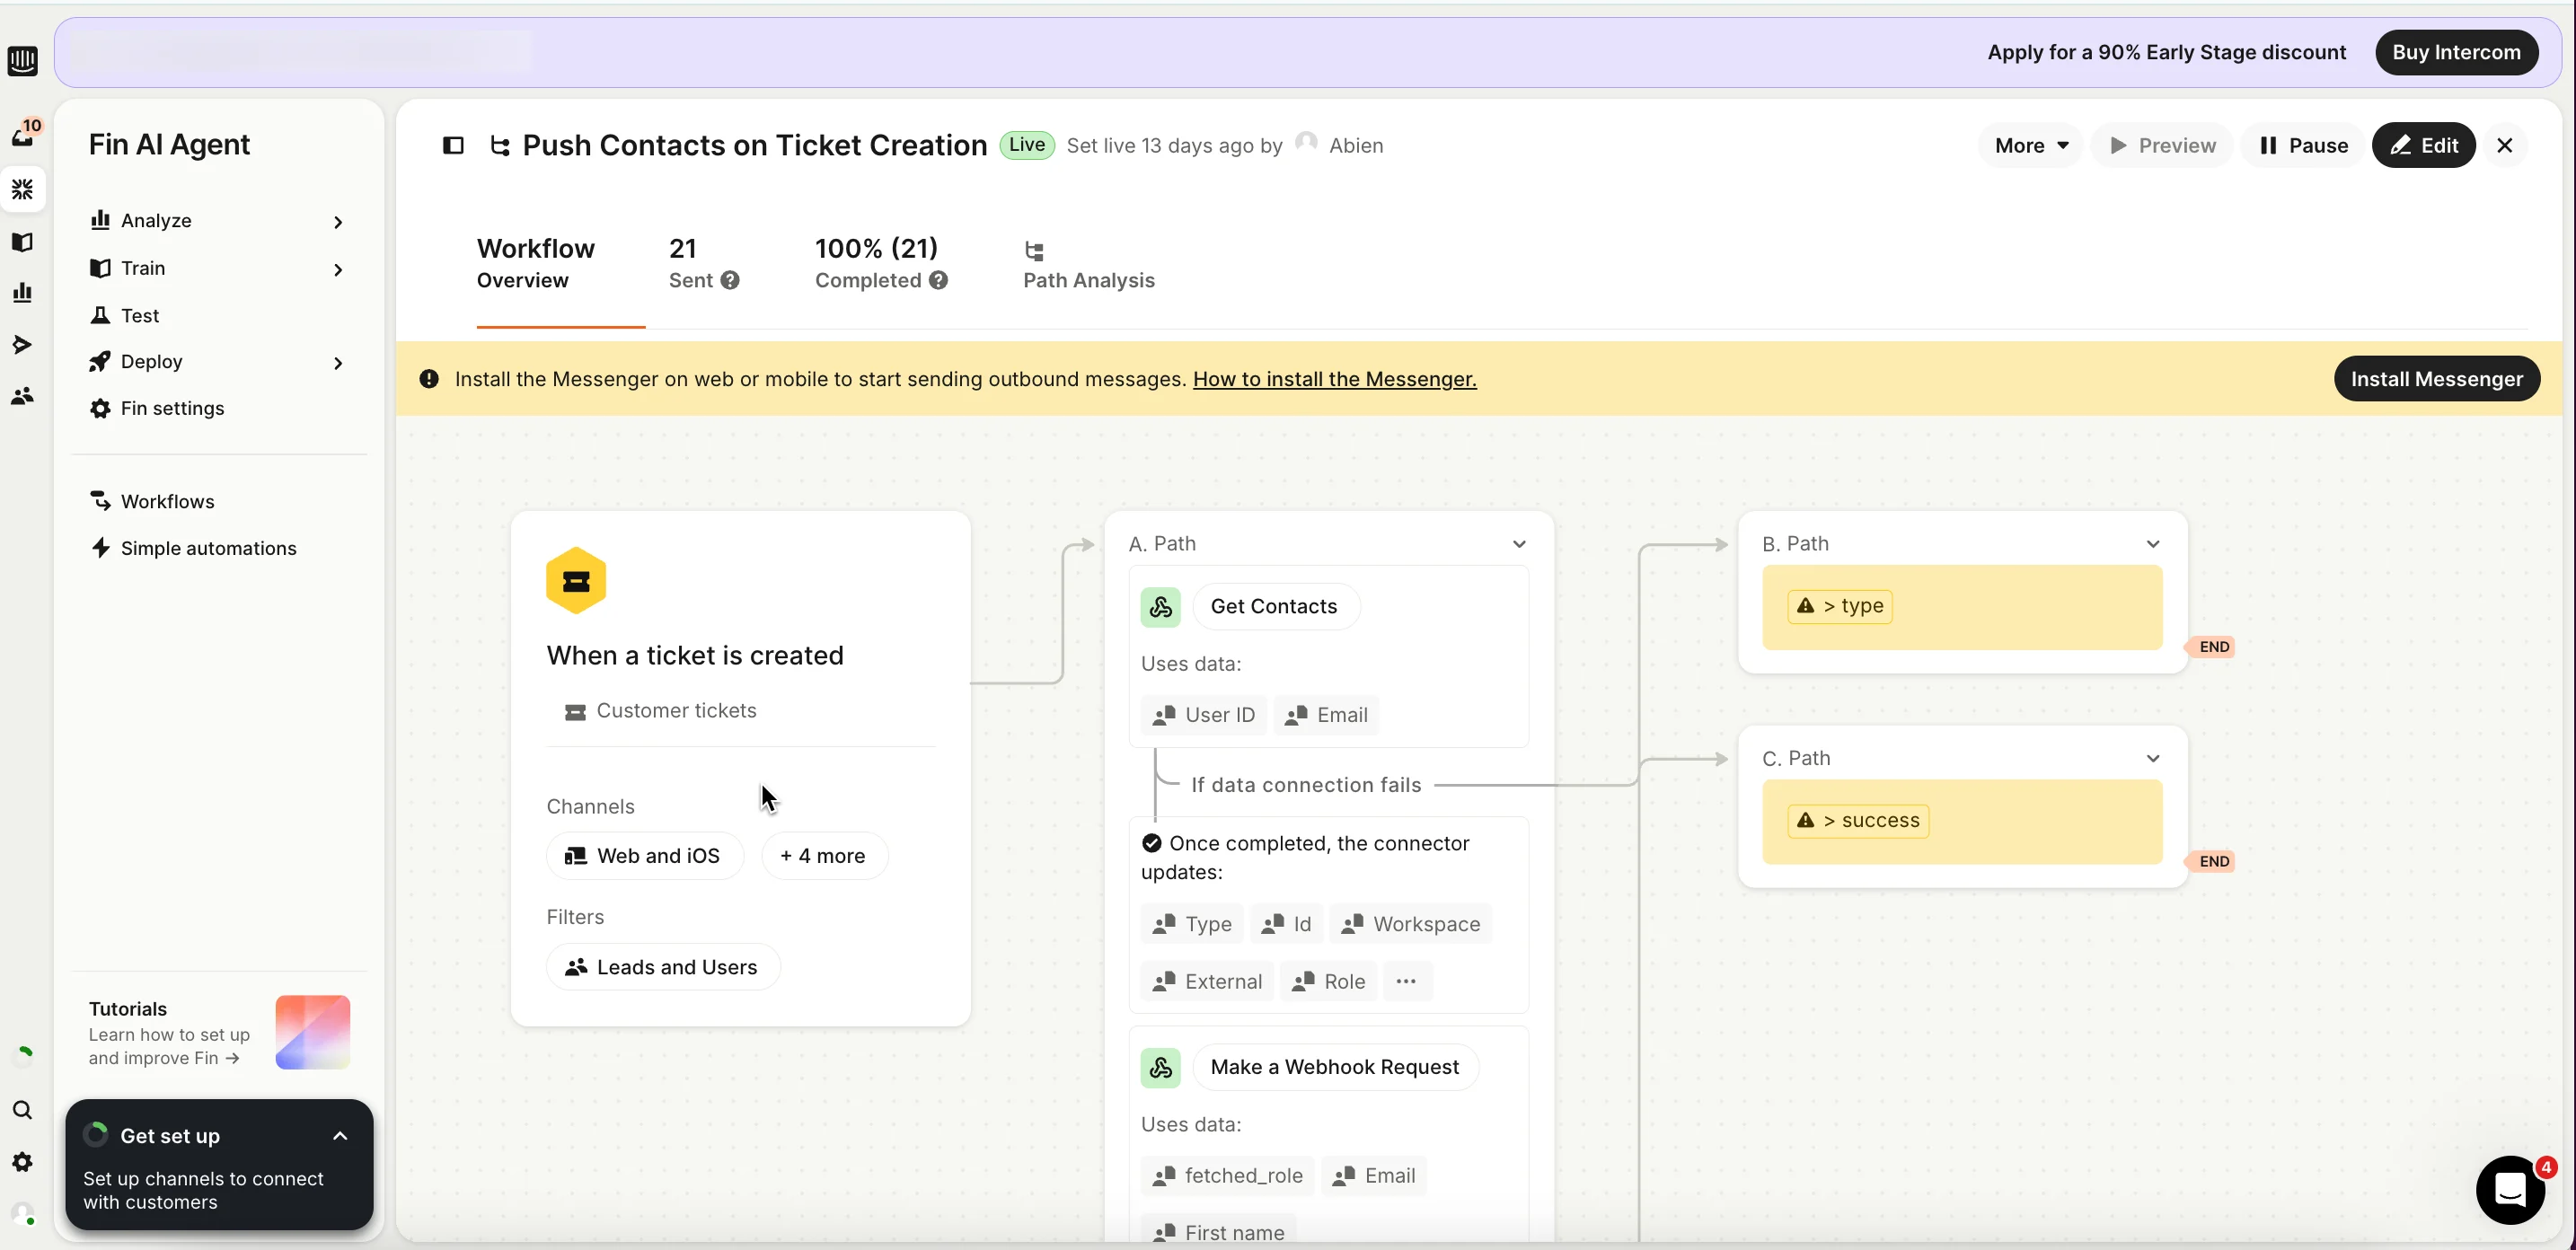 # Method 2: Use Series Workflows with Webhooks
This approach uses a Webhook within an Intercom Series to send User or Lead data to MoEngage. It is best for syncing standard user and conversation fields as part of an outbound messaging sequence without needing complex API calls.
**Information**
Intercom Series relies on built-in attribute inserters. To prevent integration errors, it is recommended to share your specific setup and requirements with your MoEngage customer success manager (CSM).
To set up the Series workflow, perform the following steps:
* Step 1: [Navigate to Series](#step-1-navigate-to-series)
* Step 2: [Set the Trigger](#step-2-set-the-trigger)
* Step 3: [Add the Webhook Action](#step-3-add-the-webhook-action)
* Step 4: [Request Body Structure](#step-4-request-body-structure)
* Step 5: [Test and Activate](#step-5-test-and-activate)
### Step 1: Navigate to Series
To navigate to series, perform the following steps:
1. In the left navigation bar of your Intercom dashboard, click **Outbound**.
2. Onthe **Outbound** menu, click **Series**.
3. On the **Series** page, click **+ New Series** in the upper-right corner.
# Method 2: Use Series Workflows with Webhooks
This approach uses a Webhook within an Intercom Series to send User or Lead data to MoEngage. It is best for syncing standard user and conversation fields as part of an outbound messaging sequence without needing complex API calls.
**Information**
Intercom Series relies on built-in attribute inserters. To prevent integration errors, it is recommended to share your specific setup and requirements with your MoEngage customer success manager (CSM).
To set up the Series workflow, perform the following steps:
* Step 1: [Navigate to Series](#step-1-navigate-to-series)
* Step 2: [Set the Trigger](#step-2-set-the-trigger)
* Step 3: [Add the Webhook Action](#step-3-add-the-webhook-action)
* Step 4: [Request Body Structure](#step-4-request-body-structure)
* Step 5: [Test and Activate](#step-5-test-and-activate)
### Step 1: Navigate to Series
To navigate to series, perform the following steps:
1. In the left navigation bar of your Intercom dashboard, click **Outbound**.
2. Onthe **Outbound** menu, click **Series**.
3. On the **Series** page, click **+ New Series** in the upper-right corner.  The **Choose a template** dialog box appears.
4. Click **Start from scratch**.
The **Choose a template** dialog box appears.
4. Click **Start from scratch**.  Now, you must set the entry rules.
5. On the **Enter a title** page, in the **Audience to target** sidebar on the right, click **Rules** to define the criteria for users who will enter this series.
6. Scroll to the end, in the **Actions to take** , click **WEBHOOK**.
Now, you must set the entry rules.
5. On the **Enter a title** page, in the **Audience to target** sidebar on the right, click **Rules** to define the criteria for users who will enter this series.
6. Scroll to the end, in the **Actions to take** , click **WEBHOOK**. 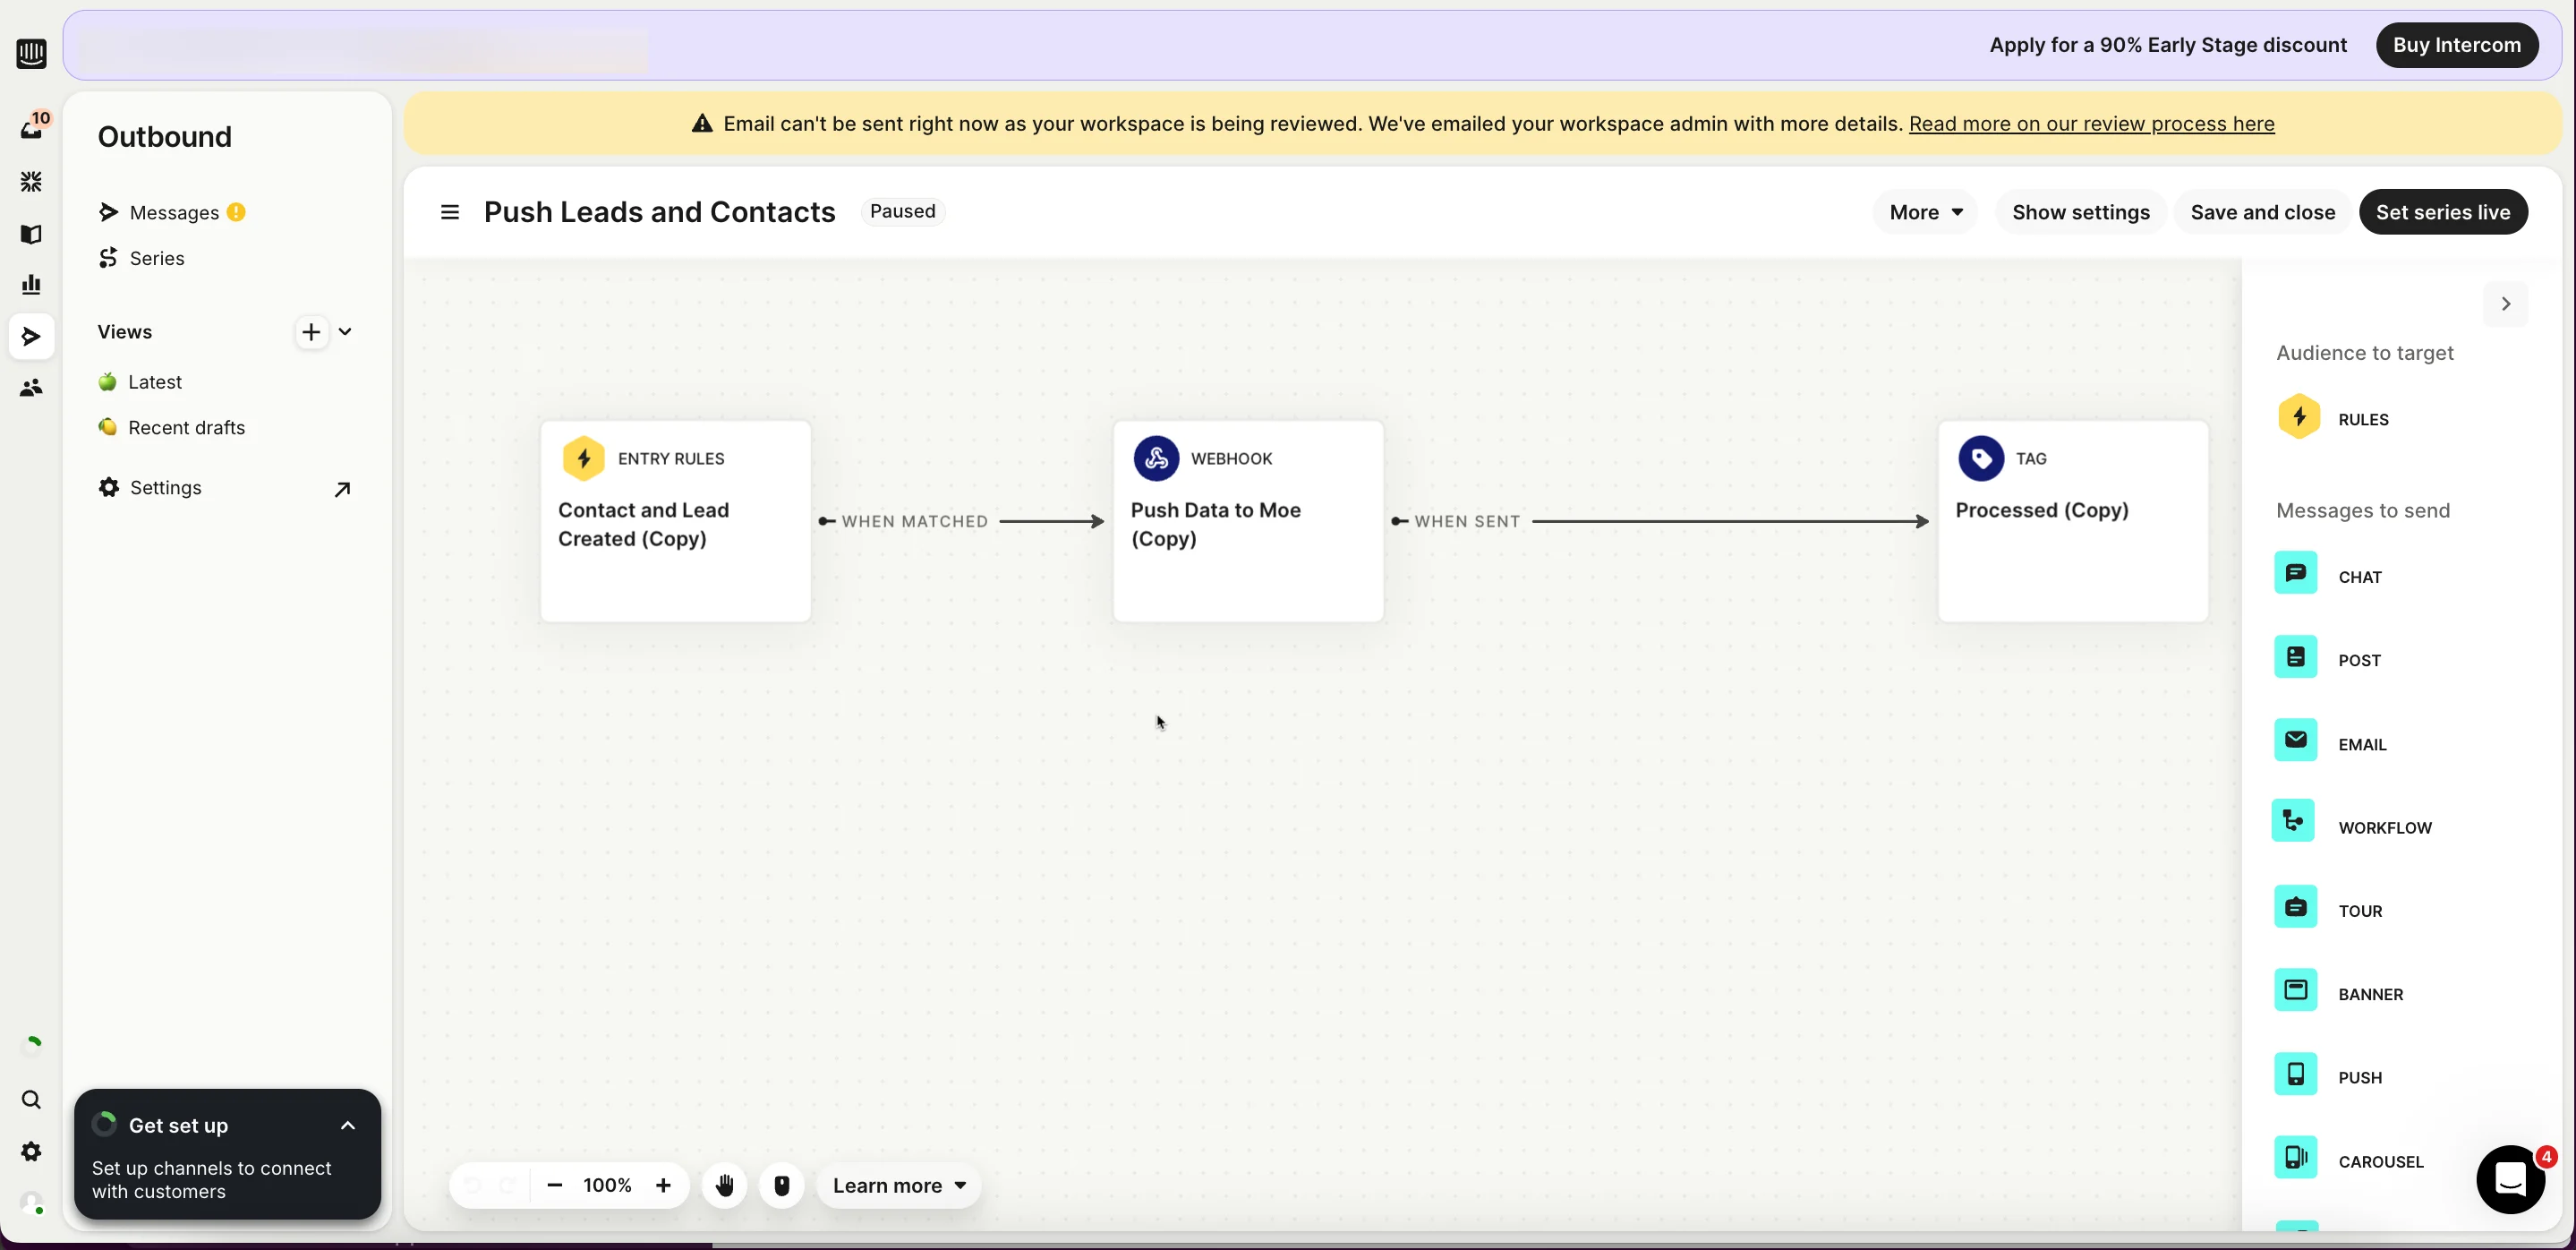 ### Step 2: Set the Trigger
To set the trigger, perform the following steps:
1. On the **Enter a title** page, click the **Entry Rules** tile. The **Enter a title** dialog box appears.
2. Click the **Visitors and Users** filter button to open the menu and select **Visitors** , **Leads** , or **Users**.
3. Select the check boxes for the specific audience you want to target.
### Step 2: Set the Trigger
To set the trigger, perform the following steps:
1. On the **Enter a title** page, click the **Entry Rules** tile. The **Enter a title** dialog box appears.
2. Click the **Visitors and Users** filter button to open the menu and select **Visitors** , **Leads** , or **Users**.
3. Select the check boxes for the specific audience you want to target. 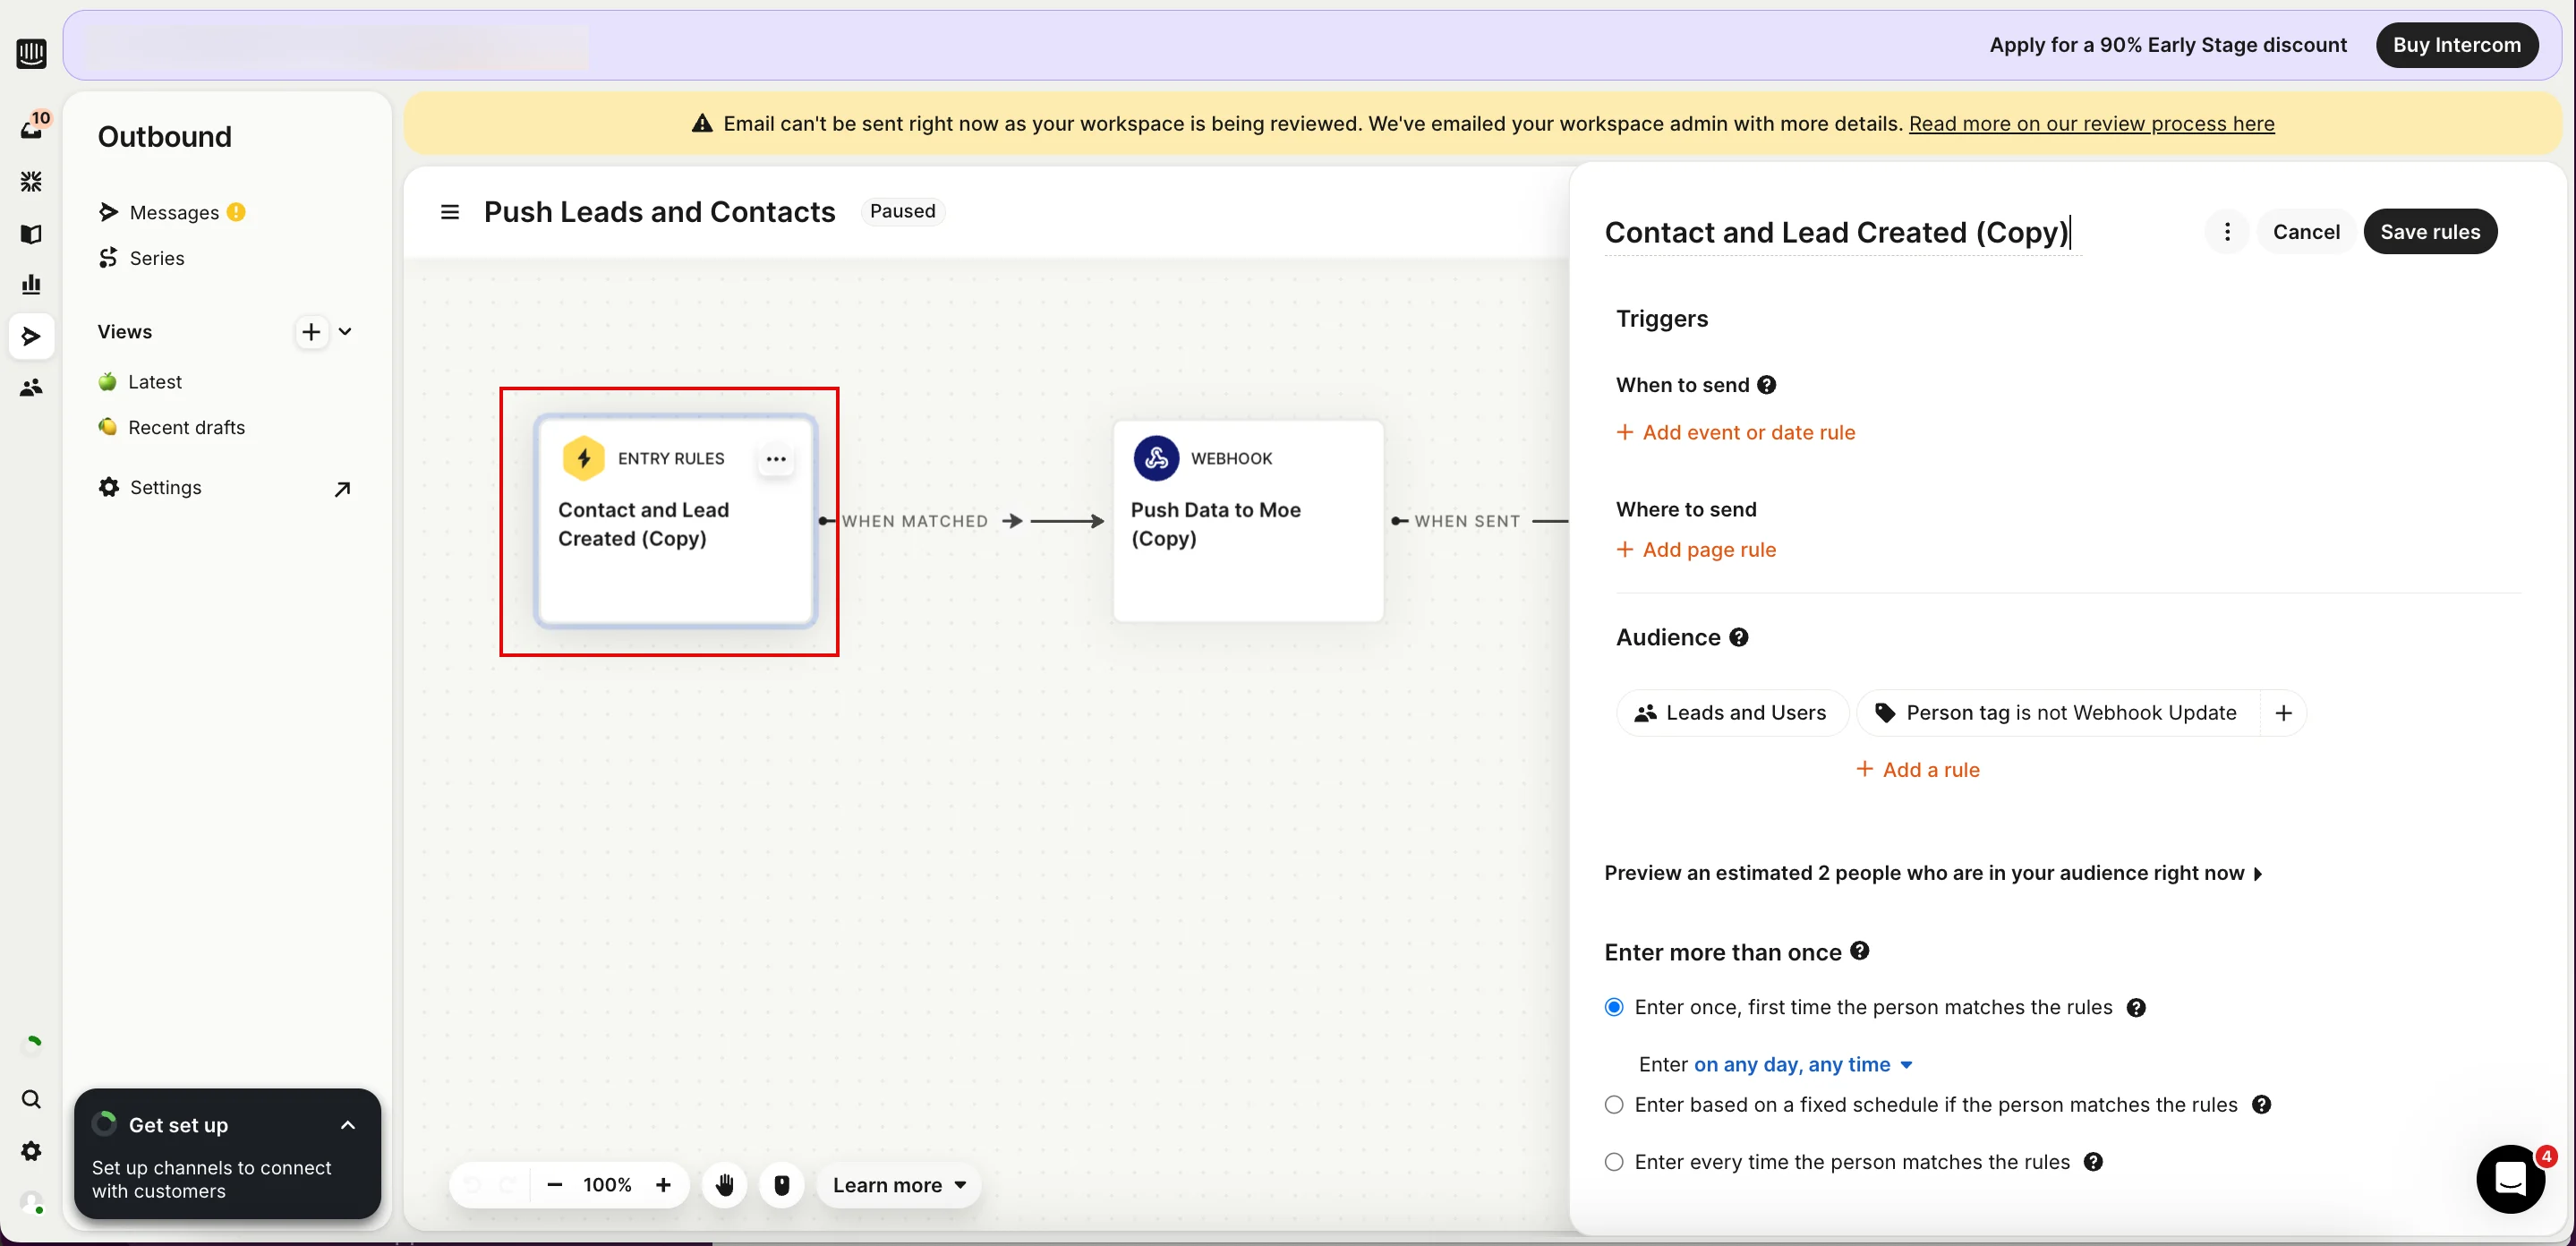 4. Click **Save rules** to apply your configuration.
### Step 3: Add the Webhook Action
To add the Webhook action, perform the following actions:
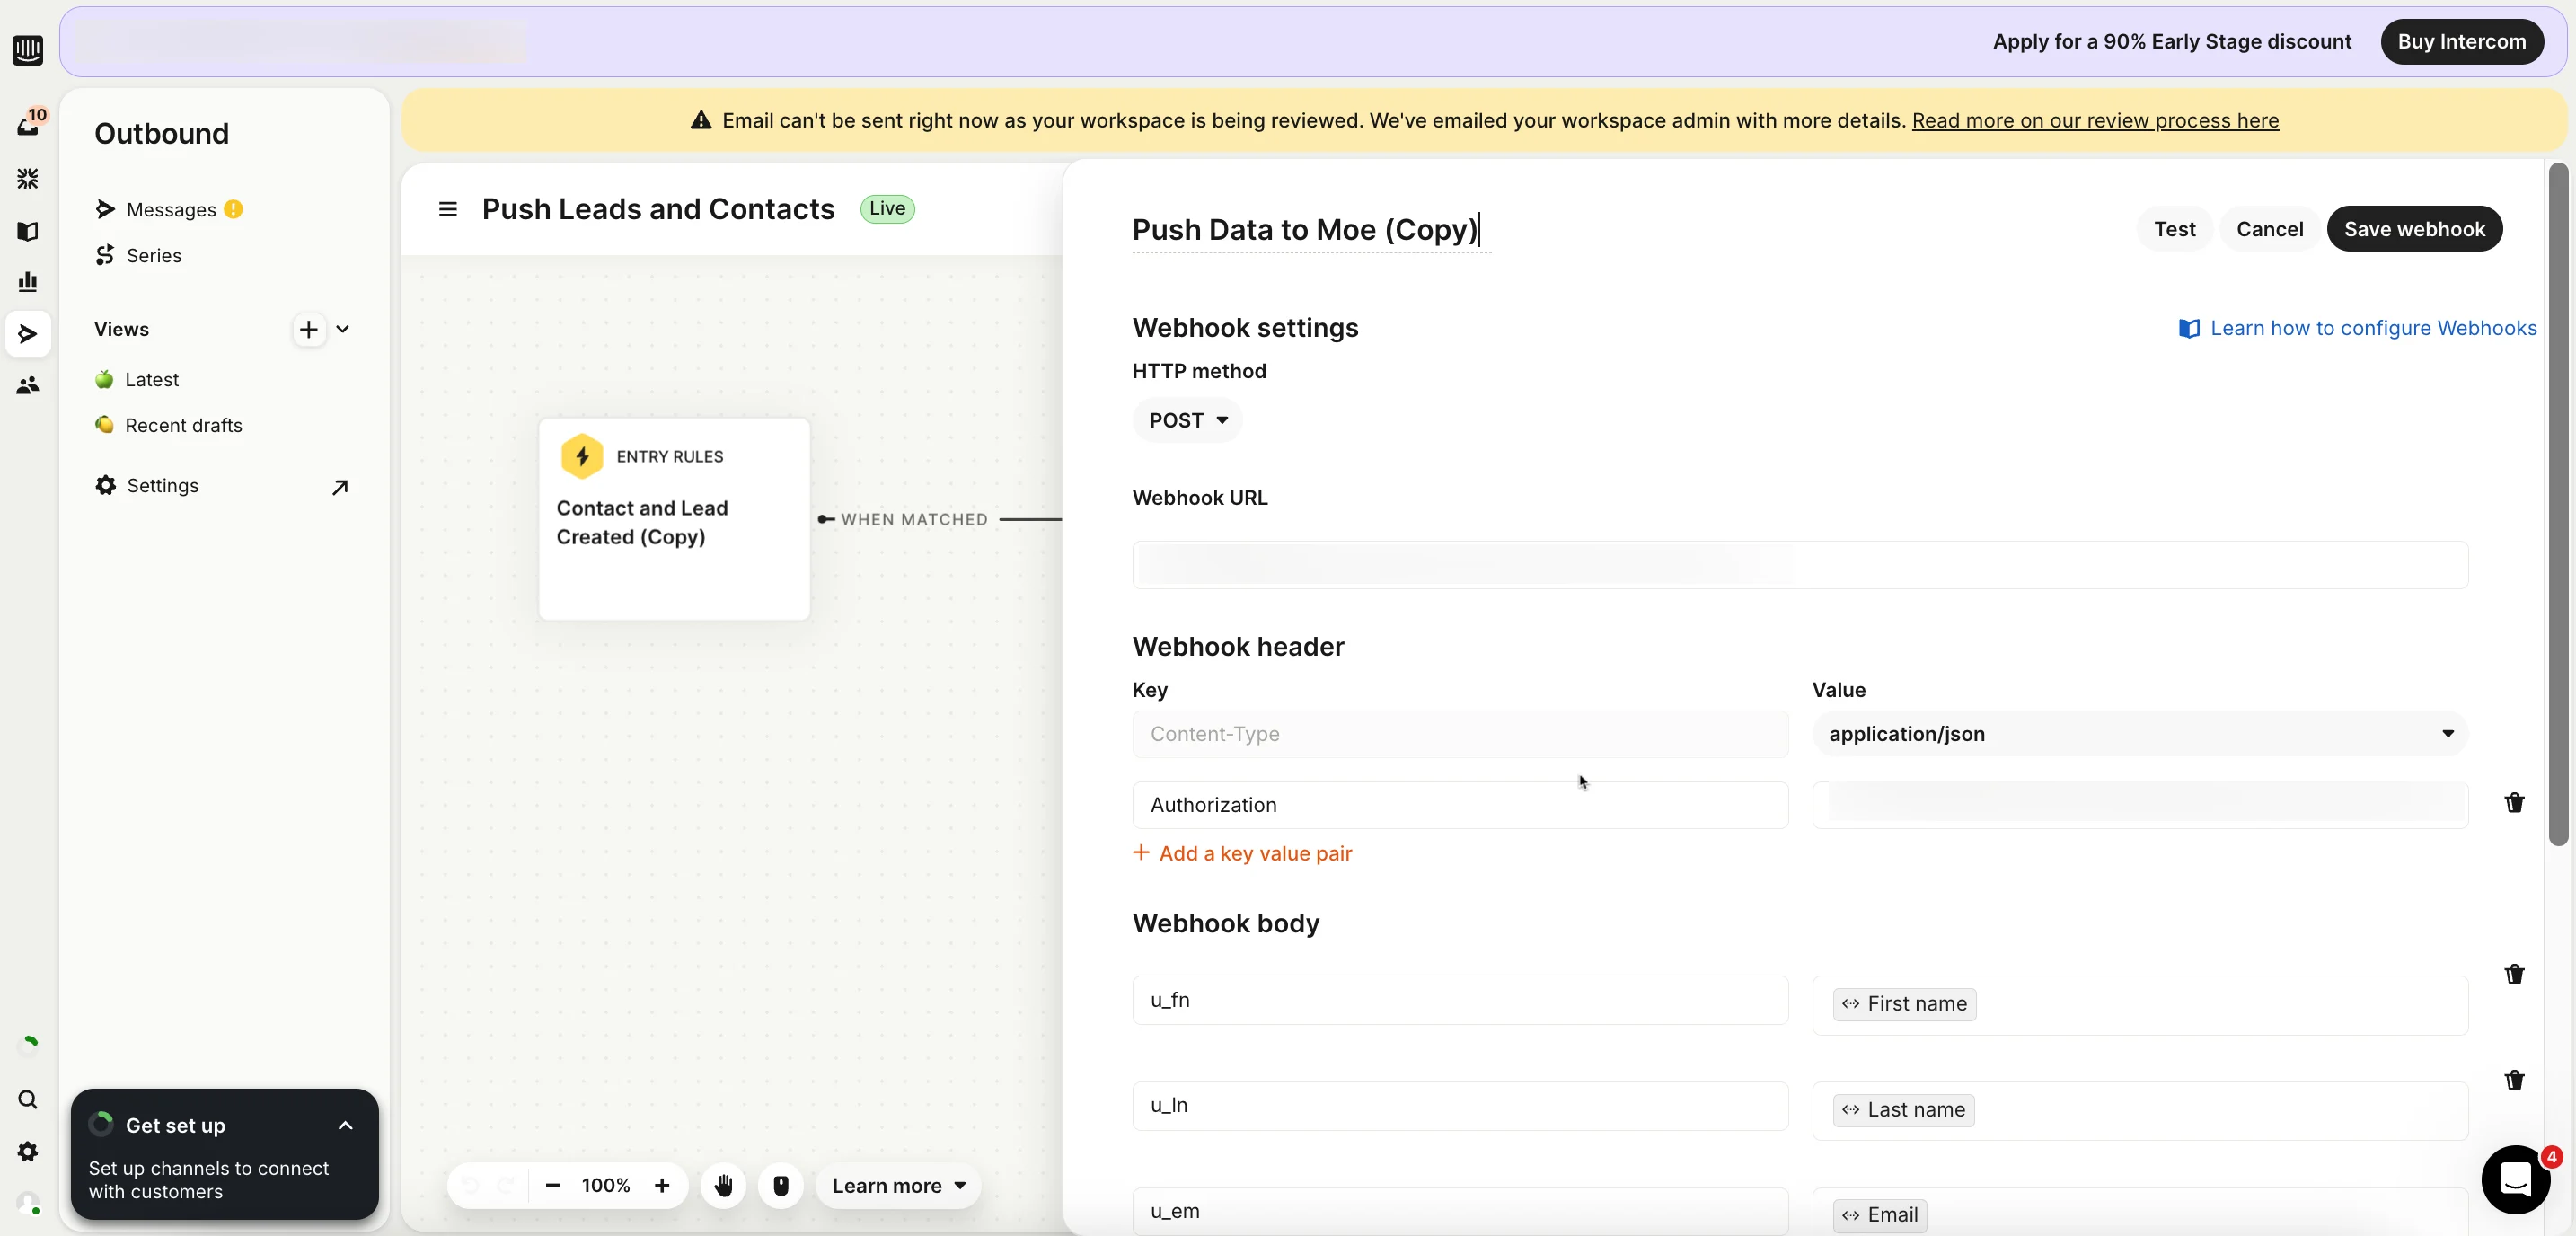
1. On the **Enter a title** page, click the **WEBHOOK** tile. The **Enter a title** dialog box appears.
2. Provide the following details:
| Webhook Section | Description |
| ------------------- | -------------------------------------------------------------------------------------------------------------------------------------------------------------------------------------------------------------------------------------------------------------------------------------------------------------------------------------------------------------------------------------------------------------------------------------------------------------------------------------------------------------------------------------------------------------------------------------------------------------------------------------------------------------------------------------------------------------------------------------------------------------------------------------------------------------------------------------------------------------------------------------- |
| **Method** | **POST** |
| **URL** | Enter the dedicated Webhook URL provided by MoEngage in the following format: `https://api-0X.moengage.com/v1/partner/intercom/{events/users}/?configName={config_name}` |
| **Webhook Headers** | Content-Type: application/json
4. Click **Save rules** to apply your configuration.
### Step 3: Add the Webhook Action
To add the Webhook action, perform the following actions:
1. On the **Enter a title** page, click the **WEBHOOK** tile. The **Enter a title** dialog box appears.
2. Provide the following details:
| Webhook Section | Description |
| ------------------- | -------------------------------------------------------------------------------------------------------------------------------------------------------------------------------------------------------------------------------------------------------------------------------------------------------------------------------------------------------------------------------------------------------------------------------------------------------------------------------------------------------------------------------------------------------------------------------------------------------------------------------------------------------------------------------------------------------------------------------------------------------------------------------------------------------------------------------------------------------------------------------------- |
| **Method** | **POST** |
| **URL** | Enter the dedicated Webhook URL provided by MoEngage in the following format: `https://api-0X.moengage.com/v1/partner/intercom/{events/users}/?configName={config_name}` |
| **Webhook Headers** | Content-Type: application/json
Authorization: Generate a Basic Authentication Token using an online [Basic Auth Header Generator tool](https://www.debugbear.com/basic-auth-header-generator). You must enter your **Workspace ID** as username and **Data API Key** as password. To find your credentials, perform the following steps: - On the MoEngage UI, navigate to **Settings** > **Account** > **APIs**.
- Copy the ID under **Workspace ID** (**earlier app id**).
- Copy the **Data** under **API keys**.
Your Basic Authentication Token is a combination of **Workspace ID** and **Data**. For example, paste the following value as your Basic Authentication Token:`Basic Qk5CR1NNNUR4eHh4eHhWQ1hSRFJEWTdSOlFsWHVoTHVaeHh4eHh4QWQrQnBYUEotNw==`
**Note**: Ensure the token is copied completely without extra spaces.
|
 ### Step 4: Request Body Structure
Build the payload by following the instructions in the section, [Step 2: Request Body Structure](#step-2-request-body-structure) and add the custom objects you created to include the additional enriched data in the payload.
### Step 5: Test and Activate
Ensure you test the Webhook to ensure data reaches MoEngage. After you confirm the data is received correctly, **Click series live**.
### Step 4: Request Body Structure
Build the payload by following the instructions in the section, [Step 2: Request Body Structure](#step-2-request-body-structure) and add the custom objects you created to include the additional enriched data in the payload.
### Step 5: Test and Activate
Ensure you test the Webhook to ensure data reaches MoEngage. After you confirm the data is received correctly, **Click series live**.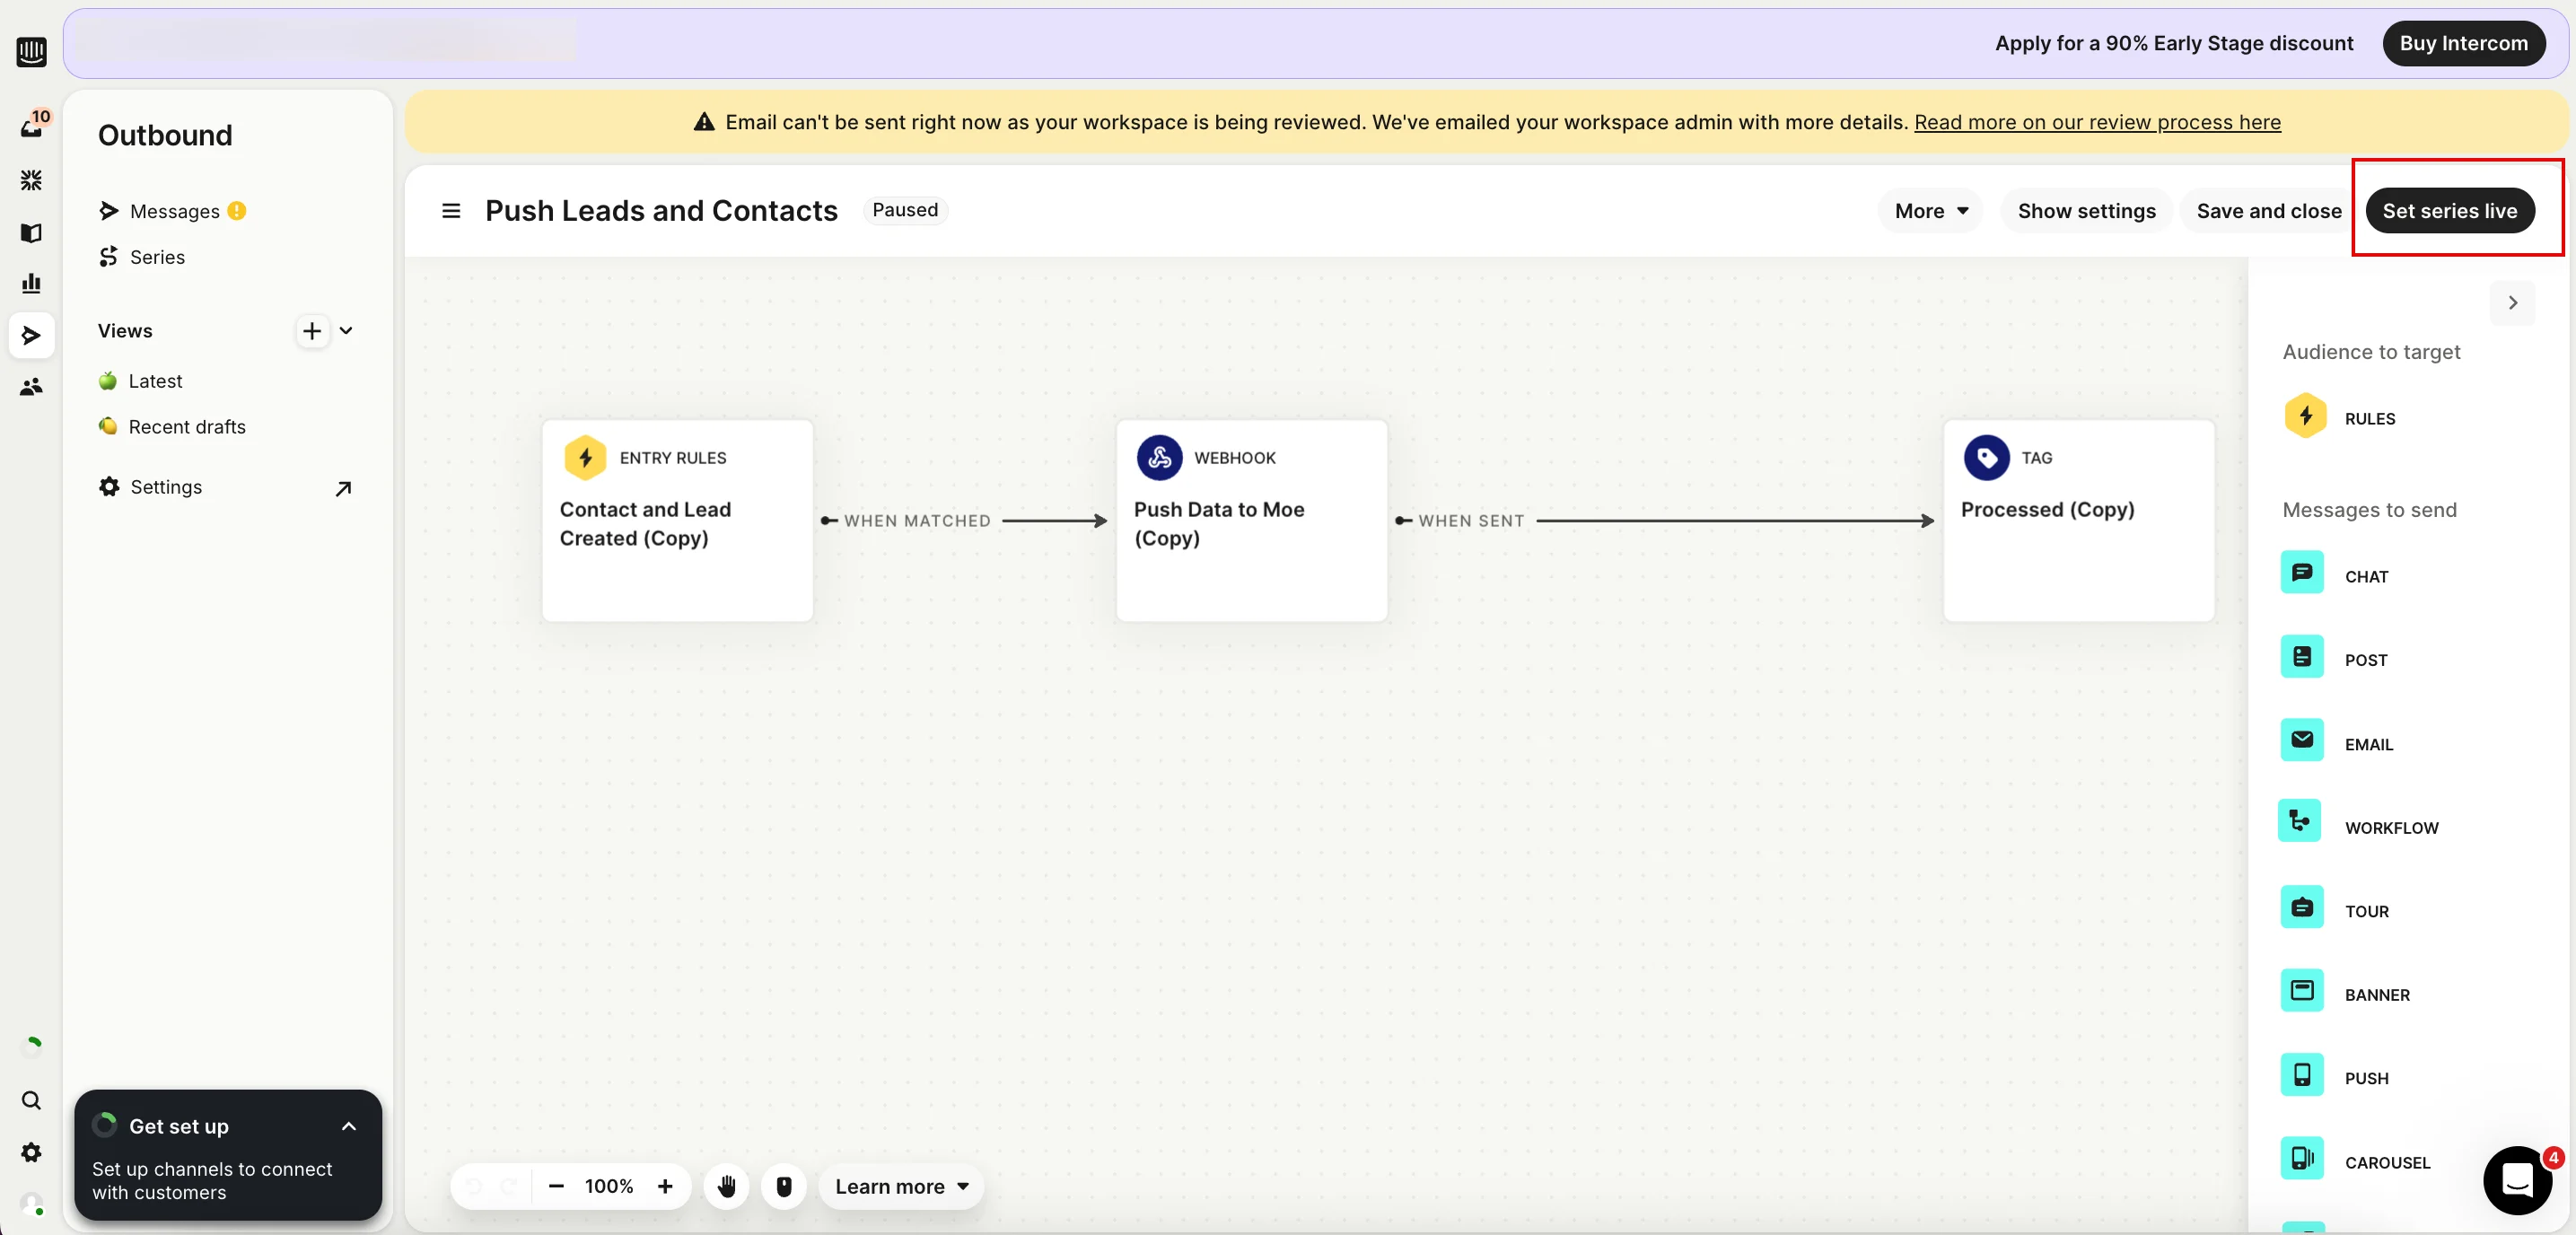 ## Rate Limits
To maintain platform stability, MoEngage limits ingestion of Intercom data to a maximum of 500 requests per second (RPS) per workspace. If your workspace exceeds this limit, MoEngage returns an HTTP `429 (Too Many Requests)` status code.
Refer to Intercom's default retry policy to understand how rate limiting affects your data flow.
**Retry Exhaustion**: If Intercom exhausts all retry attempts for a batch of data, you must contact the Intercom Support Team to replay the failed requests.
## Rate Limits
To maintain platform stability, MoEngage limits ingestion of Intercom data to a maximum of 500 requests per second (RPS) per workspace. If your workspace exceeds this limit, MoEngage returns an HTTP `429 (Too Many Requests)` status code.
Refer to Intercom's default retry policy to understand how rate limiting affects your data flow.
**Retry Exhaustion**: If Intercom exhausts all retry attempts for a batch of data, you must contact the Intercom Support Team to replay the failed requests.