> ## Documentation Index
> Fetch the complete documentation index at: https://moengage.com/docs/llms.txt
> Use this file to discover all available pages before exploring further.
# Apsalar
## Introduction
Apsalar, one of MoEngage's Technology Partners, allows you to track install acquisition data to enhance your marketing automation campaigns on MoEngage.
## Scope
Use the Publisher Name and Campaign Name of install in MoEngage.
## Integration
**Prerequisites**
* Ensure you have an active Apsalar (Singular) account.
* Ensure you have access to the **Settings** section on your MoEngage dashboard.
## Steps
To integrate Apsalar with MoEngage, follow the steps below.
### Step 1: Get the MoEngage attribution tracking app key
Log in to the MoEngage Dashboard and follow these steps:
1. Navigate to **Settings** > **Analytics** > **Acquisition tracking**.
2. Turn on **Acquisition Tracking**, and select **Apsalar** from the dropdown. This generates an **App Key**. 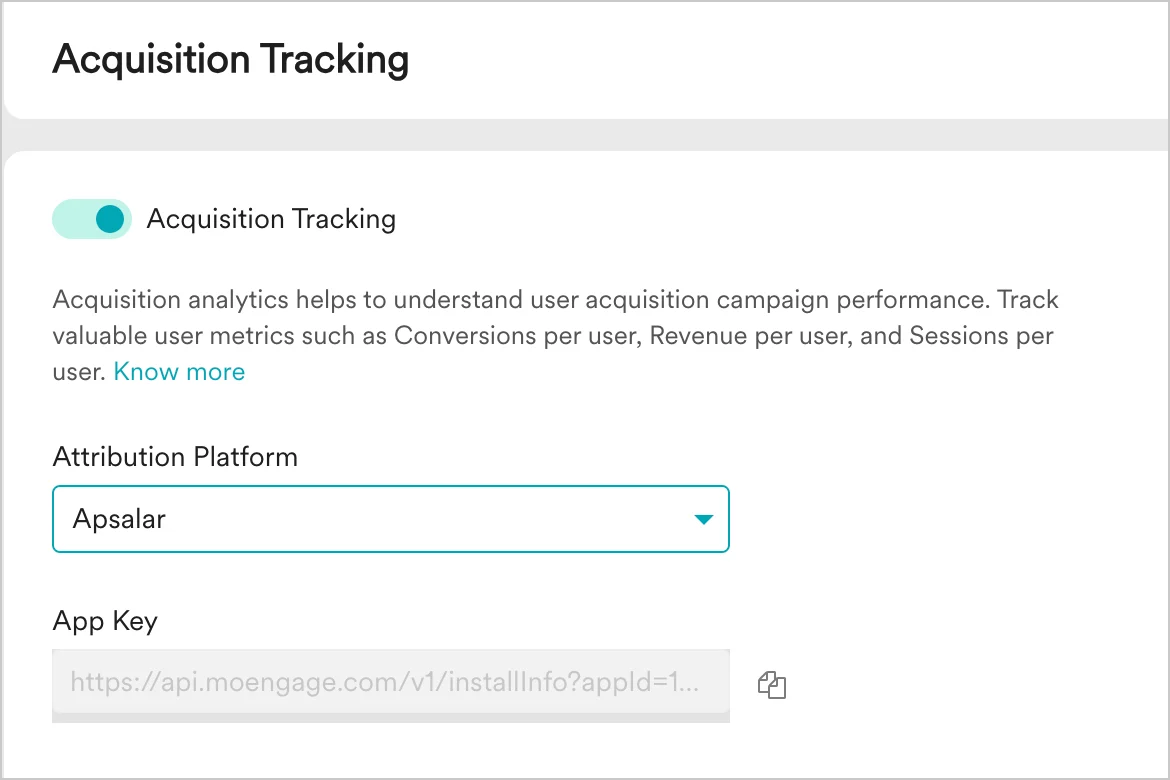 3. Click **Save**.
4. Copy the **App Key**. You will need it to configure MoEngage on Apsalar.
### Step 2: Configure settings on the Apsalar dashboard
To configure the settings on the Apsalar dashboard, follow the steps in the [Apsalar (Singular) partner-configuration document](https://support.singular.net/hc/en-us/articles/360053018851-How-to-Configure-Partner-Settings-and-Postbacks#Configuration_Steps).
Enter the following fields on the Apsalar dashboard:
| Field | Description |
| ------------------------------------------ | -------------------------------------------------------------------------------------------------------------------------------------------------------------------------------------------------------------------------------------------------------------------------------------------------------- |
| **MoEngage Data Center** | Select one of the following depending on the MoEngage Data Center you have signed up with: `DC-01`, `DC-02`, or `DC-03`. For details on identifying your MoEngage data center, refer to [Data Centers in MoEngage](https://www.moengage.com/docs/user-guide/data/key-concepts/data-centers-in-moengage). |
| **MoEngage Workspace ID** (earlier App ID) | Fetch the Workspace ID from the MoEngage dashboard by navigating to **Settings** > **Account** > **General settings** > **Workspace ID (earlier app id)**. |
| **MoEngage App Key** | Fetch the App Key from the MoEngage dashboard by navigating to **Settings** > **Account** > **APIs** > **API keys**. |
## How to use the acquisition data in MoEngage
After MoEngage starts receiving data from Apsalar, you can leverage this data in the following ways.
### User attributes
MoEngage tracks the following user attributes:
| Attribute | Description |
| -------------------- | ------------------------------------------------------ |
| `Publisher name` | Name of the campaign publisher. |
| `datetime` | Timestamp of the install. |
| `fb_campaign_name` | Name of the Facebook campaign that led to the install. |
| `fb_campaign_id` | ID of the Facebook campaign that led to the install. |
| `fb_ad_name` | Name of the Facebook ad. |
| `fb_ad_id` | ID of the Facebook ad. |
| `twtr_campaign_name` | Name of the Twitter campaign that led to the install. |
| `twtr_campaign_id` | ID of the Twitter campaign that led to the install. |
3. Click **Save**.
4. Copy the **App Key**. You will need it to configure MoEngage on Apsalar.
### Step 2: Configure settings on the Apsalar dashboard
To configure the settings on the Apsalar dashboard, follow the steps in the [Apsalar (Singular) partner-configuration document](https://support.singular.net/hc/en-us/articles/360053018851-How-to-Configure-Partner-Settings-and-Postbacks#Configuration_Steps).
Enter the following fields on the Apsalar dashboard:
| Field | Description |
| ------------------------------------------ | -------------------------------------------------------------------------------------------------------------------------------------------------------------------------------------------------------------------------------------------------------------------------------------------------------- |
| **MoEngage Data Center** | Select one of the following depending on the MoEngage Data Center you have signed up with: `DC-01`, `DC-02`, or `DC-03`. For details on identifying your MoEngage data center, refer to [Data Centers in MoEngage](https://www.moengage.com/docs/user-guide/data/key-concepts/data-centers-in-moengage). |
| **MoEngage Workspace ID** (earlier App ID) | Fetch the Workspace ID from the MoEngage dashboard by navigating to **Settings** > **Account** > **General settings** > **Workspace ID (earlier app id)**. |
| **MoEngage App Key** | Fetch the App Key from the MoEngage dashboard by navigating to **Settings** > **Account** > **APIs** > **API keys**. |
## How to use the acquisition data in MoEngage
After MoEngage starts receiving data from Apsalar, you can leverage this data in the following ways.
### User attributes
MoEngage tracks the following user attributes:
| Attribute | Description |
| -------------------- | ------------------------------------------------------ |
| `Publisher name` | Name of the campaign publisher. |
| `datetime` | Timestamp of the install. |
| `fb_campaign_name` | Name of the Facebook campaign that led to the install. |
| `fb_campaign_id` | ID of the Facebook campaign that led to the install. |
| `fb_ad_name` | Name of the Facebook ad. |
| `fb_ad_id` | ID of the Facebook ad. |
| `twtr_campaign_name` | Name of the Twitter campaign that led to the install. |
| `twtr_campaign_id` | ID of the Twitter campaign that led to the install. |
 ### Analyze the performance of different publishers
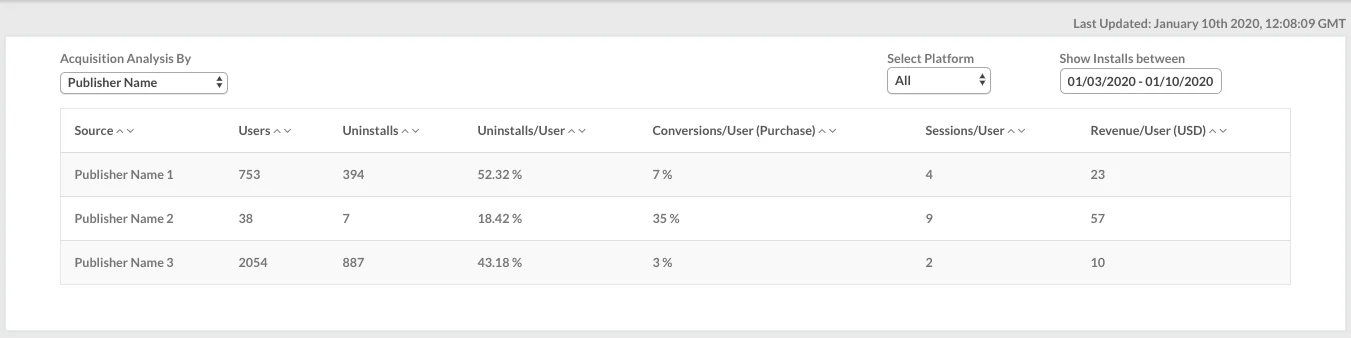
Branch Integration can help in analyzing the effectiveness of your app install campaigns and sources in MoEngage. With the help of the data you are already tracking in MoEngage like user events, conversion goals, and uninstalls, you can compare the performance of different app install campaigns you are running and also analyze the relative performance of installs from different publishers to optimize your marketing spends.
To analyze this data, view the [MoEngage acquisition dashboard](https://app.moengage.com/v3/#/acquisition).
### Analyze the performance of different publishers
Branch Integration can help in analyzing the effectiveness of your app install campaigns and sources in MoEngage. With the help of the data you are already tracking in MoEngage like user events, conversion goals, and uninstalls, you can compare the performance of different app install campaigns you are running and also analyze the relative performance of installs from different publishers to optimize your marketing spends.
To analyze this data, view the [MoEngage acquisition dashboard](https://app.moengage.com/v3/#/acquisition).
 If you use MoEngage Analytics, you can leverage the Publisher Name and Campaign Name information of installs to analyze your user funnels.
### Analyze the performance of different campaigns
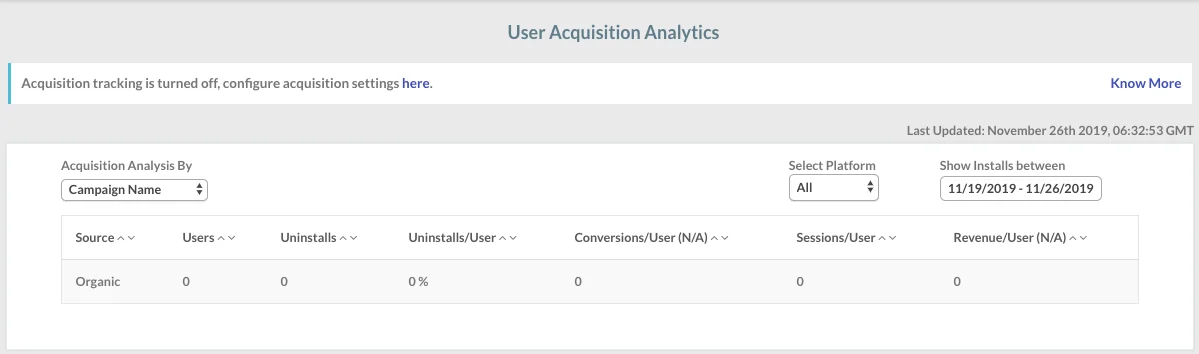
After the integration is enabled, you can also view your acquisition data analysis on the acquisition dashboard by navigating to **Analyze** > **Acquisitions** in the dashboard sidebar.
If you use MoEngage Analytics, you can leverage the Publisher Name and Campaign Name information of installs to analyze your user funnels.
### Analyze the performance of different campaigns
After the integration is enabled, you can also view your acquisition data analysis on the acquisition dashboard by navigating to **Analyze** > **Acquisitions** in the dashboard sidebar.
 ### Enhanced onboarding campaigns
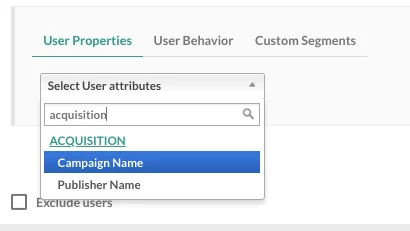
You can use the Publisher Name and Campaign Name of install—available as user properties in MoEngage—to create segments and personalize the push notifications, in-app messages, emails, and SMS that you send through MoEngage.
Install attribution data gives you an insight into how users could progress in their lifecycle right when they install the app. This is a very useful piece of information and can help you enhance the performance of your onboarding campaigns by improving retention, reducing the time to first conversion, and driving a higher LTV per user.
| Publisher category | Use case |
| -------------------------------------------------- | ----------------------------------------------------------------------------------------------------------------------------------------------------------- |
| Publishers where average sessions per user are low | Send push notifications periodically to increase the average number of sessions per user, right from the time users install the app. |
| Publishers where average LTV is high | These are your potential premium users. Implement a campaign strategy to nurture them into your premium-user segment. |
| Publishers where the uninstall rate is high | Identify users with a higher propensity to churn immediately after install, and incentivize them to make a first purchase—which can reduce your churn rate. |
### Enhanced onboarding campaigns
You can use the Publisher Name and Campaign Name of install—available as user properties in MoEngage—to create segments and personalize the push notifications, in-app messages, emails, and SMS that you send through MoEngage.
Install attribution data gives you an insight into how users could progress in their lifecycle right when they install the app. This is a very useful piece of information and can help you enhance the performance of your onboarding campaigns by improving retention, reducing the time to first conversion, and driving a higher LTV per user.
| Publisher category | Use case |
| -------------------------------------------------- | ----------------------------------------------------------------------------------------------------------------------------------------------------------- |
| Publishers where average sessions per user are low | Send push notifications periodically to increase the average number of sessions per user, right from the time users install the app. |
| Publishers where average LTV is high | These are your potential premium users. Implement a campaign strategy to nurture them into your premium-user segment. |
| Publishers where the uninstall rate is high | Identify users with a higher propensity to churn immediately after install, and incentivize them to make a first purchase—which can reduce your churn rate. |