> ## Documentation Index
> Fetch the complete documentation index at: https://moengage.com/docs/llms.txt
> Use this file to discover all available pages before exploring further.
# Meiro
> Sync unified customer data and segments from Meiro's private-first CDP to MoEngage for compliant, personalized real-time engagement.
[Meiro](https://www.meiro.io/integrations/) is a composable, private-first customer data platform (CDP) built for enterprises in regulated regions. It unifies complex customer data, including online, offline, and transactional data, into a single, compliant view.
## MoEngage × Meiro
This integration allows you to empower MoEngage's real-time engagement platform with secure, high-fidelity customer data from Meiro. It ensures your campaigns are highly personalized and fully compliant with data residency requirements ("Meta Region" compliance).
With this integration, you can:
* **Audience Sync (Outbound)** : Push hyper-segmented, compliance-vetted audiences from Meiro to MoEngage.
* **User and Attribute Sync (Outbound)** : Send enriched profiles and Meiro's Calculated Attributes (for example, Customer Lifetime Value (CLV) Score) to MoEngage.
* **Engagement Stream (Inbound)** : Feed MoEngage campaign data, such as opens and clicks, back into Meiro CDP for analysis and audience refinement.
## Use Cases
Integrating Meiro with MoEngage helps with the following use cases:
* **Enhanced personalization** : Drive relevant messages by using Meiro's predictive scores (Churn Propensity, LTV Tier) for MoEngage segments, allowing for proactive, AI-driven journeys.
* **Compliance first activation** : Ensure all MoEngage targeting is filtered by Meiro's Single Customer View to respect customer privacy consent flags and strict data residency rules.
* **Closed loop optimisation** : Use MoEngage campaign engagement data (opens, clicks) streamed back to Meiro to instantly refine audience membership and retarget non-engaged users.
* **Unified customer view:** Bridge the gap between offline and online data. Meiro provides MoEngage with unified profiles that include secure transactional and CRM history.
# Integration
Before you begin the configuration, ensure you have the following:
* An active Meiro CDP deployment (VPC or Private Cloud) and access to Meiro Integrations.
* An active MoEngage account with access to API keys and Data Center information.
| Integration Scope | Details |
| -------------------------------------------------- | -------------------------------------------------------------------------------------------------------------------------------------------- |
| Sync Meiro audiences to MoEngage | Uses Meiro Integrations \[Reverse ETL (extract, transform, and load)] to push segments as custom attributes or lists for targeted campaigns. |
| Send Meiro data (users and attributes) to MoEngage | Enriches MoEngage profiles with attributes like CLV, Churn Propensity, and privacy consent flags. |
| Send MoEngage campaign data back to Meiro CDP | Ingests engagement events (opens, clicks) through Meiro Events for closed-loop analysis. |
# Outbound Integration (Meiro to MoEngage)
This section covers setting up MoEngage as a destination using Meiro's Reverse ETL through Meiro Integrations.
## Step 1: Get Your MoEngage Endpoint
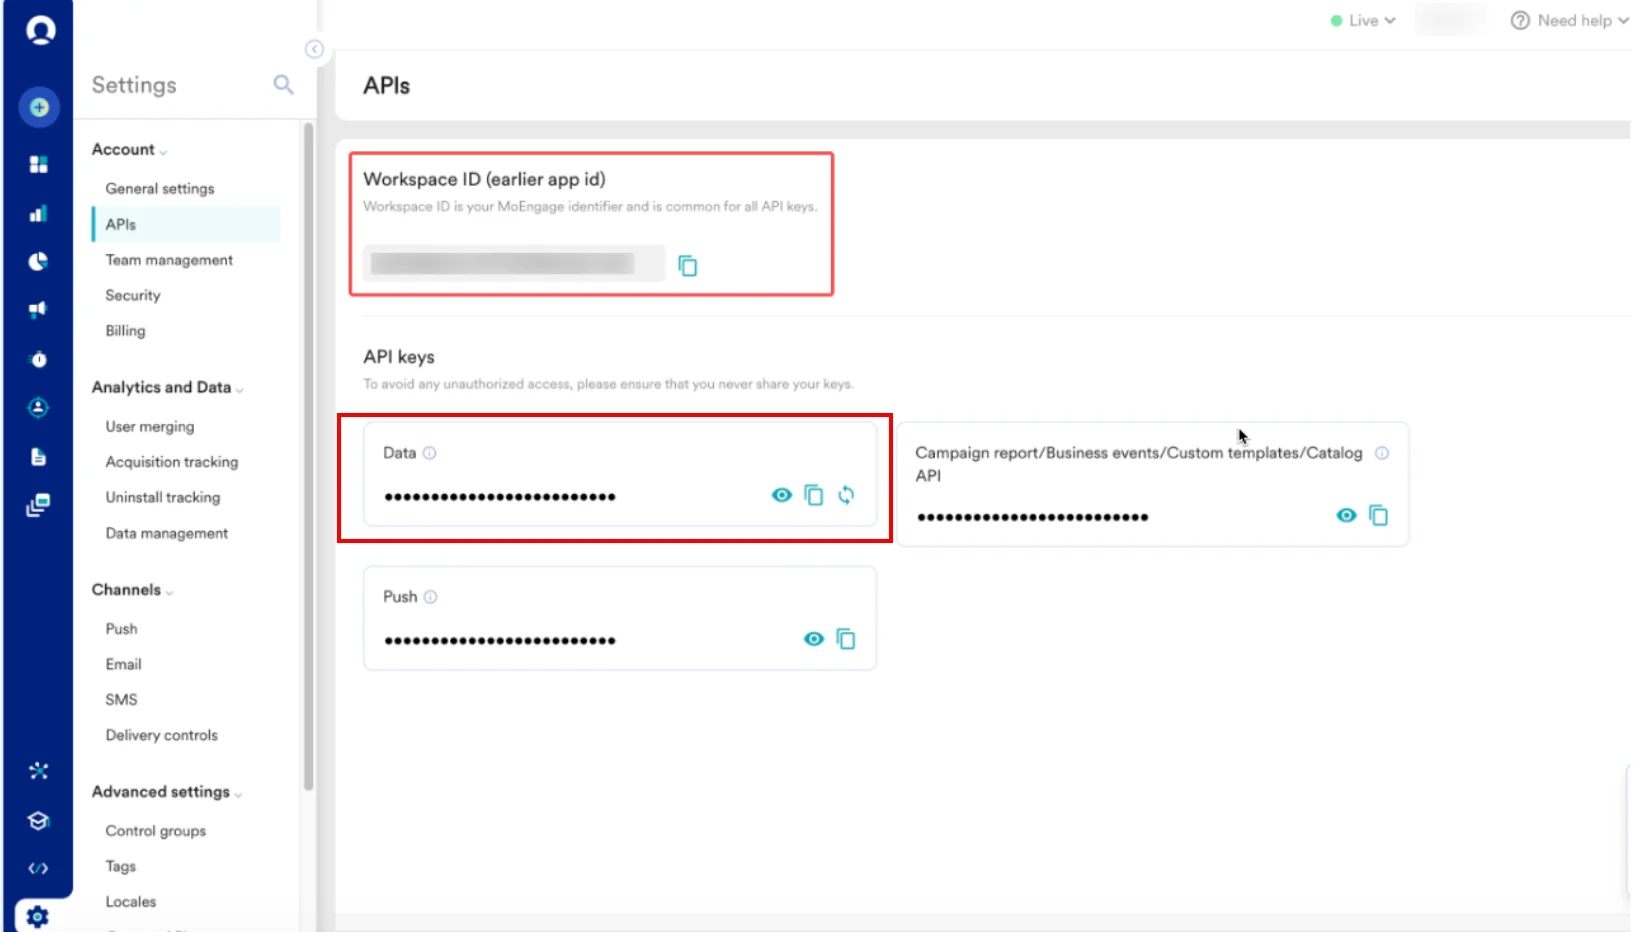
To get your MoEngage API credentials, perform the following steps:
1. On the left navigation menu in the MoEngage UI, click **Settings** > **Account** > **APIs**.
2. On the APIs page, copy the following credentials:
1. **Workspace ID** (**earlier app id)**
2. **API key**
3. Find your data center code from your dashboard's URL. The following table describes the data center names and URLs:
| Data Center Name | Dashboard URL |
| ---------------- | ---------------------------------------------------------------------- |
| DC-01 | [https://dashboard-01.moengage.com](https://dashboard-01.moengage.com) |
| DC-02 | [https://dashboard-02.moengage.com](https://dashboard-02.moengage.com) |
| DC-03 | [https://dashboard-03.moengage.com](https://dashboard-03.moengage.com) |
| DC-04 | [https://dashboard-04.moengage.com](https://dashboard-04.moengage.com) |
| DC-05 | [https://dashboard-05.moengage.com](https://dashboard-05.moengage.com) |
| DC-06 | [https://dashboard-06.moengage.com](https://dashboard-06.moengage.com) |
For more information, refer [Data Centers in MoEngage](https://moengage-user-guide.mintlify.app/user-guide/data/key-concepts/data-centers-in-moengage).
 ## Step 2: Create a New Destination in Meiro Integrations
To create a new destination, perform the following steps:
1. Log in to your Meiro Integrations dashboard.
2. Navigate to **Destinations** and click **+ Add New Destination**.
3. Search for and select the **MoEngage** tile.
4. Enter the **Destination Name** and paste the **MoEngage API Key** , **Workspace ID** , and **Data Center** code.
5. Click **Save Configuration**.
## Step 3: Activate the Data Push
1. Navigate to **Workspaces** in the **Meiro Integrations** dashboard\*\*.\*\*
2. Open an existing workflow or click **+ Create New Workspace**.
3. Add a **Loader Component** and select your configured **MoEngage Destination**.
4. Map the **Source Fields** (attributes from Meiro's Single Customer View) to the **Destination Fields** (MoEngage Custom Attributes).
* The *primary identifier* \[customer\_id or Email (Raw)] must be mapped.
5. Set the **Schedule** for the data sync (for example, Hourly or Daily).
6. Click **Activate**. Your enriched audience data is now securely streaming to MoEngage.
# Inbound Integration (MoEngage to Meiro)
This section details how to configure MoEngage Streams to send campaign engagement data back to the **Meiro Events** (ME) platform.
This feature requires MoEngage's Streams add-on. Contact your MoEngage CSM to enable it.
## Step 1: Generate Meiro Events Webhook Credentials (Source)
To generate Meiro events webhook credentials, perform the following steps:
1. Log in to your Meiro dashboard and navigate to **Integrations** > **Sources**.
2. Click +**Add New Source** and select **MoEngage Events Stream** (under Customer Engagement Channels).
3. Enter a descriptive name (for example, MoEngage\_Feedback).
4. After creation, access the I**mplementation Details** tab.
5. Copy the generated **API URL** (Webhook URL) and the **WRITE KEY**.
## Step 2: Activate MoEngage Streams
To activate the MoEngage streams, perform the following steps:
1. Provide the **Meiro API URL** and **WRITE KEY** to your MoEngage Customer Success Manager (CSM).
2. Contact your MoEngage CSM to configure MoEngage Streams to forward engagement events (for example, Email\_Opened, Campaign\_Clicked) to this Meiro endpoint.
## Step 3: Verify Data Usage in Meiro
1. In the Meiro dashboard, navigate to **Integrations** > **Sources**.
2. Select the **PREVIEW DATA** tab to verify the stream. The incoming engagement data immediately updates the **Single Customer View** , allowing the **Meiro Audience Center** to create closed-loop audiences and trigger personalized journeys.
## Step 2: Create a New Destination in Meiro Integrations
To create a new destination, perform the following steps:
1. Log in to your Meiro Integrations dashboard.
2. Navigate to **Destinations** and click **+ Add New Destination**.
3. Search for and select the **MoEngage** tile.
4. Enter the **Destination Name** and paste the **MoEngage API Key** , **Workspace ID** , and **Data Center** code.
5. Click **Save Configuration**.
## Step 3: Activate the Data Push
1. Navigate to **Workspaces** in the **Meiro Integrations** dashboard\*\*.\*\*
2. Open an existing workflow or click **+ Create New Workspace**.
3. Add a **Loader Component** and select your configured **MoEngage Destination**.
4. Map the **Source Fields** (attributes from Meiro's Single Customer View) to the **Destination Fields** (MoEngage Custom Attributes).
* The *primary identifier* \[customer\_id or Email (Raw)] must be mapped.
5. Set the **Schedule** for the data sync (for example, Hourly or Daily).
6. Click **Activate**. Your enriched audience data is now securely streaming to MoEngage.
# Inbound Integration (MoEngage to Meiro)
This section details how to configure MoEngage Streams to send campaign engagement data back to the **Meiro Events** (ME) platform.
This feature requires MoEngage's Streams add-on. Contact your MoEngage CSM to enable it.
## Step 1: Generate Meiro Events Webhook Credentials (Source)
To generate Meiro events webhook credentials, perform the following steps:
1. Log in to your Meiro dashboard and navigate to **Integrations** > **Sources**.
2. Click +**Add New Source** and select **MoEngage Events Stream** (under Customer Engagement Channels).
3. Enter a descriptive name (for example, MoEngage\_Feedback).
4. After creation, access the I**mplementation Details** tab.
5. Copy the generated **API URL** (Webhook URL) and the **WRITE KEY**.
## Step 2: Activate MoEngage Streams
To activate the MoEngage streams, perform the following steps:
1. Provide the **Meiro API URL** and **WRITE KEY** to your MoEngage Customer Success Manager (CSM).
2. Contact your MoEngage CSM to configure MoEngage Streams to forward engagement events (for example, Email\_Opened, Campaign\_Clicked) to this Meiro endpoint.
## Step 3: Verify Data Usage in Meiro
1. In the Meiro dashboard, navigate to **Integrations** > **Sources**.
2. Select the **PREVIEW DATA** tab to verify the stream. The incoming engagement data immediately updates the **Single Customer View** , allowing the **Meiro Audience Center** to create closed-loop audiences and trigger personalized journeys.