> ## Documentation Index
> Fetch the complete documentation index at: https://moengage.com/docs/llms.txt
> Use this file to discover all available pages before exploring further.
# Android SDK Initialization
> Initialize the MoEngage SDK in your Unity project's Android Application class and manifest.
# Enable Custom Manifest File
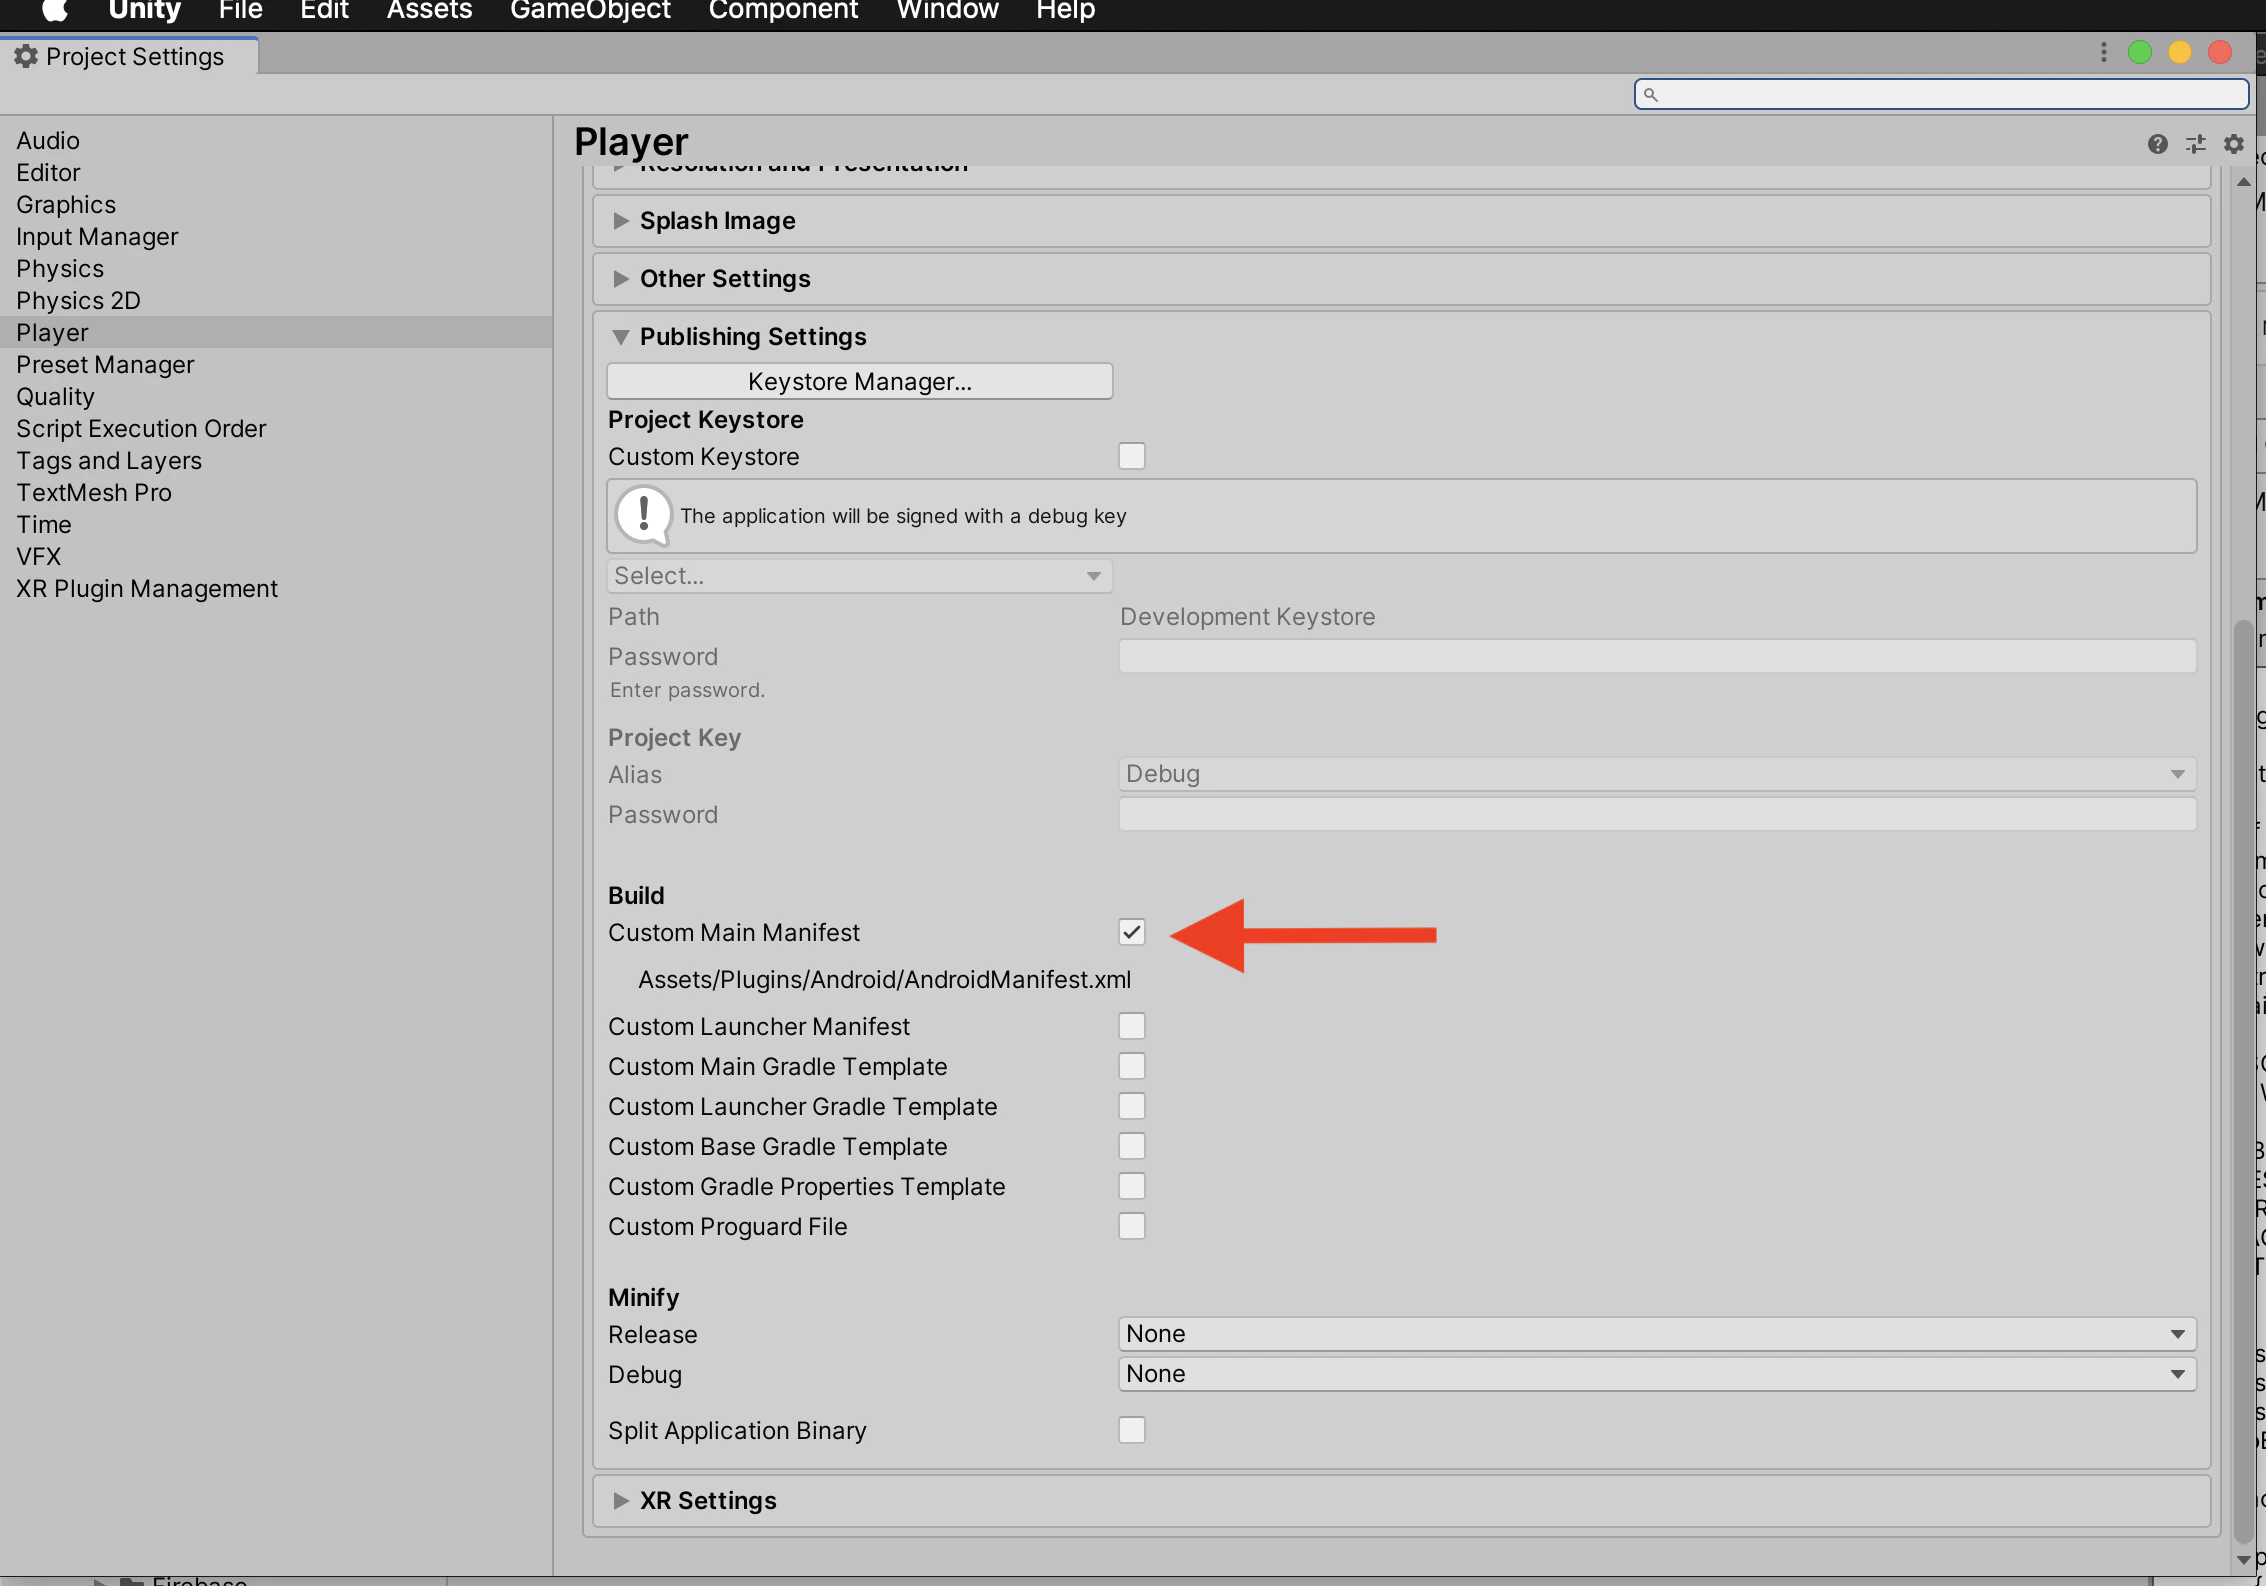
Navigate to Build Settings and switch the platform to Android. Then go to **Player Settings --> Player --> Android --> Publishing Settings**.\
Under the Build Heading check **Custom Main Manifest**.
 # Adding Dependencies
MoEngage plugin depends on the following Jetpack libraries. In case you don't have them in your application already, please add them.\
You can choose to enable the custom gradle template in your Application's **Player Settings** and the below dependencies.
```Groovy Groovy theme={null}
implementation("androidx.core:core:1.9.0") implementation("androidx.appcompat:appcompat:1.4.2") implementation("androidx.lifecycle:lifecycle-process:2.5.1")
```
# Add Application Class
* Create a Java/Kotlin class and add it to the **Assets --> Plugins --> Android** folder. Extend the class with **android.app.Application** and override the onCreate().
* Declare the above-created class in the Manifest file inside the application tag.
```AndroidManifest.xml AndroidManifest.xml theme={null}
```
The Manifest file can be found in the **Assets--> Plugins --> Android** folder.
# SDK Initialization
Get the Workspace ID from **Dashboard → Settings → Workspace → General** on the MoEngage dashboard and initialize the MoEngage SDK in the **Application class's onCreate()** method.
It is recommended that you initialize the SDK on the main thread inside **onCreate()** and not create a worker thread and initialize the SDK on that thread.
```kotlin Kotlin theme={null}
import com.moengage.unity.wrapper.MoEInitializer
import com.moengage.core.MoEngage
import com.moengage.core.DataCenter
// "YOUR_Workspace_ID" is the Workspace ID from the dashboard.
val moEngage = MoEngage.Builder(this, "YOUR_Workspace_ID", DataCenter.DATA_CENTER_X)
MoEInitializer.initialiseDefaultInstance(applicationContext, moEngage)
```
```java Java theme={null}
import com.moengage.unity.wrapper.MoEInitializer;
import com.moengage.core.MoEngage;
import com.moengage.core.DataCenter;
// "YOUR_Workspace_ID" is the Workspace ID from the dashboard.
MoEngage.Builder moEngage = new MoEngage.Builder(this, "YOUR_Workspace_ID", DataCenter.DATA_CENTER_X);
MoEInitializer.INSTANCE.initialiseDefaultInstance(applicationContext, moEngage);
```
## File-Based Initialization
As an alternative to programmatic initialization, you can initialize the SDK using a configuration file. Create `moengage_init_config.xml` in your Android library plugin at `Assets/Plugins/Android/.androidlib/res/values/moengage_init_config.xml` and specify your workspace ID and data center:
```xml moengage_init_config.xml theme={null}
YOUR_Workspace_ID
DATA_CENTER_X
```
For more information on creating an Android library plugin, refer to the [Unity documentation](https://docs.unity3d.com/6000.4/Documentation/Manual/android-library-plugin-create.html).
You must also call `MoEInitializer.initialiseDefaultInstance(application)` in your Application class alongside the file-based config. When this file is present, the SDK reads configuration from it at startup. Programmatic initialization takes precedence if both are provided.
Following details of the different data centers you need to set based on the dashboard hosts
| Data Center | Dashboard host |
| -------------------------- | ------------------------- |
| DataCenter.DATA\_CENTER\_1 | dashboard-01.moengage.com |
| DataCenter.DATA\_CENTER\_2 | dashboard-02.moengage.com |
| DataCenter.DATA\_CENTER\_3 | dashboard-03.moengage.com |
| DataCenter.DATA\_CENTER\_4 | dashboard-04.moengage.com |
| DataCenter.DATA\_CENTER\_5 | dashboard-05.moengage.com |
For more information about the detailed list of possible configurations, refer to the [API reference](https://moengage.github.io/android-api-reference/core/com.moengage.core/\[android-jvm]-mo-engage/-builder/index.html).
All the configurations are added to the builder before initialization. If you are calling initialize at multiple places, ensure that all the required flags and configurations are set each time you initialize to maintain consistency in behavior.
# Exclude MoEngage Storage File from Auto-Backup
This is a mandatory integration step and is very essential to prevent your data from getting corrupted. Android's auto back-up service periodically backs up Shared Preference files, Database files, etc, more details [here](https://developer.android.com/guide/topics/data/autobackup). This backup results in MoEngage SDK's identifiers being backed up and restored after re-install.This restoration of the identifier results in your data being corrupted and users not being reachable via push notifications.
To ensure data is not corrupted after a backup is restored, opt out of MoEngage SDK's storage files. Refer to [Exclude MoEngage Storage File from the Auto-Backup](/docs/developer-guide/android-sdk/sdk-integration/basic-integration/exclude-mo-engage-storage-file-from-auto-backup) section of the documentation to learn more about which files to exclude.
# Adding Dependencies
MoEngage plugin depends on the following Jetpack libraries. In case you don't have them in your application already, please add them.\
You can choose to enable the custom gradle template in your Application's **Player Settings** and the below dependencies.
```Groovy Groovy theme={null}
implementation("androidx.core:core:1.9.0") implementation("androidx.appcompat:appcompat:1.4.2") implementation("androidx.lifecycle:lifecycle-process:2.5.1")
```
# Add Application Class
* Create a Java/Kotlin class and add it to the **Assets --> Plugins --> Android** folder. Extend the class with **android.app.Application** and override the onCreate().
* Declare the above-created class in the Manifest file inside the application tag.
```AndroidManifest.xml AndroidManifest.xml theme={null}
```
The Manifest file can be found in the **Assets--> Plugins --> Android** folder.
# SDK Initialization
Get the Workspace ID from **Dashboard → Settings → Workspace → General** on the MoEngage dashboard and initialize the MoEngage SDK in the **Application class's onCreate()** method.
It is recommended that you initialize the SDK on the main thread inside **onCreate()** and not create a worker thread and initialize the SDK on that thread.
```kotlin Kotlin theme={null}
import com.moengage.unity.wrapper.MoEInitializer
import com.moengage.core.MoEngage
import com.moengage.core.DataCenter
// "YOUR_Workspace_ID" is the Workspace ID from the dashboard.
val moEngage = MoEngage.Builder(this, "YOUR_Workspace_ID", DataCenter.DATA_CENTER_X)
MoEInitializer.initialiseDefaultInstance(applicationContext, moEngage)
```
```java Java theme={null}
import com.moengage.unity.wrapper.MoEInitializer;
import com.moengage.core.MoEngage;
import com.moengage.core.DataCenter;
// "YOUR_Workspace_ID" is the Workspace ID from the dashboard.
MoEngage.Builder moEngage = new MoEngage.Builder(this, "YOUR_Workspace_ID", DataCenter.DATA_CENTER_X);
MoEInitializer.INSTANCE.initialiseDefaultInstance(applicationContext, moEngage);
```
## File-Based Initialization
As an alternative to programmatic initialization, you can initialize the SDK using a configuration file. Create `moengage_init_config.xml` in your Android library plugin at `Assets/Plugins/Android/.androidlib/res/values/moengage_init_config.xml` and specify your workspace ID and data center:
```xml moengage_init_config.xml theme={null}
YOUR_Workspace_ID
DATA_CENTER_X
```
For more information on creating an Android library plugin, refer to the [Unity documentation](https://docs.unity3d.com/6000.4/Documentation/Manual/android-library-plugin-create.html).
You must also call `MoEInitializer.initialiseDefaultInstance(application)` in your Application class alongside the file-based config. When this file is present, the SDK reads configuration from it at startup. Programmatic initialization takes precedence if both are provided.
Following details of the different data centers you need to set based on the dashboard hosts
| Data Center | Dashboard host |
| -------------------------- | ------------------------- |
| DataCenter.DATA\_CENTER\_1 | dashboard-01.moengage.com |
| DataCenter.DATA\_CENTER\_2 | dashboard-02.moengage.com |
| DataCenter.DATA\_CENTER\_3 | dashboard-03.moengage.com |
| DataCenter.DATA\_CENTER\_4 | dashboard-04.moengage.com |
| DataCenter.DATA\_CENTER\_5 | dashboard-05.moengage.com |
For more information about the detailed list of possible configurations, refer to the [API reference](https://moengage.github.io/android-api-reference/core/com.moengage.core/\[android-jvm]-mo-engage/-builder/index.html).
All the configurations are added to the builder before initialization. If you are calling initialize at multiple places, ensure that all the required flags and configurations are set each time you initialize to maintain consistency in behavior.
# Exclude MoEngage Storage File from Auto-Backup
This is a mandatory integration step and is very essential to prevent your data from getting corrupted. Android's auto back-up service periodically backs up Shared Preference files, Database files, etc, more details [here](https://developer.android.com/guide/topics/data/autobackup). This backup results in MoEngage SDK's identifiers being backed up and restored after re-install.This restoration of the identifier results in your data being corrupted and users not being reachable via push notifications.
To ensure data is not corrupted after a backup is restored, opt out of MoEngage SDK's storage files. Refer to [Exclude MoEngage Storage File from the Auto-Backup](/docs/developer-guide/android-sdk/sdk-integration/basic-integration/exclude-mo-engage-storage-file-from-auto-backup) section of the documentation to learn more about which files to exclude.