> ## Documentation Index
> Fetch the complete documentation index at: https://moengage.com/docs/llms.txt
> Use this file to discover all available pages before exploring further.
# Migrate To The Extension Integrator Tool
> Migrate from a manual iOS notification extension setup to the MoEngage Extension Integrator Tool in your React Native app.
All steps in this guide are performed in Xcode, open your iOS project by launching `ios/YourApp.xcworkspace` in Xcode before proceeding.
To migrate from an existing manual implementation to the integrator tool, follow the below steps:
### Step 1: Prerequisites
Before proceeding, ensure the following are in place:
* Ensure you are using MoEngage React Native SDK version [12.6.0](/docs/release-notes/sdks/react-native#core-12-6-0) or above to utilize the extension integrator tool.
* **SDK initialization:** Initialize the MoEngage SDK using [file-based initialization](/docs/developer-guide/react-native-sdk/sdk-integration/react-native/sdk-initialization/file-based-initialization/file-based-initialization).
* **App Group configuration:** Provide the `AppGroupName` key (for example, `group.com.organization.app`) you are using with your `sdkConfig.appGroupID`.
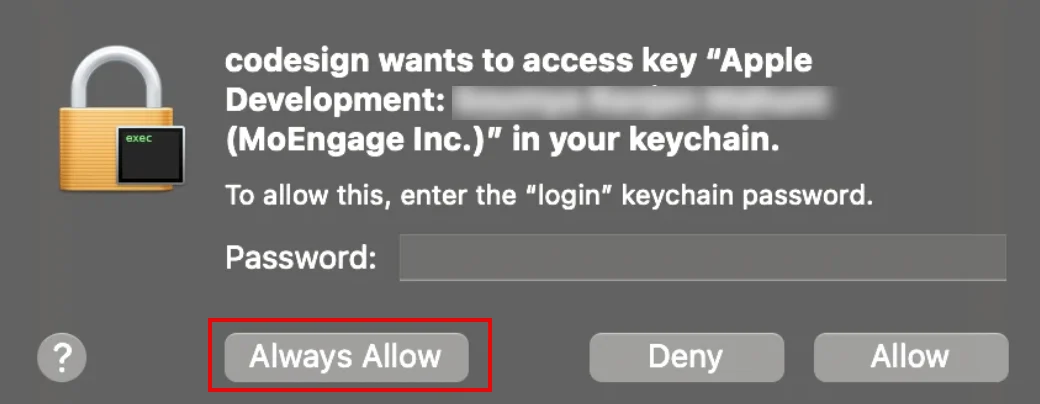
* After integration is complete, you may be prompted to access the keychain for code signing. Click **Always Allow.**
 ### Step 2: Integrate MoEngageRichNotification
Integrate `MoEngageRichNotification` if you need to support either of the following push notification features:
* **Rich media** — display images, GIFs, or video in the notification banner
* **Rich push templates** — render interactive notification layouts such as carousel
This step is mandatory if you have integrated the content extension.
To install the `MoEngageRichNotification` through SPM, perform the following steps:
1. Navigate to **File > Add Package**.
2. Enter the repository URL:
* `https://github.com/moengage/apple-sdk.git`
3. Select the **master** branch or a specific version and select **Add Package**.
4. Target the package to your application.
**Information** CocoaPods is being deprecated. MoEngage recommends using Swift Package Manager for all new integrations. For more info, refer [here](/docs/developer-guide/ios-sdk/sdk-integration/basic/sdk-integration).
1. Add the following line to your `Podfile` inside your app target.
The `react-native-moengage` package already brings in `MoEngage-iOS-SDK`, you only need to add the `RichNotification` subspec.
```ruby lines wrap theme={null}
pod 'MoEngage-iOS-SDK/RichNotification'
```
2. Run pod install:
```ruby lines wrap theme={null}
pod repo update
pod install
```
### Step 3: Integrate the extension integrator tool
Automate the extension configuration by adding a custom script to your build process.
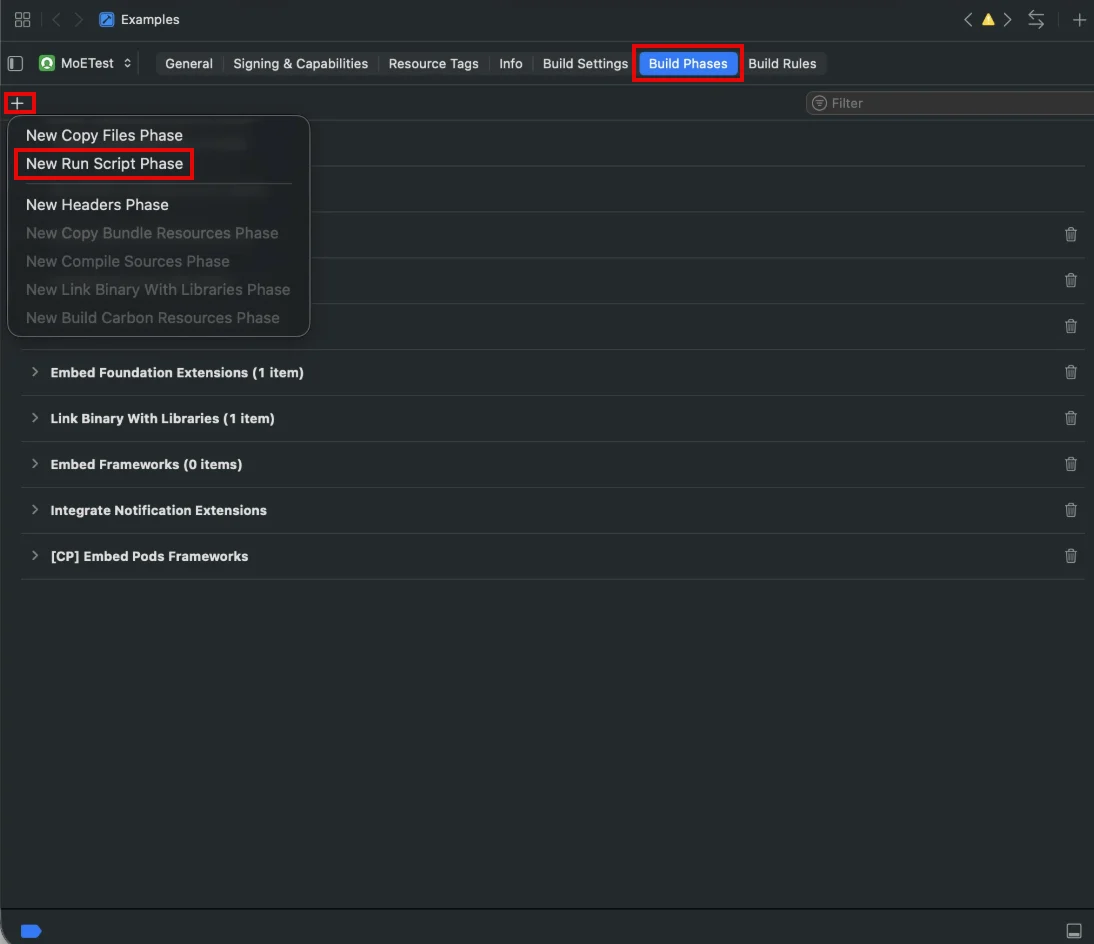
1. In Xcode, select your application target, go to **Build Phases**, and click **+** to add a **New Run Script Phase**.
### Step 2: Integrate MoEngageRichNotification
Integrate `MoEngageRichNotification` if you need to support either of the following push notification features:
* **Rich media** — display images, GIFs, or video in the notification banner
* **Rich push templates** — render interactive notification layouts such as carousel
This step is mandatory if you have integrated the content extension.
To install the `MoEngageRichNotification` through SPM, perform the following steps:
1. Navigate to **File > Add Package**.
2. Enter the repository URL:
* `https://github.com/moengage/apple-sdk.git`
3. Select the **master** branch or a specific version and select **Add Package**.
4. Target the package to your application.
**Information** CocoaPods is being deprecated. MoEngage recommends using Swift Package Manager for all new integrations. For more info, refer [here](/docs/developer-guide/ios-sdk/sdk-integration/basic/sdk-integration).
1. Add the following line to your `Podfile` inside your app target.
The `react-native-moengage` package already brings in `MoEngage-iOS-SDK`, you only need to add the `RichNotification` subspec.
```ruby lines wrap theme={null}
pod 'MoEngage-iOS-SDK/RichNotification'
```
2. Run pod install:
```ruby lines wrap theme={null}
pod repo update
pod install
```
### Step 3: Integrate the extension integrator tool
Automate the extension configuration by adding a custom script to your build process.
1. In Xcode, select your application target, go to **Build Phases**, and click **+** to add a **New Run Script Phase**.
 If you have already added a script phase and configured the input files, you can simply update the run command as described in step 3 below.
2. Add the following paths to the **Input Files** section:
* `$(BUILT_PRODUCTS_DIR)/$(INFOPLIST_PATH)`
* `$(INSTALL_DIR)/$(INFOPLIST_PATH)`
If you have already added a script phase and configured the input files, you can simply update the run command as described in step 3 below.
2. Add the following paths to the **Input Files** section:
* `$(BUILT_PRODUCTS_DIR)/$(INFOPLIST_PATH)`
* `$(INSTALL_DIR)/$(INFOPLIST_PATH)`
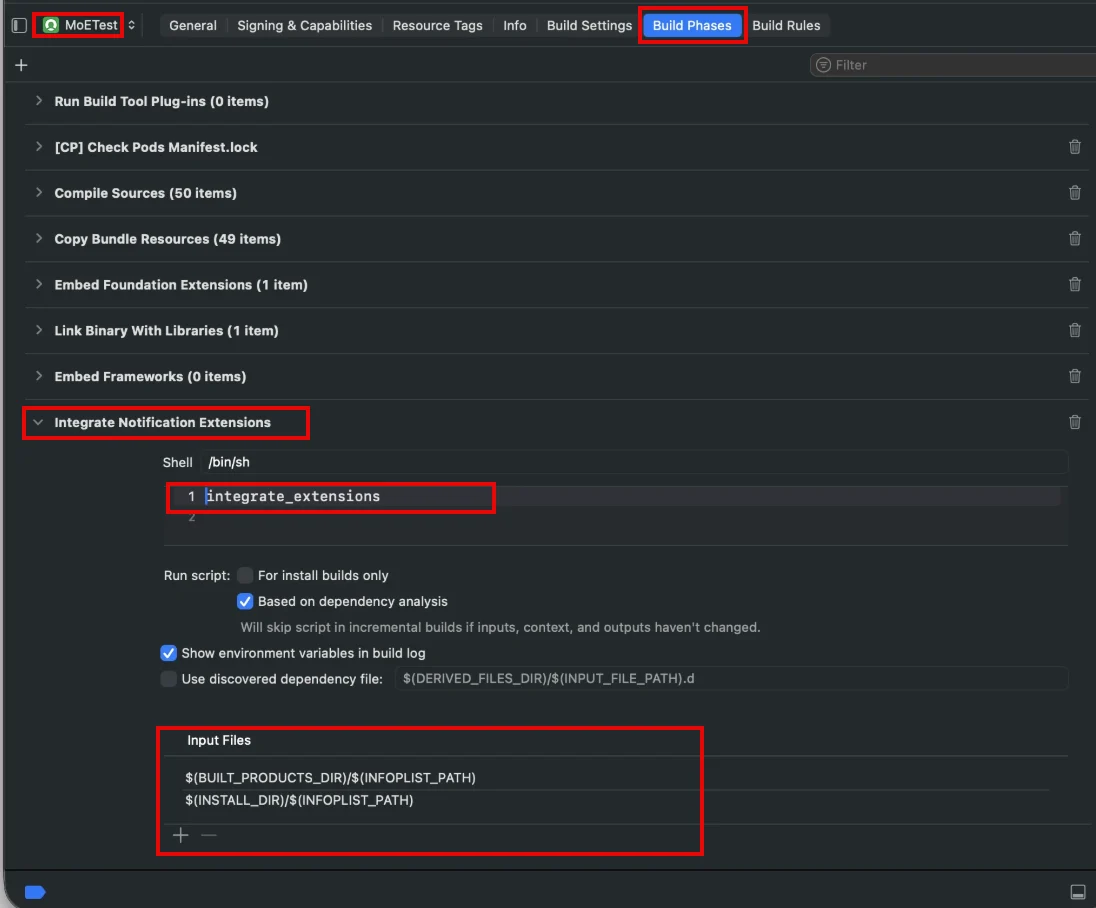 3. In the shell script input box of the Run Script Phase added in step 1, enter the command relevant to your dependency manager, replacing `$OPTIONS` with your desired configuration:
```bash Swift Package Manager (SPM) lines wrap theme={null}
${OBJROOT}/../../SourcePackages/artifacts/apple-sdk/moengage-extensions-integration/moengage-extensions-integration.artifactbundle/moengage-extensions-integration/bin/moengage-extensions-integration $OPTIONS
```
```bash CocoaPods lines wrap theme={null}
${PODS_ROOT}/MoEngageExtensionsIntegration/moengage-extensions-integration.artifactbundle/moengage-extensions-integration/bin/moengage-extensions-integration $OPTIONS
```
#### Available options
Replace `$OPTIONS` with one or more of the following:
| Option | Description |
| :--------------------------------------------------------------------- | :---------------------------------------------------------------------------------------------------------------------------------------------------------------------------- |
| `--enable-push-notification-templates` | Required if the content extension from Step 2 is used. |
| `--notification-service-extension-name $CUSTOM_SERVICE_EXTENSION_NAME` | Sets a custom name for the service extension. Use this when migrating to this tool from a custom service extension implementation. (Default: `MoEngageNotificationService`). |
| `--notification-content-extension-name $CUSTOM_CONTENT_EXTENSION_NAME` | Sets a custom name for the content extension. Use this when migrating to this tool from a custom content extension implementation. (Default: `MoEngageNotificationContent`). |
### Step 3: Remove existing extensions
Remove existing service and content extensions added in **Frameworks**, **Libraries** and **Embedded Content** section.
3. In the shell script input box of the Run Script Phase added in step 1, enter the command relevant to your dependency manager, replacing `$OPTIONS` with your desired configuration:
```bash Swift Package Manager (SPM) lines wrap theme={null}
${OBJROOT}/../../SourcePackages/artifacts/apple-sdk/moengage-extensions-integration/moengage-extensions-integration.artifactbundle/moengage-extensions-integration/bin/moengage-extensions-integration $OPTIONS
```
```bash CocoaPods lines wrap theme={null}
${PODS_ROOT}/MoEngageExtensionsIntegration/moengage-extensions-integration.artifactbundle/moengage-extensions-integration/bin/moengage-extensions-integration $OPTIONS
```
#### Available options
Replace `$OPTIONS` with one or more of the following:
| Option | Description |
| :--------------------------------------------------------------------- | :---------------------------------------------------------------------------------------------------------------------------------------------------------------------------- |
| `--enable-push-notification-templates` | Required if the content extension from Step 2 is used. |
| `--notification-service-extension-name $CUSTOM_SERVICE_EXTENSION_NAME` | Sets a custom name for the service extension. Use this when migrating to this tool from a custom service extension implementation. (Default: `MoEngageNotificationService`). |
| `--notification-content-extension-name $CUSTOM_CONTENT_EXTENSION_NAME` | Sets a custom name for the content extension. Use this when migrating to this tool from a custom content extension implementation. (Default: `MoEngageNotificationContent`). |
### Step 3: Remove existing extensions
Remove existing service and content extensions added in **Frameworks**, **Libraries** and **Embedded Content** section.
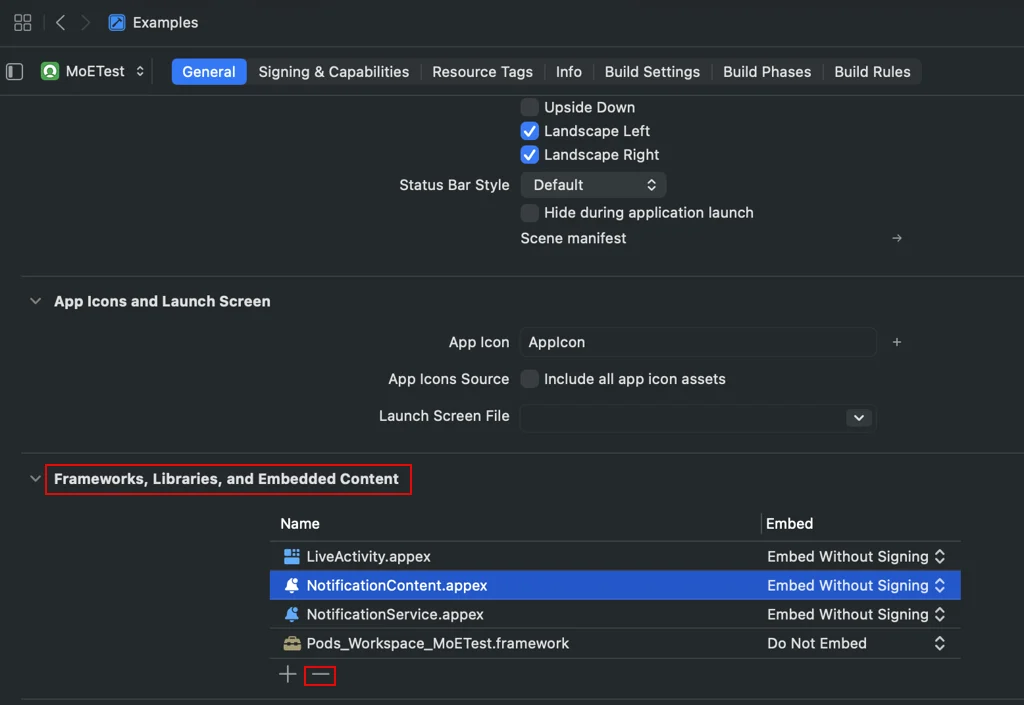 Failing to remove prevents push delivery impressions and rich push notifications.